Page 49 of 506

43
2004 SIENNA from Aug. ’04 Prod. (OM45422U)
Type A (to open only)
Type B (to open and close)
Automatic operation:
Type A—Push the switch completely down
and then release i")
04 SIENNA_U (L/O 0408)
43
2004 SIENNA from Aug. ’04 Prod. (OM45422U)
Type A (to open only)
Type B (to open and close)
Automatic operation:
Type A—Push the switch completely down
and then release it. The window will fully
open. To stop the window partway, lightly
pull the switch up and then release it.
Type B—Push the switch completely down
or pull it completely up, and then release
it. The window will fully open or close. To
stop the window partway, lightly move the
switch in the opposite direction and then
release it.
Jam protection function (type B only):
During automatic closing operation, the
window stops and opens half way if some-
thing gets caught between the window and
window frame.
If the window receives a strong impact,
this function may work even if nothing is
caught.If the battery is disconnected or run
down,
the power window may not operate
automatically and the jam protection func-
tion will not function correctly after you
reconnect, replace or recharge the battery.
In any of these cases, you should normal-
ize the power window.
To normalize the power window:
1. Push down the power window switch and lower the window halfway.
2. Pull up the switch until the window closes and hold the switch for a sec-
ond.
Make sure that the window opens and
closes automatically. If the power window
cannot be operated properly, have it
checked by your Toyota dealer.
Page 53 of 506
04 SIENNA_U (L/O 0408)
47
2004 SIENNA from Aug. ’04 Prod. (OM45422U)
�Never leave small children alone in
the vehicle, especially with the igni-
tion key still inserted. They could
use the power quarter window
switch and get trapped in a window.
Unattended children can be involved
in serious accidents.
To open the hood:1. Pull the hood lock release lever. The hood will spring up slightly.
CAUTION
Before driving, be sure that the hood
is closed and securely locked. Other-
wise, the hood may open unexpected-
ly while driving and an accident may
occur.
2. In front of the vehicle, pull up theauxiliary catch l ever and lift the
hood.
Hood
Page 54 of 506

48
2004 SIENNA from Aug. ’04 Prod. (OM45422U)
3. Hold the hood open by inserting thesupport rod into the slot.
To insert the support rod into the slot,
move it straight up. If")
04 SIENNA_U (L/O 0408)
48
2004 SIENNA from Aug. ’04 Prod. (OM45422U)
3. Hold the hood open by inserting thesupport rod into the slot.
To insert the support rod into the slot,
move it straight up. If it is moved to the
side or toward the inside of the vehicle,
it may become detached.
Before closing the hood, check to see that
you have not forgotten any tools, rags,
etc. and return the support rod to its
clip—this prevents rattles. Then lower the
hood and make sure it locks into place.
If necessary, press down gently on the
front edge to lock it.
CAUTION
After inserting the support rod into
the slot, make sure the rod supports
the hood securely from falling down
on to your head or body.
NOTICE
Be sure to return the support rod to
its clip before closing the hood. Clos-
ing the hood with the support rod up
could cause the hood to bend.
To deter the vehicle theft, the system
is designed to sound an alarm if any of
the side doors, back door or hood is
forcibly unlocked or opened or the bat-
tery terminal is disconnected and then
reconnected when the vehicle is locked.
The alarm blows the horn intermittently
and flashes the headlights, tail lights and
turn signal lights, and turns on the front
personal lights.
Theft deterrent system
Page 55 of 506

49
2004 SIENNA from Aug. ’04 Prod. (OM45422U)
SETTING THE SYSTEM1. Turn the ignition key to the “LOCK” position and remove it.
The indicator light will start flashing when")
04 SIENNA_U (L/O 0408)
49
2004 SIENNA from Aug. ’04 Prod. (OM45422U)
SETTING THE SYSTEM1. Turn the ignition key to the “LOCK” position and remove it.
The indicator light will start flashing when
the key is removed from the ignition
switch. (See “Engine immobilizer system”
on page 13 in this Section for details.)
2. Have all passengers get out of the vehicle.
3. Close and lock all the side doors, back door and hood.
The indicator light will remain on when all
the side doors, back door and hood are
closed and locked. The system will automatically be set after
30 seconds. When the system is set, the
indicator light will start flashing again.
4. After making sure the indicator light starts flashing, you may leave the ve-
hicle.
Never leave anyone in the vehicle when
you set the system, because unlocking
from the inside will activate the system.
CANCELING THE SYSTEM
The system can be canceled by the fol-
lowing ways:�Any of the side doors or the back door
is unlocked with the key or wireless
remote control transmitter.
�Turn the ignition key to “ON” position.
If the parking lights and tail lights come
on for 2 seconds when the system is
canceled, the system has been alarmed.
Check to see if there is any abnormality
with your vehicle. WHEN THE SYSTEM IS SET
Activating the system
The system will sound the alarm under
the following conditions:
�If any of the side doors or back door
is unlocked or opened without the key
or wireless remote control transmitter,
or if the hood is forcibly opened.
�If the battery terminal is disconnected
and then reconnected.
�If the ignition is hotwired.
The indicator light will come on when the
system is activated.
If the alarm has been activated and any
of the side doors or back door is un-
locked, all the side doors and back door
will re −lock automatically.
After one minute, the alarm will automati-
cally stop and the indicator light will starts
flashing again.
Page 56 of 506

50
2004 SIENNA from Aug. ’04 Prod. (OM45422U)
Reactivating the system
Once set, the system is automatically re-
set after the alarm stopped automatically
after one minute.
The")
04 SIENNA_U (L/O 0408)
50
2004 SIENNA from Aug. ’04 Prod. (OM45422U)
Reactivating the system
Once set, the system is automatically re-
set after the alarm stopped automatically
after one minute.
The alarm will activate again under the
same circumstances described in
“Activating the system”.
Stopping the alarm
The alarm will be stopped by the following
these ways:
�Unlock any of the side doors or the
back door with the key or wireless re-
mote control transmitter.
�Turn the ignition key from the “LOCK”
to “ON” position.
These ways cancel the system at the
same time. If the battery becomes discharged due
to the vehicle being unused for a long
time, etc.,
when the battery is recharged
or replaced, the system will give the
alarm. If this happens, immediately unlock
any of the side doors or the back door
with the key or the wireless remote con-
trol transmitter, and the alarm will stop.
TESTING THE SYSTEM
1. Open all the windows.
2. Set the system as described above. All the side doors and back door should
be locked with the key or wireless re-
mote control transmitter. Be sure to
wait until the indicator light starts flash-
ing.
3. Unlock any side door from the inside. The system should activate the alarm.
4. Stop the alarm as described above.
5. Repeat this operation for the other doors and hood. When testing the
hood, also check that the system is
activated when the battery terminal is
disconnected and then reconnected.
If the system does not work properly,
have it checked by your Toyota dealer.This indicates that the fuel filler door
is on the left side of your vehicle.
Fuel tank cap
Page 57 of 506
04 SIENNA_U (L/O 0408)
51
2004 SIENNA from Aug. ’04 Prod. (OM45422U)
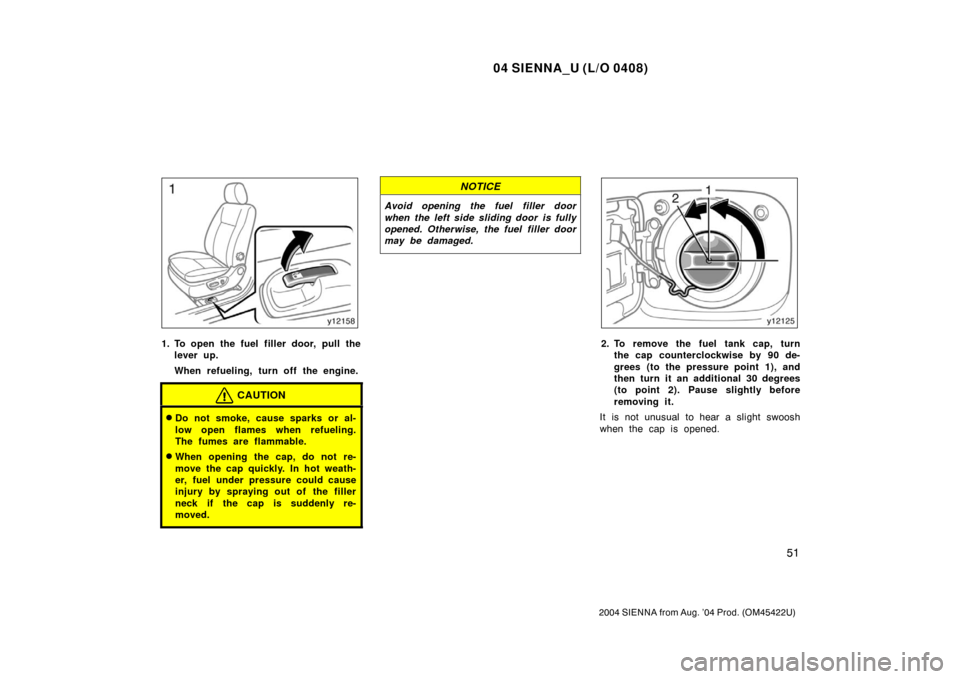
1. To open the fuel filler door, pull thelever up.
When refueling, turn off the engine.
CAUTION
�Do not smoke, cause sparks or al-
low open flames when refueling.
The fumes are flammable.
�When opening the cap, do not re-
move the cap quickly. In hot weath-
er, fuel under pressure could cause
injury by spraying out of the filler
neck if the cap is suddenly re-
moved.
NOTICE
Avoid opening the fuel filler door
when the left side sliding door is fully
opened. Otherwise, the fuel filler door
may be damaged.
2. To remove the fuel tank cap, turnthe cap counterclockwise by 90 de-
grees (to the pressure point 1), and
then turn it an additional 30 degrees
(to point 2). Pause slightly before
removing it.
It is not unusual to hear a slight swoosh
when the cap is opened.
Page 62 of 506

56
2004 SIENNA from Aug. ’04 Prod. (OM45422U)
While the vehicle is being driven, all ve-
hicle occupants should have the seatback
upright, sit well back in the seat and prop-")
04 SIENNA_U (L/O 0408)
56
2004 SIENNA from Aug. ’04 Prod. (OM45422U)
While the vehicle is being driven, all ve-
hicle occupants should have the seatback
upright, sit well back in the seat and prop-
erly wear the seat belts provided.
CAUTION
�Do not drive the vehicle unless the
occupants are properly seated. Do
not allow sitting on top of a
folded�down seatback, or in the
luggage compartment or cargo area.
Persons not properly seated and/or
properly restrained by seat belts
can be severely injured in the event
of emergency braking or a collision.
�During driving, do not allow pas-
sengers to stand up or move
around between seats. Severe inju-
ries can occur in the event of emer-
gency braking or a collision.
Driver seat
CAUTION
The SRS driver airbag deploys with
considerable force, and can cause
death or serious injury especially if
the driver is very close to the airbag.
The National Highway Traffic Safety
Administration (“NHTSA”) advises:
Since the risk zone for driver airbag
is the first 50—75 mm (2—3 in.) of
inflation, placing yourself 250 mm (10
in.) from your driver airbag provides
you with a clear margin of safety.
This distance is measured from the
center of the steering wheel to your
breastbone. If you sit less than 250
mm (10 in.) away now, you can
change your driving position in sever-
al ways:
�Move your seat to the rear as far
as you can while still reaching the
pedals comfortably.
�Slightly recline the back of the
seat. Although vehicle designs vary,
many drivers can achieve the 250
mm (10 in.) distance, even with the
driver seat all the way forward, sim-
ply by reclining the back of the
seat somewhat. If reclining the back
of your seat makes it hard to see
the road, raise yourself by using a
firm, non�slippery cushion, or raise
the seat if your vehicle has that
feature.
�If your steering wheel is adjustable,
tilt it downward. This points the air-
bag toward your chest instead of
your head and neck.
The seat should be adjusted as rec-
ommended by NHTSA above, while
still maintaining control of the foot
pedals, steering wheel, and your view
of the instrument panel controls.
Seats Front seats—
—Front seat precautions
Page 64 of 506
04 SIENNA_U (L/O 0408)
58
2004 SIENNA from Aug. ’04 Prod. (OM45422U)
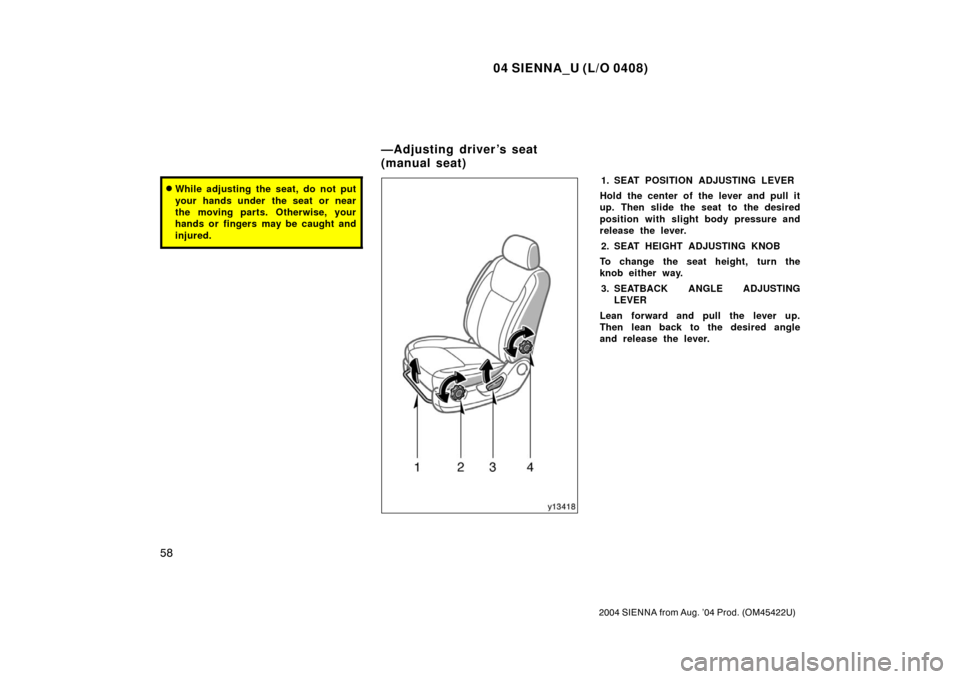
�While adjusting the seat, do not put
your hands under the seat or near
the moving parts. Otherwise, your
hands or fingers may be caught and
injured.1. SEAT POSITION ADJUSTING LEVER
Hold the center of the lever and pull it
up. Then slide the seat to the desired
position with slight body pressure and
release the lever.
2. SEAT HEIGHT ADJUSTING KNOB
To change the seat height, turn the
knob either way.
3. SEATBACK ANGLE ADJUSTING LEVER
Lean forward and pull the lever up.
Then lean back to the desired angle
and release the lever.
—Adjusting driver’s seat
(manual seat)