Page 254 of 506
04 SIENNA_U (L/O 0408)
248
2004 SIENNA from Aug. ’04 Prod. (OM45422U)
1. “DVD” buttonThis button turns on the DVD mode.
2. “SOURCE” button This button turns on the rear seat en-
tertainment system and selects the
mode.
3. “OFF” button
This button turns off the rear seat en-
tertainment system.
4. Joy stick This joy stick selects a control switch,
mode switch on the screen or the
menu for the disc.
5. “ENT” button
This button inputs the selected switch
or the selected menu for the disc.
6. “DISC/CH/PROG” button This button skips directly to a desired
preset station, disc, track or chapter.
7. “ �� ” button
This button fast forwards a screen
when the DVD player is operated.
8. “RETURN” button
This button skips to the predetermined
scene for the disc.
—Control buttons
�Controller
Page 256 of 506
04 SIENNA_U (L/O 0408)
250
2004 SIENNA from Aug. ’04 Prod. (OM45422U)
1. “” button
This button ejects a disc.
2. “SOURCE” button
This button turns on the rear seat en-
tertainment system and selects the
mode.
3. “TUNE/TRACK” button This button operates the front audio
system or select the track/chapter
when the DVD player is operated.
4. “DISC/CH/PROG” button This button skips directly to a desired
preset station, disc, track or chapter.
5. “CURSOR (REMOTE)” button
This button indicates the control
switches on the screen when the DVD
player is operated. This button also
can be used when you lose sight of
the controller.
6. Joy stick
This joy stick selects a control switch,
mode switch on the screen or the
menu for the disc.
�
Buttons on the DVD player unit
Page 266 of 506
04 SIENNA_U (L/O 0408)
260
2004 SIENNA from Aug. ’04 Prod. (OM45422U)
The “DVD Hint!” screen appears when
the DVD mode is first selected after
you turn the ignition key to the “ACC”
or “ON” position.
Push the “OK” switch when you read the
message.The DVD player can be operated with the
controller buttons directly.1. “DVD” button
2. “RETURN” button
3. “MENU” button
4. “AUDIO” button
5. “SUB TITLE” button
6. “ANGLE” button
7. “SET UP” button
8. “SEARCH” button
9. “TOP MENU” button
10. “
”, “ �”, “ �� ” and “�� ” buttons
Controller
DVD player unit
—DVD player operation
switches
Page 273 of 506
04 SIENNA_U (L/O 0408)
267
2004 SIENNA from Aug. ’04 Prod. (OM45422U)
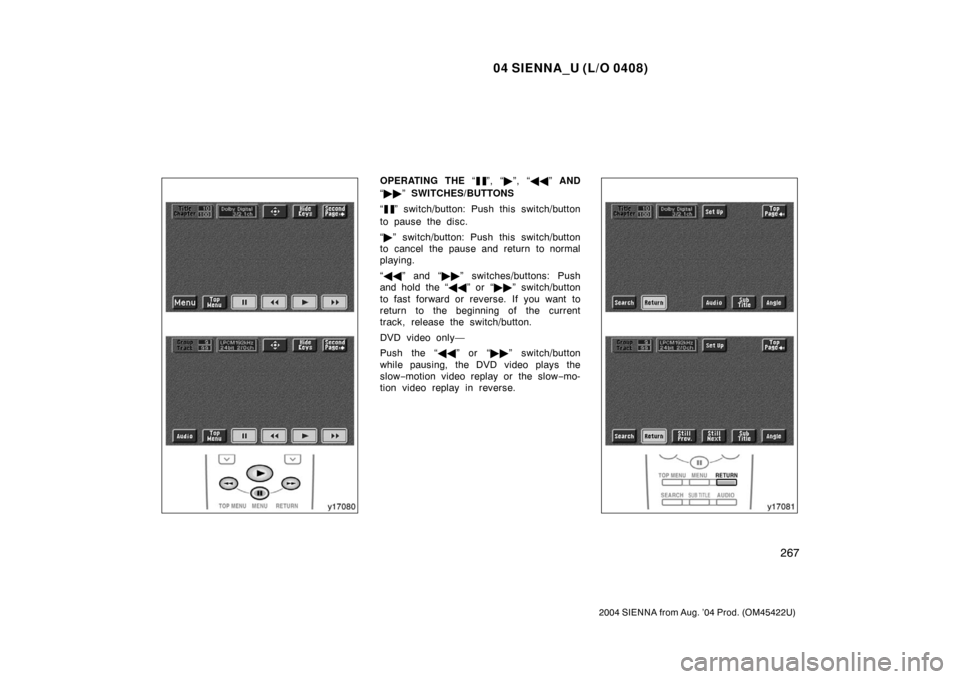
OPERATING THE “”, “�”, “ �� ” AND
“ �� ” SWITCHES/BUTTONS
“
” switch/button: Push this switch/button
to pause the disc.
“ � ” switch/button: Push this switch/button
to cancel the pause and return to normal
playing.
“ �� ” and “�� ” switches/buttons: Push
and hold the “ ��” or “�� ” switch/button
to fast forward or reverse. If you want to
return to the beginning of the current
track, release the switch/button.
DVD video only—
Push the “�� ” or “��” switch/button
while pausing, the DVD video plays the
slow −motion video replay or the slow −mo-
tion video replay in reverse.
Page 322 of 506
04 SIENNA_U (L/O 0408)
316
2004 SIENNA from Aug. ’04 Prod. (OM45422U)
1. “E/M” button
2. Garage door opener buttons
3. “MODE” button
4. Garage door opener indicator
5. Outside temperature and cruiseinformation display
6. Compass
Multi�information display—
Page 324 of 506

318
2004 SIENNA from Aug. ’04 Prod. (OM45422U)
“MODE” button
This button is used to select the item.
Every time you push the “MODE” button,
the display toggles.
For m")
04 SIENNA_U (L/O 0408)
318
2004 SIENNA from Aug. ’04 Prod. (OM45422U)
“MODE” button
This button is used to select the item.
Every time you push the “MODE” button,
the display toggles.
For more details, see “—Outside tempera-
ture and cruise information display” on
page 321.
CAUTION
Do not adjust the display while the
vehicle is moving. Be sure to adjust
the display only when the vehicle is
stopped.
The garage door opener (\b
Universal Transceiver) is manufactured
under license from HomeLink\b and can
be programmed to operate garage
doors, gates, entry doors, door locks,
home lighting systems, and security
systems, etc.
(a) Programming the HomeLink
\b
The HomeLink\b in your vehicle has 3
buttons and you can store one program
for each button.
To ensure correct programming into the
HomeLink
\b, install a new battery in the
hand− held transmitter prior to program-
ming.
The battery side of the hand −held trans-
mitter must be pointed away from the
HomeLink
\b during the programming pro-
cess.
For Canadian users, follow the procedure
in “Programming an entrance gate/Pro-
gramming all devices in the Canadian
market”.
—Garage door opener
Page 325 of 506

319
2004 SIENNA from Aug. ’04 Prod. (OM45422U)
1. Decide which of 3 HomeLink\b buttons
you want to program. Push and hold
down one of the buttons until the indi-
cator corres")
04 SIENNA_U (L/O 0408)
319
2004 SIENNA from Aug. ’04 Prod. (OM45422U)
1. Decide which of 3 HomeLink\b buttons
you want to program. Push and hold
down one of the buttons until the indi-
cator corresponding to the selected
channel begins to flash.
2. Place your hand− held garage transmit-
ter 25 to 75 mm (1 to 3 in.) away from
the surface of the HomeLink
\b.
Keep the indicator light on the HomeLink
\b
in view while programming.
3. Simultaneously press and hold the hand− held garage transmitter button
along with the selected HomeLink
\b but-
ton.
4. When the indicator light on the HomeLink
\b changes from a slow to a
rapid flash after 20 seconds, you can
release both buttons.
5. Test the operation of the HomeLink
\b by
pressing the newly programmed button.
If programming a garage door opener,
check to see if the garage door opens
and closes. If the garage door does not operate, iden-
tify if your garage transmitter is of the
“Rolling Code” type. Press and hold the
programmed HomeLink
\b button. The ga-
rage door has the rolling code feature if
the indicator light (on the HomeLink
\b)
flashes rapidly and then remains lit after
2 seconds. If your garage transmitter is
the “Rolling Code” type, proceed to the
heading “Programming a ro lling code sys-
tem”.
6. Repeat steps 2 through 5 for each re- maining HomeLink
\b button to program
another device.
Programming a rolling code system
If your device is “Rolling Code”
equipped, it is necessary to follow
steps 1 through 4 under the heading
“Programming the HomeLink
\b” before
proceeding with the steps listed below.
1. Locate the “training” button on the ceil- ing mounted garage door opener motor.
The exact location and color of the
button may vary by brand of garage
door opener. Refer to the owner ’s
guide supplied by the garage door
opener manufacturer for the location of
this “training” button. 2. Press the “training” button on the ceil-
ing mounted garage door opener motor.
Following this step, you have 30 seconds
in which to initiate step 3 below. 3. Press and release the vehicle’s pro- grammed HomeLink
\b button twice. The
garage door may open. If the door
does open, the programming process is
complete. If the door does not open,
press and release the button a third
time. This third press and release will
complete the programming process by
opening the garage door.
The ceiling mounted garage door opener
motor should now recognize the
HomeLink
\b unit and be able activate the
garage door up/down.
4. Repeat steps 1 through 3 for each re- maining HomeLink
\b button to program
another rolling code system.
Page 326 of 506

320
2004 SIENNA from Aug. ’04 Prod. (OM45422U)
Programming an entrance gate/program-
ming all devices in the Canadian market1. Decide which of the 3 HomeLink
\b but-
tons you")
04 SIENNA_U (L/O 0408)
320
2004 SIENNA from Aug. ’04 Prod. (OM45422U)
Programming an entrance gate/program-
ming all devices in the Canadian market1. Decide which of the 3 HomeLink
\b but-
tons you want to program.
2. Place your hand− held gate/device
transmitter 25 to 75 mm (1 to 3 in.)
away from the surface of the
HomeLink
\b.
Keep the indicator light on the HomeLink
\b
in view while programming. 3. Press and hold the selected HomeLink
\b button.
4. Continuously press and release ( cycle)
the hand− held gate/device transmitter
button every two seconds until step 5
is complete.
5. When the indicator light on the HomeLink
\b changes from a slow to a
rapid flash after 20 seconds, you can
release both buttons.
6. Test the operation of the HomeLink
\b by
pressing the newly programmed button.
Check to see if the gate/device oper-
ates correctly.
7. Repeat steps 1 through 6 for each re- maining HomeLink
\b button to program
another device. Programming other devices
To program other devices such as home
security systems, home door locks or
lighting, contact your authorized Toyota
dealer for assistance.
Reprogramming a button
Individual HomeLink
\b
buttons cannot be
erased, however, to reprogram a single
button, follow the procedure “Programming
the HomeLink
\b”.
(b) Operating the HomeLink
\b
To operate the HomeLink\b, press the
appropriate HomeLink\b button to activate
the programmed device. The HomeLink\b
indicator light should come on. The
HomeLink\b continues to send the signal
for up to 20 seconds as long as the
button is pressed. (c) Erasing the entire HomeLink
\b
memory (all three programs)
To erase all previously programmed codes
at one time, press and hold down the 2
outside buttons for 20 seconds until the
indicator light flashes.
If you sell your vehicle, be sure to erase
the programs stored in the HomeLink
\b
memory.

248
2004 SIENNA from Aug. ’04 Prod. (OM45422U)
1. “DVD” buttonThis button turns on the DVD mode.
2. “SOURCE” button This button turns on the rear seat en-
tertainment")

250
2004 SIENNA from Aug. ’04 Prod. (OM45422U)
1. “” button
This button ejects a disc.
2. “SOURCE” button
This button turns on the rear seat en-
tertainment system and")

260
2004 SIENNA from Aug. ’04 Prod. (OM45422U)
The “DVD Hint!” screen appears when
the DVD mode is first selected after
you turn the ignition key to the “ACC”
or “ON")

316
2004 SIENNA from Aug. ’04 Prod. (OM45422U)
1. “E/M” button
2. Garage door opener buttons
3. “MODE” button
4. Garage door opener indicator
5. Outside temperature an")