Page 7 of 138

vii
8“Mark” switch
Touch this switch to register the cursor posi-
tion as a memory point. 6. . . . . . . . . . . . . . .
9“Route” switch
Touch this switch to change the route.
42, 44 . . . . . . . . . . . . . . . . . . . . . . . . . . . . . . . .
10“Map View” switch
Touch this switch to obtain information re-
garding the route to the destination and infor-
mation about the POI (Points of Interest) on
map screen. 49, 51, 52. . . . . . . . . . . . . . . .
11“�OFF” switch
Touch this switch to obtain a broader view,
some of the switches on the screen are not
displayed. They reappear by touching the
“ON �” switch. 89. . . . . . . . . . . . . . . . . . . . .
12Zoom in switch
Touch this switch to magnify the map scale.
8 . . . . . . . . . . . . . . . . . . . . . . . . . . . . . . . . . . . .
13Foot print map switch
Touch this switch to display the foot print
map and the building information. 58. . . . .
14Screen configuration switch
Touch this switch to change the screen
mode.
53 . . . . . . . . . . . . . . . . . . . . . . . . . . . . . . . . . . .
15Distance and time to destination
Displays the distance and the estimated
travel time to the destination. 57. . . . . . . . .
16“INFO” button
Push this button to display the “Information
Menu” screen. iii, 96, 101, 108. . . . . . . . . .
17“DISPLAY” button
Push this button to display the “Display”
screen. 128. . . . . . . . . . . . . . . . . . . . . . . . . . .
Page 8 of 138

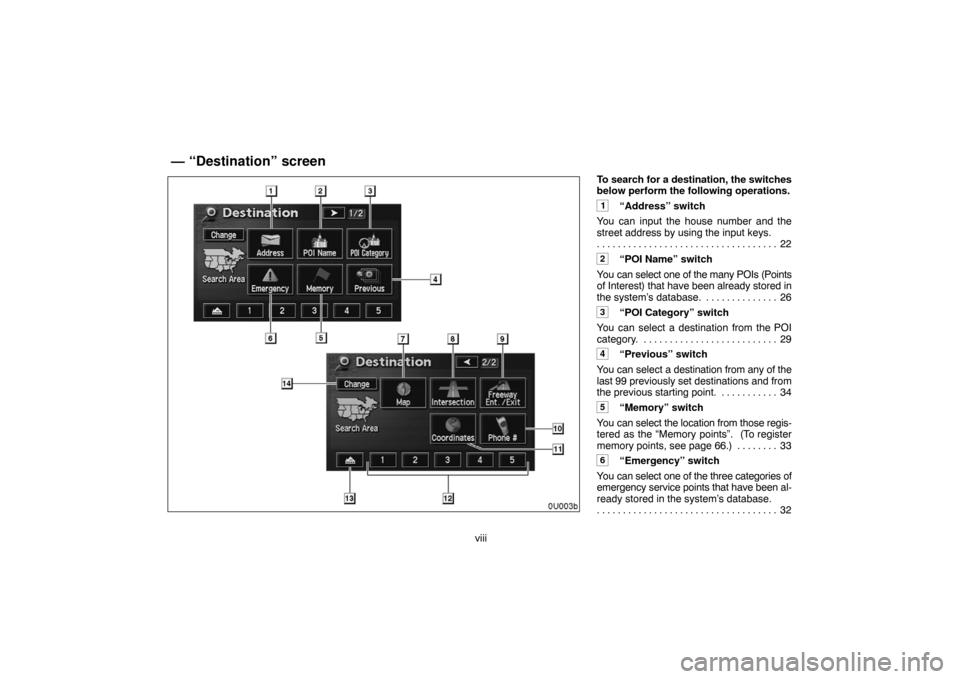
viiiTo search for a destination, the switches
below perform the following operations.
1“Address” switch
You can input the house number and the
street address by using the input keys.
22 . . . . . . . . . . . . . . . . . . . . . . . . . . . . . . . . . . .
2“POI Name” switch
You can select one of the many POIs (Points
of Interest) that have been already stored in
the system’s database. 26. . . . . . . . . . . . . .
3“POI Category” switch
You can select a destination from the POI
category. 29. . . . . . . . . . . . . . . . . . . . . . . . . .
4“Previous” switch
You can select a destination from any of the
last 99 previously set destinations and from
the previous starting point. 34. . . . . . . . . . .
5“Memory” switch
You can select the location from those regis-
tered as the “Memory points”. (To register
memory points, see page 66.) 33. . . . . . . .
6“Emergency” switch
You can select one of the three categories of
emergency service points that have been al-
ready stored in the system’s database.
32 . . . . . . . . . . . . . . . . . . . . . . . . . . . . . . . . . . .
— “Destination” screen
Page 9 of 138

ix
7“Map” switch
You can select a destination simply by
touching the location on the displayed map.
34 . . . . . . . . . . . . . . . . . . . . . . . . . . . . . . . . . . .
8“Intersection” switch
You can enter the names of two intersecting
streets. This is helpful if you do not know the
specific street address of your destination
but know the general vicinity. 35. . . . . . . . .
9“Freeway Ent./Exit” switch
You can enter the name of a freeway (inter-
state) entrance or exit. 36. . . . . . . . . . . . . . .
10“Phone #” switch
You can enter a destination by the telephone
number. 37. . . . . . . . . . . . . . . . . . . . . . . . . . .
11“Coordinates” switch
You can set a destination using latitude and
longitude coordinates. 37. . . . . . . . . . . . . . .
12Quick access switch
You can select one of 5 preset destinations
directly. To use this function, it is necessary
to set the “Attribute” for each memory point.
(To register the “Quick Access”, see page
70.)
22 . . . . . . . . . . . . . . . . . . . . . . . . . . . . . . . . . . .
13Home switch
You can select your own home without en-
tering the address each time. To use this
function, it is necessary to set the “Attribute”
for the memory point. (To register the
“Home”, see page 70.) 22. . . . . . . . . . . . . .
14“Change” switch
To change the search area, touch this
switch.
20 . . . . . . . . . . . . . . . . . . . . . . . . . . . . . . . . . . .
Page 10 of 138
xThe switches below perform the follow-
ing operations.
1“Map DVD” switch
Displays information regarding the disc ver-
sion or covered area. 12. . . . . . . . . . . . . . . .
2“Select User” switch
Enables recall of up to three memorized user
setting patterns. 63. . . . . . . . . . . . . . . . . . . .
3“Setup” switch
Enables various settings for the navigation
system. 76. . . . . . . . . . . . . . . . . . . . . . . . . . .
4“My Places” switch
Enables changes to “Memory points” and
“Areas to avoid”. 66. . . . . . . . . . . . . . . . . . . .
5“Suspend Guidance” and “Resume
Guidance” switch
Suspends or resumes the guidance.
62 . . . . . . . . . . . . . . . . . . . . . . . . . . . . . . . . . . .
6“Volume” switch
Sets the volume of the voice guidance.
63 . . . . . . . . . . . . . . . . . . . . . . . . . . . . . . . . . . .
— “Menu” screen
Page 16 of 138
6
�To register the cursor position as a
memory point
Memory point registration enables easy ac-
cess to a specific point.
Touch the “Mark” switch.
When you touch the
“Mark” switch, the fol-
lowing screen appears for a few seconds, and
then the map screen returns.
The registered point is shown by on the
map.
To change the icon or name, etc., see page
68.
You can register up to 106 memory points. If
you attempt to register more than 106, a mes-
sage appears for confirmation.
�To see information about the icon
where the cursor is set
To display information about an icon, set the
cursor on it.
POI INFORMATION
When the cursor is set on a POI icon, the
name and
“Info.” switch are displayed on
the top of the screen.
Page 17 of 138
7 Touch the
“Info.” switch.
Information such as the name, address, and
phone number are displayed.
If you touch the
“Enter ” switch, the posi-
tion of cursor is set as a destination.
If there is already a preset destination, the
“Add to ” switch and the “Replace
” switch are displayed.
When there is already a preset destination,
using the
“Add to ” switch to set an addi-
tional destination, will set the new one as the
first point of arrival.
To register this POI as a memory point, touch
the
“Mark” switch. (For details, see page
66.)
INFORMATION
The desired Point of Interest can be dis-
played on the map screen. (For details,
see page 49.)
MEMORY POINT INFORMATION
When the cursor is set on a memory point
icon, the name and
“Info.” switch are dis-
played on the top of screen.
Touch the “Info.” switch.
Information such as the name, location, and
phone number are displayed.
If you touch the
“Enter ” switch, the posi-
tion of cursor is set as a destination.
Page 18 of 138

8 If there is already a set destination, the
“Add
to
” switch and the “Replace ”switch are displayed.
When there is already a preset destination,
using the
“Add to ” switch to set an addi-
tional destination, will set the new one as the
first point of arrival.
To edit a memory point, touch the
“Edit”switch. (For details, see page 68.)
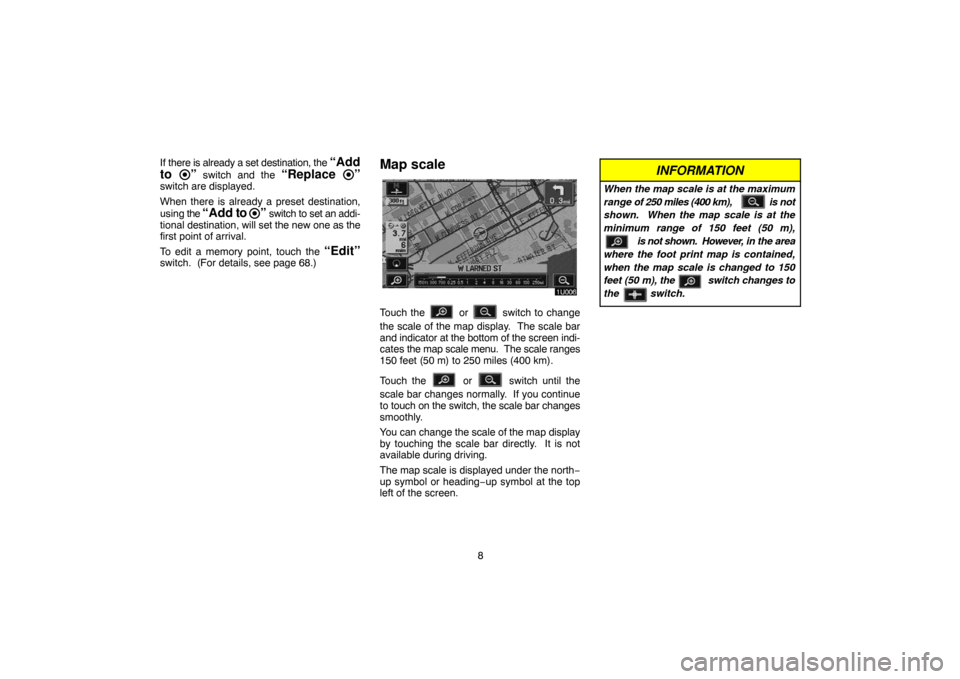
Map scale
Touch the or switch to change
the scale of the map display. The scale bar
and indicator at the bottom of the screen indi-
cates the map scale menu. The scale ranges
150 feet (50 m) to 250 miles (400 km).
Touch the
or switch until the
scale bar changes normally. If you continue
to touch on the switch, the scale bar changes
smoothly.
You can change the scale of the map display
by touching the scale bar directly. It is not
available during driving.
The map scale is displayed under the north−
up symbol or heading−up symbol at the top
left of the screen.
INFORMATION
When the map scale is at the maximum
range of 250 miles (400 km), is not
shown. When the map scale is at the
minimum range of 150 feet (50 m),
is not shown. However, in the area
where the foot print map is contained,
when the map scale is changed to 150
feet (50 m), the switch changes to
the switch.
Page 32 of 138

22
— Destination input by Home
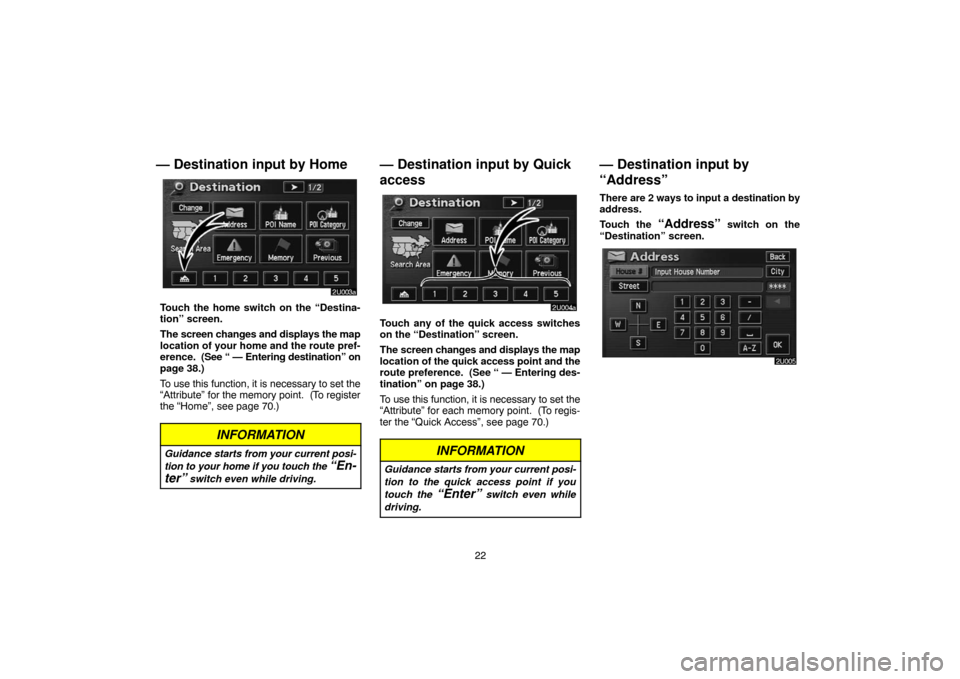
Touch the home switch on the “Destina-
tion” screen.
The screen changes and displays the map
location of your home and the route pref-
erence. (See “ — Entering destination” on
page 38.)
To use this function, it is necessary to set the
“Attribute” for the memory point. (To register
the “Home”, see page 70.)
INFORMATION
Guidance starts from your current posi-
tion to your home if you touch the
“En-
ter”
switch even while driving.
— Destination input by Quick
access
Touch any of the quick access switches
on the “Destination” screen.
The screen changes and displays the map
location of the quick access point and the
route preference. (See “ — Entering des-
tination” on page 38.)
To use this function, it is necessary to set the
“Attribute” for each memory point. (To regis-
ter the “Quick Access”, see page 70.)
INFORMATION
Guidance starts from your current posi-
tion to the quick access point if you
touch the
“Enter” switch even while
driving.
— Destination input by
“Address”
There are 2 ways to input a destination by
address.
Touch the
“Address” switch on the
“Destination” screen.