2004 TOYOTA CAMRY Navigation Manual
-
 1
1 -
 2
2 -
 3
3 -
 4
4 -
 5
5 -
 6
6 -
 7
7 -
 8
8 -
 9
9 -
 10
10 -
 11
11 -
 12
12 -
 13
13 -
 14
14 -
 15
15 -
 16
16 -
 17
17 -
 18
18 -
 19
19 -
 20
20 -
 21
21 -
 22
22 -
 23
23 -
 24
24 -
 25
25 -
 26
26 -
 27
27 -
 28
28 -
 29
29 -
 30
30 -
 31
31 -
 32
32 -
 33
33 -
 34
34 -
 35
35 -
 36
36 -
 37
37 -
 38
38 -
 39
39 -
 40
40 -
 41
41 -
 42
42 -
 43
43 -
 44
44 -
 45
45 -
 46
46 -
 47
47 -
 48
48 -
 49
49 -
 50
50 -
 51
51 -
 52
52 -
 53
53 -
 54
54 -
 55
55 -
 56
56 -
 57
57 -
 58
58 -
 59
59 -
 60
60 -
 61
61 -
 62
62 -
 63
63 -
 64
64 -
 65
65 -
 66
66 -
 67
67 -
 68
68 -
 69
69 -
 70
70 -
 71
71 -
 72
72 -
 73
73 -
 74
74 -
 75
75 -
 76
76 -
 77
77 -
 78
78 -
 79
79 -
 80
80 -
 81
81 -
 82
82 -
 83
83 -
 84
84 -
 85
85 -
 86
86 -
 87
87 -
 88
88 -
 89
89 -
 90
90 -
 91
91 -
 92
92 -
 93
93 -
 94
94 -
 95
95 -
 96
96 -
 97
97 -
 98
98 -
 99
99 -
 100
100 -
 101
101 -
 102
102 -
 103
103 -
 104
104 -
 105
105 -
 106
106 -
 107
107 -
 108
108 -
 109
109 -
 110
110 -
 111
111 -
 112
112 -
 113
113 -
 114
114 -
 115
115 -
 116
116 -
 117
117 -
 118
118 -
 119
119 -
 120
120 -
 121
121 -
 122
122 -
 123
123 -
 124
124 -
 125
125 -
 126
126 -
 127
127 -
 128
128 -
 129
129 -
 130
130 -
 131
131 -
 132
132 -
 133
133 -
 134
134

31
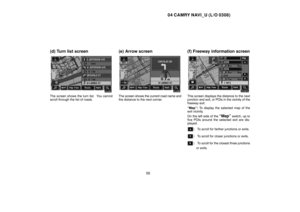
When you touch an arrow facing the desired
point, the map scrolls in that direction. When
you release your finger, scrolling stops.
To set the position of the cursor, to")

32
SETTING THE SEARCH POINT FROM THE
DESTINATIONS
Touch the destination switches at the bot-
tom of the screen.
When you touch an arrow facing the desired
point, the map scr")

33
Touch the switch of the desired destina-
tion. The screen changes and displays the
map location of the selected destination
and the route preference. (See
“ — Ente")

34
— Destination input by
“Previous”
Touch the “Previous” switch on the
“Destination” screen.
The previous starting point and up to 99 pre-
viously set destina")

35
— Destination input by
“Intersection”
Touch the “Intersection” switch on the
“Destination” screen.
Input the name of the two intersecting
streets which are")

36
— Destination input by
“Freeway Ent./Exit”
To input a freeway entrance or exit, touch
the
“Freeway Ent./Exit” switch on the
“Destination” screen.
Be sure t")

37
— Destination input by
“Coordinates”
Touch the “Coordinates” switch on the
“Destination” screen.
Input the latitude and the longitude.
When the input is fin")

38
Starting route guidance —
— Entering destination
After you input the destination, the screen
changes and displays the map location of
the selected destination and the")