2004 TOYOTA 4RUNNER Navigation Manual
-
 1
1 -
 2
2 -
 3
3 -
 4
4 -
 5
5 -
 6
6 -
 7
7 -
 8
8 -
 9
9 -
 10
10 -
 11
11 -
 12
12 -
 13
13 -
 14
14 -
 15
15 -
 16
16 -
 17
17 -
 18
18 -
 19
19 -
 20
20 -
 21
21 -
 22
22 -
 23
23 -
 24
24 -
 25
25 -
 26
26 -
 27
27 -
 28
28 -
 29
29 -
 30
30 -
 31
31 -
 32
32 -
 33
33 -
 34
34 -
 35
35 -
 36
36 -
 37
37 -
 38
38 -
 39
39 -
 40
40 -
 41
41 -
 42
42 -
 43
43 -
 44
44 -
 45
45 -
 46
46 -
 47
47 -
 48
48 -
 49
49 -
 50
50 -
 51
51 -
 52
52 -
 53
53 -
 54
54 -
 55
55 -
 56
56 -
 57
57 -
 58
58 -
 59
59 -
 60
60 -
 61
61 -
 62
62 -
 63
63 -
 64
64 -
 65
65 -
 66
66 -
 67
67 -
 68
68 -
 69
69 -
 70
70 -
 71
71 -
 72
72 -
 73
73 -
 74
74 -
 75
75 -
 76
76 -
 77
77 -
 78
78 -
 79
79 -
 80
80 -
 81
81 -
 82
82 -
 83
83 -
 84
84 -
 85
85 -
 86
86 -
 87
87 -
 88
88 -
 89
89 -
 90
90 -
 91
91 -
 92
92 -
 93
93 -
 94
94 -
 95
95 -
 96
96 -
 97
97 -
 98
98 -
 99
99 -
 100
100 -
 101
101 -
 102
102 -
 103
103 -
 104
104 -
 105
105 -
 106
106 -
 107
107 -
 108
108 -
 109
109 -
 110
110 -
 111
111 -
 112
112 -
 113
113 -
 114
114 -
 115
115 -
 116
116 -
 117
117 -
 118
118 -
 119
119 -
 120
120 -
 121
121 -
 122
122 -
 123
123 -
 124
124 -
 125
125 -
 126
126 -
 127
127 -
 128
128 -
 129
129 -
 130
130 -
 131
131 -
 132
132 -
 133
133 -
 134
134 -
 135
135 -
 136
136 -
 137
137 -
 138
138 -
 139
139 -
 140
140 -
 141
141 -
 142
142 -
 143
143 -
 144
144 -
 145
145 -
 146
146 -
 147
147 -
 148
148 -
 149
149 -
 150
150 -
 151
151 -
 152
152 -
 153
153 -
 154
154 -
 155
155 -
 156
156 -
 157
157 -
 158
158 -
 159
159 -
 160
160

81
2004 4RUNNER Navigation from Aug. ’03 Prod. (OM35813U)
L00109
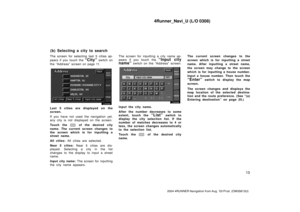
Touch the direction switches and adjust
the direction. Touch the
“OK” switch.
The buzzer sounds when y")

82
2004 4RUNNER Navigation from Aug. ’03 Prod. (OM35813U)
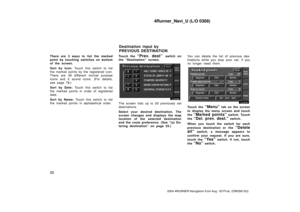
CHANGING THE POSITION
L00111
Touch the arrows to scroll to your de-
sired point on the map screen.
Touch the
“O")

83
2004 4RUNNER Navigation from Aug. ’03 Prod. (OM35813U)
1. Touch the “MENU” tab on the screen to display the “Menu” screen and touch the “Marked points” switc")

84
2004 4RUNNER Navigation from Aug. ’03 Prod. (OM35813U)
A screen for confirmation will appear
with the map of the marked point. If
you want to delete it, touch
“Yes”")

85
2004 4RUNNER Navigation from Aug. ’03 Prod. (OM35813U)
L00117
The registered point is shown by on
the map.
To change the icon or name, etc., see
“(b) Editing marked p")


87
2004 4RUNNER Navigation from Aug. ’03 Prod. (OM35813U)
3. Touch the “OK” switch when the cursor is at the center of the area that you want to avoid.
L00121
4. Depend")

88
2004 4RUNNER Navigation from Aug. ’03 Prod. (OM35813U)
1. Touch the “Edit” switch under “Area to avoid” to display the “Edit area to avoid” screen.
L00123
2.")