2004 SUBARU IMPREZA WRX automatic transmission fluid
[x] Cancel search: automatic transmission fluidPage 159 of 491
3-22
Instruments and controls
Do not operate the engine with the oil pressure
warning light on. This may cause serious en-
gine damage.
! AT OIL TEMPerature warning
light (for AT vehicles)
If this light comes on when the engine is running, it
may indicate that the automatic transmission fluid tem-
perature is too hot.
If the light comes on while driving, it is unnecessary to
stop the vehicle, but avoid driving up steep grades or
in stop and go traffic. ! Automatic transmission control system warn-
ing
If the light flashes after the engine starts, it may indi-
cate that the automatic transmission control system is
not working properly. Contact your nearest SUBARU
dealer for service immediately. !
Rear differential oil temperature
warning light (WRX-STi)
Reduce vehicle speed and park the vehicle in a
safe place as soon as possible if the R.DIFF
TEMP light comes on. Continued driving with
this light on can damage the rear differential
and other parts of the powertrain.
If this light comes on when the engine is running, it
may indicate that the rear differential oil temperature is
too hot.
At this time, the driver’s control center differential will
automatically cancel the current torque-distribution ra-
tio setting and adopts its minimum ratio.
If the light comes on while driving, reduce vehicle
speed and stop the vehicle at the nearest safe place.
Park the vehicle for several minutes. After the light
goes out, you can start driving.
If the light does not go out, contact the neares
SUBARU dealer for service.
NOTE " If the tire pressures are not correct and/or the
Page 290 of 491
7-21
Starting and operating
– CONTINUED –
mode.
NOTE "If the differential-limiting factor is large during
cornering maneuvers, a small speed difference
between the front and rear wheels may cause tight
corner braking (a phenomenon accompanied by
vibration and noise). This phenomenon does not
indicate a problem. It will disappear if the differen-
tial-action limiting factor is reduced. " Use the center-differential indicator light only as
a rough indication of the differential-action limit-
ing factor. ! Temporary release
When the driver stop the vehicle and pulls the parking-
brake lever after manually setting the differential-ac-
tion limiting factor, the factor is temporarily minimized.
The indicator in the combination meter continues to
show the driver’s selected differential-action limiting
factor. When the driver releases the parking-brake le-
ver, the factor set by the driver is restored.
Automatic transmission
The automatic transmission is electronically controlled
with 4-forward speeds and 1-reverse speed.
NOTE
Immediately after a disconnected battery is recon-
nected or ATF (automatic transmission fluid) is re-
placed, you may feel that the automatic transmis-
sion operation is somewhat unusual.
This results from erasure or invalidation of data
the on-board computer has collected and stored in
memory to allow the transmission to shift at the
most appropriate times for the current condition
of your vehicle. Optimized shifting will be restored
as the vehicle continues to be driven for a while.
Do not shift from the “P” or “N” position into
the “D”, “3”, “2”, “1” or “R” position while de-
pressing the accelerator pedal. This may cause
the vehicle to jump forward or backward.
" Shift into the “P” or “R” position only after
Page 291 of 491
7-22
Starting and operating
the vehicle is completely stopped. Shifting
while the vehicle is moving may cause damage
to the transmission."
Do not race the engine for more than five sec-
onds in any position except the “N” or “P” po-
sition when the brake is set or the tires are on
blocks. This may cause the automatic transmis-
sion fluid to overheat. " Avoid shifting from one of the forward driving
positions into the “R” position or vice versa un-
til the vehicle has completely stopped. Such
shifting may cause damage to the transmis-
sion. !
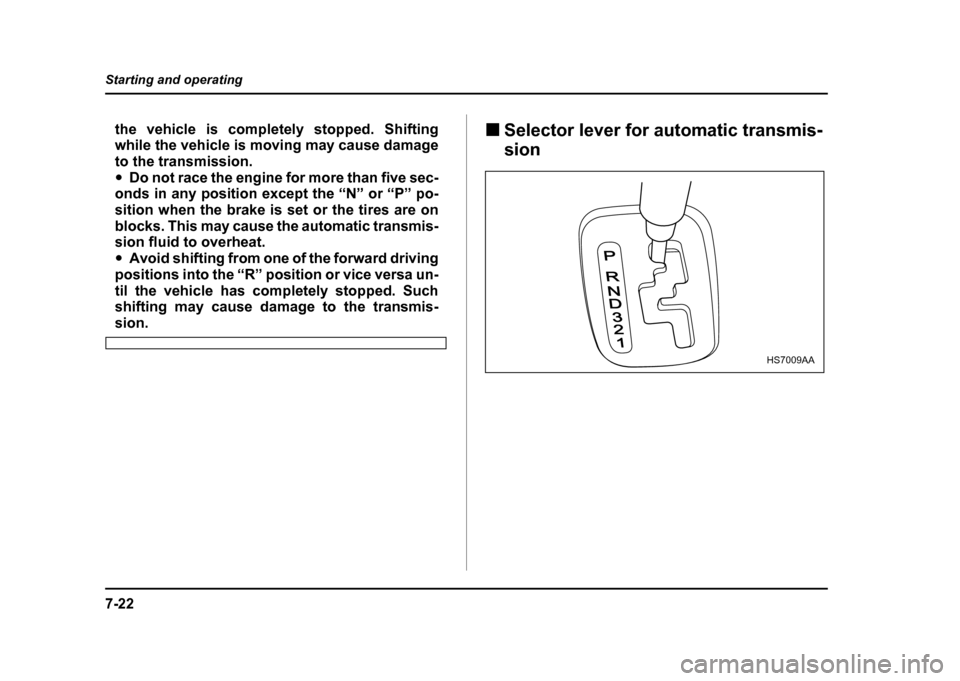
Selector lever for automatic transmis- sion
P
RND321
HS7009AA
Page 293 of 491
7-24
Starting and operating
has no effect in this condition and the risk of anaccident is consequently increased.
! D (Drive)
This position is for normal driving.
The transmission automatically shifts into a suitable
gear from 1st to 4th according to the vehicle speed
and the acceleration you require.
When more acceleration is required in this position,
press the accelerator pedal fully to the floor and hold
that position. The transmission will automatically
downshift to 3rd, 2nd or 1st gear. When you release
the pedal, the transmission will return to the original
gear position. " While climbing a grade
When driving up hill, undesired upshift to 4th gear is
prevented from taking place when the accelerator
pedal is released. This minimizes the chances of sub-
sequent downshifting to a lower gear when accelerat-
ing again. This prevents repeated upshifting and
downshifting resulting in a smoother operation of the
vehicle.
NOTE
The transmission may downshift to 2nd or 1st gear, depending on the way the accelerator pedal
is pressed to accelerate the vehicle again. "
While going down a hill
When descending a steep hill, depressing the brake
pedal will cause the transmission to downshift to 3rd
gear, thus applying engine braking. Reacceleration for
a short time will cause the transmission to upshift nor-mally.
NOTE
In some cases, depressing the brake pedal on a
downhill grade does not result in an automatic
downshift to 3rd gear. This can happen when the
automatic transmission fluid temperature is very
low, for example, during driving shortly after the
vehicle has been parked for an extended period of
time. When the ATF temperature has risen to a cer-
tain level, automatic downshift normally takes
place. In the meantime, downshift manually for en-
gine braking as required.
Also, downshifting when braking downhill will not
occur at speeds above approximately 48 mph (78
km/h). ! 3 (Third)
This position is for using engine braking when going
down a hill or for climbing a grade.
Page 323 of 491
8-12
Driving tips
starting.
Keep the door locks from freezing by squirting them
with deicer or glycerin.
Forcing a frozen door open may damage or separate
the rubber weather strips around the door. If the door
is frozen, use hot water to melt the ice, and afterwards
thoroughly wipe the water away.
Use a windshield washer fluid that contains an anti-
freeze solution. Do not use engine antifreeze or other
substitutes because they may damage the paint of the
vehicle. !
Before driving your vehicle
Before entering the vehicle, remove any snow or ice
from your shoes because that could make the pedals
slippery and dangerous.
While warming up the vehicle before driving, check
that the accelerator pedal, brake pedal, and all other
controls operate smoothly.
Clear away ice and snow that has accumulated under
the fenders to avoid making steering difficult. During
severe winter driving, stop when and where it is safe
to do so and check under the fenders periodically. !
Parking in cold weather
Do not use the parking brake when parking for long
periods in cold weather since it could freeze in that po-
sition. Instead, observe the following:
1. Place the shift lever in “1” or “R” for manual trans-
mission vehicles, and in “P” for automatic transmission
vehicles.
2. Use tire stops under the tires to prevent the vehicle
from moving.
When the vehicle is parked in snow or when it snows,
raise the wiper blades off the glass to prevent damageto them.
When the vehicle has been left parked after use on
roads heavily covered with snow, or has been left
parked during a snowstorm, icing may develop on the
brake system, which could cause poor braking action.
Check for snow or ice buildup on the suspension, disc
brakes and brake hoses underneath the vehicle.
If there is caked snow or ice, remove it, being careful
not to damage the disc brakes and brake hoses andABS harness.
Snow can trap dangerous exhaust gases under
your vehicle. Keep snow clear of the exhaust
Page 350 of 491
8-39
Driving tips
– CONTINUED –
tance is required because of the added weight and
length caused by attaching the trailer to your vehicle.
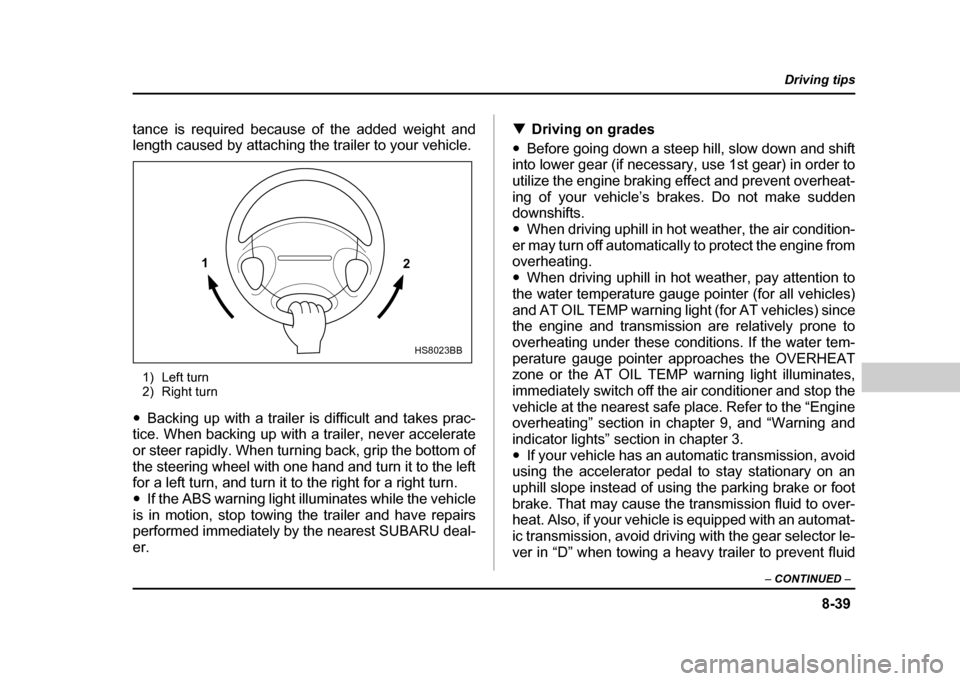
1) Left turn
2) Right turn
" Backing up with a trailer is difficult and takes prac-
tice. When backing up with a trailer, never accelerate
or steer rapidly. When turning back, grip the bottom of
the steering wheel with one hand and turn it to the left
for a left turn, and turn it to the right for a right turn." If the ABS warning light illuminates while the vehicle
is in motion, stop towing the trailer and have repairs
performed immediately by the nearest SUBARU deal-er. !
Driving on grades
" Before going down a steep hill, slow down and shift
into lower gear (if necessary, use 1st gear) in order to
utilize the engine braking effect and prevent overheat-
ing of your vehicle’s brakes. Do not make sudden
downshifts. " When driving uphill in hot weather, the air condition-
er may turn off automatically to protect the engine from
overheating. " When driving uphill in hot weather, pay attention to
the water temperature gauge pointer (for all vehicles)
and AT OIL TEMP warning light (for AT vehicles) since
the engine and transmission are relatively prone to
overheating under these conditions. If the water tem-
perature gauge pointer approaches the OVERHEAT
zone or the AT OIL TEMP warning light illuminates,
immediately switch off the air conditioner and stop the
vehicle at the nearest safe place. Refer to the “Engine
overheating” section in chapter 9, and “Warning and
indicator lights” section in chapter 3." If your vehicle has an automatic transmission, avoid
using the accelerator pedal to stay stationary on an
uphill slope instead of using the parking brake or foot
brake. That may cause the transmission fluid to over-
heat. Also, if your vehicle is equipped with an automat-
ic transmission, avoid driving with the gear selector le-
ver in “D” when towing a heavy trailer to prevent fluid
1 2
HS8023BB
Page 386 of 491

11 - 1
11
Maintenance and service
Maintenance schedule ................................. 11-3
Maintenance precautions ............................ 11-3 Before checking or servicing in the engine compartment .................................................. 11-4
When you do checking or servicing in the engine compartment while the engine is
running ............................................................ 11-5
Engine hood .................................................. 11-5
Engine compartment overview ................... 11-8 2.5 liter model .................................................... 11-8
2.0 liter (Turbo) model ...................................... 11-9
2.5 liter (Turbo) model ...................................... 11-10
Engine oil ...................................................... 11-11 Checking the oil level ....................................... 11-11
Changing the oil and oil filter .......................... 11-12
Recommended grade and viscosity ................ 11-16
Recommended grade and viscosity under severe driving conditions .............................. 11-18
Synthetic oil ....................................................... 11-18
Cooling system ............................................. 11-18 Cooling fan, hose and connections ................ 11-19
Engine coolant .................................................. 11-19
Air cleaner element ...................................... 11-23 Replacing the air cleaner element ................... 11-23
Spark plugs ................................................... 11-26 Recommended spark plugs ............................. 11-27
Drive belts ..................................................... 11-27
Manual transmission oil ............................... 11-28 Checking the oil level ....................................... 11-28
Recommended grade and viscosity ................ 11-30 Automatic transmission fluid ...................... 11-31
Checking the fluid level .................................... 11-31
Recommended fluid ......................................... 11-32
Front differential gear oil (AT vehicles) ...... 11-33 Checking the oil level ....................................... 11-33
Recommended grade and viscosity ............... 11-33
Rear differential gear oil ............................... 11-34 Checking the gear oil level .............................. 11-34
Recommended grade and viscosity ............... 11-35
Power steering fluid ...................................... 11-36 Checking the fluid level .................................... 11-36
Recommended fluid ......................................... 11-37
Brake fluid ..................................................... 11-37 Checking the fluid level .................................... 11-37
Recommended brake fluid ............................... 11-38
Clutch fluid (MT vehicles) ............................ 11-38 Checking the fluid level .................................... 11-38
Recommended clutch fluid .............................. 11-39
Brake booster ................................................ 11-40
Brake pedal .................................................... 11-40 Checking the brake pedal free play ................ 11-40
Checking the brake pedal reserve distance ... 11-41
Clutch pedal (MT vehicles) ........................... 11-41 Checking the clutch function .......................... 11-41
Checking the clutch pedal free play ............... 11-42
Replacement of brake pad and lining ......... 11-42 Breaking-in of new brake pads and linings .... 11-43
Parking brake stroke .................................... 11-44
Tires and wheels ........................................... 11-44
Page 393 of 491
11 - 8
Maintenance and service
Engine compartment overview !
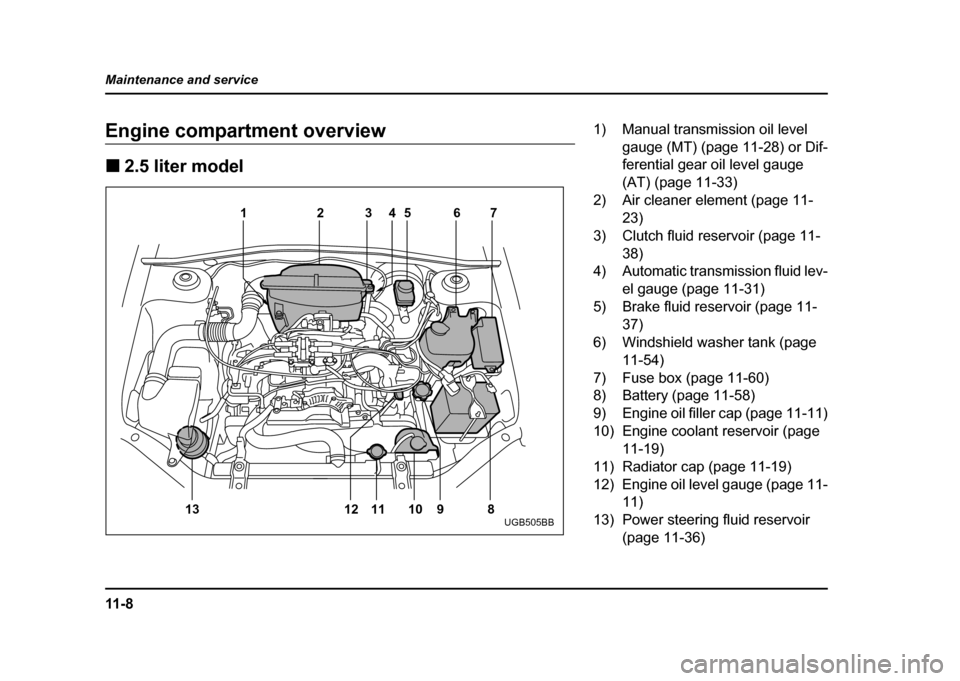
2.5 liter model
12 345 67
8
9
10
11
12
13
UGB505BB
1) Manual transmission oil level
gauge (MT) (page 11-28) or Dif-
ferential gear oil level gauge
(AT) (page 11-33)
2) Air cleaner element (page 11- 23)
3) Clutch fluid reservoir (page 11- 38)
4) Automatic transmission fluid lev-
el gauge (page 11-31)
5) Brake fluid reservoir (page 11-
37)
6) Windshield washer tank (page 11-54)
7) Fuse box (page 11-60)
8) Battery (page 11-58)
9) Engine oil filler cap (page 11-11)
10) Engine coolant reservoir (page 11-19)
11) Radiator cap (page 11-19)
12) Engine oil level gauge (page 11- 11)
13) Power steering fluid reservoir
(page 11-36)