2004 SUBARU IMPREZA WRX check engine
[x] Cancel search: check enginePage 400 of 491
11 -1 5
Maintenance and service
– CONTINUED –
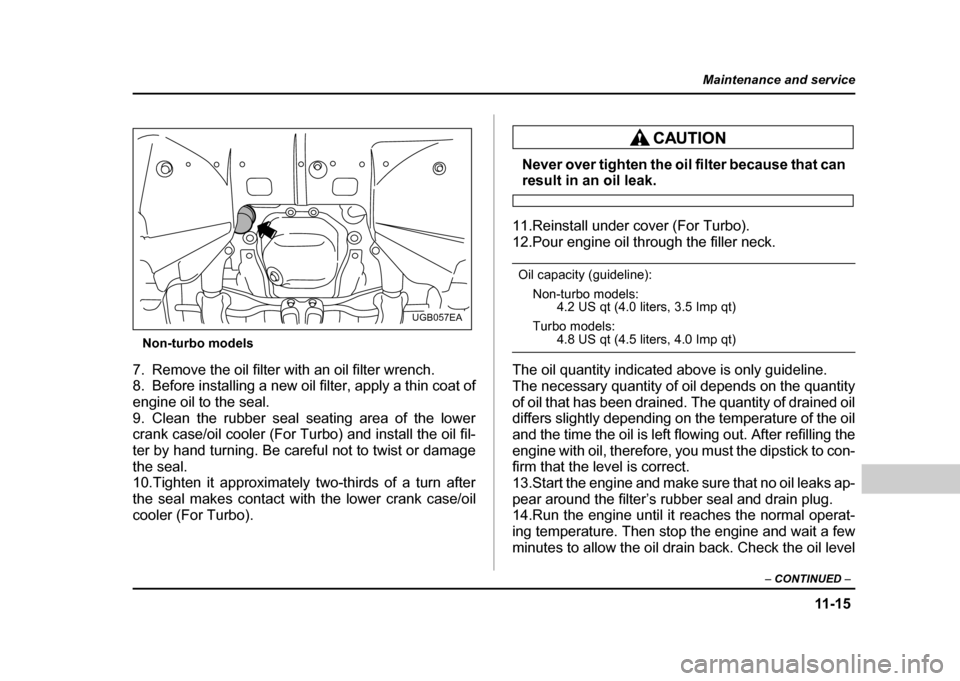
Non-turbo models
7. Remove the oil filter with an oil filter wrench.
8. Before installing a new oil filter, apply a thin coat of
engine oil to the seal.
9. Clean the rubber seal seating area of the lower
crank case/oil cooler (For Turbo) and install the oil fil-
ter by hand turning. Be careful not to twist or damage
the seal.
10.Tighten it approximately two-thirds of a turn after
the seal makes contact with the lower crank case/oil
cooler (For Turbo).
Never over tighten the oil filter because that canresult in an oil leak.
11.Reinstall under cover (For Turbo).
12.Pour engine oil through the filler neck.
Oil capacity (guideline): Non-turbo models: 4.2 US qt (4.0 liters, 3.5 Imp qt)
Turbo models:
4.8 US qt (4.5 liters, 4.0 Imp qt)
The oil quantity indicated above is only guideline.
The necessary quantity of oil depends on the quantity
of oil that has been drained. The quantity of drained oil
differs slightly depending on the temperature of the oil
and the time the oil is left flowing out. After refilling the
engine with oil, therefore, you must the dipstick to con-
firm that the level is correct.
13.Start the engine and make sure that no oil leaks ap-
pear around the filter’s rubber seal and drain plug.
14.Run the engine until it reaches the normal operat-
ing temperature. Then stop the engine and wait a few
minutes to allow the oil drain back. Check the oil level
UGB057EA
Page 404 of 491
11 -1 9
Maintenance and service
– CONTINUED –
ed parts. The alcohol contained in the enginecoolant may damage the paint surface.
! Cooling fan, hose and connections
Your vehicle employs an electric cooling fan which is
thermostatically controlled to operate when the engine
coolant reaches a specific temperature.
If the radiator cooling fan does not operate even when
the engine coolant temperature gauge exceeds the
normal operating range, the cooling fan circuit may be
defective. Check the fuse and replace it if necessary.
If the fuse is not blown, have the cooling system
checked by your SUBARU dealer.
If frequent addition of coolant is necessary, there may
be a leak in the engine cooling system. It is recom-
mended that the cooling system and connections be
checked for leaks, damage, or looseness. !
Engine coolant
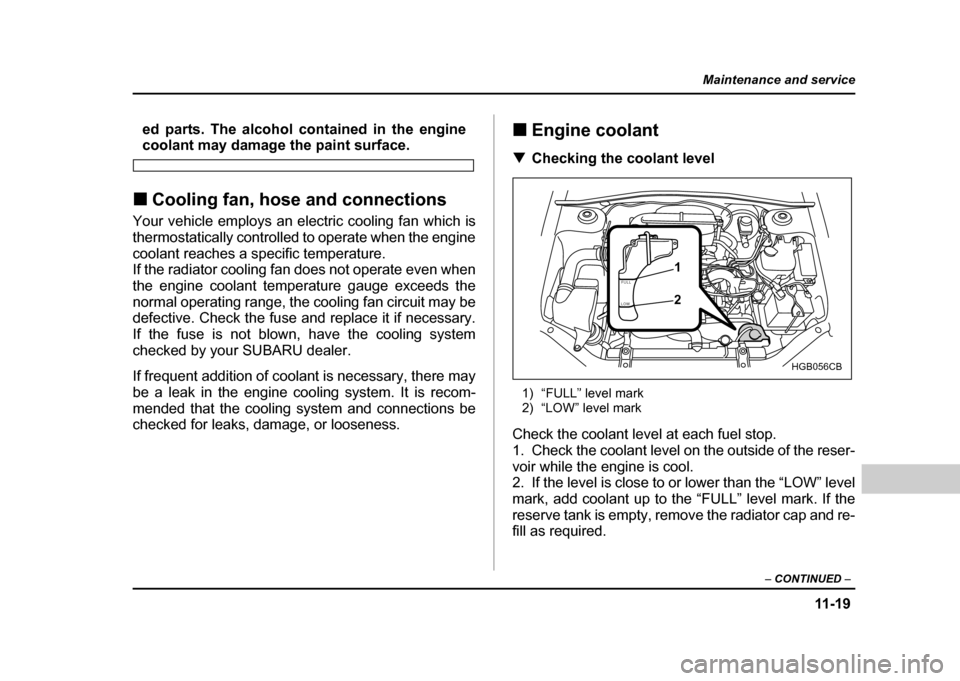
! Checking the coolant level
1) “FULL” level mark
2) “LOW” level mark
Check the coolant level at each fuel stop.
1. Check the coolant level on the outside of the reser-
voir while the engine is cool.
2. If the level is close to or lower than the “LOW” level
mark, add coolant up to the “FULL” level mark. If the
reserve tank is empty, remove the radiator cap and re-
fill as required.
FULL
LOW
HGB056CB
1 2
Page 405 of 491
11 - 2 0
Maintenance and service
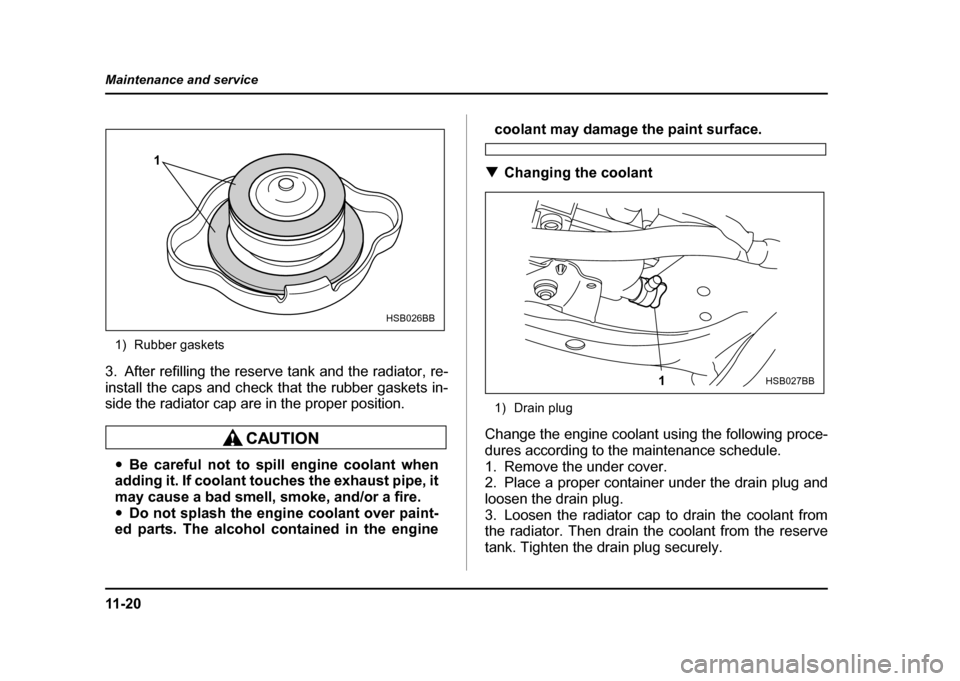
1) Rubber gaskets
3. After refilling the reserve tank and the radiator, re-
install the caps and check that the rubber gaskets in-
side the radiator cap are in the proper position.
" Be careful not to spill engine coolant when
adding it. If coolant touches the exhaust pipe, it
may cause a bad smell, smoke, and/or a fire." Do not splash the engine coolant over paint-
ed parts. The alcohol contained in the engine
coolant may damage the paint surface.
! Changing the coolant
1) Drain plug
Change the engine coolant using the following proce-
dures according to the maintenance schedule.
1. Remove the under cover.
2. Place a proper container under the drain plug and
loosen the drain plug.
3. Loosen the radiator cap to drain the coolant from
the radiator. Then drain the coolant from the reserve
tank. Tighten the drain plug securely.
1
HSB026BB
1HSB027BB
Page 416 of 491
11 -3 1
Maintenance and service
– CONTINUED –
Automatic transmission fluid !Checking the fluid level
The automatic transmission fluid expands largely as
its temperature rises; the fluid level differs according to
fluid temperature. Therefore, there are two different
scales for checking the level of hot fluid and cold fluid
on the dipstick.
Though the fluid level can be checked without warm-
ing up the fluid on the “COLD” range, we recommend
checking the fluid level when the fluid is at operating
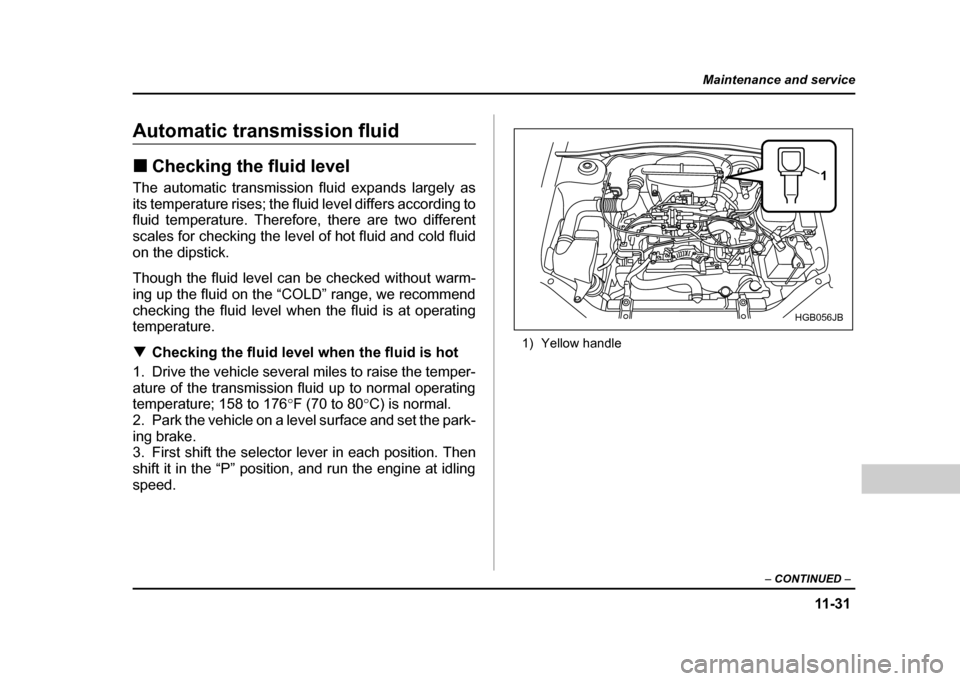
temperature. ! Checking the fluid level when the fluid is hot
1. Drive the vehicle several miles to raise the temper-
ature of the transmission fluid up to normal operating
temperature; 158 to 176 °F (70 to 80 °C) is normal.
2. Park the vehicle on a level surface and set the park-
ing brake.
3. First shift the selector lever in each position. Then
shift it in the “P” position, and run the engine at idling
speed. 1) Yellow handle
HGB056JB
1
Page 425 of 491
11 - 4 0
Maintenance and service
Brake booster
If the brake booster does not operate as described be-
low, have it checked by your SUBARU dealer.
1. With the engine off, depress the brake pedal sever-
al times, applying the same pedal force each time. The
distance the pedal travels should not vary.
2. With the brake pedal depressed, start the engine.
The pedal should move slightly down to the floor.
3. With the brake pedal depressed, stop the engine
and keep the pedal depressed for 30 seconds. The
pedal height should not change.
4. Start the engine again and run for about one minute
then turn it off. Depress the brake pedal several times
to check the brake booster. Brake booster operates
properly if the pedal stroke decreases with each de- pression.Brake pedal
Check the brake pedal free play and reserve distance
according to the maintenance schedule in the “War-
ranty and Maintenance Booklet”. !
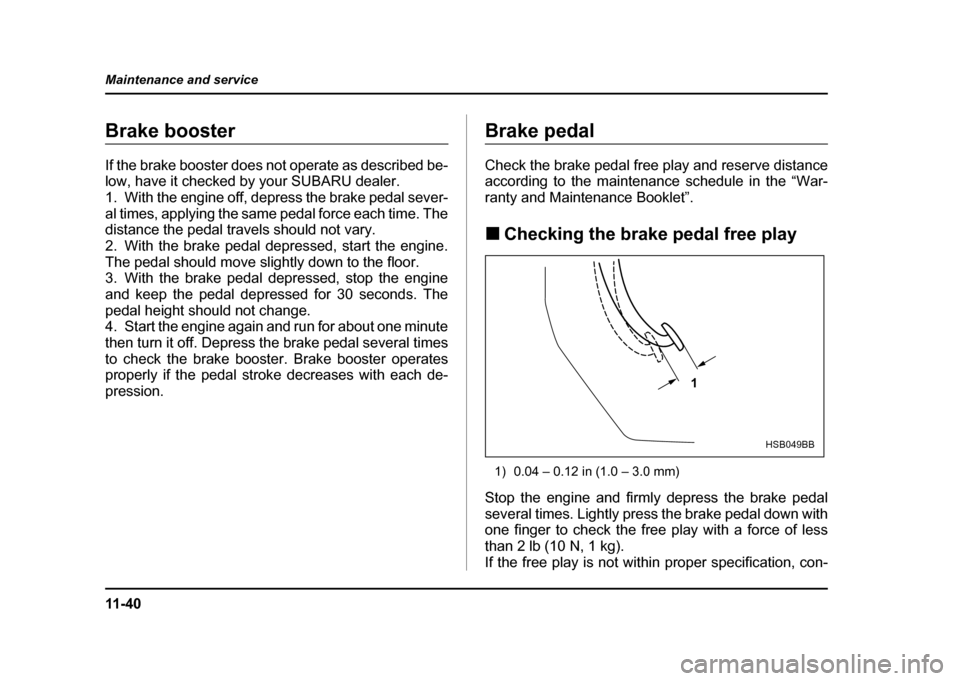
Checking the brake pedal free play
1) 0.04 – 0.12 in (1.0 – 3.0 mm)
Stop the engine and firmly depress the brake pedal
several times. Lightly press the brake pedal down with
one finger to check the free play with a force of less
than 2 lb (10 N, 1 kg).
If the free play is not within proper specification, con-
1
HSB049BB
Page 426 of 491
11 -4 1
Maintenance and service
– CONTINUED –
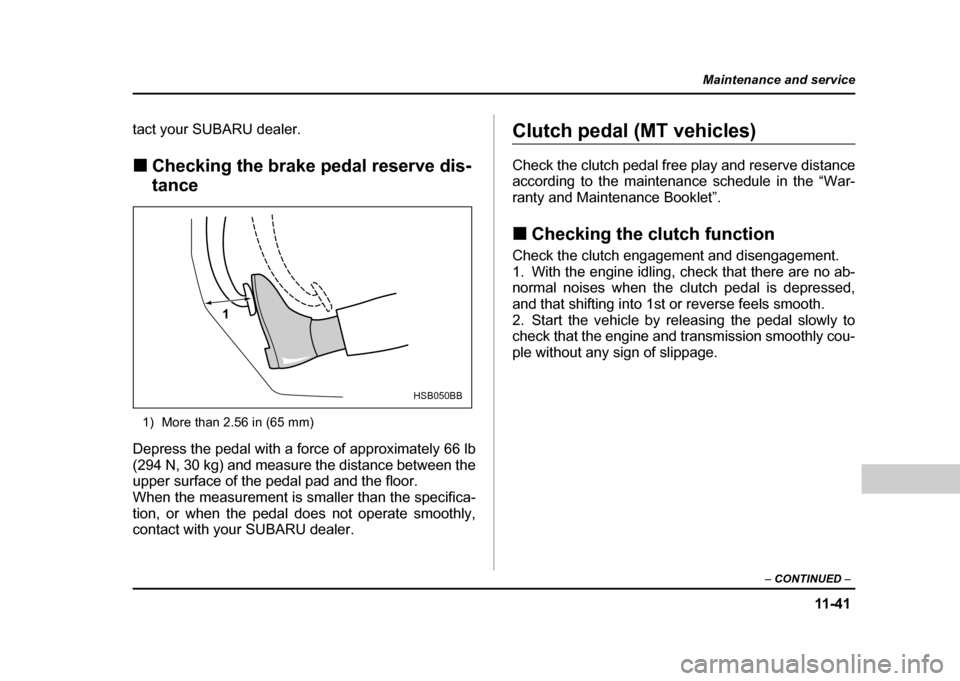
tact your SUBARU dealer. !Checking the brake pedal reserve dis- tance
1) More than 2.56 in (65 mm)
Depress the pedal with a force of approximately 66 lb
(294 N, 30 kg) and measure the distance between the
upper surface of the pedal pad and the floor.
When the measurement is smaller than the specifica-
tion, or when the pedal does not operate smoothly,
contact with your SUBARU dealer.Clutch pedal (MT vehicles)
Check the clutch pedal free play and reserve distance
according to the maintenance schedule in the “War-
ranty and Maintenance Booklet”. ! Checking the clutch function
Check the clutch engagement and disengagement.
1. With the engine idling, check that there are no ab-
normal noises when the clutch pedal is depressed,
and that shifting into 1st or reverse feels smooth.
2. Start the vehicle by releasing the pedal slowly to
check that the engine and transmission smoothly cou-
ple without any sign of slippage.
1
HSB050BB
Page 482 of 491

14-3
Index
Cargo
Area cover ................................................................ 6-15
Area light ......................................................... 6-2, 11-77
Tie-down hooks ...................................................... 6-17
Catalytic converter ...................................................... 8-4
Center Console ..................................................................... 6-6
Ventilators ................................................................. 4-3
Visor ............................................................................ 6-4
Changing
Flat tire ....................................................................... 9-5
Oil and oil filter ........................................................ 11-12
Charge warning light .................................................. 3-21
CHECK ENGINE warning light/ Malfunction indicator lamp ..................................3-20
Checking
Brake pedal free play ........................................... 11-40
Brake pedal reserve distance ...........................11-41
Clutch function ........................................................ 11-41
Clutch pedal free play .......................................... 11-42
Engine oil level ....................................................... 11-11
Fluid level ....................... 11-31, 11-36, 11-37, 11-38
Gear oil level ................................ 11-28, 11-33, 11-34
Child restraint systems ............................................... 1-31
Installation with seatbelt .....................................1-35
Lower and tether anchorages ..........................1-42
Child safety .................................................................... 6Locks
.......................................................................... 2-21
Chime
Key .............................................................................. 3-4
Seatbelt ........................................................... 1-15, 3-19
Cigarette lighter socket ............................................. 6-10
Cleaning Aluminum wheels .................................................. 10-3
Interior ........................................................................ 10-6
Ventilator grille ........................................................ 4-19
Climate control system
Manual ....................................................................... 4-4
Semi-automatic ...................................................... 4-11
Clock ................................................................................. 3-28
Clutch fluid ...................................................................... 11-38
Clutch pedal ................................................................... 11-41
Coat hook ....................................................................... 6-14
Coin tray .......................................................................... 6-7
Cooling system ............................................................. 11-18
Corrosion protection ......................................... 8-14, 10-4
Cruise control ................................................................ 7-37
Indicator light ........................................................... 3-26
Set indicator light ................................................... 3-26
Cup holder ...................................................................... 6-7
D
Daytime running light system .................................3-31
Differential gear oil
Page 488 of 491

14-9
Index
Turn signal
Indicator lights ......................................................... 3-26
Lever ........................................................................... 3-31
U
Under-floor storage compartment ........................6-18
V
Valet mode ..................................................................... 2-17
Vanity mirror .................................................................. 6-5
Vehicle
Capacity weight ...................................................... 8-19
Identification ............................................................ 12-10
Symbols ..................................................................... 4
Ventilator ......................................................................... 4-2
W
Warning and indicator lights ....................................3-19
Warning lights
ABS ............................................................................. 3-23
Anti-lock Brake system .......................................3-23
AT OIL TEMPerature ........................................... 3-22
Brake system .......................................................... 3-24
Charge ....................................................................... 3-21
CHECK ENGINE ................................................... 3-20
Door open ................................................................. 3-25Front-wheel drive
................................................... 3-25
Oil pressure ............................................................. 3-21
R.Diff TEMPerature ............................................. 3-22
Seatbelt ........................................................... 1-15, 3-19
SRS airbag system ............................................... 3-20
Warranties and maintenance .................................8-29
Washing ........................................................................... 10-2
Waxing and polishing ................................................. 10-3
Wear indicators ............................................................ 11-49
Wheel
Alignment .................................................................. 12-5
Balance ...................................................................... 11-48
Covers ........................................................................ 11-52
Replacement ........................................................... 11-51
Windows .......................................................................... 2-22
Windshield
Washer fluid ............................................................. 11-54
Wiper and washer switches ..............................3-37
Wiper deicer ............................................................ 3-42
Winter driving ................................................................ 8-11
Wiper and washer ....................................................... 3-35