Page 47 of 491
1-20
Seat, seatbelt and SRS airbags
"
Adjusting the rear seat shoulder belt anchor
height (window-side seating positions only)
The shoulder belt anchor height should be adjusted to
the position best suited for you. To adjust the anchor
height, push the release button and slide the anchor
up or down. Pull down on the anchor to make sure that
it is locked in place.
Always adjust the anchor height so that the shoulder
belt passes over the middle of the shoulder without
touching the neck.
When wearing the seatbelts, make sure the
shoulder portion of the webbing does not pass
over your neck. If it does, adjust the seatbelt an-
chor to a lower position. Placing the shoulder
belt over the neck may result in neck injury dur-
ing sudden braking or in a collision.
" Unfastening the seatbelt
Push the button on the buckle.
Before closing the door, make sure that the belts are
UG1075BA
HS1053BA
Page 104 of 491

2-1
2
Keys and doors
Keys ............................................................... 2-2 Key number ....................................................... 2-3
Door locks ..................................................... 2-3 Locking and unlocking from the outside ........ 2-3
Locking and unlocking from the inside .......... 2-4
Power door locking switches ...................... 2-5
Remote keyless entry system ..................... 2-6 Locking the doors ............................................. 2-7
Unlocking the doors ......................................... 2-8
Illuminated entry ............................................... 2-8
Vehicle finder function ..................................... 2-8
Sounding a panic alarm ................................... 2-9
Selecting audible signal operation .................. 2-9
Replacing the battery ....................................... 2-9
Replacing lost transmitters .............................. 2-10
Security system (if equipped) ..................... 2-14 System operation .............................................. 2-14
Arming the system ............................................ 2-15
Disarming the system ....................................... 2-17
Valet mode ......................................................... 2-17
Passive arming .................................................. 2-18
Child safety locks ......................................... 2-21
Windows ........................................................ 2-22 Power windows ................................................. 2-22
Trunk lid (Sedan) .......................................... 2-25 To open and close the trunk lid from outside 2-25
To open the trunk lid from inside .................... 2-26
To cancel the trunk lid release ........................ 2-26
Internal trunk lid release handle ...................... 2-26
Rear gate (Wagon) ........................................ 2-29 Moonroof (if equipped) ................................. 2-31
Tilt function ....................................................... 2-31
Sliding function ................................................. 2-31
Sun shades ........................................................ 2-33
Page 105 of 491
2-2
Keys and doors
Keys and doorsKeys
WRX-STi
1) Master key (1)
2) STi key (Master key (2))
3) Valet key
4) Key number plate Except WRX-STi
1) Master key
2) Submaster key
3) Valet key
4) Key number plate
Three types of keys are provided for your vehicle:
Master key, STi key/submaster key and valet key.
The master key and STi key/submaster key fit all locks
on your vehicle." Ignition switch
" Doors
" Trunk (sedan)
" Glove box
1 2
3
4
UG2035BB
1 2
3
4
HS2011BB
Page 106 of 491
2-3
Keys and doors
– CONTINUED –
The valet key fits only the ignition switch and driver’s
door lock. You can keep the trunk and glove box
locked when you leave your vehicle and valet key at a
parking facility.
Do not attach a large key holder or key case to
either key. If it banged against your knees while
you were driving, it could turn the ignition switch from the ON position to the ACC or OFF
position, thereby stopping the engine.
! Key number
The key number is stamped on the metal plate at-
tached to the key set. Write down the key number and
keep it in another safe place, not in the vehicle. This
number is needed to make a replacement key if you
lose your key or lock it inside the vehicle.
Door locks ! Locking and unlocking from the out-
side
To lock the door from the outside with the key, turn the
key toward the rear. To unlock the door, turn the key
toward the front.
Pull the outside door handle to open an unlocked door.
UG2501BA
Page 107 of 491
2-4
Keys and doors
1) Rotate the lock lever rearward.
2) Close the door.
To lock the door from the outside without the key, ro-
tate the lock lever rearward and then close the door.
To lock the door from the outside using the power door
locking switch, push the front side of the switch
(“LOCK” side) and then close the door. In this case, all
closed doors and the rear gate (for wagon) are locked
at the same time.
Always make sure that all doors and the rear gate (for
wagon) are locked before leaving your vehicle.
NOTE
Make sure that you do not leave the key inside the
vehicle when locking the doors from the outside
without the key. ! Locking and unlocking from the inside
1) Lock
2) Unlock
To lock the door from the inside, rotate the lock lever
rearward. To unlock the door from the inside, rotate the lock lever forward.
The red mark on the lock lever appears when the door
HS2013EB
1
2
12
UG2502BB
Page 108 of 491

2-5
Keys and doors
– CONTINUED –
is unlocked.
Pull the inside door handle to open an unlocked door.
Always make sure that all doors and the rear gate (for
wagon) are closed before starting to drive.
Keep all doors locked when you drive, especial-
ly when small children are in your vehicle.
Along with the proper use of seat belts and
child restraints, locking the doors reduces the
chance of being thrown out of the vehicle in an
accident.
It also helps prevent passengers from falling
out if a door is accidentally opened, and intrud-
ers from unexpectedly opening doors and en-
tering your vehicle.
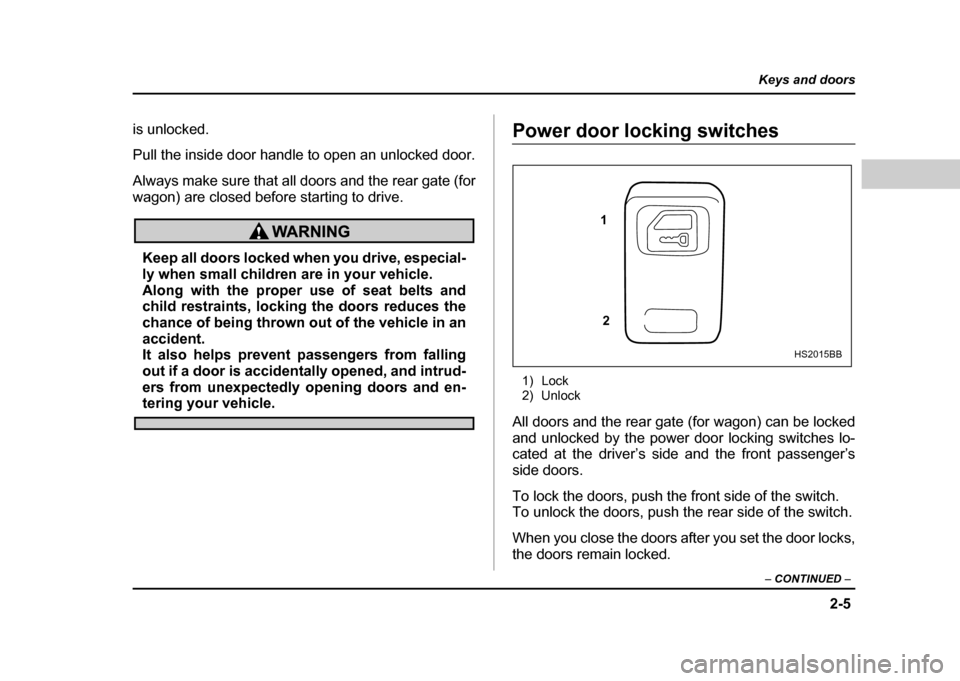
Power door locking switches
1) Lock
2) Unlock
All doors and the rear gate (for wagon) can be locked
and unlocked by the power door locking switches lo-
cated at the driver’s side and the front passenger’s
side doors.
To lock the doors, push the front side of the switch.
To unlock the doors, push the rear side of the switch.
When you close the doors after you set the door locks,
the doors remain locked.
1
2
HS2015BB
Page 109 of 491

2-6
Keys and doors
NOTE
Make sure that you do not leave the key inside the
vehicle before locking the doors from the outside
using power door locking switches.Remote keyless entry system
Two transmitters are provided for your vehicle.
The remote keyless entry system has the following
functions. "
Locking and unlocking the doors (and rear gate on
the wagon) without a key " Sounding a panic alarm
" Arming and disarming the security system (if your
vehicle is equipped with an optional security system).
See the next section “Security system (if equipped)”
for detailed information.
This device complies with Part 15 of the FCC
Rules and with RSS-210 of Industry Canada. Oper- ation is subject to the following two conditions: (1)
This device may not cause harmful interference,
and (2) this device must accept any interference
received, including interference that may cause
undesired operation.
Changes or modifications not expressly approved
by the party responsible for compliance could
void the user’s authority to operate the equipment.
The operable distance of the keyless entry system is
approximately 30 feet (10 meters). However, this dis-
tance will vary depending on environmental condi-
Page 110 of 491

2-7
Keys and doors
– CONTINUED –
tions. Range may be reduced near sources of RF in-
terference such as power plants and radio/television
broadcasting towers.
The remote keyless entry system does not operate
when the key is inserted in the ignition switch to pre-
vent accidental lockout.
"Do not expose the transmitter to severe
shocks, such as those experienced as a result
of dropping or throwing." Do not take the transmitter apart except when
replacing the battery." Do not get the transmitter wet. If it gets wet,
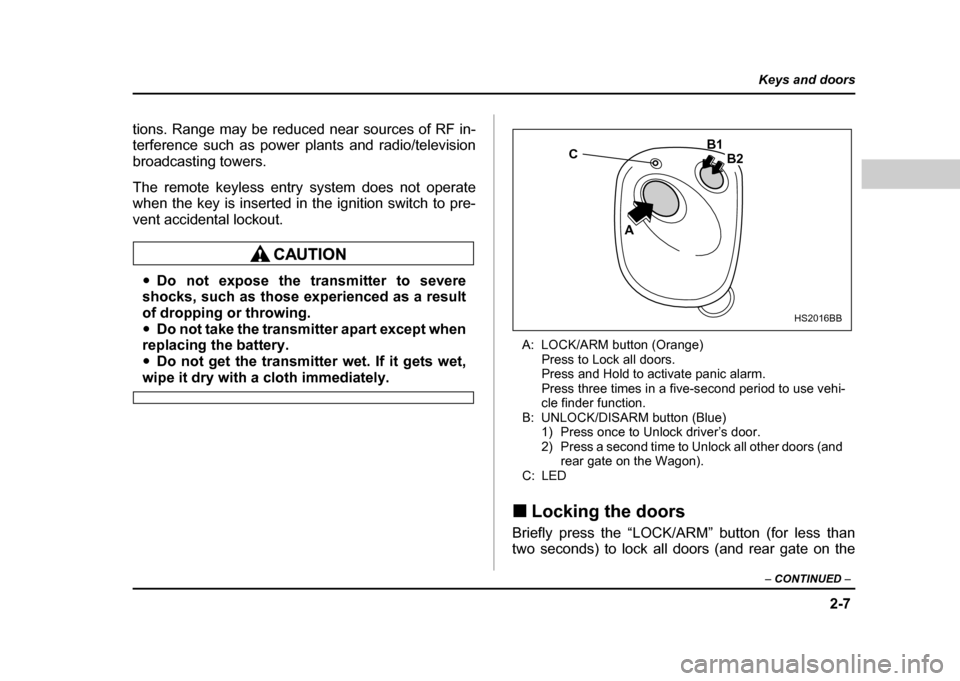
wipe it dry with a cloth immediately. A: LOCK/ARM button (Orange)
Press to Lock all doors.
Press and Hold to activate panic alarm.
Press three times in a five-second period to use vehi-
cle finder function.
B: UNLOCK/DISARM button (Blue) 1) Press once to Unlock driver’s door.
2) Press a second time to Unlock all other doors (and rear gate on the Wagon).
C: LED
! Locking the doors
Briefly press the “LOCK/ARM” button (for less than
two seconds) to lock all doors (and rear gate on the
C
A B1
B2
HS2016BB