2004 SUBARU IMPREZA ESP
[x] Cancel search: ESPPage 111 of 491
2-8
Keys and doors
wagon).
An electronic chirp will sound one time and the turn
signal lights will flash one time.
If any of the doors (or the rear gate) is not fully closed,
an electronic chirp will sound five times and the turn
signal lights will flash five times to alert you that the
doors (or the rear gate) are not properly closed. When
you close the door, it will automatically lock.
NOTE
If the “LOCK/ALARM” button is pressed for two
seconds or longer, the panic alarm will sound.
When locking the doors in normal circumstances,press the “LOCK/ALARM” button for less than two
seconds. For details on the panic alarm, refer to
“Sounding a panic alarm”. !
Unlocking the doors
Briefly press the “UNLOCK/DISARM” button (for less
than two seconds) to unlock the driver’s door. An elec-
tronic chirp will sound two times and the turn signal
lights will flash two times. To unlock all other doors
(and rear gate on the wagon), briefly press the “UN-
LOCK/DISARM” button a second time within 5 sec-
onds.
NOTE
If the interval between the first and second press-
es of the “UNLOCK/DISARM” button (for unlock-
ing of all of the doors and the rear gate) is extreme-
ly short, the system may not respond. ! Illuminated entry
The interior (dome) light and ignition switch light (for
turbo models) will illuminate when the “UNLOCK/DIS-
ARM” button is pressed. These lights stay illuminated
for approximately 30 seconds if any of the doors (or
the rear gate on the wagon) is not opened.
If the “LOCK/ARM” button is pressed before 30 sec-
onds have elapsed, these lights will go out. Also, these
lights will go out if the key is inserted in the ignition switch. The interior light must be set to the middle po-
sition in order for this function to operate.
! Vehicle finder function
Use this function to find your vehicle parked among
many vehicles in a large parking lot. Provided you are
within 30 feet (10 meters) of the vehicle, pressing the
“LOCK/ARM” button three times in a five-second peri-
od will cause your vehicle’s horn to sound one time
and its turn signal lights to flash three times.
Page 156 of 491
3-19
Instruments and controls
– CONTINUED –
ing a shutdown. "When the actual ambient temperature falls outside
the specified indicator range.Warning and indicator lights
Several of the warning and indicator lights come on
momentarily and then go out when the ignition switch
is initially turned to the “ON” position. This permits
checking the operation of the bulbs.
Apply the parking brake and turn the ignition switch to
the “ON” position. The following lights come on:
Seatbelt warning light
SRS airbag system warning light
CHECK ENGINE warning light/Malfunction indica- tor lamp
Charge warning light
Oil pressure warning light
AT OIL temperature warning light (AT vehicles)ABS warning light
Brake system warning light
If any lights fail to come on, it indicates a burned-out
bulb or a malfunction of the corresponding system.
Consult your authorized SUBARU dealer for repair. ! Seatbelt warning light and chime
When the ignition switch is turned to the “ON” position,
the seatbelt warning light will come on and the remind-
er chime will sound for about six seconds to remind the
Page 196 of 491
4-7
Climate control
– CONTINUED –
gardless of the position of the air conditioner button to
defog the windshield quickly.
However, the air conditioner indicator light does not
come on at this time.
NOTE
Warm air also comes out from the right and left air
outlets. To stop warm air flow from these outlets,
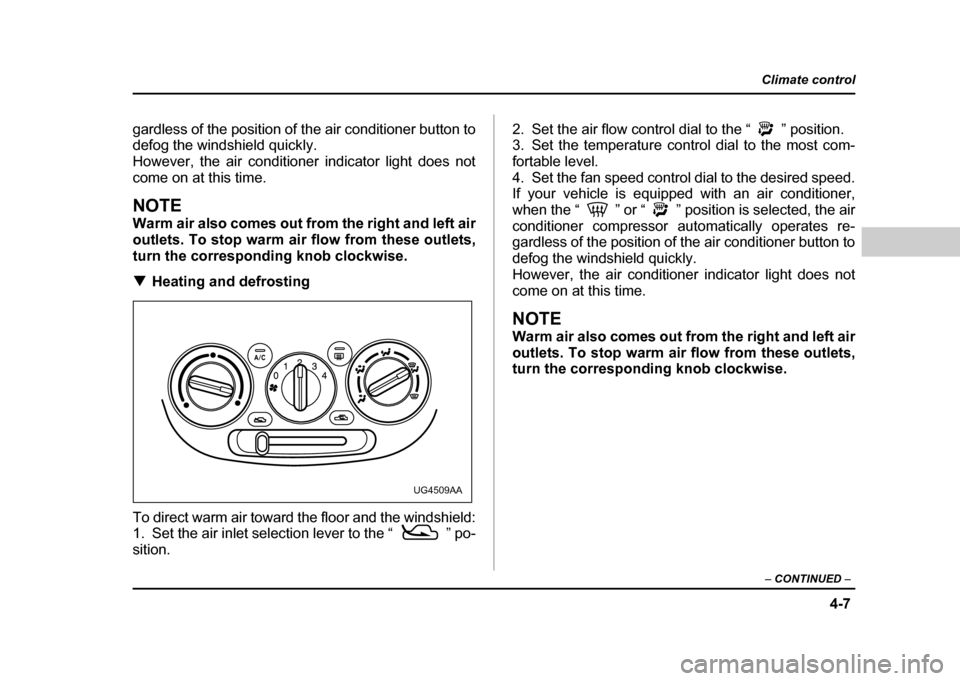
turn the corresponding knob clockwise. !Heating and defrosting
To direct warm air toward the floor and the windshield:
1. Set the air inlet selection lever to the “ ” po- sition. 2. Set the air flow control dial to the “ ” position.
3. Set the temperature control dial to the most com-
fortable level.
4. Set the fan speed control dial to the desired speed.
If your vehicle is equipped with an air conditioner,
when the “ ” or “ ” position is selected, the air
conditioner compressor automatically operates re-
gardless of the position of the air conditioner button to
defog the windshield quickly.
However, the air conditioner indicator light does not
come on at this time.
NOTE
Warm air also comes out from the right and left air
outlets. To stop warm air flow from these outlets,
turn the corresponding knob clockwise.
UG4509AA
Page 197 of 491

4-8
Climate control
!
Heating
To direct warm air toward the floor:
1. Set the air inlet selection lever to the “ ” po-sition.
2. Set the air flow control dial to the “ ” position.
3. Set the temperature control dial to the most com-
fortable level.
4. Set the fan speed control dial to the desired speed.
NOTE
Warm air also comes out from the right and left air
outlets. To stop warm air flow from these outlets,
turn the corresponding knob clockwise. !
Bi-level heating
This setting allows you to direct air of different temper-
atures from the instrument panel and foot outlets. The
air from the foot outlets is slightly warmer than from the
instrument panel outlets.
1. Set the air inlet selection lever to the “ ” po-sition.
2. Set the air flow control dial to the “ ” position.
3. Set the temperature control dial to the desired tem-perature level.
4. Set the fan speed control dial to the desired speed.
Setting the temperature control dial fully turned to the
red area or blue area decreases the temperature dif-
UG4510AAUG4511AA
Page 204 of 491

4-15
Climate control
– CONTINUED –
1. Fan speed control dial: AUTO position
2. Air flow control dial: position
3. Air temperature control dial: desired position
4. Air inlet selection button: OFF position
5. Air conditioner button: OFF position
NOTE "To heat the passenger compartment rapidly, set
the air temperature control dial to the 85 (30) posi-
tion and the air inlet selection button to the ON po-
sition. When the passenger compartment has
warmed up sufficiently, return the air inlet selec-
tion button to the OFF position. " Warm air also comes out from the right and left
air outlets. To stop warm air flow from these out-
lets, turn the corresponding knob clockwise. !
Rapid cooling
To cool the passenger compartment rapidly, make the
following settings:
1. Fan speed control dial: All the way to the right
2. Air flow control dial: “ ” position
3. Air temperature control dial: 65 (20) position
4. Air inlet selection button: ON position
5. Air conditioner button: ON position
NOTE
From time to time, return the air inlet selection but-
ton to the OFF position to draw outside air into the
passenger compartment.
UG4041BA
Page 206 of 491

4-17
Climate control
– CONTINUED –
NOTE "For rapid defrosting or defogging, set the fan
speed control dial to the highest speed position. " If air supplied from the outlets is too cold, the
windshield may become fogged on the outside.
Turn up the air temperature control dial slightly if
this happens." Warm air also comes out from the right and left
air outlets. To stop warm air flow from these out-
lets, turn the corresponding knob clockwise. ! Heating and defrosting
To direct warm air toward the floor and windshield,
make the following settings: 1. Fan speed control dial: desired position
2. Air flow control dial: position
3. Air temperature control dial: in 75 – 85 (25 – 30)
range
When the dial is placed in the “ ” position, the air
conditioner compressor operates automatically to de-
fog the windshield quickly. At the same time, the air in-
let selection is automatically set to “outside air” mode.
However, the air conditioner does not operate auto-
matically when the dial is placed in the “ ” position
after the dial has been placed in the “ ” position
and the air conditioner has been turned off manually.
NOTE "
If air supplied from the outlets is too cold, the
windshield may become fogged on the outside.
Turn up the air temperature control dial slightly if
this happens. " Warm air also comes out from the right and left
air outlets. To stop warm air flow from these out-
lets, turn the corresponding knob clockwise.
UG4043AA
Page 227 of 491
5-14
Audio
!
To start playback
When the “CD” button (13) is pressed, the CD changer
will start playback. The display shows the current disc
number, track number and the elapsed time during
playback.
NOTE " If a disc is in the player, the “DISC” button is
used to change from CD player operation to DISC
changer operation. Each time the “DISC” button is
pressed, the operating mode will change alter-
nately. " At the end of the disc, the player automatically
continues with the next disc. " After playback on the last disc finishes, play-
back will automatically return to the first disc. " If you have loaded fewer than 6 discs, any miss-
ing disc is automatically skipped. ! Selection of a desired disc
You can select a desired disc from among the discs
contained in the CD changer only by pressing the cor-
responding number on one of the disc select buttons.
If you are to listen to the 5th disc in the CD changer,
press the “5” button of the disc select buttons. All other
discs in the CD changer can also be selected in a sim-
ilar way.
NOTE " No disc change takes place if the button corre-
sponding to the storage tray in which no disc is
loaded is pressed." If the disc select button corresponding to the
disc now in playback is pressed again, the disc
will be replayed from its beginning. ! To select a song from its beginning
" Forward direction
Briefly press the “ ” button (12) to skip to the begin-
ning of the next track. Each time the button is pressed,
the indicated track number will increase. " Backward direction
Briefly press the “ ” button (12) to skip to the begin-
ning of the current track. Each time the button is
pressed, the indicated track number will decrease. ! Fast forwarding and fast reverse
" Fast forwarding
Press the “ ” button (12) continuously for more than
1 second to fast forward the disc.
Release the button to stop fast forwarding.
If you continue fast forwarding to the end of the disc,
the CD changer will automatically stop fast forwarding
and start playback beginning with the first track on the
Page 240 of 491
5-27
Audio
– CONTINUED –
NOTE
Make sure to always insert a disc with the label
side up. If a disc is inserted with the label side
down, it might be ejected or the player might shutoff. !How to insert a CD(s)
" Inserting a CD
1. Press “LOAD” button (18). If the magazine in the
player has an idle position where you can insert a disc,
the “DISC” indicator associated with the idle position
will blink.
If no indicator blinks, it means that there is no idle po-
sition in the magazine.
2. As soon as the “DISC” indicator begins to blink, the
“IN” will appear on display for a period of 15 seconds.
Insert a disc during the period. The disc will be then
automatically drawn in, and the player will begin to
play back the first number of the disc. " To insert more discs in succession, repeat Steps 1
and 2. The magazine will be loaded with discs in the
ascending order of position number.
If you do not insert any disc in 15 seconds after you
have pressed the “LOAD” button, the player will begin
to play back the first number of the last disc you have
inserted. "
The disc indicator steadily lights up if a disc is al-
ready inserted in the corresponding position of the
magazine." While the player is in the loading mode, if you press
any of the other mode buttons “FM” (1), “AM” (2) and
“TAPE” (12), the player will enter the standby mode.
Press the “CD” button (21) to start playback. " Inserting a disc in a desired position
1. Press the “LOAD” button. If the magazine in the
player has an idle position where you can insert a disc,
the “DISC” indicator associated with the idle position
will blink.
The positions in the magazine the indicator of which
steadily lights up are already loaded with discs.
2. Press the “DISC SELECT” button (26) at the posi-
tion where you want to insert a disc. The associated
“DISC” indicator will blink, and the “IN” will be dis-
played.
3. If you insert a disc during the 15-second period
while the “IN” is on display, the disc will be automati-
cally drawn in, and the player will start playback of the
disc, beginning with the first number. " To insert more discs in succession, repeat Steps 1
and 2. " While the player is in the loading mode, if you press
any of the other mode buttons “FM” (1), “AM” (2) and