2004 SUBARU IMPREZA CD player
[x] Cancel search: CD playerPage 236 of 491
5-23
Audio
– CONTINUED –
NOTE "Only use good quality cassettes (cassettes
longer than C-90 are not recommended). " Put cassettes back in their boxes immediately
after use to protect them from dust and dirt and to
prevent the tape from unwinding. " Never expose cassettes to heat, direct sunlight
or moisture. " Clean the tape head (once or twice a month) us-
ing a wet-type cleaning cassette .
! To play back a cassette tape
" When cassette tape is not in the player
When a cassette is partially inserted, it is automatically
drawn in and starts tape playback. " When cassette tape is in the player
When the “TAPE” button (12) is pressed, the display
will show “PLAY” and the player will start playback. ! Tape travel indicators
These indicate the direction the cassette tape is mov-
ing.
: indicates that the top side of the cassette is being
played back.
: indicates that the bottom side of the cassette is be-
ing played back. !
Program switching button (PROG)
When the program switching button “PROG” (16) is
pressed during playback, the tape travel indicators will
switch and the player will begin playing back the oppo-
site side of the tape. The same mechanism is auto-
matically activated when the end of the tape is
reached. This allows the opposite side of the tape to
play, providing continuous playback. ! Fast-forward button (FF)
To fast-forward the tape, press the “FF” button (15).
The display will show “FF”. To stop fast-forwarding,
press the “FF” or “TAPE” (12) button. ! Rewind button (REW)
To rewind the tape, press the “REW” button (17). The
display will indicate “REW”. To stop rewinding, press
the “REW” or “TAPE” (12) button. ! Eject button ( )
When “ ” button (10) is pressed, play back stops
and the cassette tape is ejected.
The ejection function also operates when the ignition
switch is in the “LOCK” position. Always make certain
that you remove the cassette tape.
Page 237 of 491
5-24
Audio
!
Tape program sensor button (TPS)
" Blank skip
When the “TPS” button (13) is pressed, the “TPS” in-
dicator will come on and the player will automatically
skip any blank portion of 15 second or more and play
the next program, even if it is on the other side. To
cancel blank skip mode, press the “TPS” button again. " Blank search
Press “TPS” button (13) during playback to return to
the beginning of the current selection or to skip to the
beginning of the next selection. To use this function,
press the “TPS” button to turn on the “TPS” indicator.
If the fast-forward button “FF” (15) is then pressed, the
player advances the tape to the beginning of the next
selection and starts playing it. If the rewind button
“REW” (17) is pressed instead, the player rewinds the
tape to the beginning of the current selection and
starts replaying it. The “TPS” function may not operate
properly under the following conditions: " When the recording level is low.
" When there are long pauses in the middle of a se-
lection." When the tape contains verbal material such as
conversations. " When the blanks between selections are shorter
than five seconds. "
When there are no blanks between selections (live
concerts, etc.). ! Repeat button (RPT)
Push the “RPT” button (11) to repeat the piece of mu-
sic being listened to. To use this function, push the
“RPT” button while the piece you want to hear again is
being played. “RPT” will be indicated on the display.
When the selection ends, the cassette player automat-
ically rewinds to the beginning of the piece and the se-
lection begins again. To cancel the repeat function,
push the “RPT” button again. Until the repeat function
is cancelled, the same piece of music will be repeated
indefinitely. The “RPT” function may not operate prop-
erly under the following conditions:" When the recording level is low.
" When there are long pauses in the middle of a se-
lection." When the tape contains verbal material such as
conversations." When the blanks between selections are shorter
than five seconds. " When there are no blanks between selections (live
concerts, etc). ! Dolby B NR button ( )
Press “ ” button (14) when playing tapes recorded
using the Dolby NR system*. The “ ” indicator will
Page 238 of 491

5-25
Audio
– CONTINUED –
light up and high-frequency noise on the tape will be
reduced for clearer sound reproduction.
*: Noise reduction system manufactured under license from
Dolby Laboratories Licensing Corporation. “Dolby” and the
double-D Symbol are trade marks of Dolby Laboratories Li-
censing Corporation. "Auto metal sensor
The cassette player automatically adjusts for metal or
CrO 2 tape.
Page 240 of 491
5-27
Audio
– CONTINUED –
NOTE
Make sure to always insert a disc with the label
side up. If a disc is inserted with the label side
down, it might be ejected or the player might shutoff. !How to insert a CD(s)
" Inserting a CD
1. Press “LOAD” button (18). If the magazine in the
player has an idle position where you can insert a disc,
the “DISC” indicator associated with the idle position
will blink.
If no indicator blinks, it means that there is no idle po-
sition in the magazine.
2. As soon as the “DISC” indicator begins to blink, the
“IN” will appear on display for a period of 15 seconds.
Insert a disc during the period. The disc will be then
automatically drawn in, and the player will begin to
play back the first number of the disc. " To insert more discs in succession, repeat Steps 1
and 2. The magazine will be loaded with discs in the
ascending order of position number.
If you do not insert any disc in 15 seconds after you
have pressed the “LOAD” button, the player will begin
to play back the first number of the last disc you have
inserted. "
The disc indicator steadily lights up if a disc is al-
ready inserted in the corresponding position of the
magazine." While the player is in the loading mode, if you press
any of the other mode buttons “FM” (1), “AM” (2) and
“TAPE” (12), the player will enter the standby mode.
Press the “CD” button (21) to start playback. " Inserting a disc in a desired position
1. Press the “LOAD” button. If the magazine in the
player has an idle position where you can insert a disc,
the “DISC” indicator associated with the idle position
will blink.
The positions in the magazine the indicator of which
steadily lights up are already loaded with discs.
2. Press the “DISC SELECT” button (26) at the posi-
tion where you want to insert a disc. The associated
“DISC” indicator will blink, and the “IN” will be dis-
played.
3. If you insert a disc during the 15-second period
while the “IN” is on display, the disc will be automati-
cally drawn in, and the player will start playback of the
disc, beginning with the first number. " To insert more discs in succession, repeat Steps 1
and 2. " While the player is in the loading mode, if you press
any of the other mode buttons “FM” (1), “AM” (2) and
Page 241 of 491
5-28
Audio
“TAPE” (12), the player will enter standby mode. Press
the “CD” button to start playback. "
Loading all the magazine (Full disc loading mode)
1. If you continue to press the “LOAD” button for more
than 1.5 seconds, the player will produce beep sound
and will enter the full disc loading mode.
2. A “DISC” indicator will blink, and the “IN” will be on
display for a period of 15 seconds. If a disc is success-
fully loaded during this period, the “DISC” indicator will
stop blinking and will steadily light.
3. When the loading of a disc is complete, the next
“DISC” indicator will blink. Then repeat Step 2.
4. When the magazine is filled with discs by repeating
Steps 2 and 3, the player will start playback of the
discs, beginning with the one inserted first.
If you fail to insert any disc during each 15-second in-
terval, the full disc loading mode will be canceled, and
the player will start playback of the disc inserted first. ! How to play back a CD or make a pause
" When there is no CD inserted:
Insert a CD by referring to “How to Insert a CD(s)”.
When a CD is loaded, the player will start playback of
the CD, beginning with the first number. "
When there are CDs loaded:
Press a desired one of the “DISC SELECT” buttons
(26) the “DISC” indicator of which steadily lights up.
The player will then start playback of the selected CD,
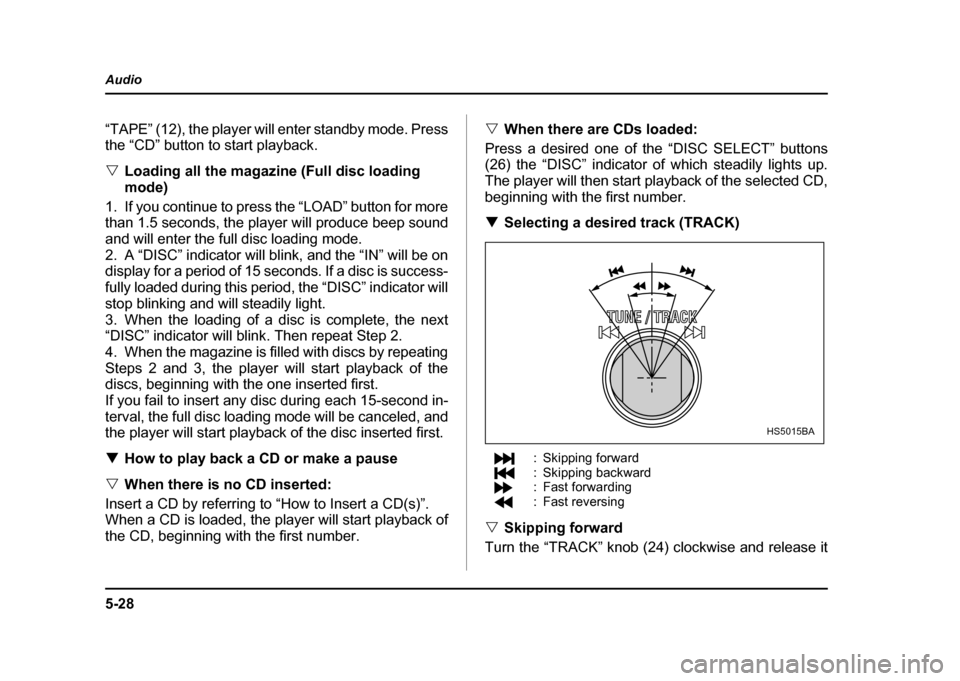
beginning with the first number. ! Selecting a desired track (TRACK)
: Skipping forward
: Skipping backward
: Fast forwarding
: Fast reversing
" Skipping forward
Turn the “TRACK” knob (24) clockwise and release it
HS5015BA
Page 242 of 491

5-29
Audio
– CONTINUED –
immediately to skip to the beginning of the next track.
Each time the knob is turned and released, the indicat-
ed track number will increase. "Skipping backward
Turn the “TRACK” knob (24) counterclockwise and re-
lease it immediately to skip to the beginning of the cur-
rent track. If you continue to turn and release the knob,
the indicated truck number will decrease. " Fast forwarding
Turn the “TRACK” knob (24) clockwise and hold it con-
tinuously for more than 2 seconds to fast forward the disc.
Release the knob to stop fast forwarding. " Fast reversing
Turn the “TRACK” knob (24) counterclockwise and
hold it continuously for more than 2 seconds to fast re-
verse the disc.
Release the knob to stop fast reverse. ! Repeat playback
Press the “RPT” button (25) while a song is playing to
play the song repeatedly. The “RPT” indicator will
come on and the song will be played continuously. To
cancel the repeat mode, press the button again. Then
the “RPT” indicator goes out, and normal playback mode is restored. !
Random playback
Press the “RDM” button (23) while a disc is being
played back to play all songs on the disc in a random
order. The “RDM” indicator will come on and all songs
on the disc will be played in a random order.
To cancel the random mode, press the button again.
Then the “RDM” indicator goes out, and normal play-
back mode is restored. ! Scan
When the “SCAN” button (19) is pressed while the disc
is being played back, you can hear the first 10 seconds
of each track to search for the desired program. To
continue listening to the program, press the “SCAN”
button again. After all tracks on the disc have been
scanned, normal playback mode is restored. ! How to unload CDs from the player
" Ejecting a CD from the player
Of the discs loaded, you can select and remove only
one disc.
1. Press the “DISC SELECT” button (26) of the disc
whose “DISC” indicator is ON.
2. Press the “EJECT” button (22). Then the “DISC” in-
dicator associated with the disc you have selected will
Page 243 of 491
5-30
Audio
blink, and the disc will be ejected.
To remove more discs in succession, repeat Steps 1
and 2. "
Ejecting all discs from the player (All disc ejec-
tion mode)
1. If you continue to press the “EJECT” button (22),
the player will produce beep sound and will enter the
all disc ejection mode.
2. Remove the disc that has been ejected. The other
discs loaded will then be ejected one after another. If
you do not remove the disc that has been ejected, the
“All disc ejection mode” will be canceled.
NOTE
Avoid driving the vehicle with a CD sticking out,
because vibration might make it fall out.
Page 245 of 491
5-32
Audio
"
Do not attempt to insert two or more discs
into the slot at a time. Doing so can cause me-
chanical damage to the CD changer." Use only music CDs identified by
am ark .
" Do not use CDs listed below which could
cause damage to the CD player. "3-inch (8 cm) compact disc.
" Any disc with a peel-off or seal on it.
" Any disc with scratches and/or dust.
" Bent disc.
" Cleaning disc.
" CD accessory. (E.g., 3-inch (8 cm) disc
adapter)
" Do not insert or remove any disc when the
automatic transmission selector lever is in the
park position; the selector lever in that position
can interfere with disc insertion or removal,
causing scratches on the disc surface (for AT
vehicles).
! To insert a disc
1. Press one of the “Disc select” buttons (3) (num-
bered from 1 to 6) for which the disc indicator light (2) is “OFF”.
The Disc indicator lights are located directly above the
corresponding “Disc select” buttons.
2. The indicator will begin blinking. The blinking will last for 15 seconds.
During this period, insert a desired disc, and the disc
will begin to play. (If any disc is not inserted during this
period, the “Disc slot” (1) door will close. Repeat step
1.)
Be sure to hold a disc with the label side (the side
where titles are printed) up.
3. To insert another disc, repeat step 1 and 2 choos-
ing a different disc select button. !
To insert six discs at a time
1. Press and hold the “Disc select” button number 1
until all disc indicators begin blinking (about 1.5 sec-
onds).
2. The indicators will blink for 15 seconds. During this
period, insert desired six discs.
3. When all discs are loaded, the first disc will begin to
play. (If no disc is inserted within this 15 seconds, the
entire disc load sequence will be canceled.) ! To remove a disc
1. Press the desired one of the “Disc select” buttons
(3) (numbered from 1 to 6) for which the disc indicator
light is on.