2004 SUBARU IMPREZA airbag
[x] Cancel search: airbagPage 101 of 491
1-74
Seat, seatbelt and SRS airbags
"
Under the center console
" Inside each front fender
" Steering wheel and column and nearby areas
" Top of the dashboard on front passenger’s
side and nearby areas " Each front seat and nearby area (only for ve-
hicles with SRS side airbags)
" Inside each center pillar
In the event that the SRS airbag is deployed, re-
placement of the system should be performed
only by an authorized SUBARU dealer. When the
components of the SRS airbag system are re-
placed, use only genuine SUBARU parts.
To ensure their long-term reliability, the SRS airbags
must be inspected by a SUBARU dealer ten years af-
ter the date of manufacture, which is shown on the cer-
tification plate attached to the driver’s door jamb.
NOTE
In the following cases, contact your SUBARU deal-
er as soon as possible. " The front part of the vehicle was involved in an
accident in which the SRS frontal airbags did not
deploy. " The pad section of the steering wheel or front passenger’s frontal airbag cover is scratched,
cracked, or otherwise damaged.
In addition, if your vehicle is equipped with SRS
side airbags, contact your SUBARU dealer as
soon as possible in the following cases. "
Either center pillar or a nearby area of the vehi-
cle was involved in an accident in which the SRS
side airbag did not deploy. " The fabric or leather of either front seatback is
cut, frayed, or otherwise damaged. ! Precautions against vehicle modifica- tion
"To avoid accidental activation of the system
or rendering the system inoperative, which may
result in serious injury, no modifications
should be made to any components or wiring of
the SRS airbag system.
This includes following modifications: "Installation of custom steering wheels
" Attachment of additional trim materials to
the dashboard " Installation of custom seats (for vehicles
Page 102 of 491
1-75
Seat, seatbelt and SRS airbags
– CONTINUED –
with SRS side airbags only) "Replacement of seat fabric or leather (for
vehicles with SRS side airbags only) " Installation of additional fabric or leather
on the front seat (for vehicles with SRS side
airbags only)
" Installation of additional electrical/electronic
equipment such as a mobile two-way radio on
or near the SRS airbag system components
and/or wiring is not advisable. This could inter-
fere with proper operation of the SRS airbag
system.
Do not perform any of the following modifica-
tions. Such modifications can interfere with
proper operation of the SRS airbag system." Attachment of any equipment (brush bar,
winches, snow plow, skid plate, etc.) other than
SUBARU genuine accessory parts to the front
end. " Modification of the suspension system or
front end structure. " Installation of a tire of different size and con-
struction from the tires specified on the tire placard attached to the driver’s door jamb. "
Attachment of any equipment (side steps or
side sill protectors, etc.) other than SUBARU
genuine accessory parts to the side body (for
vehicles with side airbags only).
Always consult your SUBARU dealer if you want to in-
stall any accessory parts to your vehicle.
Page 121 of 491
2-18
Keys and doors
chirp is emitted. !
Passive arming
When passive arming mode has been programmed by
the dealer, arming of the system is automatically ac-
complished without using the remote transmitter. Note
that in this mode, DOORS MUST BE MANUALLY LOCKED. ! To enter the passive mode
0
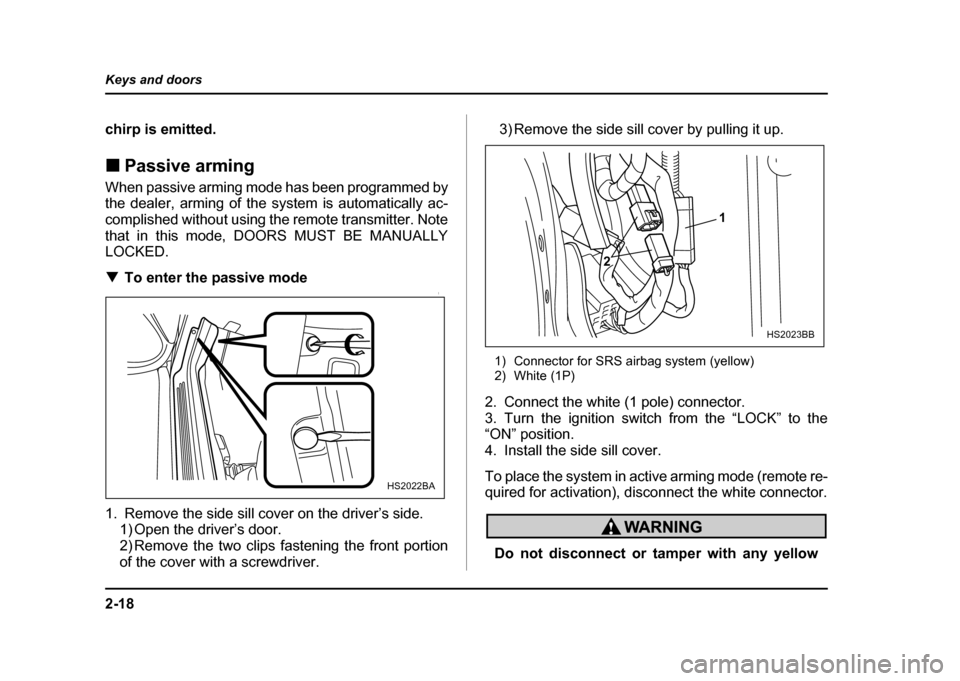
1. Remove the side sill cover on the driver’s side.
1) Open the driver’s door.
2) Remove the two clips fastening the front portion
of the cover with a screwdriver. 3) Remove the side sill cover by pulling it up.
1) Connector for SRS airbag system (yellow)
2) White (1P)
2. Connect the white (1 pole) connector.
3. Turn the ignition switch from the “LOCK” to the “ON” position.
4. Install the side sill cover.
To place the system in active arming mode (remote re-
quired for activation), disconnect the white connector.
Do not disconnect or tamper with any yellow
HS2022BA
1
2
HS2023BB
Page 122 of 491
2-19
Keys and doors
– CONTINUED –
connector and/or any harness covered with yel-
low insulation and/or tape.
Doing so could result in accidental inflation of
the SRS airbag or could make the SRS airbag
system inoperative, which may result in serious
injury.
! Arming the system
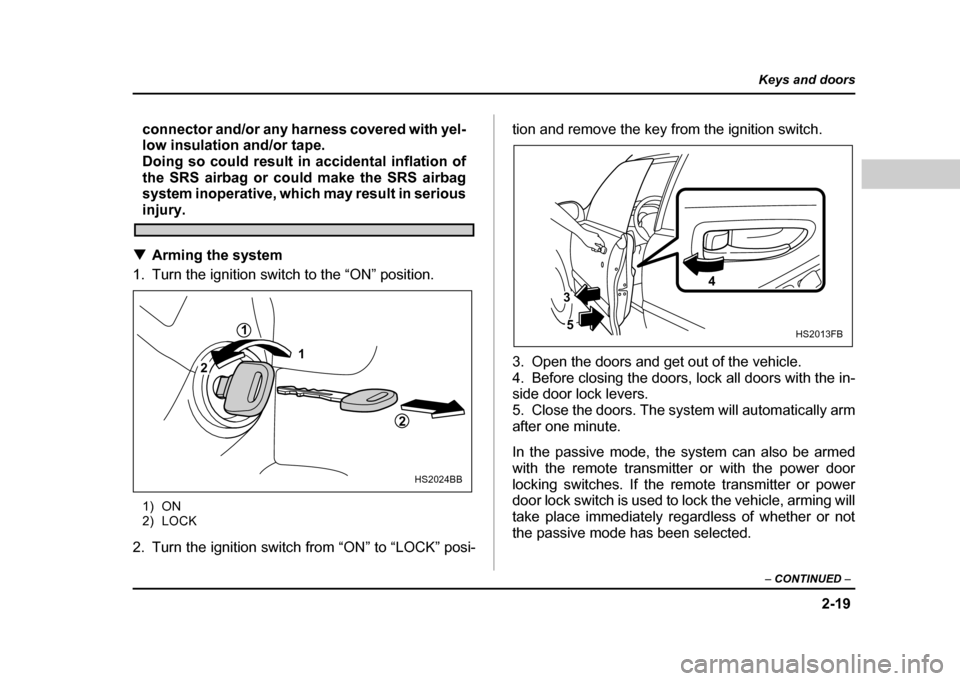
1. Turn the ignition switch to the “ON” position.
1) ON
2) LOCK
2. Turn the ignition switch from “ON” to “LOCK” posi- tion and remove the key from the ignition switch.
3. Open the doors and get out of the vehicle.
4. Before closing the doors, lock all doors with the in-
side door lock levers.
5. Close the doors. The system will automatically arm
after one minute.
In the passive mode, the system can also be armed
with the remote transmitter or with the power door
locking switches. If the remote transmitter or power
door lock switch is used to lock the vehicle, arming will
take place immediately regardless of whether or not
the passive mode has been selected.
1
2
1
2
HS2024BB
HS2013FB
4
5
3
Page 138 of 491

3-1
3
Instruments and controls
Ignition switch .............................................. 3-3 LOCK .................................................................. 3-3
ACC .................................................................... 3-4
ON ....................................................................... 3-4
START ................................................................ 3-4
Key reminder chime .......................................... 3-4
Ignition switch light (if equipped) .................... 3-5
Key interlock release (AT vehicles only) ........ 3-5
Hazard warning flasher ................................ 3-6
Meters and gauges (WRX-STi) .................... 3-7 Combination meter illumination ...................... 3-7
Cancelling sequential illumination of the combination meter ......................................... 3-7
Speedometer ..................................................... 3-7
Odometer/Trip meter ........................................ 3-8
Tachometer ........................................................ 3-9
Fuel gauge ......................................................... 3-9
Temperature gauge ........................................... 3-10
Ambient temperature gauge ............................ 3-11
REV indicator light and buzzer (WRX-STi) . 3-12 Setting the alarm-level engine speed .............. 3-13
Deactivating the REV alarm system ................ 3-14
Meters and gauges (Except WRX-STi) ........ 3-15 Speedometer ..................................................... 3-15
Odometer/Trip meter ........................................ 3-15
Tachometer ........................................................ 3-16
Fuel gauge ......................................................... 3-16
Temperature gauge ........................................... 3-17
Ambient temperature gauge (if equipped) ...... 3-18
Warning and indicator lights ....................... 3-19 Seatbelt warning light and chime .................... 3-19 SRS airbag system warning light .................... 3-20
CHECK ENGINE warning light/Malfunction
indicator lamp ................................................. 3-20
Charge warning light ........................................ 3-21
Oil pressure warning light ............................... 3-21
AT OIL TEMPerature warning light (for AT vehicles) ............................................. 3-22
Rear differential oil temperature warning light
(WRX-STi) ........................................................ 3-22
ABS warning light ............................................. 3-23
Brake system warning light ............................. 3-24
Door open warning lights ................................ 3-25
Front-wheel drive warning light (for AT vehicles – if equipped) ...................... 3-25
Intercooler water spray warning light
(WRX-STi) ........................................................ 3-25
Selector lever position indicator (AT vehicles) 3-26
Turn signal indicator lights .............................. 3-26
High beam indicator light ................................. 3-26
Cruise control indicator light ........................... 3-26
Cruise control set indicator light .................... 3-26
Driver’s control center differential auto indicator light (WRX-STi) ............................... 3-26
Driver’s control center differential indicator
lights (WRX-STi) ............................................. 3-27
Headlight indicator light (WRX-STi) ................ 3-27
REV indicator light (WRX-STi) ......................... 3-27
Clock .............................................................. 3-28
Light control switch ...................................... 3-29 Headlights ......................................................... 3-29
High/low beam change (dimmer) .................... 3-30
Headlight flasher ............................................... 3-30
Page 156 of 491
3-19
Instruments and controls
– CONTINUED –
ing a shutdown. "When the actual ambient temperature falls outside
the specified indicator range.Warning and indicator lights
Several of the warning and indicator lights come on
momentarily and then go out when the ignition switch
is initially turned to the “ON” position. This permits
checking the operation of the bulbs.
Apply the parking brake and turn the ignition switch to
the “ON” position. The following lights come on:
Seatbelt warning light
SRS airbag system warning light
CHECK ENGINE warning light/Malfunction indica- tor lamp
Charge warning light
Oil pressure warning light
AT OIL temperature warning light (AT vehicles)ABS warning light
Brake system warning light
If any lights fail to come on, it indicates a burned-out
bulb or a malfunction of the corresponding system.
Consult your authorized SUBARU dealer for repair. ! Seatbelt warning light and chime
When the ignition switch is turned to the “ON” position,
the seatbelt warning light will come on and the remind-
er chime will sound for about six seconds to remind the
Page 157 of 491

3-20
Instruments and controls
driver to fasten the seatbelt.
The seatbelt warning light remains on for about six
seconds and turns off automatically after six seconds.
The seatbelt reminder chime will turn off when the
driver’s side seatbelt is buckled or it will turn off auto-
matically after six seconds. !
SRS airbag system warning light
When the ignition switch is turned to the “ON” position,
the SRS airbag system warning light will come on for
about six seconds and go out. This shows the SRS air-
bag and SRS side airbag (if equipped) and seatbelt
pretensioners are in normal operation.
If this light comes on while driving or remains illuminat-
ed even after a period of about 6 seconds from when
the ignition has been turned on, it may indicate that the
SRS airbag system or SRS side airbag system (if
equipped) or seatbelt pretensioner system is not work-
ing properly. Contact your nearest SUBARU dealer
immediately. !
CHECK ENGINE warning light/
Malfunction indicator lamp
If the CHECK ENGINE light comes on while you
are driving, have your vehicle checked/repaired
by your SUBARU dealer as soon as possible.
Continued vehicle operation without having the
emission control system checked and repaired
as necessary could cause serious damage,
which may not be covered by your vehicle’s
warranty.
If this light comes on steadily or blinks while the engine
is running, it may indicate that there is a problem or po-
tential problem somewhere in the emission controlsystem. ! If the light comes on steadily:
If the light comes on steadily while driving or does not
go out after the engine starts, an emission control sys-
tem malfunction has been detected.
You should have your vehicle checked by an autho-
rized SUBARU dealer immediately.
Page 370 of 491

9-19
In case of emergency
– CONTINUED –
"Be sure to remove the towing hook after tow-
ing. Leaving the towing hook mounted on the
vehicle could interfere with proper operation of
the SRS airbag system in a frontal collision.
Rear towing hook:
To prevent deformation to the front bumper and
the towing hook, do not apply excessive lateral
load to the towing hook. Tie-down hooks:
1) Tie-down hook
2) Towing and tie-down hook
HS9018BA
1 1
2
1
HG9018BB