Page 73 of 189

72CONTROLS AND EQUIPMENTAfter the ignition is switched off, you have
to re-activate the rain sensor. To do this,
move the lever into position 0 and then back
again into position 1.
Warning
Do not use the windscreen washer
system at low temperatures, without
heating the windscreen beforehand.
Otherwise the window cleaner could
freeze on the windscreen and restrict
the view to the front.Headlight washer system*When the side lights, low beam or main
beam are switched on, the headlight lenses
are also washed every time the windscreen
is washed.
There is a time delay of about 3 second af-
ter operating the lever (position 5) before
the headlights are washed.
Stubborn dirt (such as insect residues)
should be removed from the headlight
lenses at regular intervals, for example
when refuelling.
In winter, also clean off any snow on the
washer nozzles or use de-icing spray to re-
move the ice to ensure proper operation.
Rear window� Intermittent wipe
Stalk in position 6.
The wiper operates every 6 seconds.
� Automatic wash/wipe*
Push down stalk away from steering wheel
into position 7. The washer system and the
wiper operate so long as the stalk remains
in this position.
Release stalk. The washer system no lon-
ger operates and the wiper performs a fur-
ther 1 to 3 sweeps (depending on the length
of the washing operation).
The stalk remains in position 6 after be-
ing released.
� Switching off intermittent wipe
Stalk in position 0.
Heating and ventilationControlsRotary control A - temperature selection
clockwise - increases heat output
anti-clockwise - decreases heat output
Rotary switch B - blower and shutting-
off air supply
The quantity of air which flows through the
heater is regulated with rotary switch B.
The air supply can be regulated in four
stages.
The blower is switched off in position 0. To
switch off the fresh air supply press button
D , see below. The air supply should only
be switched off for a short time as the win-
dows may mist up.
Page 82 of 189

81
CONTROLS AND EQUIPMENT
Variation from automatic modeThe automatic mode offers the ideal re-
quirements for the well-being of the occu-
pants of the car throughout all the seasons
of the year in practically all cases.
In individual situations, however, it may be
necessary to vary certain subfunctions of
the automatic mode by pressing individual
pushbuttons. In this case, the Climatronic
continues to operate automatically as be-
fore:�
The blower speed and thus the air quan-
tity can be increased or reduced by press-
ing pushbuttons 11 and 12. This is indicated
by an increase or reduction in the number
of dashes in position 2.
� When pushbutton 1 is pressed
- the ECON mode is switched off,
- the windshield and side windows can be defrosted or kept clear (direct vents 4 to
the side windows),
- the dehumidifying and defrosting effect on the windshield can be intensified. Note
To achieve
intensive demisting of the
windscreen, press button 1, set the blower
to maximum speed (button 12) and in-
crease the temperature by pressing button
16 until the display „HI“ appears. The air
vents for upper and lower body must be
closed (button 13 and 14). The air vents 3
must be closed - refer to p. 103. The recir-
culated air mode must be switched off -
button 10.
� The recirculated air mode is switched
on and off by pressing button 10. The sym-
bol 5 appears in the display.
The recirculated air mode prevents polluted
ambient air from entering the interior of the
car, for example when driving through a
tunnel or in congested traffic.
The recirculated air mode can also be se-
lected in order to warm up or cool down the
vehicle particularly rapidly. In this operat-
ing state, the air is drawn out of the interior
of the car and is heated or cooled, respec-
tively.
Warning
The recirculated air mode must only
be used for short periods as no fresh
air is supplied to the interior and the
windows may mist up.
Page 84 of 189

83
CONTROLS AND EQUIPMENT
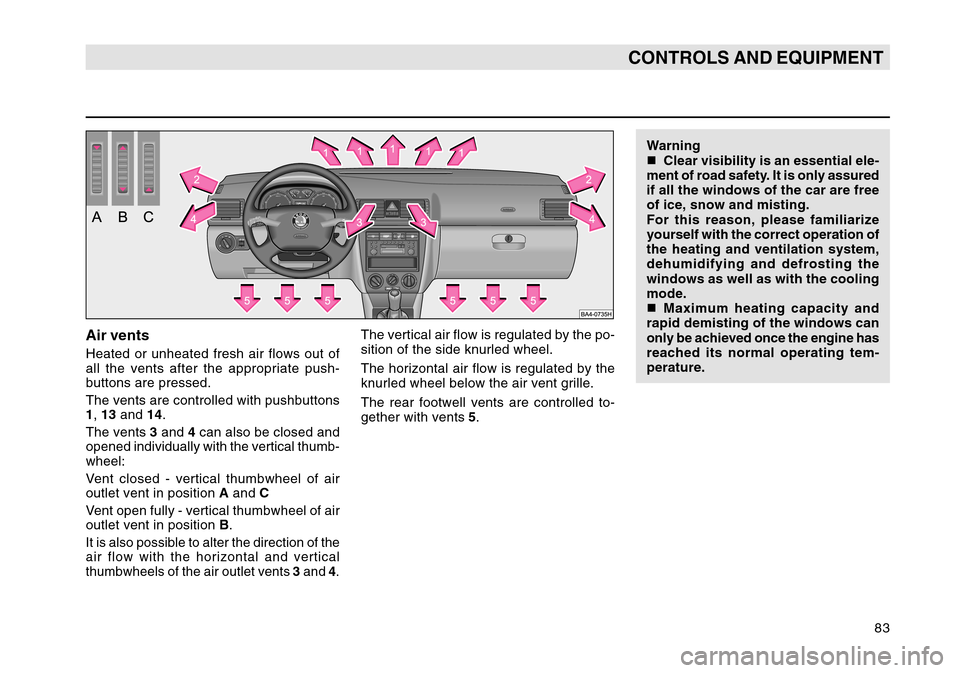
Air ventsHeated or unheated fresh air flows out of
all the vents after the appropriate push-
buttons are pressed.
The vents are controlled with pushbuttons
1, 13 and 14.
The vents 3 and 4 can also be closed and
opened individually with the vertical thumb-
wheel:
Vent closed - vertical thumbwheel of air
outlet vent in position A and C
Vent open fully - vertical thumbwheel of air
outlet vent in position B.It is also possible to alter the direction of the
air flow with the horizontal and vertical
thumbwheels of the air outlet vents 3 and 4.
The vertical air flow is regulated by the po-
sition of the side knurled wheel.
The horizontal air flow is regulated by the
knurled wheel below the air vent grille.
The rear footwell vents are controlled to-
gether with vents 5. Warning
�
Clear visibility is an essential ele-
ment of road safety. It is only assured
if all the windows of the car are free
of ice, snow and misting.
For this reason, please familiarize
yourself with the correct operation of
the heating and ventilation system,
dehumidifying and defrosting the
windows as well as with the cooling
mode.
� Maximum heating capacity and
rapid demisting of the windows can
only be achieved once the engine has
reached its normal operating tem-
perature.
Page 87 of 189

86CONTROLS AND EQUIPMENTConvenience systemWhen the car is locked, the roof can be
closed as follows:
�Turn key into lock position (driver or pas-
senger door) and hold until the roof is
closed. The closing operation is immedi-
ately interrupted if the key is released.
Warning
Close the sliding/tilting roof with
care! Closing the roof inattentively
can result in injuries.
Do not leave the ignition key in the
ignition lock when getting out of the
car.
The rollback protection is not active
if the convenience system is used.
Refer to p. 16 for more detailed in-
formation.
Emergency operationIf the system is faulty, the sliding/tilting roof
can be closed manually:
� Use a screwdriver to carefully remove
the plastic cover.
� Take crank handle out of its fixture, in-
sert fully into the opening and close or open
sliding/tilting roof.
� Insert crank handle into its fixture again
and fit on the plastic cover.
Sun visorsThe large sun visors can be taken out of
the side fixtures and swivelled toward the
doors. The small sun visor above the inte-
rior rear-view mirror* can only be folded
down.Sun visors with vanity lighting*The lighting of the vanity mirror comes on
automatically when the sun visor is folded
down.
Page 88 of 189

87
CONTROLS AND EQUIPMENT
Storage compartment on the
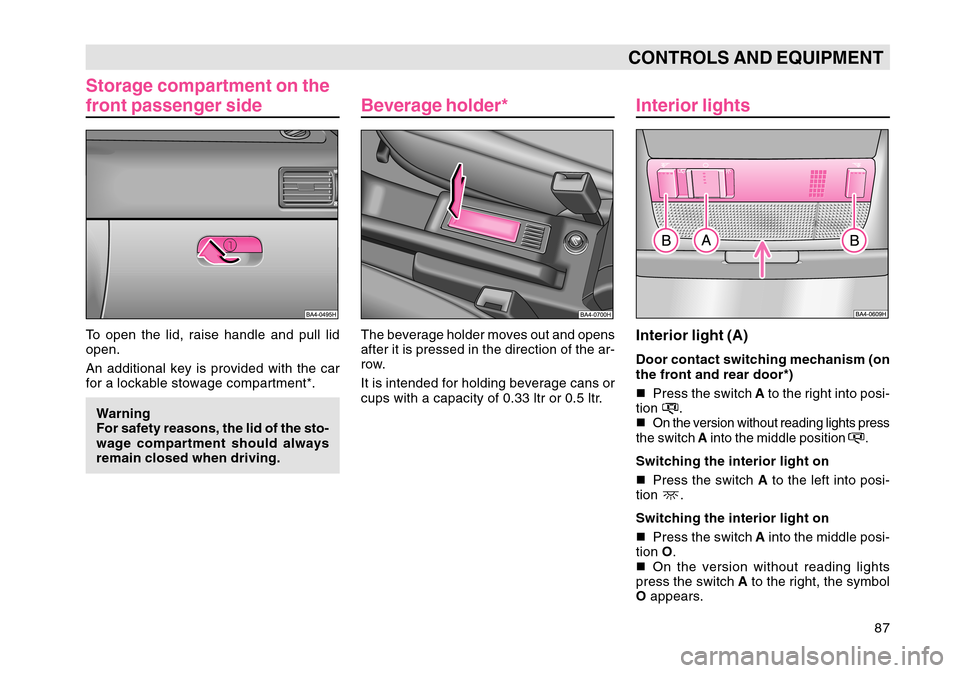
front passenger sideTo open the lid, raise handle and pull lid
open.
An additional key is provided with the car
for a lockable stowage compartment*.Warning
For safety reasons, the lid of the sto-
wage compartment should always
remain closed when driving.
Interior lightsInterior light (A)Door contact switching mechanism (on
the front and rear door*)
� Press the switch A to the right into posi-
tion
.
�
On the version without reading lights press
the switch A into the middle position
.
Switching the interior light on
� Press the switch A to the left into posi-
tion
.
Switching the interior light on
� Press the switch A into the middle posi-
tion O.
� On the version without reading lights
press the switch A to the right, the symbol
O appears.
Beverage holder*The beverage holder moves out and opens
after it is pressed in the direction of the ar-
row.
It is intended for holding beverage cans or
cups with a capacity of 0.33 ltr or 0.5 ltr.
Page 89 of 189

88CONTROLS AND EQUIPMENTNoteInterior lights with off time delay* remain on
for a few seconds after the doors are closed.On models fitted with central locking, the
interior light remains on for about 20 sec-
onds when the car is unlocked, a door is
opened or the ignition key is removed pro-
vided the switch is in the door contact po-
sition.
On an open door, the interior light is
switched off after 60 minutes, in order to
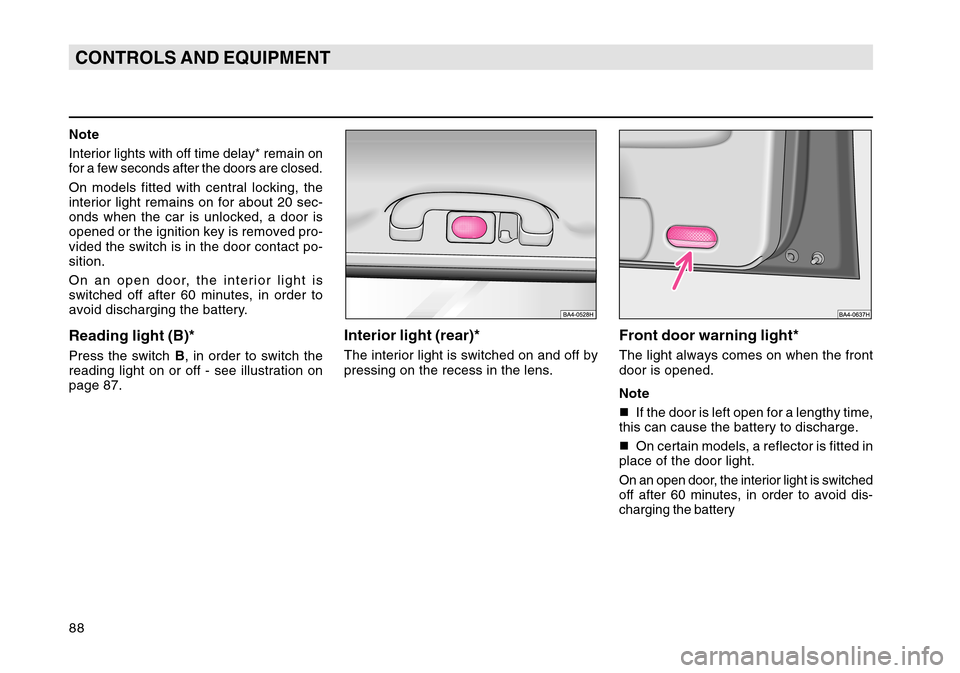
avoid discharging the battery.Reading light (B)*Press the switch B, in order to switch the
reading light on or off - see illustration on
page 87.
Interior light (rear)*The interior light is switched on and off by
pressing on the recess in the lens.
Front door warning light*The light always comes on when the front
door is opened.
Note
� If the door is left open for a lengthy time,
this can cause the battery to discharge.
� On certain models, a reflector is fitted in
place of the door light.On an open door, the interior light is switched
off after 60 minutes, in order to avoid dis-
charging the battery
Page 90 of 189

89
CONTROLS AND EQUIPMENT
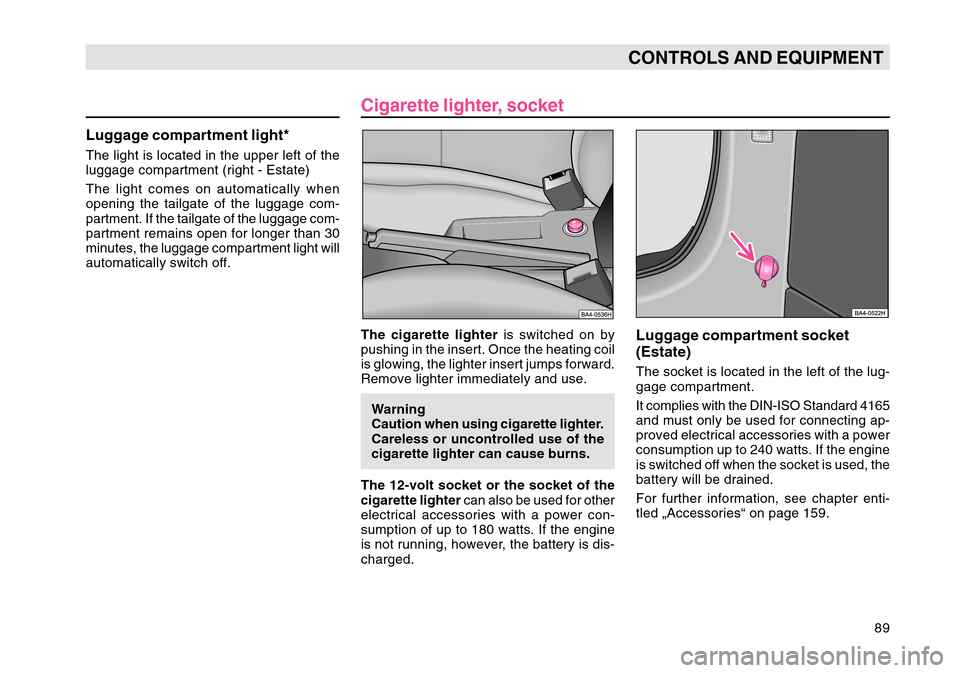
Cigarette lighter, socketThe cigarette lighter is switched on by
pushing in the insert. Once the heating coil
is glowing, the lighter insert jumps forward.
Remove lighter immediately and use.
Warning
Caution when using cigarette lighter.
Careless or uncontrolled use of the
cigarette lighter can cause burns.
The 12-volt socket or the socket of the
cigarette lighter can also be used for other
electrical accessories with a power con-
sumption of up to 180 watts. If the engine
is not running, however, the battery is dis-
charged.
Luggage compartment socket
(Estate)The socket is located in the left of the lug-
gage compartment.
It complies with the DIN-ISO Standard 4165
and must only be used for connecting ap-
proved electrical accessories with a power
consumption up to 240 watts. If the engine
is switched off when the socket is used, the
battery will be drained.
For further information, see chapter enti-
tled „Accessories“ on page 159.
Luggage compartment light*The light is located in the upper left of the
luggage compartment (right - Estate)
The light comes on automatically when
opening the tailgate of the luggage com-
partment. If the tailgate of the luggage com-
partment remains open for longer than 30
minutes, the luggage compartment light will
automatically switch off.
Page 91 of 189
90CONTROLS AND EQUIPMENT
AshtraysFront ashtray*The ashtray is located below the fold-open
lid. It is opened by pressing on the bottom
part of the lid.
Removing
Pull out ashtray in direction of arrow A.
Inserting
Insert ashtray straight into the guide and
press lightly in direction of arrow B.
The lid is closed by pressing lightly on the
bottom edge.
Rear ashtray*Removing
Open lid to the rear and pull out ashtray in
direction of arrow.
Inserting
Insert ashtray vertically and press it down
until it locks in place. Close lid.
A cup holder is provided on the inside of
the lid of the ashtray.
Warning
Never place flammable objects in the
ashtray - risk of fire!