Page 177 of 189
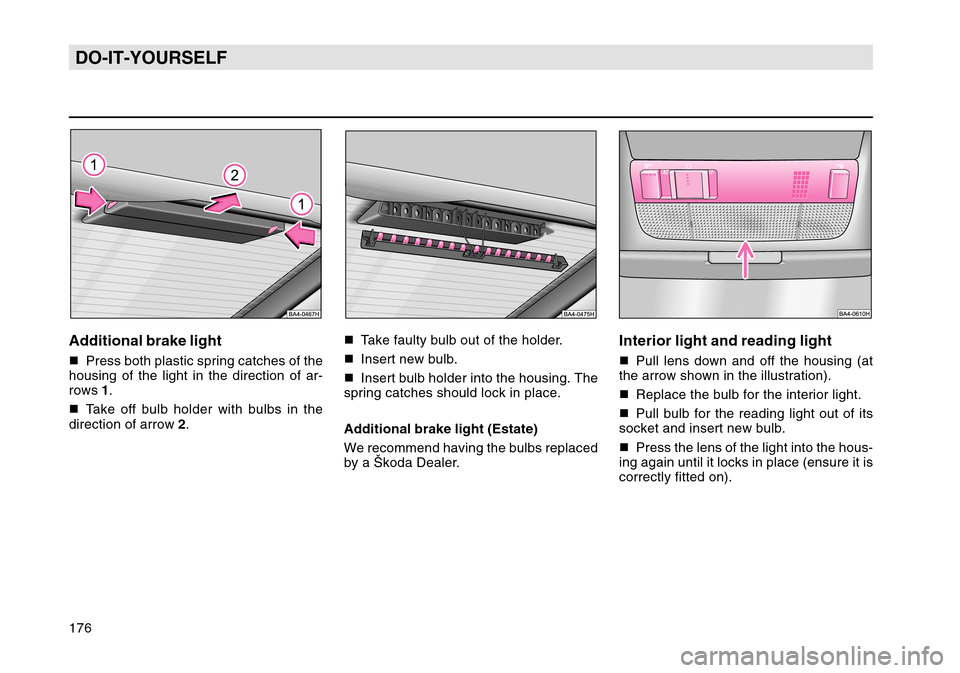
176DO-IT-YOURSELFAdditional brake light�Press both plastic spring catches of the
housing of the light in the direction of ar-
rows 1.
� Take off bulb holder with bulbs in the
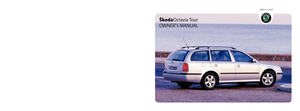
direction of arrow 2. �
Take faulty bulb out of the holder.
� Insert new bulb.
� Insert bulb holder into the housing. The
spring catches should lock in place.
Additional brake light (Estate)
We recommend having the bulbs replaced
by a Škoda Dealer.
Interior light and reading light� Pull lens down and off the housing (at
the arrow shown in the illustration).
� Replace the bulb for the interior light.
� Pull bulb for the reading light out of its
socket and insert new bulb.
� Press the lens of the light into the hous-
ing again until it locks in place (ensure it is
correctly fitted on).
Page 178 of 189
 Owners Manual 177
DO-IT-YOURSELF
Interior light (rear)*�Insert a screwdriver between light and
headlining - see arrow. Carefully press out
the light.
� Turn the socket in the rear of the light to
the left and take")
177
DO-IT-YOURSELF
Interior light (rear)*�Insert a screwdriver between light and
headlining - see arrow. Carefully press out
the light.
� Turn the socket in the rear of the light to
the left and take out.
� Pull faulty bulb out of the socket.
� Insert new bulb.
� Insert the socket again into the light and
turn fully to the right.
� Insert light first of all at the side oppo-
site the arrow and then press into the head-
lining.
Jump-startingIf the engine does not start because the
battery is discharged, it is possible to use
jump-start cables to start the car with the
battery of another vehicle. Pay attention to
the following points in this case:
� Both batteries should have a rated volt-
age of 12 V. The capacity (Ah) of the bat-
tery supplying the power must not be sig-
nificantly less than the capacity of the dis-
charged battery.
� Only jump-start cables with an ad-
equately large cross-section should be
used. Pay attention to the instructions of
the cable manufacturer.
� We recommend purchasing the jump-
start cable as a Genuine Škoda Accessory
or in sales outlets of the battery manufac-
turer.
� Use only jump-start cables with insulated
clamps. A discharged battery may already freeze
if there is only slight frost. Before con-
necting the jump-start cables, it is es-
sential to thaw out a frozen battery oth-
erwise it might explode.
�
Run the engine of the vehicle supplying
the current.
� It is essential to connect the jump-start
cables in the following sequence:
1. One end of the ( +) cable (usually red) to
the ( +) terminal of the discharged battery.
2. Other end of the red ( +) cable to the ( +)
terminal of the battery supplying the cur-
rent.
3. One end of the ( -) cable (usually black)
to the ( -) terminal of the battery supplying
the current.
4. Other end of the black ( -) cable to a solid
metal part bolted to engine block or to the
engine block itself.
Page 179 of 189
 Owners Manual 178DO-IT-YOURSELFA - Discharged battery
B - Battery supplying current
Warning
Do not connect the cable to the nega-
tive terminal (-) of the discharged
battery. This can produce sparks
when the engin")
178DO-IT-YOURSELFA - Discharged battery
B - Battery supplying current
Warning
Do not connect the cable to the nega-
tive terminal (-) of the discharged
battery. This can produce sparks
when the engine is started which
might ignite the gas flowing out of
the battery.
Do not affix the cable end 4 to parts
of the fuel and brake system. Warning
�
The non-insulated parts of the ca-
ble clamps must not touch one an-
other on any account. In addition, the
jump-start cable attached to the posi-
tive terminal of the battery must not
come into contact with electrically
conducting parts of the vehicle - risk
of short circuit!
� Route the jump-start cables so
that they cannot come into contact
with rotating parts in the engine com-
partment.
� Do not bend over the batteries -
risk of acid burns!
� Keep sources of ignition (naked
flames, burning cigarettes etc.) well
away from the battery - risk of explo-
sion!
� Start the engine as described in the sec-
tion „Starting engine“.
� If the engine does not start right away,
do not crank the starter for more than 10
seconds and then wait about 30 seconds
before making a further attempt.
� Once the engine is running, disconnect
both cables in exactly the reverse order.
Tow-starting/towingThe towing eyes are located at the rear right
below the bumper and at the front - see
arrow.
A tow rope or tow bar should be attached
only to these towing eyes.
� Remove a ventilation grille before using
the front towing eye. Ventilation grille is held
in place with plastic spring catches in the
area of the arrow. Ventilation grille can be
removed by hand.
� Grasp the top part of the grille, press
grille off in direction of arrow 1 and take out
in direction of arrow 2.
� After using the towing eye, insert the
ventilation grille into the guides and press
on.
Page 180 of 189
 Owners Manual 179
DO-IT-YOURSELF
It is not recommended to tow-start the
vehicle (despite observing the instruc-
tions which are given in the Owner’s
Manual) in view of the fact that severe
engine damage may resul")
179
DO-IT-YOURSELF
It is not recommended to tow-start the
vehicle (despite observing the instruc-
tions which are given in the Owner’s
Manual) in view of the fact that severe
engine damage may result in certain cir-
cumstances.
It is best to attempt to start the engine
by using jump-starting cables - refer to
page 177 of the Owner’s Manual - or to
call on the services of SERVICE Mobil.
General information
�The tow rope should be elastic so that
there is no strain on either vehicle. It is best
to use only plastic fibre ropes or ropes
made of a similarly elastic material. It is
important to ensure that no impermissible
pulling forces and no sudden shock loads
occur. If attempting to tow a car which is
not on a paved road, there is always a risk
of the parts of the car to which the tow rope
is attached being subjected to excessive
stress and damaged.
� Before attempting to start the engine
by tow-starting the car, always use the
battery of another vehicle as a jump-
starting aid if possible - see page 177. It is essential to pay attention to the follo-
wing points when tow-starting and to-
wing the car:
�
Observe any legal regulations regarding
towing another vehicle.
� Both drivers should be acquainted with
the special features of towing a vehicle.
Persons not familiar with towing a vehicle
should not attempt to tow-start or tow a car.
� If a tow rope is used, the driver of the
towing vehicle should engage the clutch
particularly softly when moving off and shift-
ing gears.
� The driver of the towed car should en-
sure that the tow rope is always taught. �
The ignition of the towed car should be
switched on so that the steering wheel is
not blocked and the turn signal lights, the
windscreen wipers, horn, lights and other
electrical components can be switched on.
� As the brake servo unit only operates
when the engine is running, note that suffi-
ciently greater force is required to depress
the brake pedal when the engine is not run-
ning and the steering is also much more
difficult to operate.
For technical reasons, it is not possible
to tow-start a car fitted with an automatic
gearbox.
In the event of a defect in the gearbox,
your vehicle no longer contains lubri-
cant, the car must be towed with the
driving wheels lifted or on a special
transporter or trailer.
Page 181 of 189
 Owners Manual 180DO-IT-YOURSELFAdditional points for the driver of the to-
wed vehicle to note during tow-starting:
�Before starting to tow the car, engage
3rd or 4th gear, depress clutch pedal and
hold. The igniti")
180DO-IT-YOURSELFAdditional points for the driver of the to-
wed vehicle to note during tow-starting:
�Before starting to tow the car, engage
3rd or 4th gear, depress clutch pedal and
hold. The ignition should be switched on.
� Once both vehicles are moving, release
the clutch pedal.
� As soon as the engine has started, de-
press clutch pedal and take the car out of
gear to avoid running into the towing vehi-
cle.
� If your car is fitted with a catalytic con-
verter, the engine must not be started by
towing the car over a distance of more
than 50 m (150 ft) if the catalytic con-
verter is warm otherwise uncombusted
fuel may get into the catalytic converter
and cause damage. Pay attention to the following points if
towing a car fitted with an automatic
gearbox:
�
Move the shift lever into position „N“.
� The maximum towing speed is 50 km/h
(30 mph).
� The maximum towing distance is 50 km
(30 miles)!
� If the car has to be towed over a greater
distance, the front wheels should be raised
clear of the ground.
The gear oil pump does not operate when
the engine is not running; consequently, the
gearbox is not sufficiently lubricated when
running at high speeds and over lengthy
distances.
� If the car is towed by a tow truck, the front
wheels should always be raised clear of the
ground.
If the rear wheels are raised clear of the
ground, the drive shafts will rotate in the
opposite direction. As a result, the gears in
the automatic gearbox will run at such high
speeds that the gearbox could suffer se-
vere damage within a short time.
Page 182 of 189
 Owners Manual 181
TECHNICAL DATA
Vehicle identification data
The vehicle identification number
(chassis number)is stamped in the rear cross panel of the
engine compartment. It is visible through a
window in the ple")
181
TECHNICAL DATA
Vehicle identification data
The vehicle identification number
(chassis number)is stamped in the rear cross panel of the
engine compartment. It is visible through a
window in the plenum chamber cover.
This number is also shown in the left cor-
ner of the windscreen.The engine numberis stamped on the engine block.Identification plateis located in the front of the engine com-
partment at the left suspension strut dome.Homologation plate*is located on the front lock panel.
Vehicles for certain countries are not pro-
vided with a homologation plate.
Vehicle data stickeris located below the floor covering of the
luggage compartment. The sticker contains the following vehicle
data:
1 - Vehicle identification number
2 - Vehicle model
3 - Engine output/Gearbox/
Engine code letters/Gearbox code
letters
Paint number/Interior equipment
number
4 - Optional equipment number.
The vehicle data are also stated in the Serv-
ice Schedule.
Sticker on fuel filler flapA sticker is affixed to the inside of the fuel
filler flap, and contains the following infor-
mation:
- approved fuel specification
- tyre inflation pressures
- tyre sizes.
Page 183 of 189
 Owners Manual 182ALPHABETICAL INDEX4x4 models, 123AABS, 60, 122
Accessories, 159- Changes and replacement ofparts, 159
Accumulator, 146
Acoustic signals, 46
Adjustable steering wheel, 43
Adjusting, - Seats, 19
- Se")
182ALPHABETICAL INDEX4x4 models, 123AABS, 60, 122
Accessories, 159- Changes and replacement ofparts, 159
Accumulator, 146
Acoustic signals, 46
Adjustable steering wheel, 43
Adjusting, - Seats, 19
- Seat belt height, 100
- Headlamp beam, 66
Air conditioning system, 75
Air outlet vents, 73, 76, 83
Airbag system, 56, 103
Airbag, 103
Alarm, 13
Anti-theft alarm system, 13
Armrest, 36
Ashtrays, 90
Automatic air conditioning, 79
Automatic gearbox, 39
Automatic vehicle wash systems, 130
Automatic wipe/wash, 71BBalancing wheels, 154
Battery - charging, 61 Battery - recharging, 149
Battery, 146
Beverage holder, 87
Beverages, 87
Bonnet, 135
- Opening, 135
- Closing, 135
Brake Assist, 121
Brake booster, 121
Brake fluid level, 144
Brake fluid, 61, 144
Brake fluid, 61, 144
Brake pad, 58
Brake system, 61, 120, 121, 122, 123, 144
Brakes, 61, 120, 121, 122, 123, 144
Breakdown assistance, 161
Bulbs, 60, 161, 170
CCavity protection, 134
CD changer, 31
Central locking, 8 - Opening a single door, 9
Cigarette lighter, 89
Climatronic, 79
Clock, 50
Cockpit, 5
Coming home, 67
Convenience operation, 10, 16, 86
Coolant level, 143 Coolant temperature, 48
Coolant, 48, 58, 142
Coolant, 48, 58, 142
Cooling, 142
Cruise control system, 68
DDefrosting windows, 63, 73, 76
Diesel engines, 46
Diesel, 128
Digital clock, 50
Disc wheels, 133
- Steel wheels, 133
- Light-alloy wheels, 133
Door and window seals, 132
Door, 8
Driving abroad, 158
Driving economically and in an environmentally
Dust, noise and pollen filter, 152EEDL, 61, 122
Electric sliding/tilting roof, 85
Electrical power windows, 15
Electrically adjustable seats , 20
Engine - starting, 44
Engine - switching off, 46
Engine compartment, 135
Engine electronics, 57, 60
Page 184 of 189
 Owners Manual 183
ALPHABETICAL INDEX
Engine oil, 138- Specification, 138
Engine oil, 59, 118, 138
Engine oil, 59, 119, 138
EPC, 57, 60
ESP, 60, 64
Exterior mirror, 16FFault display, 50
Fire extinguisher, 166
First-")
183
ALPHABETICAL INDEX
Engine oil, 138- Specification, 138
Engine oil, 59, 118, 138
Engine oil, 59, 119, 138
EPC, 57, 60
ESP, 60, 64
Exterior mirror, 16FFault display, 50
Fire extinguisher, 166
First-aid box, 161
Fog lights, 57, 63
Fog lights, 63
Four-wheel drive models, 123
Fresh air, 78
Friendly way, 118
Front airbag, 103
Front passenger airbag switch, 107
Fuel consumption, 119
Fuel reserve, 49, 58
Fuel, 49, 58, 65, 119, 128
Fuses, 167HHandbrake, 36
Hands-free system, 37
Hazard warning light system, 63
Hazard warning light system, 63
Head restraints, 18, 95
- Adjusting head restraints, 18, 95 - Adjusting height, 18, 95
Headlamp beam adjustment, 66
Headlight flasher, 5
Headlight flasher, 67
Headlights - masking over, 158
Heating, 72
Hydraulic oil, 141
CHChild safety locks, 8
Child safety, 111
Child seat, 111
Chrome parts, 132IIdentification data, 181
Ignition lock, 43 - Steering lock, 44
Immobiliser, 7, 61
Indicators, 48
Information display, 53
Instrument lighting, 62
Interior light, 87
Interior lights, 88
Interlock, 101
ISOFIX system, 116
Isofix, 116JJump-starting, 177
KKeys, 6LLashing eyes, 29
Lights, 62 - Warning lights, 56
- Parking lights, 67
- Turn signal lights, 67
- Changing a bulb, 169
Loading area cover, 32
Loading area increased (Estate), 32
Locking the car, 8
Low beam, 62
Low beam, 62
Luggage compartment cover (Estate), 32
Luggage compartment cover, 26
Luggage compartment lights, 89
Luggage compartment, 11, 27MManual shifting of gears, 38
Mobile phone, 37, 159
Mobile phones and two-way radio systems, 159
MSR, 123
Multifunction display (MFD), 50
Multifunction steering wheel, 70
Multifunction switch, 67
 1
1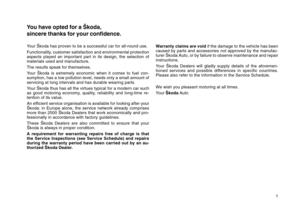 2
2 3
3 4
4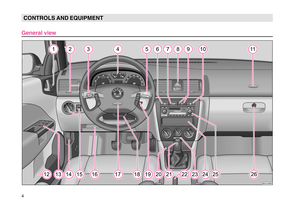 5
5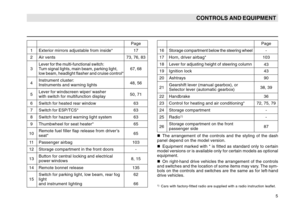 6
6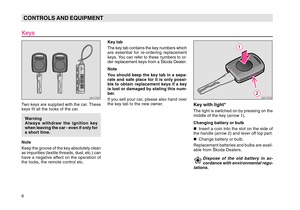 7
7 8
8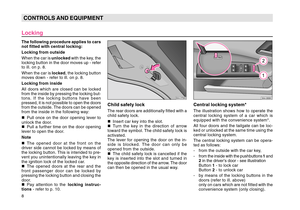 9
9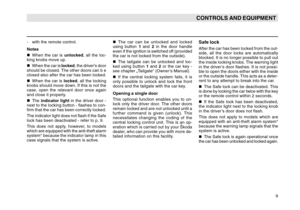 10
10 11
11 12
12 13
13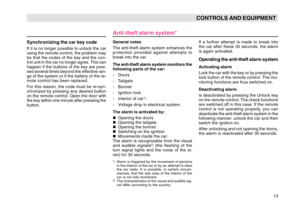 14
14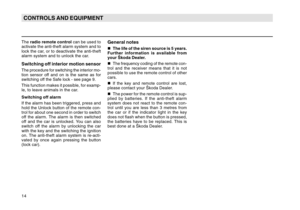 15
15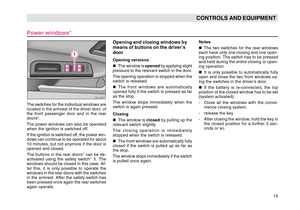 16
16 17
17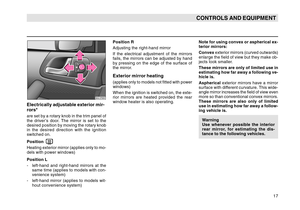 18
18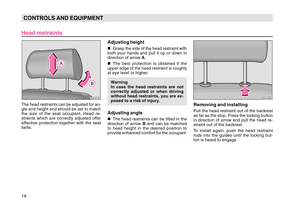 19
19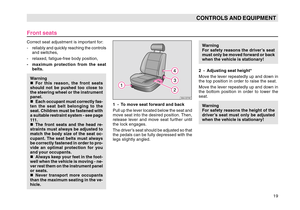 20
20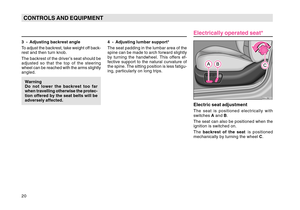 21
21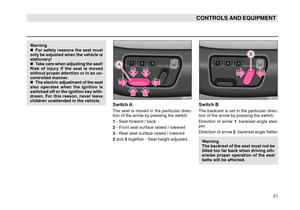 22
22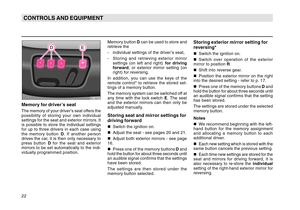 23
23 24
24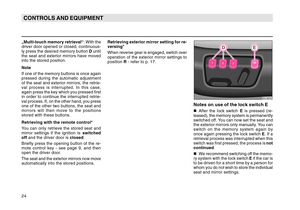 25
25 26
26 27
27 28
28 29
29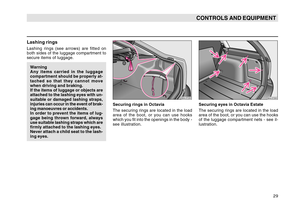 30
30 31
31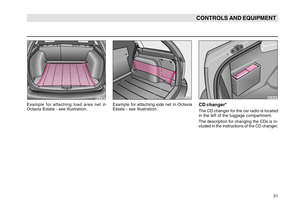 32
32 33
33 34
34 35
35 36
36 37
37 38
38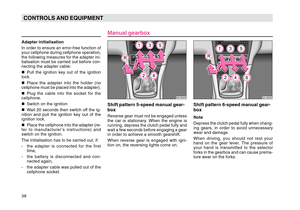 39
39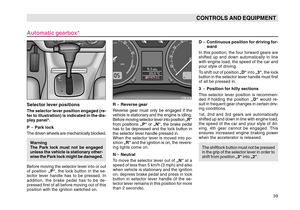 40
40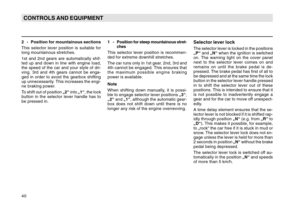 41
41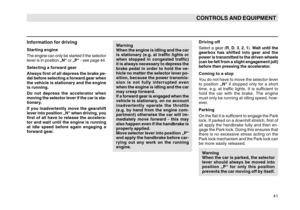 42
42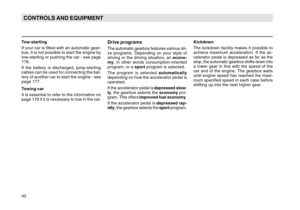 43
43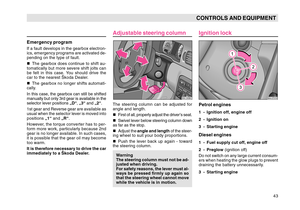 44
44 45
45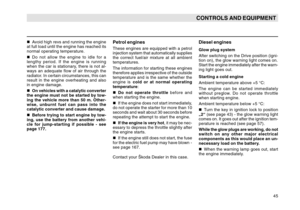 46
46 47
47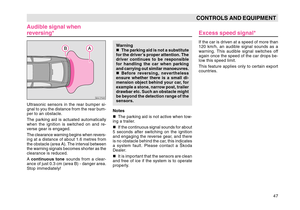 48
48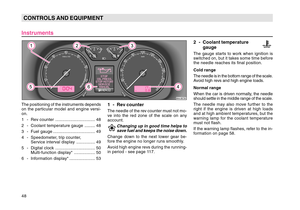 49
49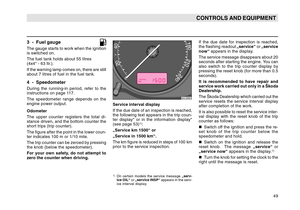 50
50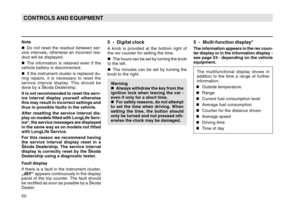 51
51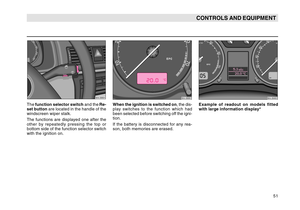 52
52 53
53 54
54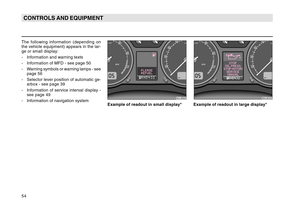 55
55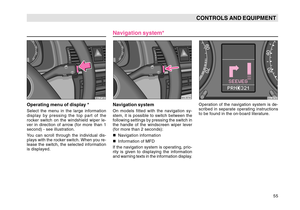 56
56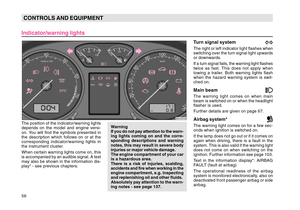 57
57 58
58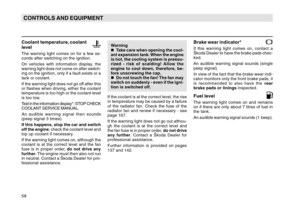 59
59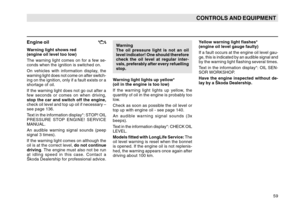 60
60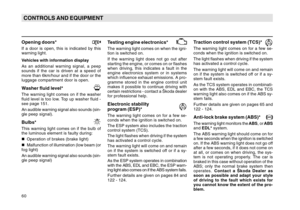 61
61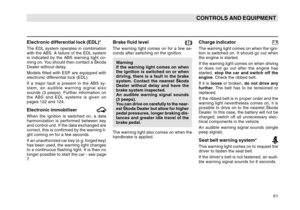 62
62 63
63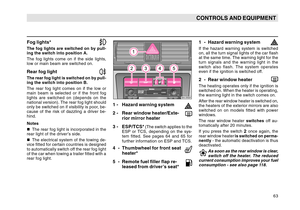 64
64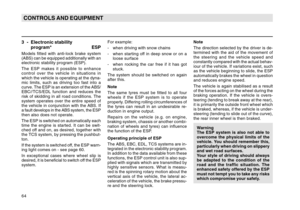 65
65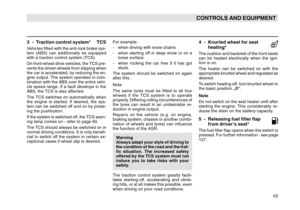 66
66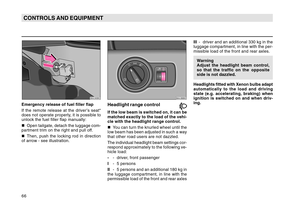 67
67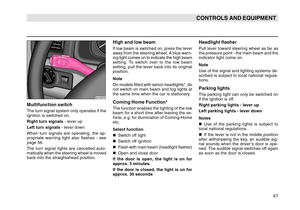 68
68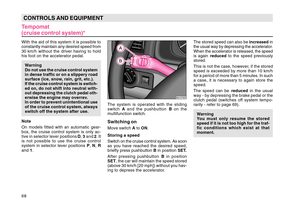 69
69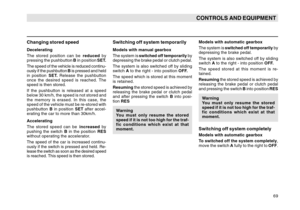 70
70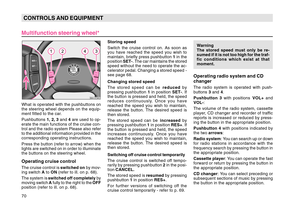 71
71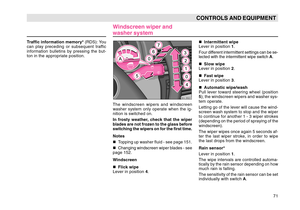 72
72 73
73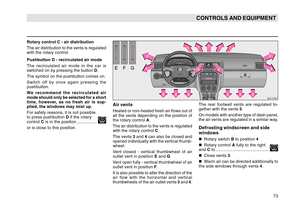 74
74 75
75 76
76 77
77 78
78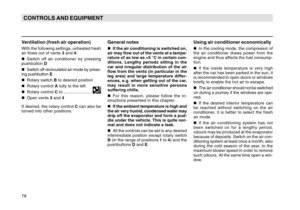 79
79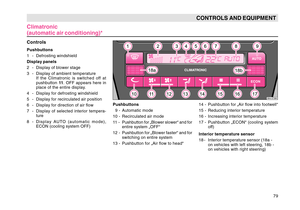 80
80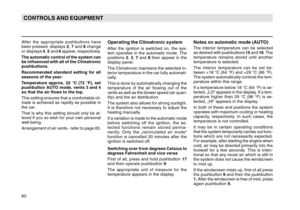 81
81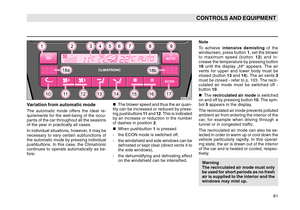 82
82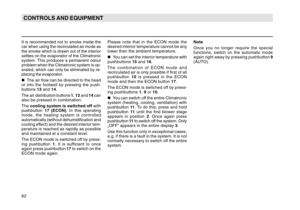 83
83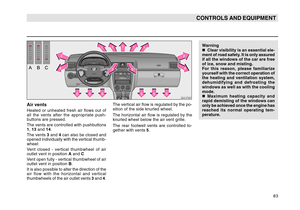 84
84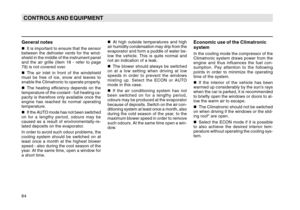 85
85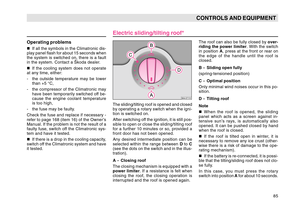 86
86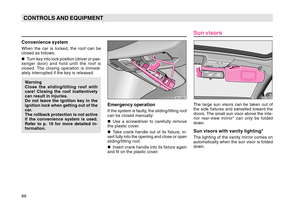 87
87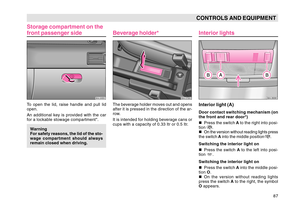 88
88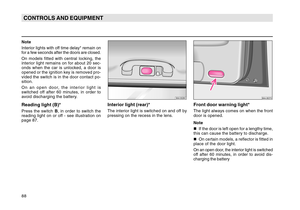 89
89 90
90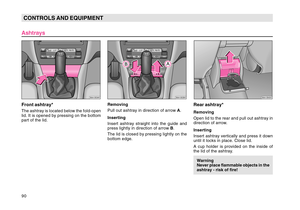 91
91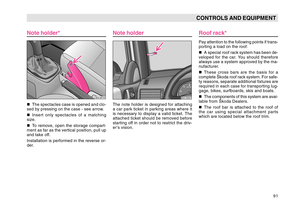 92
92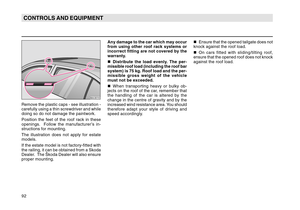 93
93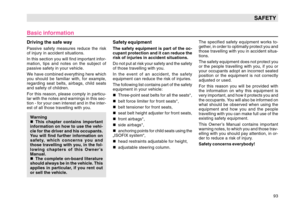 94
94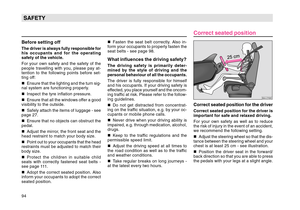 95
95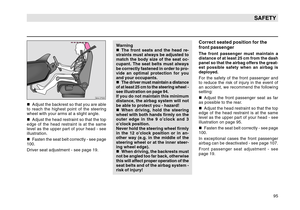 96
96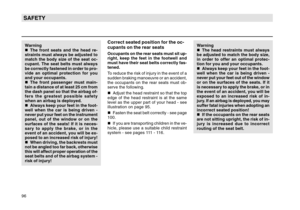 97
97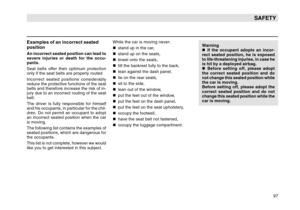 98
98 99
99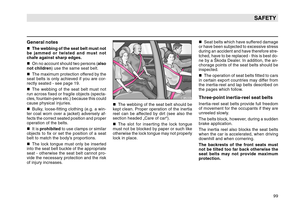 100
100 101
101 102
102 103
103 104
104 105
105 106
106 107
107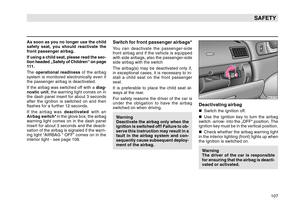 108
108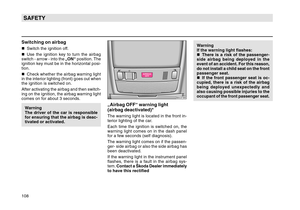 109
109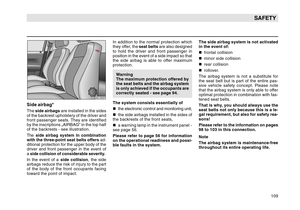 110
110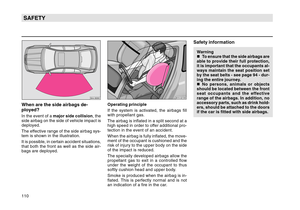 111
111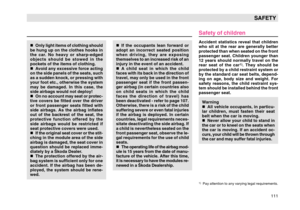 112
112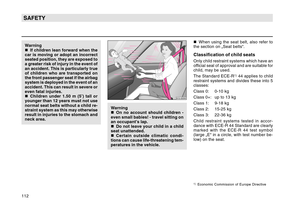 113
113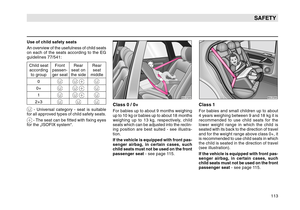 114
114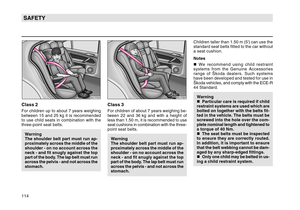 115
115 116
116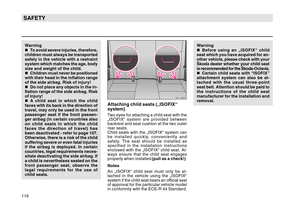 117
117 118
118 119
119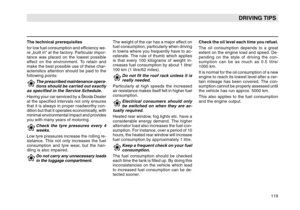 120
120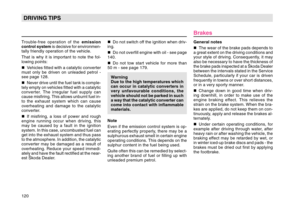 121
121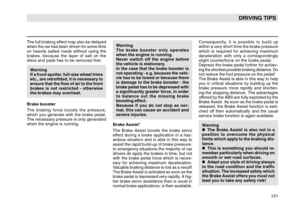 122
122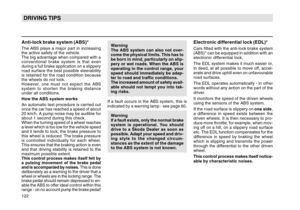 123
123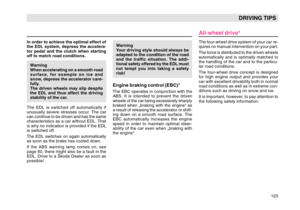 124
124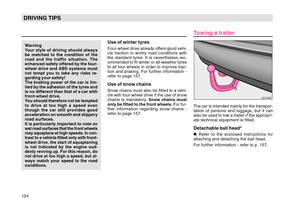 125
125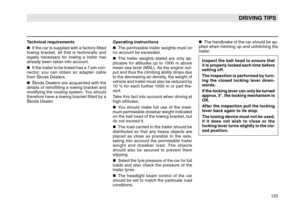 126
126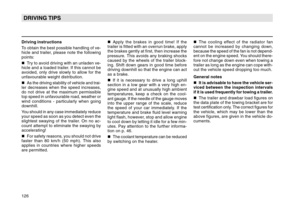 127
127 128
128 129
129 130
130 131
131 132
132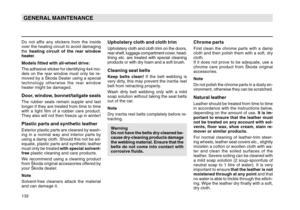 133
133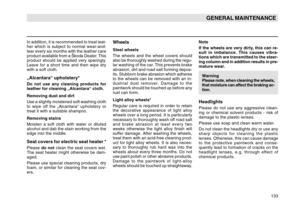 134
134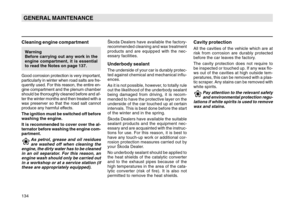 135
135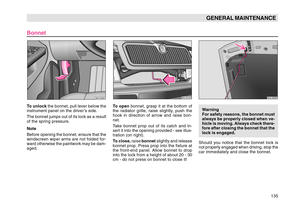 136
136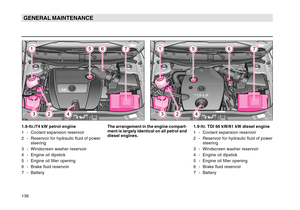 137
137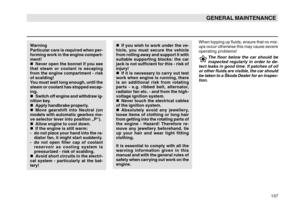 138
138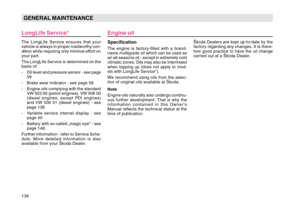 139
139 140
140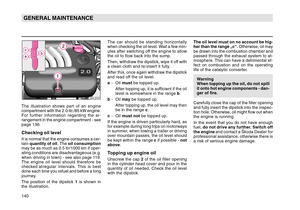 141
141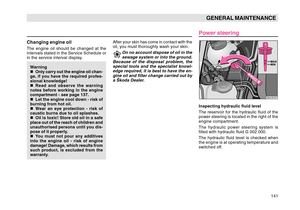 142
142 143
143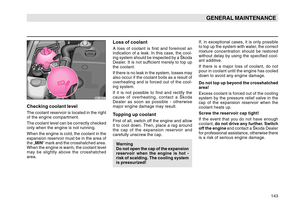 144
144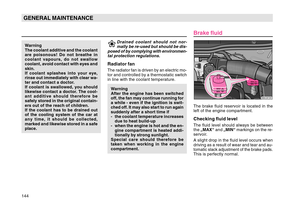 145
145 146
146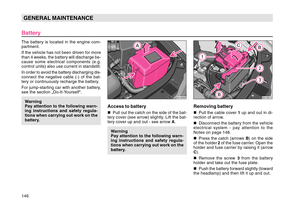 147
147 148
148 149
149 150
150 151
151 152
152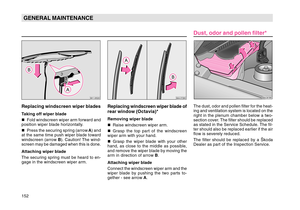 153
153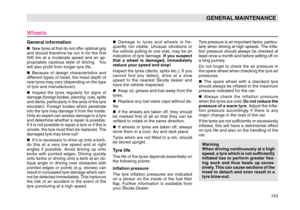 154
154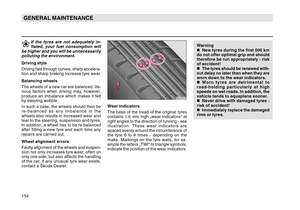 155
155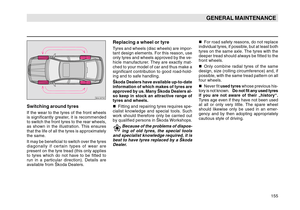 156
156 157
157 158
158 159
159 160
160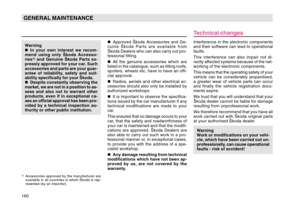 161
161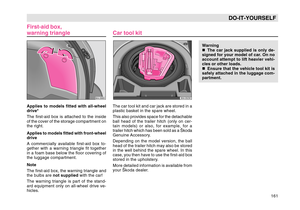 162
162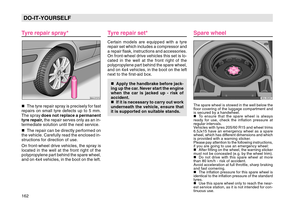 163
163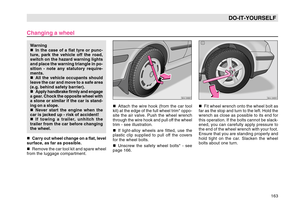 164
164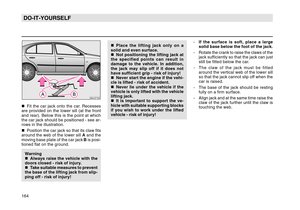 165
165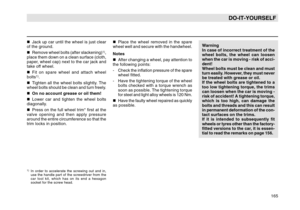 166
166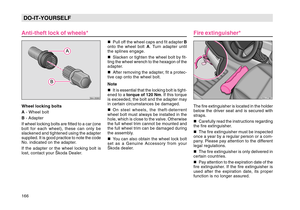 167
167 168
168 169
169 170
170 171
171 172
172 173
173 174
174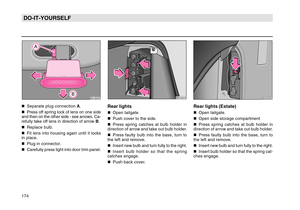 175
175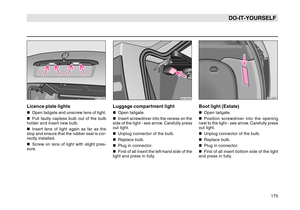 176
176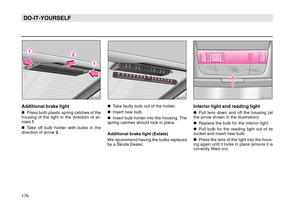 177
177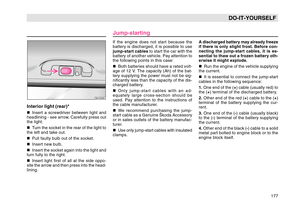 178
178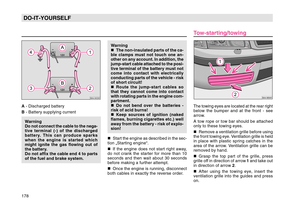 179
179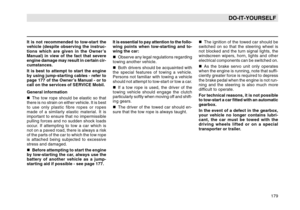 180
180 181
181 182
182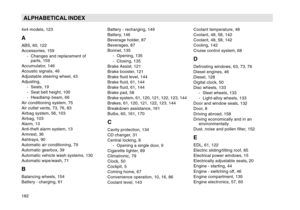 183
183 184
184 185
185 186
186 187
187 188
188