Page 19 of 189
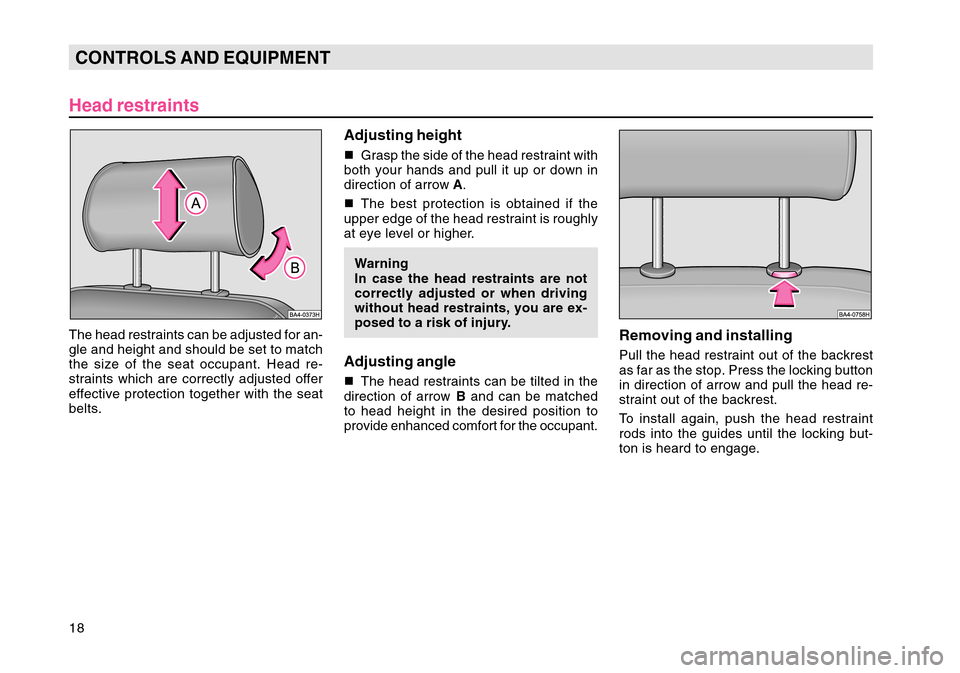
18CONTROLS AND EQUIPMENTThe head restraints can be adjusted for an-
gle and height and should be set to match
the size of the seat occupant. Head re-
straints which are correctly adjusted offer
effective protection together with the seat
belts.Head restraints
Adjusting height�Grasp the side of the head restraint with
both your hands and pull it up or down in
direction of arrow A.
� The best protection is obtained if the
upper edge of the head restraint is roughly
at eye level or higher.
Warning
In case the head restraints are not
correctly adjusted or when driving
without head restraints, you are ex-
posed to a risk of injury.Adjusting angle� The head restraints can be tilted in the
direction of arrow B and can be matched
to head height in the desired position to
provide enhanced comfort for the occupant.
Removing and installingPull the head restraint out of the backrest
as far as the stop. Press the locking button
in direction of arrow and pull the head re-
straint out of the backrest.
To install again, push the head restraint
rods into the guides until the locking but-
ton is heard to engage.
Page 20 of 189

19
CONTROLS AND EQUIPMENT
Front seatsCorrect seat adjustment is important for:
- reliably and quickly reaching the controlsand switches,
- relaxed, fatigue-free body position,
- maximum protection from the seat belts.
Warning
� For this reason, the front seats
should not be pushed too close to
the steering wheel or the instrument
panel.
� Each occupant must correctly fas-
ten the seat belt belonging to the
seat. Children must be fastened with
a suitable restraint system - see page
111 .
� The front seats and the head re-
straints must always be adjusted to
match the body size of the seat oc-
cupant. The seat belts must always
be correctly fastened in order to pro-
vide an optimal protection for you
and your occupants.
� Always keep your feet in the foot-
well when the vehicle is moving - ne-
ver rest them on the instrument panel
or seats.
� Never transport more occupants
than the maximum seating in the ve-
hicle.
1 - To move seat forward and back
Pull up the lever located below the seat and
move seat into the desired position. Then,
release lever and move seat further until
the lock engages.
The driver’s seat should be adjusted so that
the pedals can be fully depressed with the
legs slightly angled. Warning
For safety reasons the driver’s seat
must only be moved forward or back
when the vehicle is stationary!
2 - Adjusting seat height*
Move the lever repeatedly up and down in
the top position in order to raise the seat.
Move the lever repeatedly up and down in
the bottom position in order to lower the
seat. Warning
For safety reasons the height of the
driver’s seat must only be adjusted
when the vehicle is stationary!
Page 21 of 189
20CONTROLS AND EQUIPMENT3 - Adjusting backrest angle
To adjust the backrest, take weight off back-
rest and then turn knob.
The backrest of the driver’s seat should be
adjusted so that the top of the steering
wheel can be reached with the arms slightly
angled.Warning
Do not lower the backrest too far
when travelling otherwise the protec-
tion offered by the seat belts will be
adversely affected.
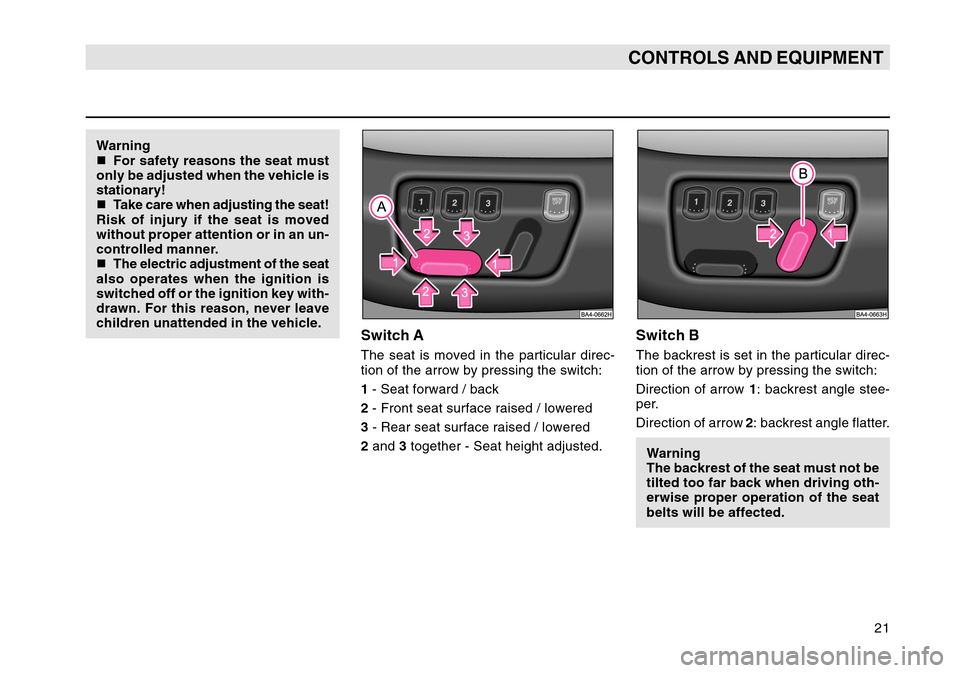
Electrically operated seat*Electric seat adjustmentThe seat is positioned electrically with
switches A and B.
The seat can also be positioned when the
ignition is switched on.
The backrest of the seat is positioned
mechanically by turning the wheel C.
4 - Adjusting lumbar support*
The seat padding in the lumbar area of the
spine can be made to arch forward slightly
by turning the handwheel. This offers ef-
fective support to the natural curvature of
the spine. The sitting position is less fatigu-
ing, particularly on long trips.
Page 22 of 189
21
CONTROLS AND EQUIPMENT
Warning
�For safety reasons the seat must
only be adjusted when the vehicle is
stationary!
� Take care when adjusting the seat!
Risk of injury if the seat is moved
without proper attention or in an un-
controlled manner.
� The electric adjustment of the seat
also operates when the ignition is
switched off or the ignition key with-
drawn. For this reason, never leave
children unattended in the vehicle.
Switch AThe seat is moved in the particular direc-
tion of the arrow by pressing the switch:
1 - Seat forward / back
2 - Front seat surface raised / lowered
3 - Rear seat surface raised / lowered
2 and 3 together - Seat height adjusted.
Switch BThe backrest is set in the particular direc-
tion of the arrow by pressing the switch:
Direction of arrow 1: backrest angle stee-
per.
Direction of arrow 2: backrest angle flatter.
Warning
The backrest of the seat must not be
tilted too far back when driving oth-
erwise proper operation of the seat
belts will be affected.
Page 27 of 189
26CONTROLS AND EQUIPMENTFolding rear seat back�First of all, insert head restraints into the
backrest.
� Then, fold back rear seat backrest until
it locks in position - pull as a check. Fold
back seat into its original position.
Note
After folding back the seat cushion and the
rear seat backrests, the seat belt buckles
and the lap belt should be in their original
position - they should be ready for use.
Warning
The backrests of the rear seat should
be properly locked to ensure that no
objects can slip forward out of the
luggage compartment into the inte-
rior of the car during a sudden appli-
cation of the brakes.
Luggage compartment coverWarning
No objects should be carried on the
luggage compartment cover. These
may result in injuries to occupants
in the event of a sudden application
of the brakes or an accident.
In addition, the heater elements of the rear
window may be damaged by objects rub-
bing against them.
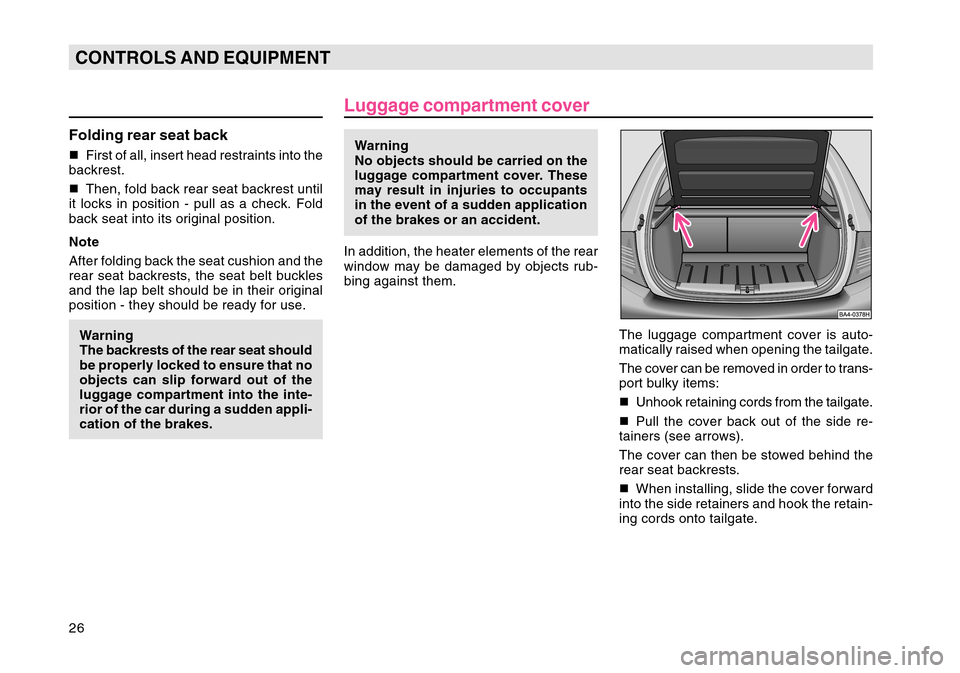
The luggage compartment cover is auto-
matically raised when opening the tailgate.
The cover can be removed in order to trans-
port bulky items:
�Unhook retaining cords from the tailgate.
� Pull the cover back out of the side re-
tainers (see arrows).
The cover can then be stowed behind the
rear seat backrests.
� When installing, slide the cover forward
into the side retainers and hook the retain-
ing cords onto tailgate.
Page 28 of 189
27
CONTROLS AND EQUIPMENT
Luggage compartmentTo ensure proper handling of your car, al-
ways distribute any load which you carry
(passengers and luggage).
Heavy objects should be transported as
close as possible to the rear suspension,
or even better between the front and rear.
In addition, please ensure that the heater
elements of the rear window are not dam-
aged by objects rubbing against them.
In the event of an accident, there is such a
high kinetic energy, which is produced by
small and light objects that they can cause
severe injuries.
The magnitude of the kinetic energy de-
pends on the speed at which the vehicle is
travelling and on the weight of the object.
The speed at which the vehicle is travel-
ling is in this case the more significant fac-
tor.
Example: In the event of a frontal collision
at a speed of 50 km/h, an unsecured ob-
ject with a weight of 4.5 kg produces an
energy, which corresponds to 20 times its
own weight.
This means that it results in a weight of
approx. 90 kg.
You can imagine the injuries that can oc-
cur, if this „bullet“ is flying through the inte-
rior compartment and hits an occupant.Warning
�
Store the objects in the luggage
compartment and attach them to the
lashing eyes.
�
Loose objects in the passenger
compartment can be thrown forward
during a sudden manoeuvre or in case
of an accident and they can injure the
occupants or other oncoming traffic.
This risk is still increased, if the ob-
jects, which are flying around, are hit
by a deployed airbag.
In this case, the objects, which are
thrown back, can injure the occu-
pants - hazard! �
Never drive with the tailgate ajar
or even open otherwise exhaust
gases will be drawn into the interior!
� Please note that when you trans-
port heavy items, this results in a
change in the centre of gravity of the
vehicle and thus affects the handling.
You should therefore adjust your
style of driving and speed to match,
and also alter the setting of the head-
lights, if necessary.
Page 30 of 189
29
CONTROLS AND EQUIPMENT
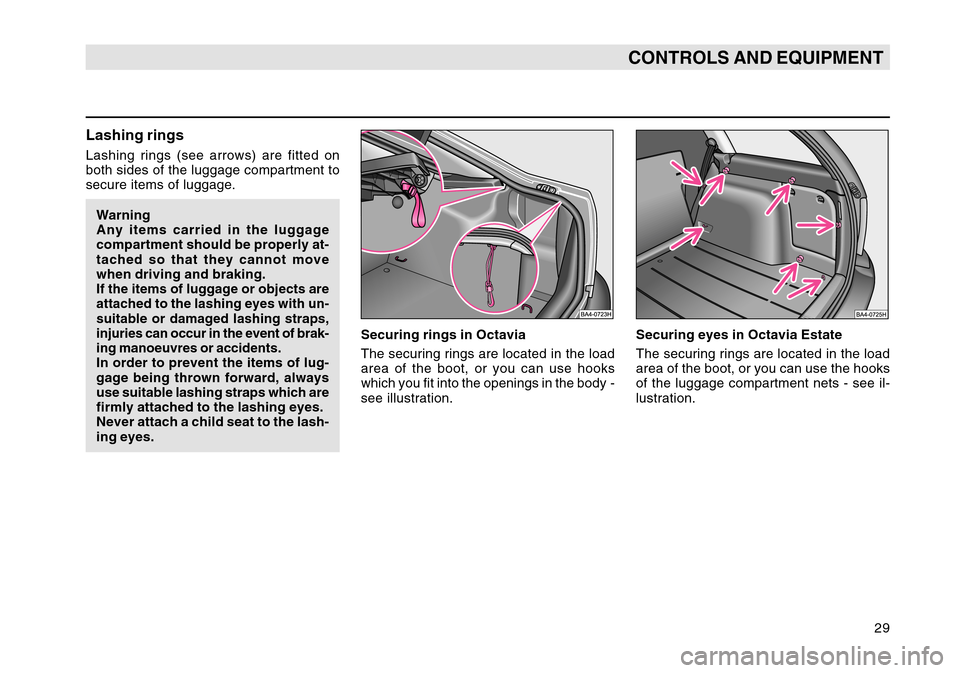
Lashing ringsLashing rings (see arrows) are fitted on
both sides of the luggage compartment to
secure items of luggage.Warning
Any items carried in the luggage
compartment should be properly at-
tached so that they cannot move
when driving and braking.If the items of luggage or objects are
attached to the lashing eyes with un-
suitable or damaged lashing straps,
injuries can occur in the event of brak-
ing manoeuvres or accidents.In order to prevent the items of lug-
gage being thrown forward, always
use suitable lashing straps which are
firmly attached to the lashing eyes.
Never attach a child seat to the lash-
ing eyes. Securing rings in Octavia
The securing rings are located in the load
area of the boot, or you can use hooks
which you fit into the openings in the body -
see illustration.
Securing eyes in Octavia Estate
The securing rings are located in the load
area of the boot, or you can use the hooks
of the luggage compartment nets - see il-
lustration.
Page 33 of 189
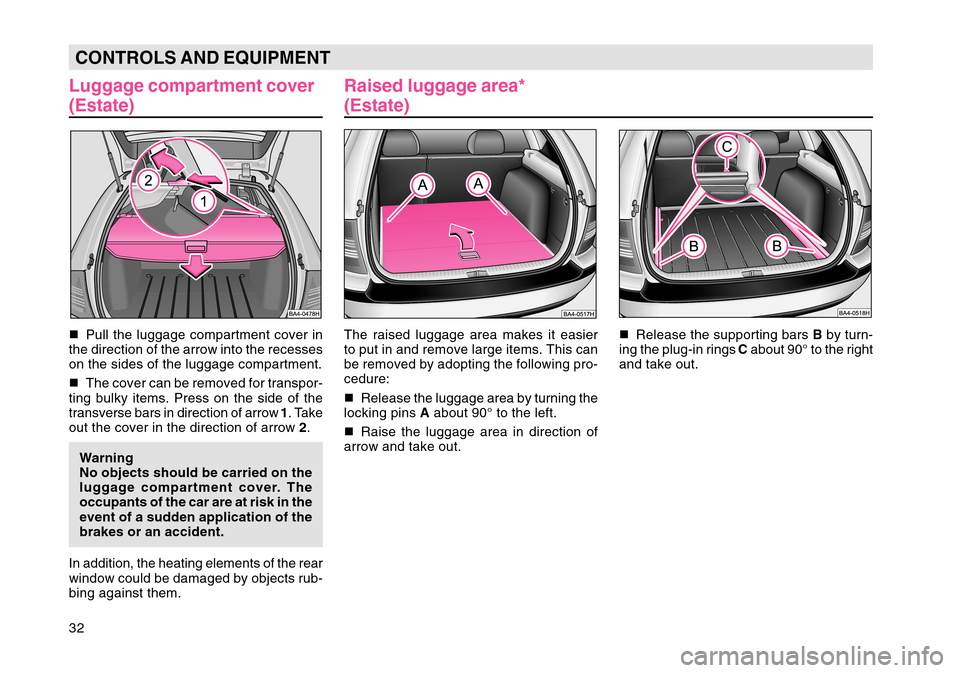
32CONTROLS AND EQUIPMENTLuggage compartment cover
(Estate)�Pull the luggage compartment cover in
the direction of the arrow into the recesses
on the sides of the luggage compartment.
� The cover can be removed for transpor-
ting bulky items. Press on the side of the
transverse bars in direction of arrow 1. Take
out the cover in the direction of arrow 2.
Warning
No objects should be carried on the
luggage compartment cover. The
occupants of the car are at risk in the
event of a sudden application of the
brakes or an accident.
In addition, the heating elements of the rear
window could be damaged by objects rub-
bing against them.
Raised luggage area*
(Estate)The raised luggage area makes it easier
to put in and remove large items. This can
be removed by adopting the following pro-
cedure:
� Release the luggage area by turning the
locking pins A about 90° to the left.
� Raise the luggage area in direction of
arrow and take out. �
Release the supporting bars B by turn-
ing the plug-in rings C about 90° to the right
and take out.