Page 173 of 189
 Owners Manual 172DO-IT-YOURSELF
Front turn signal lights�Open bonnet.
� Remove securing screw 1.
� Push turn signal light housing in direc-
tion of arrow.
� Turn bulb holder slightly to the left and
take off.
� Pr")
172DO-IT-YOURSELF
Front turn signal lights�Open bonnet.
� Remove securing screw 1.
� Push turn signal light housing in direc-
tion of arrow.
� Turn bulb holder slightly to the left and
take off.
� Press faulty bulb into the socket, turn to
the left and remove.
� Insert new bulb and turn fully to the right.
� Insert bulb holder and turn slightly to the
right as far as the stop.
� Fit turn signal light on outside with the
two retaining lugs at the side into the re-
cesses of the headlight.
� Tighten screw 1.
Front side light bulb� Open bonnet.
� Take off cap for headlight.
� Pull out light socket with bulb - see ar-
row.
� Remove the faulty bulb from the socket.
� Insert new bulb.
� Fit socket with new bulb into its fixture.
� Fit on cap for the headlight.
Fog lights*�Open bonnet.
� Turn plastic cap for headlight toward
middle of vehicle and then take off.
� Separate plug connection B.
� Release spring wire clamp A of bulb fix-
ture and fold down.
� Take out halogen bulb with cable. Insert
new bulb so that the locating lugs in the
reflector are positioned in the matching re-
cesses in the bulb disc.
� Fold spring wire clamp over bulb disc.
Press wire clamp together and lock it again
in place.
� Plug in connector.
� Fit on cap.
� Have the beam setting of the fog lights
checked by a Škoda Dealer.
Page 174 of 189
173
DO-IT-YOURSELF
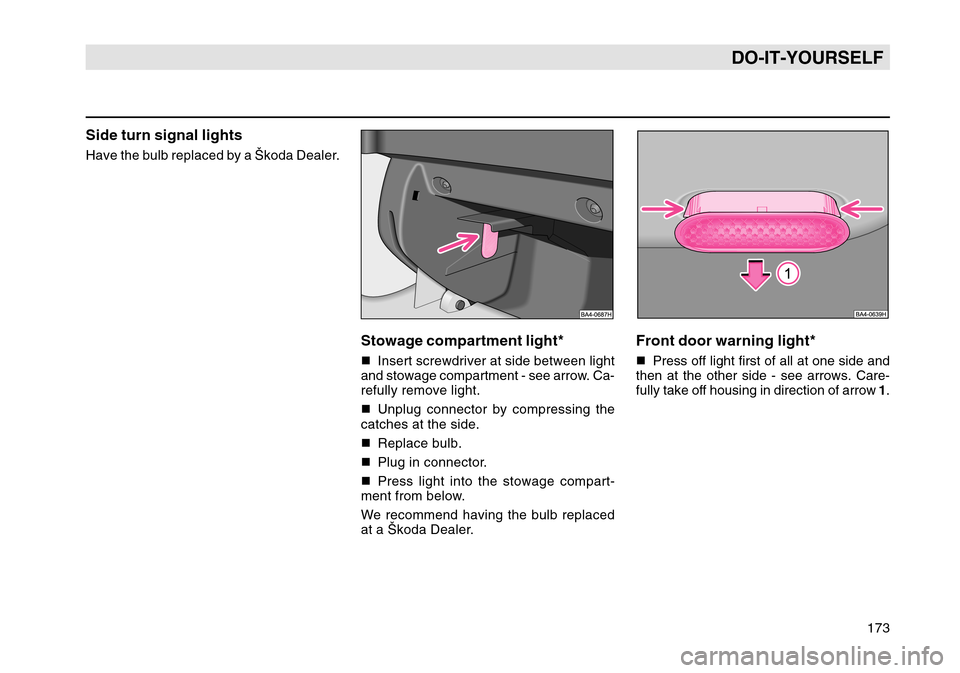
Side turn signal lightsHave the bulb replaced by a Škoda Dealer.
Stowage compartment light*�Insert screwdriver at side between light
and stowage compartment - see arrow. Ca-
refully remove light.
� Unplug connector by compressing the
catches at the side.
� Replace bulb.
� Plug in connector.
� Press light into the stowage compart-
ment from below.
We recommend having the bulb replaced
at a Škoda Dealer.
Front door warning light*� Press off light first of all at one side and
then at the other side - see arrows. Care-
fully take off housing in direction of arrow 1.
Page 175 of 189
174DO-IT-YOURSELF
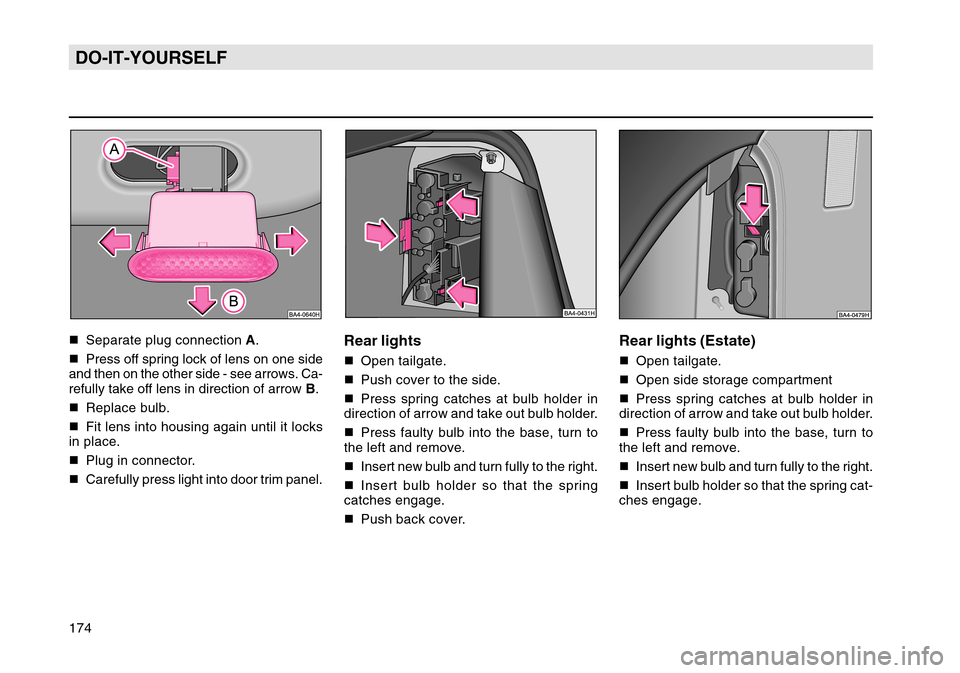
Rear lights (Estate)�Open tailgate.
� Open side storage compartment
� Press spring catches at bulb holder in
direction of arrow and take out bulb holder.
� Press faulty bulb into the base, turn to
the left and remove.
� Insert new bulb and turn fully to the right.
� Insert bulb holder so that the spring cat-
ches engage.
�
Separate plug connection A.
� Press off spring lock of lens on one side
and then on the other side - see arrows. Ca-
refully take off lens in direction of arrow B.
� Replace bulb.
� Fit lens into housing again until it locks
in place.
� Plug in connector.
� Carefully press light into door trim panel.
Rear lights�Open tailgate.
� Push cover to the side.
� Press spring catches at bulb holder in
direction of arrow and take out bulb holder.
� Press faulty bulb into the base, turn to
the left and remove.
� Insert new bulb and turn fully to the right.
� Insert bulb holder so that the spring
catches engage.
� Push back cover.
Page 176 of 189
175
DO-IT-YOURSELF
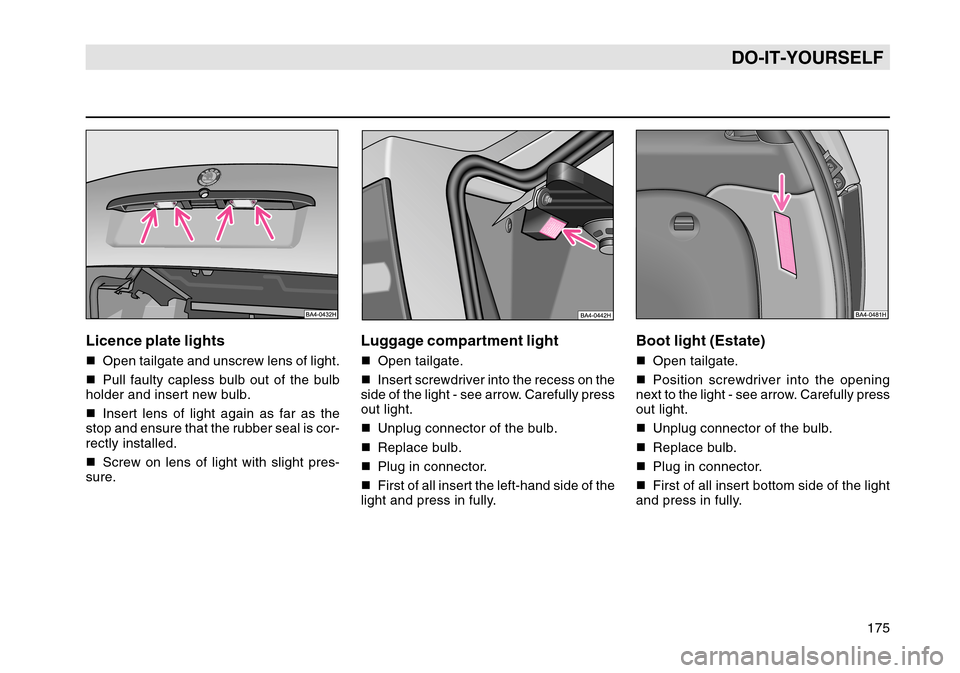
Licence plate lights�Open tailgate and unscrew lens of light.
� Pull faulty capless bulb out of the bulb
holder and insert new bulb.
� Insert lens of light again as far as the
stop and ensure that the rubber seal is cor-
rectly installed.
� Screw on lens of light with slight pres-
sure.
Luggage compartment light� Open tailgate.
� Insert screwdriver into the recess on the
side of the light - see arrow. Carefully press
out light.
� Unplug connector of the bulb.
� Replace bulb.
� Plug in connector.
� First of all insert the left-hand side of the
light and press in fully.
Boot light (Estate)� Open tailgate.
� Position screwdriver into the opening
next to the light - see arrow. Carefully press
out light.
� Unplug connector of the bulb.
� Replace bulb.
� Plug in connector.
� First of all insert bottom side of the light
and press in fully.
Page 177 of 189
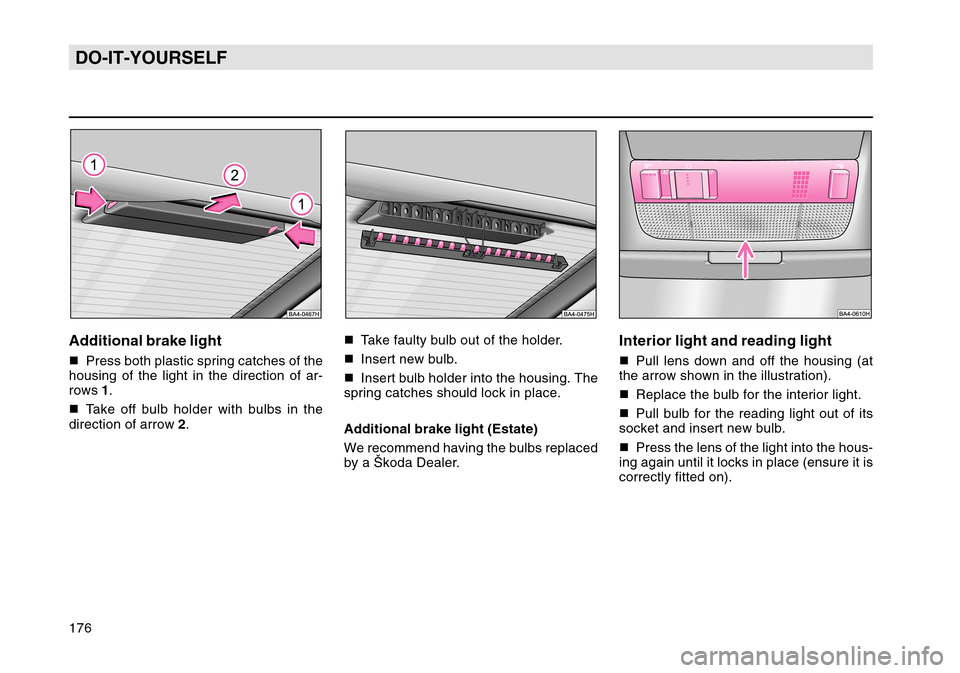
176DO-IT-YOURSELFAdditional brake light�Press both plastic spring catches of the
housing of the light in the direction of ar-
rows 1.
� Take off bulb holder with bulbs in the
direction of arrow 2. �
Take faulty bulb out of the holder.
� Insert new bulb.
� Insert bulb holder into the housing. The
spring catches should lock in place.
Additional brake light (Estate)
We recommend having the bulbs replaced
by a Škoda Dealer.
Interior light and reading light� Pull lens down and off the housing (at
the arrow shown in the illustration).
� Replace the bulb for the interior light.
� Pull bulb for the reading light out of its
socket and insert new bulb.
� Press the lens of the light into the hous-
ing again until it locks in place (ensure it is
correctly fitted on).
Page 178 of 189
 Owners Manual 177
DO-IT-YOURSELF
Interior light (rear)*�Insert a screwdriver between light and
headlining - see arrow. Carefully press out
the light.
� Turn the socket in the rear of the light to
the left and take")
177
DO-IT-YOURSELF
Interior light (rear)*�Insert a screwdriver between light and
headlining - see arrow. Carefully press out
the light.
� Turn the socket in the rear of the light to
the left and take out.
� Pull faulty bulb out of the socket.
� Insert new bulb.
� Insert the socket again into the light and
turn fully to the right.
� Insert light first of all at the side oppo-
site the arrow and then press into the head-
lining.
Jump-startingIf the engine does not start because the
battery is discharged, it is possible to use
jump-start cables to start the car with the
battery of another vehicle. Pay attention to
the following points in this case:
� Both batteries should have a rated volt-
age of 12 V. The capacity (Ah) of the bat-
tery supplying the power must not be sig-
nificantly less than the capacity of the dis-
charged battery.
� Only jump-start cables with an ad-
equately large cross-section should be
used. Pay attention to the instructions of
the cable manufacturer.
� We recommend purchasing the jump-
start cable as a Genuine Škoda Accessory
or in sales outlets of the battery manufac-
turer.
� Use only jump-start cables with insulated
clamps. A discharged battery may already freeze
if there is only slight frost. Before con-
necting the jump-start cables, it is es-
sential to thaw out a frozen battery oth-
erwise it might explode.
�
Run the engine of the vehicle supplying
the current.
� It is essential to connect the jump-start
cables in the following sequence:
1. One end of the ( +) cable (usually red) to
the ( +) terminal of the discharged battery.
2. Other end of the red ( +) cable to the ( +)
terminal of the battery supplying the cur-
rent.
3. One end of the ( -) cable (usually black)
to the ( -) terminal of the battery supplying
the current.
4. Other end of the black ( -) cable to a solid
metal part bolted to engine block or to the
engine block itself.
Page 183 of 189
 Owners Manual 182ALPHABETICAL INDEX4x4 models, 123AABS, 60, 122
Accessories, 159- Changes and replacement ofparts, 159
Accumulator, 146
Acoustic signals, 46
Adjustable steering wheel, 43
Adjusting, - Seats, 19
- Se")
182ALPHABETICAL INDEX4x4 models, 123AABS, 60, 122
Accessories, 159- Changes and replacement ofparts, 159
Accumulator, 146
Acoustic signals, 46
Adjustable steering wheel, 43
Adjusting, - Seats, 19
- Seat belt height, 100
- Headlamp beam, 66
Air conditioning system, 75
Air outlet vents, 73, 76, 83
Airbag system, 56, 103
Airbag, 103
Alarm, 13
Anti-theft alarm system, 13
Armrest, 36
Ashtrays, 90
Automatic air conditioning, 79
Automatic gearbox, 39
Automatic vehicle wash systems, 130
Automatic wipe/wash, 71BBalancing wheels, 154
Battery - charging, 61 Battery - recharging, 149
Battery, 146
Beverage holder, 87
Beverages, 87
Bonnet, 135
- Opening, 135
- Closing, 135
Brake Assist, 121
Brake booster, 121
Brake fluid level, 144
Brake fluid, 61, 144
Brake fluid, 61, 144
Brake pad, 58
Brake system, 61, 120, 121, 122, 123, 144
Brakes, 61, 120, 121, 122, 123, 144
Breakdown assistance, 161
Bulbs, 60, 161, 170
CCavity protection, 134
CD changer, 31
Central locking, 8 - Opening a single door, 9
Cigarette lighter, 89
Climatronic, 79
Clock, 50
Cockpit, 5
Coming home, 67
Convenience operation, 10, 16, 86
Coolant level, 143 Coolant temperature, 48
Coolant, 48, 58, 142
Coolant, 48, 58, 142
Cooling, 142
Cruise control system, 68
DDefrosting windows, 63, 73, 76
Diesel engines, 46
Diesel, 128
Digital clock, 50
Disc wheels, 133
- Steel wheels, 133
- Light-alloy wheels, 133
Door and window seals, 132
Door, 8
Driving abroad, 158
Driving economically and in an environmentally
Dust, noise and pollen filter, 152EEDL, 61, 122
Electric sliding/tilting roof, 85
Electrical power windows, 15
Electrically adjustable seats , 20
Engine - starting, 44
Engine - switching off, 46
Engine compartment, 135
Engine electronics, 57, 60
Page 184 of 189
 Owners Manual 183
ALPHABETICAL INDEX
Engine oil, 138- Specification, 138
Engine oil, 59, 118, 138
Engine oil, 59, 119, 138
EPC, 57, 60
ESP, 60, 64
Exterior mirror, 16FFault display, 50
Fire extinguisher, 166
First-")
183
ALPHABETICAL INDEX
Engine oil, 138- Specification, 138
Engine oil, 59, 118, 138
Engine oil, 59, 119, 138
EPC, 57, 60
ESP, 60, 64
Exterior mirror, 16FFault display, 50
Fire extinguisher, 166
First-aid box, 161
Fog lights, 57, 63
Fog lights, 63
Four-wheel drive models, 123
Fresh air, 78
Friendly way, 118
Front airbag, 103
Front passenger airbag switch, 107
Fuel consumption, 119
Fuel reserve, 49, 58
Fuel, 49, 58, 65, 119, 128
Fuses, 167HHandbrake, 36
Hands-free system, 37
Hazard warning light system, 63
Hazard warning light system, 63
Head restraints, 18, 95
- Adjusting head restraints, 18, 95 - Adjusting height, 18, 95
Headlamp beam adjustment, 66
Headlight flasher, 5
Headlight flasher, 67
Headlights - masking over, 158
Heating, 72
Hydraulic oil, 141
CHChild safety locks, 8
Child safety, 111
Child seat, 111
Chrome parts, 132IIdentification data, 181
Ignition lock, 43 - Steering lock, 44
Immobiliser, 7, 61
Indicators, 48
Information display, 53
Instrument lighting, 62
Interior light, 87
Interior lights, 88
Interlock, 101
ISOFIX system, 116
Isofix, 116JJump-starting, 177
KKeys, 6LLashing eyes, 29
Lights, 62 - Warning lights, 56
- Parking lights, 67
- Turn signal lights, 67
- Changing a bulb, 169
Loading area cover, 32
Loading area increased (Estate), 32
Locking the car, 8
Low beam, 62
Low beam, 62
Luggage compartment cover (Estate), 32
Luggage compartment cover, 26
Luggage compartment lights, 89
Luggage compartment, 11, 27MManual shifting of gears, 38
Mobile phone, 37, 159
Mobile phones and two-way radio systems, 159
MSR, 123
Multifunction display (MFD), 50
Multifunction steering wheel, 70
Multifunction switch, 67