2004 SATURN VUE audio
[x] Cancel search: audioPage 168 of 392

Stereo RCA Jacks
The RCA jacks are located behind the video screen on
the overhead console. The RCA jacks allow audio or
video signals to be connected from an auxiliary device
such as a camcorder or a video game unit to the
RSE. Adapter connectors or cables may be required to
connect the auxiliary device to the RCA jacks. Refer
to the manufacturer’s instructions for proper usage.
The RCA jacks are color coded to match typical home
entertainment system equipment. The yellow jack
(right) is for the video input. The white jack (middle) is
for the left audio input. The red jack (left) is for the right
audio input.Power for auxiliary devices is not supplied by the
radio system.
To use the auxiliary function, connect a camcorder or a
video game unit to the RCA jacks and turn on the
auxiliary device. If you want to view a DVD, insert the
DVD into the DVD radio. The system will automatically
switch to DVD and start to play. To switch between
the auxiliary device and the DVD, press the AUX button
on the DVD player or the SRCE button on the remote
control. See “DVD Radio” and “Remote Control” later in
this section for more information.
Audio Output
Only one audio source can be heard through the
speakers at one time.
The only way to listen to the audio through the vehicle
speakers is if the front seat passengers select DVD
Family Mode using the AUX button on the radio.
There are three modes to the RSE system:
RSE:This is the default, when a DVD is inserted, the
rear speakers will be muted. The rear seat passengers
will be able to hear audio through the wireless
headphones. The front seat passengers will be able to
listen to the radio by pressing the AM FM button, or
listen to XM™ Satellite Radio Service (if equipped) by
pressing the AUX button, through the front speakers.
3-64
ProCarManuals.com
Page 169 of 392

When a CD is inserted, the radio may be put into
RSE mode by pressing the RSE button. The rear seat
passengers will be able to listen to the CD through
the wireless headphones. The front seat passengers
will be able to listen to the radio by pressing the
AM FM button, or listen to XM™ Satellite Radio Service
(if equipped) by pressing the AUX button, through the
front speakers.
DVD Family:When in RSE mode, press the AUX
button to switch to DVD Family. All passengers will be
able to hear audio through the vehicles speakers.
DVD Aux:When RCA jacks are connected, the rear
speakers will be muted. The rear seat passengers
will be able to hear audio from the auxiliary device
through the wireless headphones. The front seat
passengers will be able to listen to the radio by pressing
the AM FM button, or listen to XM™ Satellite Radio
Service (if equipped) or CD, by pressing the AUX button,
through the front speakers.
If RSE mode is on when the radio is powered off,
the parental control will be activated the next time
the radio is turned on. To resume playback, press
the RSE button.Video Screen
The video screen is located in the overhead console.
To use the video screen, do the following:
1. Push forward on the release button on the DVD
display console.
2. Pull the screen down, away from you, and adjust its
position as desired.
When the video screen is not in use, push it up into its
locked position.
If a DVD is playing and the screen is raised to its locked
position, the screen will shut off, but the DVD will
continue to play through the previously selected audio
source.
The video screen contains the transmitters for the
wireless headphones and the remote control. If the
screen is in the closed position, the signals will not be
available for the operation of the headphones or
the remote control.
Notice:Directly touching the video screen may
damage it. Do not touch the screen. See “Cleaning
the Video Screen” later in this section for more
information.
3-65
ProCarManuals.com
Page 170 of 392

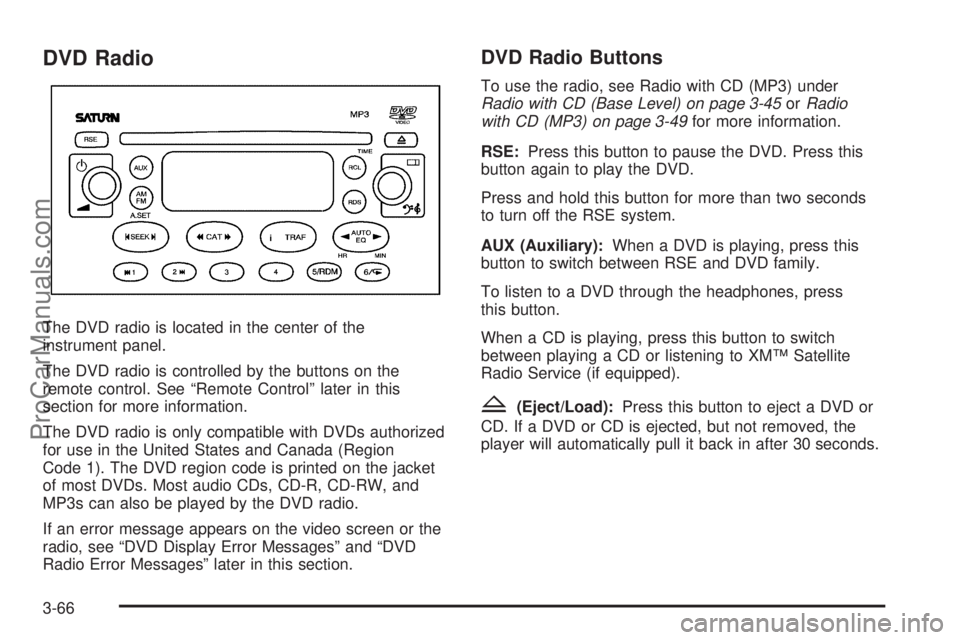
DVD Radio
The DVD radio is located in the center of the
instrument panel.
The DVD radio is controlled by the buttons on the
remote control. See “Remote Control” later in this
section for more information.
The DVD radio is only compatible with DVDs authorized
for use in the United States and Canada (Region
Code 1). The DVD region code is printed on the jacket
of most DVDs. Most audio CDs, CD-R, CD-RW, and
MP3s can also be played by the DVD radio.
If an error message appears on the video screen or the
radio, see “DVD Display Error Messages” and “DVD
Radio Error Messages” later in this section.
DVD Radio Buttons
To use the radio, see Radio with CD (MP3) under
Radio with CD (Base Level) on page 3-45orRadio
with CD (MP3) on page 3-49for more information.
RSE:Press this button to pause the DVD. Press this
button again to play the DVD.
Press and hold this button for more than two seconds
to turn off the RSE system.
AUX (Auxiliary):When a DVD is playing, press this
button to switch between RSE and DVD family.
To listen to a DVD through the headphones, press
this button.
When a CD is playing, press this button to switch
between playing a CD or listening to XM™ Satellite
Radio Service (if equipped).
Z(Eject/Load):Press this button to eject a DVD or
CD. If a DVD or CD is ejected, but not removed, the
player will automatically pull it back in after 30 seconds.
3-66
ProCarManuals.com
Page 173 of 392

z(Set-up Menu):Press this button to adjust the
color, tint, brightness, contrast, and display mode
(normal, full, or zoom). The dynamic range compression
feature can be used to reduce loud audio and increase
low audio produced by some DVDs.
e(Audio):Press this button to display a menu that
will only appear when a DVD is playing. The format and
content of this function will vary for each disc.
r(Fast Reverse):Press this button to fast reverse
the DVD or CD. To stop fast reversing, press this button
again. This button may not work when the DVD is
playing the copyright information or the previews.
SRCE (Source):Press this button to switch between
the DVD player and an auxiliary source.
c(Stop):Press this button to stop playing, rewinding,
or fast forwarding a DVD or CD. Press this button
twice to return to the beginning of the DVD.
t(Previous Track/Chapter):Press this button to
return to the start of the current track or chapter.
Press this button again to go to the previous track or
chapter. This button may not work when the DVD
is playing the copyright information or the previews.1 through 0 (Numeric Keypad):The numeric keypad
provides the capability of direct chapter, title, and
track number selection.
}10 (Double Digit Entries):Press the button, to
select chapter, title, and track numbers greater than 9.
Press this button before inputting the number.
\(Clear):Press this button, within three seconds
after inputting a numeric selection to clear all numeric
inputs.
P(Illumination):Press this button to turn the remote
control backlight on. The backlight will time out after
about 7 to 10 seconds if no other button is pressed while
the backlight is on.
y(Main DVD Menu):Press this button to access
the DVD menu. The DVD menu is different on every
DVD. Use the up, down, left, and right arrow buttons to
move the cursor around the DVD menu. After making
a selection press the enter button. This button only
operates when using a DVD.
r(Enter):Press this button to select the choices
that are highlighted in any menu.
3-69
ProCarManuals.com
Page 191 of 392

This light will come on
when your traction control
system is limiting wheel
spin. SeeLow Traction
Light on page 3-33.
You may feel or hear
the system working, but
this is normal.
The traction control system automatically comes
on whenever you start your vehicle. To limit wheel spin,
especially in slippery road conditions, you should
always leave the system on. But you can turn the
traction control system off if you ever need to. You
should turn the system off if your vehicle ever gets stuck
in sand, mud, ice or snow and rocking the vehicle is
required. See “Rocking Your Vehicle To Get It Out”
underIf You Are Stuck: In Sand, Mud, Ice or Snow
on page 4-44.If your vehicle is equipped
with the 2.2L four cylinder
engine, the traction
control system can be
turned off by pressing the
traction control button.
It is located on the
instrument panel above
the audio system.
The light on the button will go off. If your vehicle is
equipped with the 3.5L V6 engine, the traction control
system will be turned off when the shift lever is in
REVERSE (R) or LOW (L). The traction control system
warning light will be displayed on the instrument
panel.
The traction control system can be activated again
by pressing the traction control button for the 2.2L
four cylinder engine, or by selecting DRIVE (D)
or INTERMEDIATE (I) for the 3.5L V6 engine.
4-11
ProCarManuals.com
Page 287 of 392

Vehicle Storage
If you are not going to drive your vehicle for 25 days
or more, remove the black, negative (−) cable from
the battery. This will help keep your battery from
running down.
{CAUTION:
Batteries have acid that can burn you and gas
that can explode. You can be badly hurt if you
are not careful. SeeJump Starting on
page 5-45for tips on working around a battery
without getting hurt.
Also, for your audio system, seeTheft-Deterrent
Feature on page 3-72.
Jump Starting
If your battery has run down, you may want to use
another vehicle and some jumper cables to start your
vehicle. Be sure to follow the steps below to do it safely.
{CAUTION:
Batteries can hurt you. They can be dangerous
because:
They contain acid that can burn you.
They contain gas that can explode
or ignite.
They contain enough electricity to
burn you.
If you do not follow these steps exactly, some
or all of these things can hurt you.
5-45
ProCarManuals.com
Page 377 of 392

A
About Driving Your Vehicle.................................... ii
Accessory Power Outlets.................................3-20
Activating the Theft-Deterrent Feature................3-72
Adding a Snow Plow or Similar Equipment.........4-54
Adding Windshield Washer Fluid.......................5-40
Additives, Fuel................................................. 5-6
Add-On Electrical Equipment............................5-98
Adjusting the Speakers
(Balance/Fade)............................3-45, 3-47, 3-53
After Off-Road Driving.....................................4-30
Air Cleaner/Filter, Engine.................................5-21
Air Conditioning..............................................3-21
Airbag
Readiness Light..........................................3-28
Airbag Sensing and Diagnostic Module (SDM)...... 7-7
Airbag Systems..............................................1-48
Adding Equipment to Your Airbag-Equipped
Vehicle...................................................1-57
How Does an Airbag Restrain?......................1-54
Servicing Your Airbag-Equipped Vehicle..........1-56
What Makes an Airbag In�ate?......................1-54
What Will You See After an
Airbag In�ates?........................................1-55
When Should an Airbag In�ate?....................1-53
Where Are the Airbags?...............................1-50All-Wheel Drive...............................................5-51
All-Wheel-Drive (AWD) System.........................4-12
AM ...............................................................3-74
AM-FM Radio.................................................3-43
Antenna, Fixed Mast.......................................3-75
Antenna, XM™ Satellite Radio
Antenna System..........................................3-75
Anti-lock Brake System (ABS)............................ 4-8
Anti-Lock Brake, System Warning Light..............3-31
Appearance Care............................................5-89
Care of Safety Belts....................................5-92
Chemical Paint Spotting...............................5-95
Cleaning the Inside of Your Vehicle................5-89
Cleaning the Outside of Your Vehicle..............5-92
Finish Damage............................................5-95
Sheet Metal Damage...................................5-95
Underbody Maintenance...............................5-95
Vehicle Care/Appearance Materials................5-96
Weatherstrips..............................................5-92
Approaching a Hill..........................................4-22
Audio Output..................................................3-64
Audio System(s).............................................3-42
AM-FM Radio.............................................3-43
Care of Your CD and DVD Player..................3-75
Care of Your CDs and DVDs........................3-75
Fixed Mast Antenna.....................................3-75
Radio with CD....................................3-45, 3-49
1
ProCarManuals.com
Page 378 of 392

Audio System(s) (cont.)
Setting the Time for Radios with Radio
Data Systems (RDS)................................3-43
Setting the Time for Radios without
Radio Data Systems (RDS).......................3-43
Theft-Deterrent Feature................................3-72
Understanding Radio Reception.....................3-74
XM™ Satellite Radio Antenna System............3-75
Automatic Dimming Mirror Operation..........2-30, 2-32
Automatic Headlamp System............................3-18
Automatic Transaxle........................................2-15
Fluid..........................................................5-25
Operation...................................................2-18
B
Backing Up....................................................4-59
Battery..........................................................5-44
Battery Replacement......................................... 2-6
Battery Run-Down Protection............................3-20
Battery Warning Light......................................3-29
Before Leaving on a Long Trip.........................4-37
Before You Drive............................................3-62
Before You Go Off-Roading..............................4-18
Brake
Parking......................................................2-23
System Warning Light..................................3-30Brake Fluid....................................................5-41
Brake Wear...................................................5-43
Brakes..........................................................5-41
Braking........................................................... 4-7
Braking in Emergencies...................................4-10
Break-In, New Vehicle.....................................2-14
Bulb Replacement...........................................5-53
Center High-Mounted Stoplamp (CHMSL)........5-58
Fog Lamps.................................................5-57
Front Turn Signal and Parking Lamps.............5-56
Halogen Bulbs............................................5-53
Headlamp Aiming........................................5-52
Headlamps.................................................5-53
Replacement Bulbs......................................5-60
Sidemarker Lamps.......................................5-57
Taillamps, Turn Signal, Stoplamps and
Back-up Lamps........................................5-59
Buying New Tires...........................................5-72
C
California Fuel.................................................. 5-6
Canadian Owners................................................ ii
Canadian Roadside Assistance........................... 7-7
Capacities and Speci�cations..........................5-102
Carbon Monoxide...................2-10, 2-27, 4-40, 4-55
2
ProCarManuals.com