2004 SATURN VUE buttons
[x] Cancel search: buttonsPage 156 of 392

5. Press and hold one of the six numbered
pushbuttons. Preset X Stored will appear on the
display and you will hear a beep. Whenever
that numbered pushbutton is pressed, the station
that was set will return and the equalization that was
selected will be stored for that pushbutton. If the
equalization of a preset is changed while listening to
that station, the radio will save the new equalization.
6. Repeat the steps for each pushbutton.
If the battery has been disconnected or a radio fuse has
been removed, the preset stations and time of day
may need to be reset.
Using Automatic Set
A.SET (Automatic Set):Press and hold the AM
FM button to have the radio automatically select
the �rst 12 strongest radio stations for FM and the
six strongest radio stations for AM.
To select the stations, perform the following:
1. Press AM FM to select FM1, FM2, or AM.
2. Press and hold AM FM until you hear a beep.
The radio will begin to search the current band.
The radio will store the stations, starting from
the lowest frequency, to each preset pushbutton.
A.SET will appear on the display when the radio
is �nished storing the stations.
Cancelling Automatic Set
The radio retains the previously stored stations so they
can be recalled when automatic set is canceled.
Press and hold AM FM until you hear a beep. A.SET
will no longer appear on the display.
Setting the Tone (Bass/Treble)
QP
(Bass/Treble):Press this knob until BASS or
TREB appears on the display. Turn this knob to increase
or to decrease. The display will show the bass or the
treble level. If a station is weak or noisy, decrease
the treble.
qAUTO EQr(Automatic Equalization):Press the
right and left arrow to select customized equalization
settings designed for country/western, jazz, news, pop,
rock, and classical. There is also a �at setting that
has been factory tuned for the best overall performance.
To return the bass and treble to the manual mode,
press either arrow until CUSTOM appears on the
display.
3-52
ProCarManuals.com
Page 165 of 392

2l(Next):Press this pushbutton to go to the
next track. If this pushbutton is held or pressed more
than once, the player will continue moving forward
through the current directory.
4:Press this pushbutton to enter playlist mode.
Use the tune knob to cycle through the available
playlists. Playlist X will appear on the display. Use
the 1 and 2 pushbuttons to cycle through songs in
a particular playlist. Press the 4 pushbutton again to
exit playlist mode.
If a CD is a mixed mode, containing standard CD audio
and MP3 compressed audio, the radio will assign the
standard CD audio to a directory, which is listed as
ROM audio directory.
O(Tune):Turn this knob to quickly change tracks
on the CD.
4(Information):Press this button to see the elapsed
time of the track and the current track time. To change
the default on the display, track name, artist name, album
name, �le name, or directory, press this button to scroll
through each display. Once the desired display is shown,
press and hold the RCL button for �ve seconds. The
selected display will now be the default.
rCAT[:Press either arrow to change directories.
CD Messages
If any error message appears on the display and/or the
CD comes out, it could be for one of the following
reasons:
It is very hot. When the temperature returns to
normal, the CD should play.
You are driving on a very rough road. When the
road becomes smoother, the CD should play.
The CD is dirty, scratched, wet, or upside down.
The air is very humid. If so, wait about an hour
and try again.
The format of the CD may not be compatible.
See “MP3 Format” earlier for more information.
There may have been a problem while burning
the CD.
The label may be caught in the CD player.
If the CD is not playing correctly, for any other reason,
try a known good CD.
If any error occurs repeatedly or if an error cannot be
corrected, contact your retailer. If the radio displays
an error message, write it down and provide it to your
retailer when reporting the problem.
3-61
ProCarManuals.com
Page 170 of 392
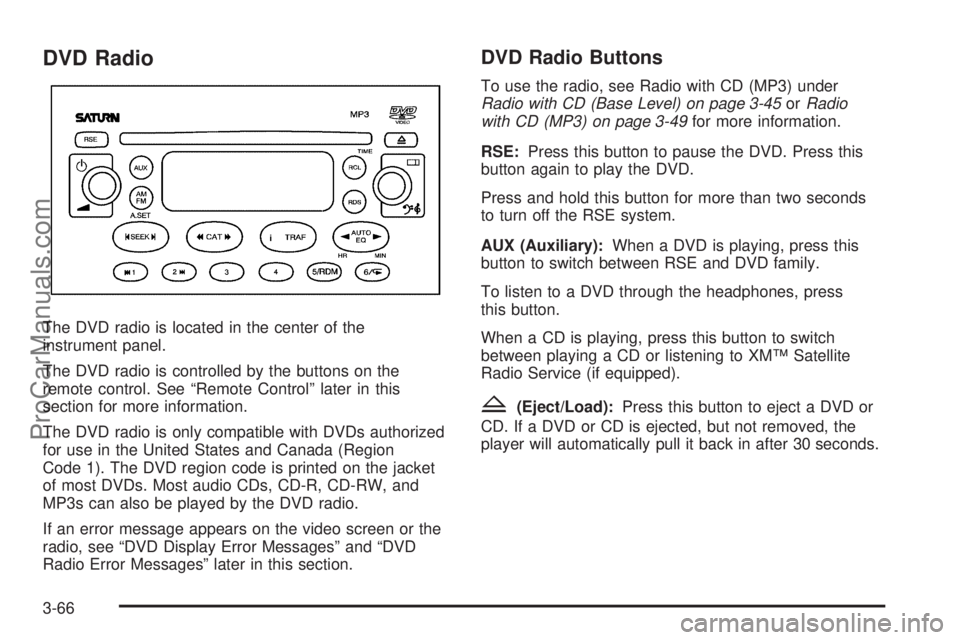
DVD Radio
The DVD radio is located in the center of the
instrument panel.
The DVD radio is controlled by the buttons on the
remote control. See “Remote Control” later in this
section for more information.
The DVD radio is only compatible with DVDs authorized
for use in the United States and Canada (Region
Code 1). The DVD region code is printed on the jacket
of most DVDs. Most audio CDs, CD-R, CD-RW, and
MP3s can also be played by the DVD radio.
If an error message appears on the video screen or the
radio, see “DVD Display Error Messages” and “DVD
Radio Error Messages” later in this section.
DVD Radio Buttons
To use the radio, see Radio with CD (MP3) under
Radio with CD (Base Level) on page 3-45orRadio
with CD (MP3) on page 3-49for more information.
RSE:Press this button to pause the DVD. Press this
button again to play the DVD.
Press and hold this button for more than two seconds
to turn off the RSE system.
AUX (Auxiliary):When a DVD is playing, press this
button to switch between RSE and DVD family.
To listen to a DVD through the headphones, press
this button.
When a CD is playing, press this button to switch
between playing a CD or listening to XM™ Satellite
Radio Service (if equipped).
Z(Eject/Load):Press this button to eject a DVD or
CD. If a DVD or CD is ejected, but not removed, the
player will automatically pull it back in after 30 seconds.
3-66
ProCarManuals.com
Page 172 of 392
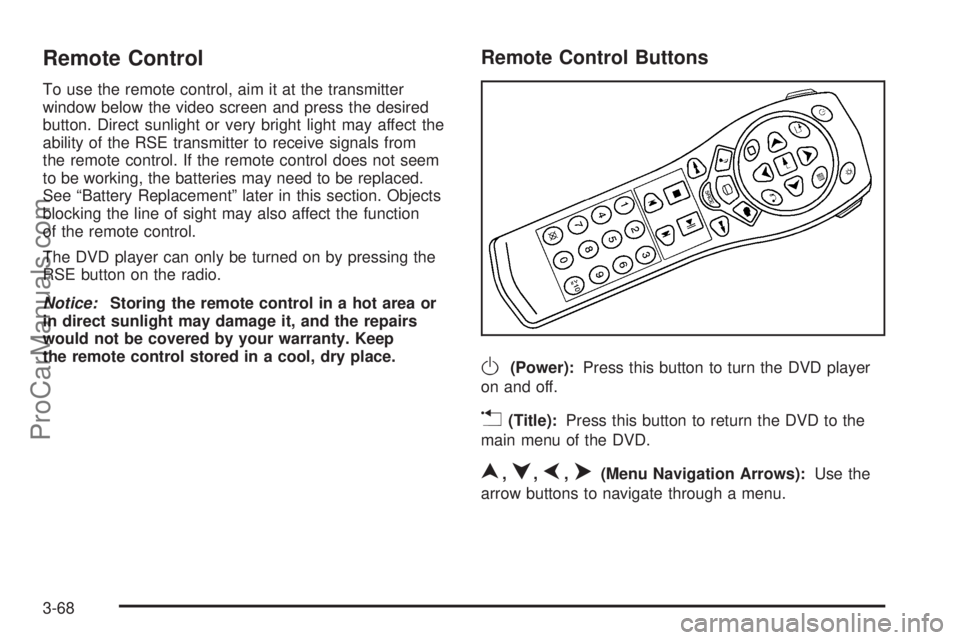
Remote Control
To use the remote control, aim it at the transmitter
window below the video screen and press the desired
button. Direct sunlight or very bright light may affect the
ability of the RSE transmitter to receive signals from
the remote control. If the remote control does not seem
to be working, the batteries may need to be replaced.
See “Battery Replacement” later in this section. Objects
blocking the line of sight may also affect the function
of the remote control.
The DVD player can only be turned on by pressing the
RSE button on the radio.
Notice:Storing the remote control in a hot area or
in direct sunlight may damage it, and the repairs
would not be covered by your warranty. Keep
the remote control stored in a cool, dry place.
Remote Control Buttons
O(Power):Press this button to turn the DVD player
on and off.
v(Title):Press this button to return the DVD to the
main menu of the DVD.
n,q,p,o(Menu Navigation Arrows):Use the
arrow buttons to navigate through a menu.
3-68
ProCarManuals.com
Page 173 of 392
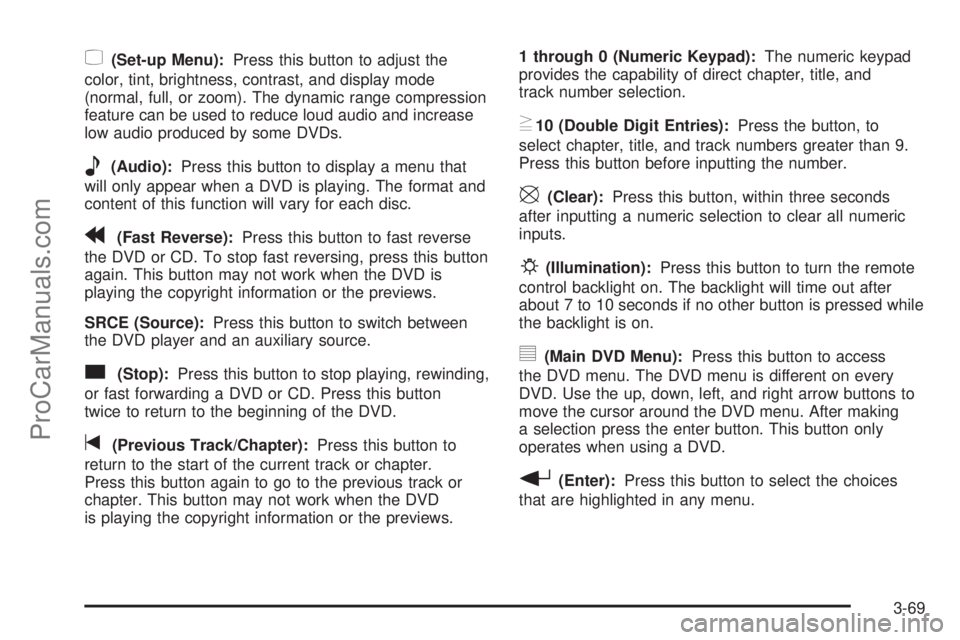
z(Set-up Menu):Press this button to adjust the
color, tint, brightness, contrast, and display mode
(normal, full, or zoom). The dynamic range compression
feature can be used to reduce loud audio and increase
low audio produced by some DVDs.
e(Audio):Press this button to display a menu that
will only appear when a DVD is playing. The format and
content of this function will vary for each disc.
r(Fast Reverse):Press this button to fast reverse
the DVD or CD. To stop fast reversing, press this button
again. This button may not work when the DVD is
playing the copyright information or the previews.
SRCE (Source):Press this button to switch between
the DVD player and an auxiliary source.
c(Stop):Press this button to stop playing, rewinding,
or fast forwarding a DVD or CD. Press this button
twice to return to the beginning of the DVD.
t(Previous Track/Chapter):Press this button to
return to the start of the current track or chapter.
Press this button again to go to the previous track or
chapter. This button may not work when the DVD
is playing the copyright information or the previews.1 through 0 (Numeric Keypad):The numeric keypad
provides the capability of direct chapter, title, and
track number selection.
}10 (Double Digit Entries):Press the button, to
select chapter, title, and track numbers greater than 9.
Press this button before inputting the number.
\(Clear):Press this button, within three seconds
after inputting a numeric selection to clear all numeric
inputs.
P(Illumination):Press this button to turn the remote
control backlight on. The backlight will time out after
about 7 to 10 seconds if no other button is pressed while
the backlight is on.
y(Main DVD Menu):Press this button to access
the DVD menu. The DVD menu is different on every
DVD. Use the up, down, left, and right arrow buttons to
move the cursor around the DVD menu. After making
a selection press the enter button. This button only
operates when using a DVD.
r(Enter):Press this button to select the choices
that are highlighted in any menu.
3-69
ProCarManuals.com
Page 175 of 392
DVD Display Error Messages
The video screen may display one of the following:
Disc Format Error:This message is displayed when
a disc is inserted upside down, not readable, or if
the disc format is not compatible. The disc will be
automatically ejected from the radio.
Region Code Error:This message will be displayed,
if the disc is not a Region Code 1. The disc will be
automatically ejected from the radio.
No Disc:This message will be displayed, if no disc
is present when the eject, RSE, or AUX button is
pressed on the radio.
DVD Radio Error Messages
No Disc:This message will be displayed, if no disc
is present when the eject, RSE, or AUX button is
pressed on the radio.
DVD Distortion
Video distortion may occur when operating cellular
phones, scanners, CB radios, Global Position Systems
(GPS)*, two-way radios, mobile fax, or walkie talkies.
It may be necessary to turn off the DVD player
when operating one of these devices in or near the
vehicle.
*Excludes the OnStar
®System.
Cleaning the DVD Player
When cleaning the outside DVD faceplate and buttons,
use only a clean cloth dampened with clean water.
Cleaning the Video Screen
When cleaning the video screen, use only a clean cloth
dampened with clean water. Use care when directly
touching or cleaning the screen, as damage may result.
3-71
ProCarManuals.com
Page 176 of 392
Theft-Deterrent Feature
The Radio with Single CD (MP3) and the Radio with
Six-Disc CD (MP3) have a theft deterrent feature.
The theft deterrent feature is designed to discourage
theft of your vehicle’s radio. It works by using a secret
code to disable all radio functions whenever battery
power is interrupted.
The theft deterrent feature for the radio may be used or
ignored. If ignored, the radio plays normally and the
radio is not protected by the feature. If the theft deterrent
feature is activated, the radio will not operate if stolen.
When the theft deterrent feature is activated. LOCK
will appear on the radio display to indicate a locked
condition anytime battery power has been removed. If
the battery loses power for any reason, you must unlock
the radio with the secret code before it will operate.
Activating the Theft-Deterrent Feature
The instructions which follow explain how to enter
your secret code to activate the theft deterrent feature.
Read through all 10 steps before starting the
procedure.
If you allow more than 15 seconds to elapse between
any steps, the radio automatically reverts to time
and you must start the procedure over at Step 4.
1. Write down any four-digit number from 0000 to
9999 and keep it in a safe place separate from
the vehicle.
2. Turn the ignition to RUN.
3. Turn the radio off.
4. Press the 5 and 6 pushbuttons at the same time for
�ve seconds. -- -- -- -- will appear on the display.
Next you will use the secret code number which you
have written down.
5. Press the SEEK/SCAN down or SEEK left arrow to
make the �rst digit agree with your code.
6. Press the SEEK/SCAN up or SEEK right arrow to
make the second digit agree with your code.
7. Press the TUNE down or AUTO EQ left arrow to
make the third digit agree with your code.
3-72
ProCarManuals.com