2004 PONTIAC GTO automatic transmission
[x] Cancel search: automatic transmissionPage 97 of 326

AUTO LOCK IN DRIVE (Automatic
Transmission Only)
This option is used to enable or disable the automatic
door locking when in Drive function. Use the up or down
arrows to select Yes or No. If Yes is selected, the
Auto Lock In Drive function is activated, the default is
No. Press the MODE button to continue. SeeDoor
Locks on page 2-6.
DOOR LOCK INDICATION
This option is used to select the type of indication
provided to the driver upon locking and unlocking the
vehicle’s doors. Use the up or down arrows to select
Indicators or Indicators & Horn, the default is Indicators.
Press the MODE button to continue.
Exiting Programming Mode
To exit, do one of the following:
•Press the MODE button to scroll through to the exit
screen.
•Drive the vehicle at more than 6 mph (10 km/h).
•Switch the ignition off if vehicle is stopped.
EXIT OPTIONS MENU
This option is used to either exit personalization mode
options menu or to return to the start of the options
menu. Use the up or down arrows to select Yes or No.
If Yes is selected, the trip computer exits calibration
mode and returns to the previous trip computer display.
If No is selected, the menu jumps back to the start of
the options menu, RESTORE TO FACTORY SETTINGS
display. Press the MODE button to continue.
2-37
Page 109 of 326

Pausing Cruise Control
To pause cruise control, press the brake pedal on
automatic transmissions or the clutch pedal on
manual transmissions, or press the ON-OFF/CANCEL
switch once.
This deactivates the cruise control but retains the speed
in its memory. The CRUISE ACTIVE message and
cruise control symbol on the display will turn off.
To regain the memory speed momentarily, turn the lever
up to the RES-ACCEL position, provided you are
travelling over 25 mph (40 km/h). Holding the lever in
the RES-ACCEL position for longer than one second
causes the vehicle to accelerate.
Passing Another Vehicle While Using
Cruise Control
Use the accelerator pedal to increase your speed.
When you take your foot off the pedal, your vehicle will
slow down to the cruise control speed you set earlier.
Using Cruise Control on Hills
How well your cruise control will work on hills depends
upon your speed, load, and the steepness of the
hills. When going up steep hills, you may have to step
on the accelerator pedal to maintain your speed.When going downhill, you may have to brake or shift to
a lower gear to keep your speed down. Of course,
applying the brake takes you out of cruise control. Many
drivers find this to be too much trouble and don’t use
cruise control on steep hills.
Ending Cruise Control
Press the ON-OFF/CANCEL switch twice. The cruise
control symbol and message will turn off.
Pressing the ON-OFF/CANCEL switch once pauses the
cruise control but keeps the system ready and the
speed in memory.
A second press turns the system off completely and
wipes the speed memory clear.
A third press turns the system back on to ready, without
any speed memory.
Turning off the ignition completely turns off cruise
control and wipes the speed memory clear.
Cruise control will be canceled if the Traction Control
System (TCS) becomes active. SeeTraction Control
System (TCS) on page 4-8.
Erasing Speed Memory
When you turn off the cruise control or the ignition, your
cruise control set speed memory is erased.
3-11
Page 110 of 326

Exterior Lamps
The dial to the left of the
steering wheel on the
instrument panel controls
the following positions:
;(Parking Lamps):Turn the dial to this position to
turn on the parking lamps, together with the taillamps,
sidemarker lamps, license plate lamps, and instrument
panel lights.
2(Headlamps):Turn the dial to this position to turn
on the headlamps, together with the parking lamps,
taillamps, sidemarker lamps, and license plate lamps.AUTO (Automatic Headlamps):Turn the dial to AUTO
to provide for automatic operation of the headlamps,
taillamps, sidemarker lamps, and parking lamps.
For more information see “Automatic Headlamp System”
following.
9(Off):Turn the switch to this position to turn all
lamps off.
Daytime Running Lamps (DRL)
Daytime Running Lamps (DRL) can make it easier for
others to see the front of your vehicle during the
day. DRL can be helpful in many different driving
conditions, but they can be especially helpful in the short
periods after dawn and before sunset.
The DRL system will make your low-beam headlamps
come on at a reduced brightness when the following
conditions are met:
•The ignition is on.
•The exterior lamp control is turned to AUTO and
the light sensor detects daytime light.
•The exterior lamp control is turned to the off
position.
•The parking brake is released.
•For vehicles with automatic transmissions, the shift
lever is not in PARK (P).
3-12
Page 123 of 326

Speedometer
The speedometer shows vehicle speed in both miles
per hour (mph) and kilometers per hour (km/h).
Tachometer
The tachometer shows engine speed in revolutions
per minute (rpm).
For automatic transmission vehicle’s, under wide open
throttle acceleration, when the accelerator pedal is
pushed flat to the floor, it is possible that the tachometer
needle may briefly enter the lower end of the
tachometer’s red zone just prior to automatically
upshifting into a higher gear. This is normal during
wide open throttle acceleration and will not harm
the engine.
Notice:If you operate the engine with the
tachometer in the shaded warning area, your vehicle
could be damaged, and the damages would not
be covered by your warranty. Do not operate
the engine with the tachometer in the shaded
warning area.
Safety Belt Reminder Light
When the key is turned to
ON, the safety belt light
will come on and stay
on for several seconds and
a chime will be sounded
for eight seconds,
then it will flash
continuously until the
driver’s belt is buckled.
If the driver’s belt is already buckled, the light will not
come on.
3-25
Page 162 of 326

Using Anti-Lock
Do not pump the brakes. Just hold the brake pedal
down firmly and let anti-lock work for you. You may hear
the anti-lock pump or motor operate, and feel the
brake pedal pulsate, but this is normal.
Braking in Emergencies
With anti-lock, you can steer and brake at the same
time. In many emergencies, steering can help you more
than even the very best braking.
Traction Control System (TCS)
Your vehicle has a Traction Control System (TCS) that
limits wheel spin. This is especially useful in slippery
road conditions. The system operates only if it senses
that one or both of the rear wheels are spinning or
beginning to lose traction. When this happens,
the system reduces engine power and applies the
brakes, as necessary.
Traction control helps you to keep control of the vehicle
and reminds you to match your speed to the road
conditions. In addition, traction control when activated,
provides feedback to the driver by pulsing the
accelerator pedal.You may feel or hear the system working, but this is
normal. The TCS is automatically turned on whenever
the ignition is turned from off to on. A Low Traction
message is displayed on the trip computer, indicating
traction control is limiting wheel spin, until the MODE
button on the trip computer is pressed. The message
then goes back to the original trip computer display with
a small low traction symbol on the left. The symbol
will remain as long as the low traction situation exists.
To limit wheel spin, especially in slippery road
conditions, you should always leave the TCS on.
But you can turn the system off if you prefer.
To turn the system off,
press the T/C button.
On manual transmission
vehicles the button is
located on the driver’s side
of the center console.
On automatic transmission
vehicles the button is
located on the passenger’s
side of the shift lever.
4-8
Page 191 of 326
Service............................................................5-3
Doing Your Own Service Work.........................5-4
Adding Equipment to the Outside of
Your Vehicle..............................................5-5
Fuel................................................................5-5
Gasoline Octane............................................5-5
Gasoline Specifications....................................5-5
California Fuel...............................................5-6
Additives.......................................................5-6
Fuels in Foreign Countries...............................5-7
Filling Your Tank............................................5-7
Filling a Portable Fuel Container.......................5-9
Checking Things Under the Hood....................5-10
Hood Release..............................................5-11
Engine Compartment Overview.......................5-12
Engine Oil...................................................5-13
Engine Air Cleaner/Filter................................5-18
Automatic Transmission Fluid.........................5-19
Manual Transmission Fluid.............................5-23
Hydraulic Clutch...........................................5-24
Engine Coolant.............................................5-25
Engine Overheating.......................................5-28
Cooling System............................................5-31
Power Steering Fluid.....................................5-36Windshield Washer Fluid................................5-37
Brakes........................................................5-38
Battery........................................................5-41
Jump Starting...............................................5-42
Bulb Replacement..........................................5-47
Halogen Bulbs..............................................5-47
Headlamps..................................................5-47
Front Turn Signal and Parking Lamps..............5-49
Rear Turn Signal, Stoplamps and
Back-Up Lamps........................................5-49
Replacement Bulbs.......................................5-50
Windshield Wiper Blade Replacement..............5-50
Tires..............................................................5-51
Inflation - Tire Pressure.................................5-58
Tire Inspection and Rotation...........................5-62
When It Is Time for New Tires.......................5-64
Buying New Tires.........................................5-65
Uniform Tire Quality Grading..........................5-66
Wheel Alignment and Tire Balance..................5-67
Wheel Replacement......................................5-68
Tire Chains..................................................5-69
If a Tire Goes Flat........................................5-70
Changing a Flat Tire.....................................5-71
Compact Spare Tire......................................5-77
Section 5 Service and Appearance Care
5-1
Page 203 of 326
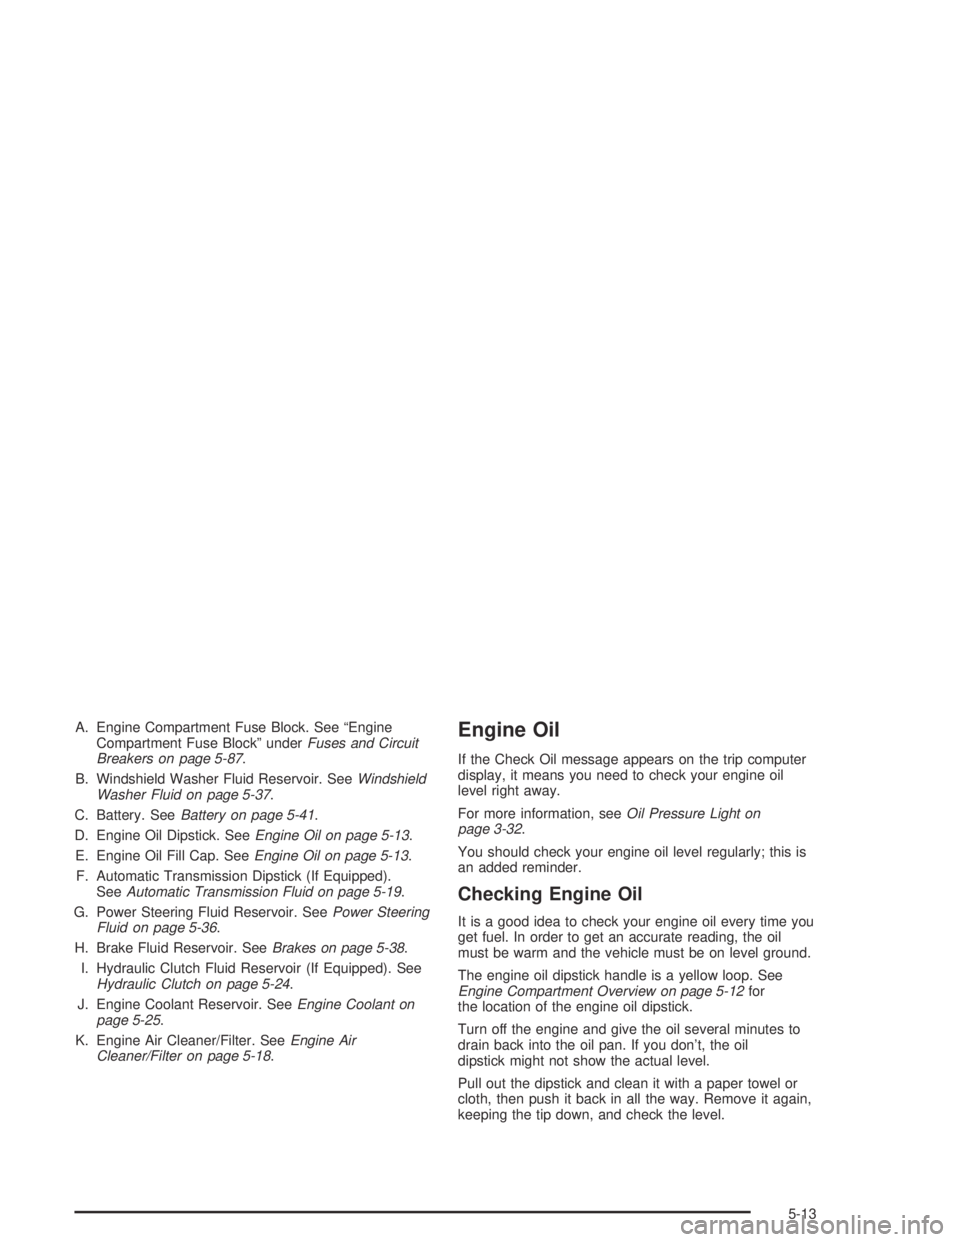
A. Engine Compartment Fuse Block. See “Engine
Compartment Fuse Block” underFuses and Circuit
Breakers on page 5-87.
B. Windshield Washer Fluid Reservoir. SeeWindshield
Washer Fluid on page 5-37.
C. Battery. SeeBattery on page 5-41.
D. Engine Oil Dipstick. SeeEngine Oil on page 5-13.
E. Engine Oil Fill Cap. SeeEngine Oil on page 5-13.
F. Automatic Transmission Dipstick (If Equipped).
SeeAutomatic Transmission Fluid on page 5-19.
G. Power Steering Fluid Reservoir. SeePower Steering
Fluid on page 5-36.
H. Brake Fluid Reservoir. SeeBrakes on page 5-38.
I. Hydraulic Clutch Fluid Reservoir (If Equipped). See
Hydraulic Clutch on page 5-24.
J. Engine Coolant Reservoir. SeeEngine Coolant on
page 5-25.
K. Engine Air Cleaner/Filter. SeeEngine Air
Cleaner/Filter on page 5-18.Engine Oil
If the Check Oil message appears on the trip computer
display, it means you need to check your engine oil
level right away.
For more information, seeOil Pressure Light on
page 3-32.
You should check your engine oil level regularly; this is
an added reminder.
Checking Engine Oil
It is a good idea to check your engine oil every time you
get fuel. In order to get an accurate reading, the oil
must be warm and the vehicle must be on level ground.
The engine oil dipstick handle is a yellow loop. See
Engine Compartment Overview on page 5-12for
the location of the engine oil dipstick.
Turn off the engine and give the oil several minutes to
drain back into the oil pan. If you don’t, the oil
dipstick might not show the actual level.
Pull out the dipstick and clean it with a paper towel or
cloth, then push it back in all the way. Remove it again,
keeping the tip down, and check the level.
5-13
Page 209 of 326

{CAUTION:
Operating the engine with the air cleaner/lter
off can cause you or others to be burned.
The air cleaner not only cleans the air, it helps
to stop ame if the engine backres. If it is
not there and the engine backres, you could
be burned. Do not drive with it off, and be
careful working on the engine with the air
cleaner/lter off.
Notice:If the air cleaner/lter is off, a backre can
cause a damaging engine re. And, dirt can
easily get into your engine, which will damage it.
Always have the air cleaner/lter in place when you
are driving.
Automatic Transmission Fluid
When to Check and Change
The fluid level should be checked monthly, by looking at
the fluid level on the dipstick. A good time to check
your automatic transmission fluid level is when
the engine oil is changed.
SeeScheduled Maintenance on page 6-4for more
information on when to check and change the fluid
and filter.
5-19