Page 83 of 432

Notice:If your key seems stuck in OFF and you
can't turn it, be sure you are using the correct key;
if so, is it all the way in? If it is, then turn the
steering wheel left and right while you turn the key
hard. Turn the key only with your hand. Using a
tool to force it could break the key or the ignition
switch. If none of these works, then your vehicle
needs service.
ACC (ACCESSORY):This position lets you use things
like the radio and windshield wipers while the engine
is off.
R(RUN):This position is where the key returns to
after you start the vehicle. With the engine off, you can
use RUN to display some of the warning and indicator
lights.
/(START):This position starts the engine. Let go of
the key when the engine starts. The key will return
to the RUN position.
A continuous warning chime will sound and a KEY IN
IGNITION warning message will display on the DIC
if the key is in the ignition in the OFF or ACCESSORY
positions and the driver's door is opened.
Retained Accessory Power (RAP)
With Retained Accessory Power (RAP), the power
windows, audio system and sunroof will continue to
work up to 10 minutes after the ignition key is turned
to OFF and none of the doors are opened.
Starting Your Engine
1. Move your shift lever to PARK (P) or NEUTRAL (N).
Your engine won't start in any other position ± that's
a safety feature. To restart while you're already
moving, use NEUTRAL (N) only.
Notice:Don't try to shift to PARK (P) if your vehicle
is moving. If you do, you could damage the transaxle.
Shift to PARK (P) only when your vehicle is stopped.
2. With your foot off the accelerator pedal, turn your
ignition key to START. When the engine starts,
let go of the key. The idle speed will go down as
your engine gets warm.
Notice:Holding your key in START for longer than
15 seconds at a time will cause your battery to
be drained much sooner. And the excessive
heat can damage your starter motor. Wait about
15 seconds between each try to help avoid draining
your battery or damaging your starter.
2-19
Page 110 of 432

Windshield Washer Lever
Windshield Wipers
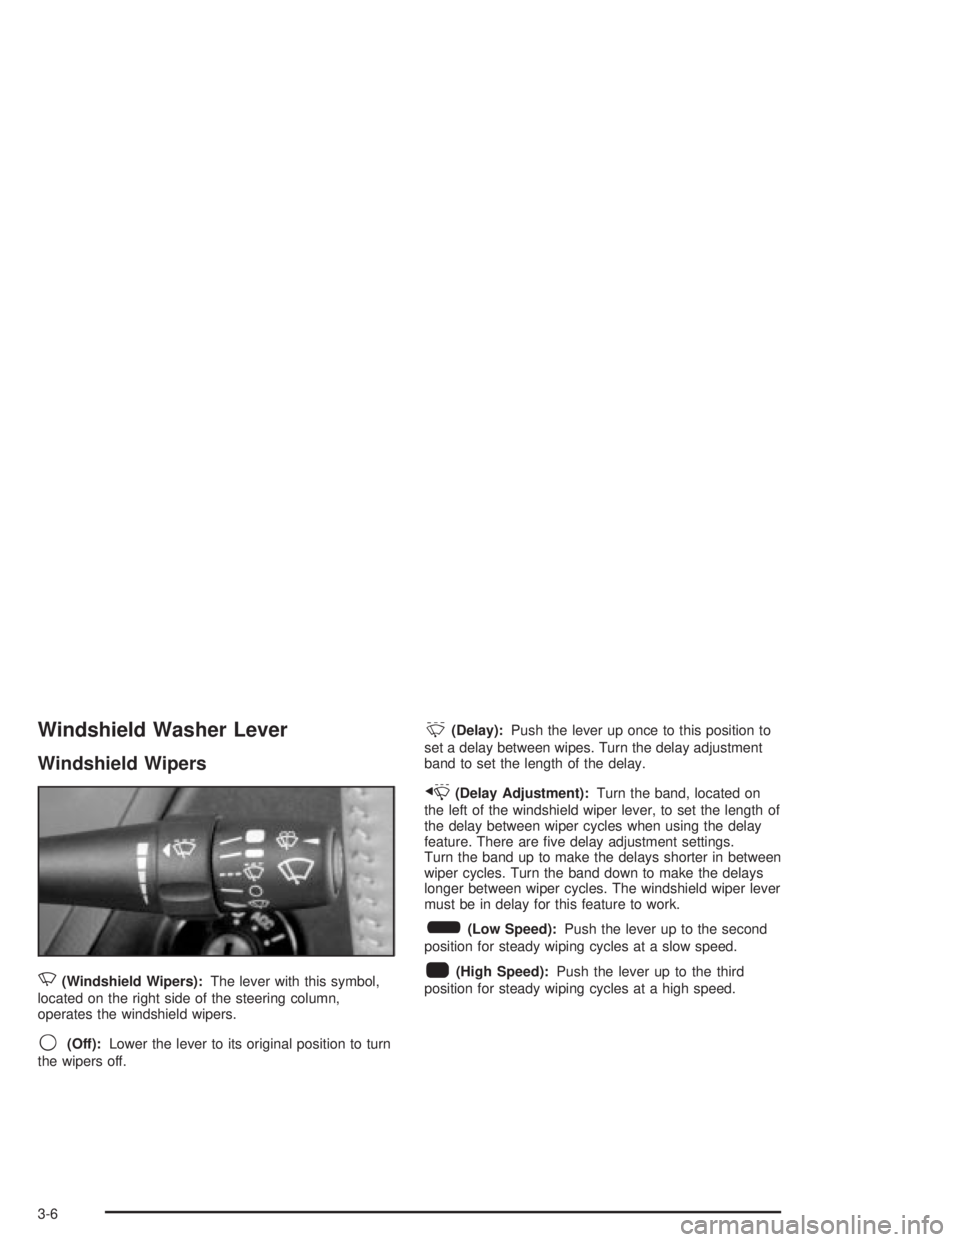
N
(Windshield Wipers):The lever with this symbol,
located on the right side of the steering column,
operates the windshield wipers.
9(Off):Lower the lever to its original position to turn
the wipers off.
&(Delay):Push the lever up once to this position to
set a delay between wipes. Turn the delay adjustment
band to set the length of the delay.
x(Delay Adjustment):Turn the band, located on
the left of the windshield wiper lever, to set the length of
the delay between wiper cycles when using the delay
feature. There are ®ve delay adjustment settings.
Turn the band up to make the delays shorter in between
wiper cycles. Turn the band down to make the delays
longer between wiper cycles. The windshield wiper lever
must be in delay for this feature to work.
6(Low Speed):Push the lever up to the second
position for steady wiping cycles at a slow speed.
1(High Speed):Push the lever up to the third
position for steady wiping cycles at a high speed.
3-6
Page 111 of 432

7(Mist):For a single wiping cycle, push the lever
down once and let go. The wipers will stop after one
cycle. For additional cycles, hold the lever down.
Be sure to clear ice and snow from the wiper blades
before using them. If they're frozen to the windshield,
gently loosen or thaw them. Damaged wiper blades may
prevent you from seeing well enough to drive safely.
If the blades do become damaged, install new blades or
blade inserts. For more information, see
Windshield
Wiper Blade Replacement on page 5-67.
Heavy snow or ice can overload the wiper motor.
A circuit breaker will stop the motor until it cools down.
Clear away snow or ice to prevent an overload.
Windshield Washer
{CAUTION:
In freezing weather, don't use your washer
until the windshield is warmed. Otherwise the
washer ¯uid can form ice on the windshield,
blocking your vision.
The windshield washer button is located at the end of
the windshield wiper lever.
K(Washer Fluid):Press this button to activate the
washer ¯uid to spray onto the windshield. The wipers
will run for a few cycles to clear the windshield. For more
wash cycles, press and hold the button.
If your vehicle is low on washer ¯uid, the LOW WASHER
FLUID message will appear on the Driver Information
Center (DIC) display. See
DIC Warnings and Messages
on page 3-65for more information.
3-7
Page 134 of 432
To change the passenger compartment air ®lter,
do the following:
1. Put the ignition in ACCESSORY and turn the
windshield wipers on.
2. Turn the ignition to off when the windshield wipers
are in the upright position.
3. Raise the hood.
4. Disconnect the windshield washer pump hose from
the fender rail and the air inlet grille.
5. Remove the hood weather-strip from the passenger's
side of the vehicle, peeling it back halfway to the
center.
6. Remove the air inlet grille retainers.
7. Remove the air inlet grille.8. Remove the passenger compartment air ®lter by
pulling up on the tab.
9. Install a new passenger compartment air ®lter.
Make sure it slides under the compartment
retainers.
10. Reverse steps 1 through 7.
3-30
Page 347 of 432

Windshield Wiper Blade
Replacement
Remove and replace a windshield wiper by following
these steps:
1. Put the ignition in ACCESSORY and turn the
windshield wipers on.
2. Stop the windshield wipers when they are in the
upright position by turning the key to the off position.
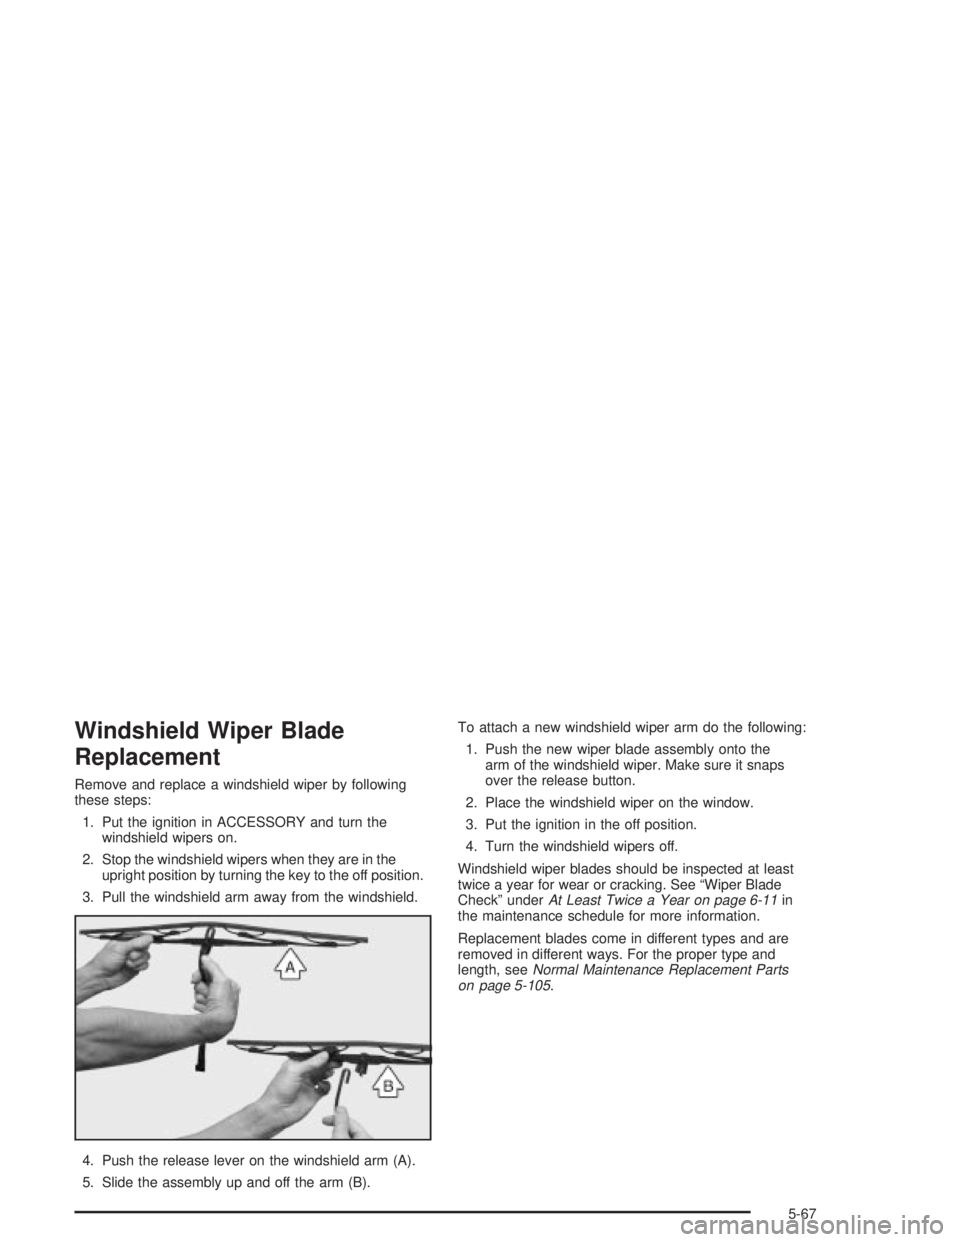
3. Pull the windshield arm away from the windshield.
4. Push the release lever on the windshield arm (A).
5. Slide the assembly up and off the arm (B).To attach a new windshield wiper arm do the following:
1. Push the new wiper blade assembly onto the
arm of the windshield wiper. Make sure it snaps
over the release button.
2. Place the windshield wiper on the window.
3. Put the ignition in the off position.
4. Turn the windshield wipers off.
Windshield wiper blades should be inspected at least
twice a year for wear or cracking. See ªWiper Blade
Checkº under
At Least Twice a Year on page 6-11in
the maintenance schedule for more information.
Replacement blades come in different types and are
removed in different ways. For the proper type and
length, see
Normal Maintenance Replacement Parts
on page 5-105.
5-67
Page 382 of 432
Underhood Fuse Block
Some fuses are located in
a fuse block in the engine
compartment on the
passenger's side. Unscrew
the bolt in the center of
the fuse block cover
and remove the cover.
A fuse chart is on the inside of the cover. To take the
cover off, press the tab at the bottom of the cover
and pull.
Fuses Usage
1 Left Front Hiigh-Beam Headlamp
2 Right Front High-Beam Headlamp
3 Left Front Low-Beam Headlamp
4 Right Front Low-Beam Headlamp
5 Windshield Wipers/Washer
6 Washer/Remote Vehicle Current
7 Fog Lamps
9 SIR
10 Auxilliary Power
11 Horn
12 Emission
5-102
Page 432 of 432
Windshield Washer........................................... 3-7
Fluid..........................................................5-43
Windshield Washer Fluid Level Check................6-10
Windshield Washer Lever.................................. 3-6
Windshield Wiper
Blade Replacement......................................5-67
Fuses........................................................5-99
Windshield Wipers............................................ 3-6
Winter Driving................................................4-28
Wiper Blade Check.........................................6-11X
XMŸ Radio Satellite Service (USA Only)............3-101
XMŸ Satellite Radio Antenna System..............3-132
XMŸ Satellite Radio Service (USA Only)............3-130
XMŸ Radio Satellite Service (USA Only)............3-115
XMŸ Radio Satellite Service (USA Only)..............3-90
Y
Your Vehicle and the Environment....................... 6-2
16