2004 PONTIAC GRAND PRIX section 5
[x] Cancel search: section 5Page 216 of 432

Do not add paper labels to discs, they could get caught
in the CD player.
Do not play 3 inch discs without a standard adapter disc.
If an error appears on the display, see ªCompact Disc
Messagesº later in this section.
\1 (Forward):Press and hold this pushbutton to
advance quickly within a track. You will hear sound at
a reduced volume. Release it to play the passage.
The display will show elapsed time.
RDM 3 (Random):Press this pushbutton to hear the
tracks in random, rather than sequential, order.
RDM and the track number will appear on the display.
4
s(Reverse):Press and hold this pushbutton
to reverse quickly within a track. You will hear sound
at a reduced volume. Release it to play the passage.
The display will show elapsed time.
EQ (Equalizer):Press EQ to select the desired
customized equalization setting while playing a compact
disc. The equalization will be automatically set
whenever you play a compact disc. See ªEQº listed
previously for more information.
wSEEKx:Press the down arrow while playing a
CD to go to the start of the current track if more
than eight seconds have played. Press the up arrow to
go to the next track. If you press either arrow more
than once, the player will continue moving backward or
forward through the disc.
wSCANx:Press and hold one of the arrows for
more than two seconds until SCAN and the track
number appear on the display and you hear a beep.
The disc will go to the next track, play for a few seconds,
then go on to the next track. Press this button again
to stop scanning.
RCL (Recall):Press this knob to see how long the
current track has been playing. To change the default
on the display (track or elapsed time), press the
knob until you see the display you want, then hold the
knob until the display ¯ashes. The selected display
will now be the default. While elapsed time is showing,
CD TIME will appear on the display.
3-112
Page 227 of 432
Playing a Compact Disc
The integral CD player can play the smaller 8 cm single
discs with an adapter ring. Full-size compact discs
and the smaller discs are loaded in the same manner.
If playing a CD-R the sound quality may be reduced due
to CD-R quality, the method of recording, the quality
of the music that has been recorded, and the way the
CD-R has been handled. You may experience an
increase in skipping, difficulty in ®nding tracks, and/or
difficulty in loading and ejecting. If these problems occur
try a know good CD.
Do not add paper labels to discs, they could get caught
in the CD player.
Do not play 3 inch discs without a standard adapter disc.
If an error appears on the display, see ªCompact Disc
Messagesº later in this section.
LOAD CD
Z:Press the LOAD side of this button to
load CDs into the compact disc player. This compact
disc player will hold up to six discs.To insert one disc, do the following:
1. Turn the ignition on.
2. Press and release the LOAD side of the
LOAD CD button.
3. Wait for the light, located to the right of the slot,
to turn green.
4. Load a disc. Insert the disc partway into the slot,
label side up. The player will pull the disc in.
When a disc is inserted, the CD symbol will be displayed.
If you select an equalization setting for your disc, it will be
activated each time you play a disc.
If the radio is on or off, the disc will begin to play
automatically.
To insert multiple discs, do the following:
1. Turn the ignition on.
2. Press and hold the LOAD side of the LOAD CD
button for two seconds.
You will hear a beep and the light, located to the
right of the slot, will begin to ¯ash.
3-123
Page 228 of 432

3. Once the light stops ¯ashing and turns green,
load a disc. Insert the disc partway into the slot,
label side up. The player will pull the disc in.
Once the disc is loaded, the light will begin ¯ashing
again. Once the light stops ¯ashing and turns
green you can load another disc. The disc player
takes up to six discs. Do not try to load more
than six.
To load more than one disc but less than six, complete
Steps 1 through 3. When you have ®nished loading
discs, with the radio on or off, press the LOAD side of
the LOAD CD button to cancel the loading function.
The radio will begin to play the last CD loaded.
When a disc is inserted, the CD symbol will be
displayed. If more than one disc has been loaded, a
number for each disc will be displayed. If you select an
equalization setting for your disc, it will be activated
each time you play a disc.
If the radio is on or off, the last disc loaded will begin to
play automatically.
As each new track starts to play, the track number will
appear on the display.Playing a Speci®c Loaded
Compact Disc
For every CD loaded, a number will appear on the radio
display. To play a speci®c CD, ®rst press the CD AUX
button to start playing a CD. Then press the numbered
pushbutton that corresponds to the CD you want to
play. A small bar will appear under the CD number that
is playing, and the track number will appear.
If an error appears on the radio display, see ªCompact
Disc Messagesº later in this section.
LOAD CD
Z(Eject):Pressing the CD eject side of
this button will eject a single disc or multiple discs.
To eject the disc that is currently playing, press
and release this button. To eject multiple discs, press
and hold this button for two seconds. You will hear
a beep and the light will ¯ash to let you know when a
disc is being ejected.
REMOVE CD will be displayed. You can now remove
the disc. If the disc is not removed, after 25 seconds,
the disc will be automatically pulled back into the
receiver. If you try to push the disc back into the
receiver, before the 25 second time period is complete,
the receiver will sense an error and will try to eject
the disc several times before stopping.
3-124
Page 229 of 432

Do not repeatedly press the CD eject side of the
LOAD CD eject button to eject a disc after you have
tried to push it in manually. The receivers 25-second
eject timer will reset at each press of eject, which
will cause the receiver to not eject the disc until the
25-second time period has elapsed.
Once the player stops and the disc is ejected, remove the
disc. After removing the disc, press the PWR knob off and
then on again. This will clear the disc-sensing feature and
enable discs to be loaded into the player again.
{REV (Reverse):Press and hold this button to
reverse quickly within a track. You will hear sound at a
reduced volume. Release it to play the passage.
The display will show elapsed time.
FWD
|(Forward):Press and hold this button to
advance quickly within a track. You will hear sound
at a reduced volume. Release it to play the passage.
The display will show elapsed time.
RPT (Repeat):With repeat, you can repeat one track
or an entire disc. To use repeat, do the following:
·To repeat the track you are listening to, press and
release the RPT button. RPT will appear on the
display. Press RPT again to turn it off.
·To repeat the disc you are listening to, press and
hold the RPT button for two seconds. RPT will
appear on the display. Press RPT again to turn it off.RDM (Random):With random, you can listen to the
tracks in random, rather than sequential, order, on one
disc or on all of the discs. To use random, do one
of the following:
·To play the tracks on the disc you are listening to in
random order, press and release the RDM button.
You will hear a beep and RANDOM ONE will
appear on the display. Press RDM again to turn
it off.
·To play the tracks on all of the discs that are
loaded in random order, press and hold RDM
for more than two seconds. RANDOM ALL will
appear on the display. Press RDM again to
turn it off.
AUTO EQ (Automatic Equalization):Press AUTO EQ
to select the desired equalization setting while playing
a compact disc. The equalization will be automatically
set whenever you play a compact disc. For more
information on AUTO EQ, see ªAUTO EQº listed
previously in this section.
sSEEKt:Press the left arrow to go to the start of
the current track, if more than ten seconds have passed.
Press the right arrow to go to the next track. If you
press the button more than once, the player will continue
moving backward or forward through the disc.
3-125
Page 230 of 432
sSCANt:To scan one disc, press and hold either
SCAN arrow for more than two seconds until SCAN
appears on the display and you hear a beep. Use this
feature to listen to 10 seconds of each track of the
currently selected disc. SCAN will appear on the display.
Press either SCAN arrow again, to stop scanning.
To scan all loaded discs, press and hold either SCAN
arrow for more than four seconds until DISC SCAN
appears on the display and you hear a beep. Use this
feature to listen to 10 seconds of the ®rst tracks of each
disc loaded. Press either SCAN arrow again, to stop
scanning.
RCL (Recall):Press this button to see how long the
current track has been playing. To change the default on
the display (track and elapsed time), press the button
until you see the display you want, then hold the button
until the display ¯ashes. The selected display will
now be the default.
BAND:Press this button to play the radio when a
disc(s) is in the player.Using Song List Mode
The integrated six-disc CD changer has a feature called
song list. This feature is capable of saving 20 track
selections.
To save tracks into the song list feature, perform the
following steps:
1. Turn the CD player on and load it with at least one
disc. See ªLOAD CDº listed previously in this section
for more information.
2. Check to see that the disc changer is not in song
list mode. S-LIST should not appear in the display.
If S-LIST is present, press the SONG LIST
button to turn it off.
3. Select the desired disc by pressing the numbered
pushbutton and then use the SEEK SCAN right
arrow button to locate the track that you want
to save. The track will begin to play.
4. Press and hold the SONG LIST button for two or
more seconds to save the track into memory.
When SONG LIST is pressed a beep will be
heard immediately. After two seconds of pressing
SONG LIST continuously, two beeps will sound
to con®rm that the track has been saved.
5. Repeat Steps 3 and 4 for saving other selections.
If you attempt to save more than 20 selections,
S-LIST FULL will appear on the display.
3-126
Page 237 of 432
Your Driving, the Road, and Your Vehicle..........4-2
Defensive Driving...........................................4-2
Drunken Driving.............................................4-3
Control of a Vehicle........................................4-6
Braking.........................................................4-6
Traction Control System (TCS).......................4-10
Enhanced Traction System (ETS)....................4-11
Stabilitrak
žPlus System................................4-13
Steering......................................................4-14
Off-Road Recovery.......................................4-16
Passing.......................................................4-16
Loss of Control.............................................4-18
Driving at Night............................................4-19
Driving in Rain and on Wet Roads..................4-20City Driving..................................................4-23
Freeway Driving...........................................4-24
Before Leaving on a Long Trip.......................4-25
Highway Hypnosis........................................4-26
Hill and Mountain Roads................................4-26
Winter Driving..............................................4-28
If You Are Stuck: In Sand, Mud,
Ice or Snow..............................................4-32
Towing..........................................................4-33
Towing Your Vehicle.....................................4-33
Recreational Vehicle Towing...........................4-33
Loading Your Vehicle....................................4-35
Towing a Trailer...........................................4-37
Section 4 Driving Your Vehicle
4-1
Page 245 of 432
Remember: Anti-lock doesn't change the time you need
to get your foot up to the brake pedal or always
decrease stopping distance. If you get too close to the
vehicle in front of you, you won't have time to apply
your brakes if that vehicle suddenly slows or stops.
Always leave enough room up ahead to stop, even
though you have anti-lock brakes.
Using Anti-Lock
Don't pump the brakes. Just hold the brake pedal down
®rmly and let anti-lock work for you. You may feel a
slight brake pedal pulsation or notice some noise,
but this is normal.
Braking in Emergencies
At some time, nearly every driver gets into a situation
that requires hard braking.
If you have anti-lock, you can steer and brake at the
same time. However, if you don't have anti-lock,
your ®rst reaction Ð to hit the brake pedal hard andhold it down Ð may be the wrong thing to do. Your
wheels can stop rolling. Once they do, the vehicle can't
respond to your steering. Momentum will carry it in
whatever direction it was headed when the wheels
stopped rolling. That could be off the road, into the very
thing you were trying to avoid, or into traffic.
If you don't have anti-lock, use a ªsqueezeº braking
technique. This will give you maximum braking while
maintaining steering control. You can do this by pushing
on the brake pedal with steadily increasing pressure.
In an emergency, you will probably want to squeeze
the brakes hard without locking the wheels. If you hear
or feel the wheels sliding, ease off the brake pedal.
This will help you retain steering control. If you
dohave
anti-lock, it's different. See ªAnti-Lock Brake Systemº
in this section.
In many emergencies, steering can help you more than
even the very best braking.
4-9
Page 252 of 432
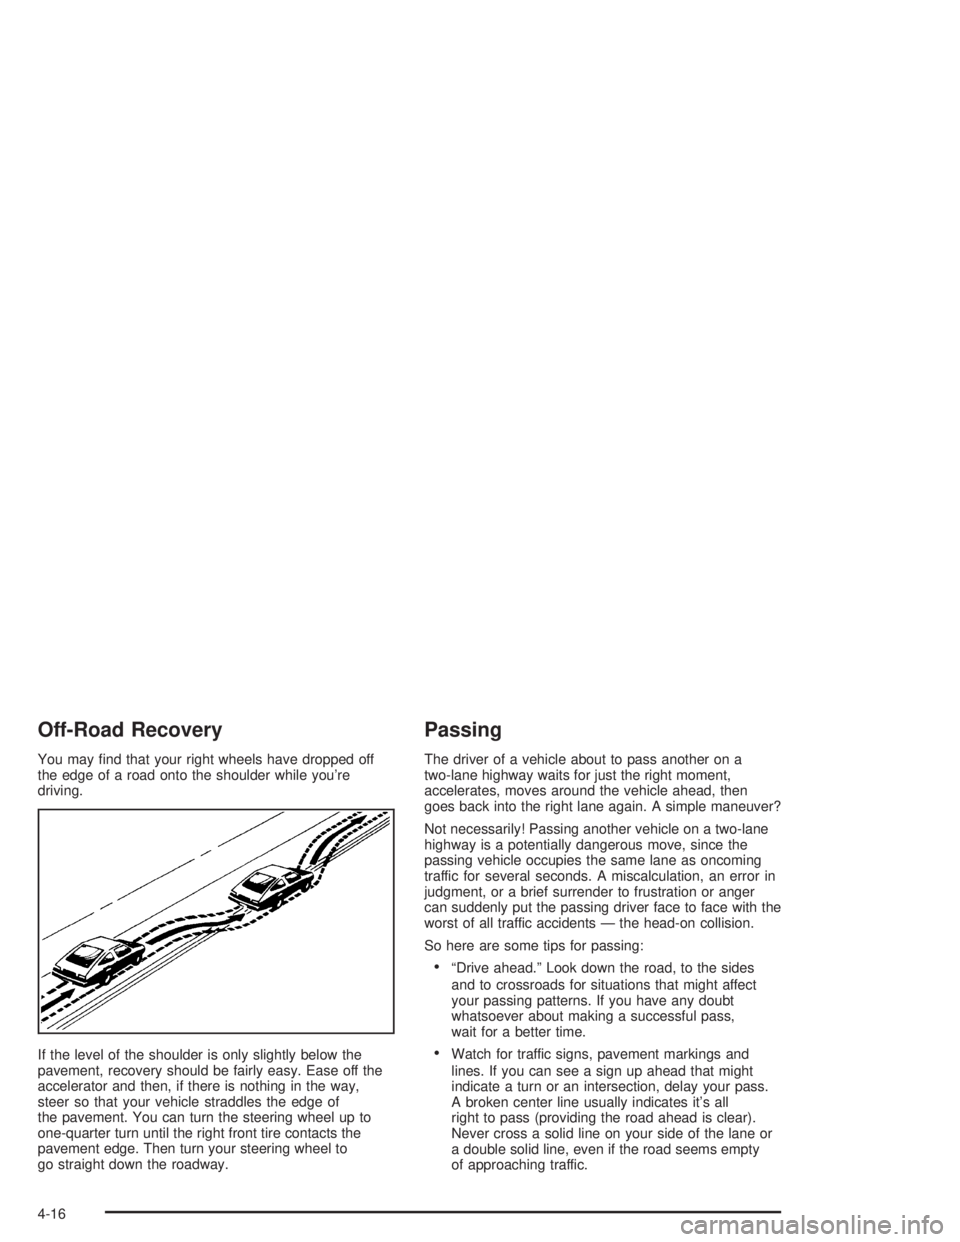
Off-Road Recovery
You may ®nd that your right wheels have dropped off
the edge of a road onto the shoulder while you're
driving.
If the level of the shoulder is only slightly below the
pavement, recovery should be fairly easy. Ease off the
accelerator and then, if there is nothing in the way,
steer so that your vehicle straddles the edge of
the pavement. You can turn the steering wheel up to
one-quarter turn until the right front tire contacts the
pavement edge. Then turn your steering wheel to
go straight down the roadway.
Passing
The driver of a vehicle about to pass another on a
two-lane highway waits for just the right moment,
accelerates, moves around the vehicle ahead, then
goes back into the right lane again. A simple maneuver?
Not necessarily! Passing another vehicle on a two-lane
highway is a potentially dangerous move, since the
passing vehicle occupies the same lane as oncoming
traffic for several seconds. A miscalculation, an error in
judgment, or a brief surrender to frustration or anger
can suddenly put the passing driver face to face with the
worst of all traffic accidents Ð the head-on collision.
So here are some tips for passing:
·ªDrive ahead.º Look down the road, to the sides
and to crossroads for situations that might affect
your passing patterns. If you have any doubt
whatsoever about making a successful pass,
wait for a better time.
·Watch for traffic signs, pavement markings and
lines. If you can see a sign up ahead that might
indicate a turn or an intersection, delay your pass.
A broken center line usually indicates it's all
right to pass (providing the road ahead is clear).
Never cross a solid line on your side of the lane or
a double solid line, even if the road seems empty
of approaching traffic.
4-16