Page 130 of 173

02-02-2004
Luggage net The stowing rings allow the net to be
placed in different positions.
YOUR 607 IN DETAIL125
Rear sunblind The blind, fitted to the rear parcel shelf, is intended to protect occu-pants from the glare of the sun andthe lights of cars behind
.
Sunblind operation: With the engine running: � Briefly press button Don the cen-
tre console to open it out.
� Briefly press button Dagain to
store it away.
Warning: Do not place anything on
the blind, to avoid it being damaged. Rear armrest This provides access to the ski flap from the passenger compartment. It has two cup holders.
Storage compartmentsThere are two storage compartments located behind the side trim of theboot. The left side storage compartment is fitted with a CD storage bracket foreight single CDs and one double CD.
To access a storage compartment:�
Push the handle downwards and fold down the panel.
Rear shelf compartment This is provided for the storage of a first aid kit. The catch on the lid is designed to withstand a weight of 9 lbs (4kg) onimpact.
Page 133 of 173
 AND THEELECTRONIC BRAKE FORCEDISTRIBUTION (EBFD)
The ABS, in conjunction with the electronic brake force distribution,increases the stability and manoe-vrability of y")
ANTI-LOCK BRAKING
SYSTEM (ABS) AND THEELECTRONIC BRAKE FORCEDISTRIBUTION (EBFD)
The ABS, in conjunction with the electronic brake force distribution,increases the stability and manoe-vrability of your vehicle on braking, inparticular on poor or slippery roadsurfaces. Note:when changing wheels (tyres
and rims), make sure that these are approved. The anti-lock braking system comes into operation automatically whenthere is a risk of wheel lock.
When this warning lightcomes on, accompanied bya buzzer and the message"ABS fault" , it indicates
that there is a malfunction of
the ABS, which can cause a loss ofcontrol of the vehicle when braking.
When this warning lightcomes on, connected to the
STOPand ABS warning
lights, accompanied by abuzzer and the message
'Braking fault' , it indicates that there
is a malfunction of the electronicbrake force distribution, which cancause a loss of control of the vehiclewhen braking.
YOUR 607 IN DETAIL
128
EMERGENCY BRAKING
ASSISTANCE SYSTEM
In an emergency, this system enables the optimum braking pres-
sure to be reached more quickly,thus reducing the stopping distance. It is triggered by the speed at which
the brake pedal is activated. The
effect of this is a reduction in theresistance of the pedal and an
increase in braking efficiency.Stop immediately. In both cases, consult a Peugeot
dealer.
Normal operation of the ABS maymake itself felt by slight vibrationsof the brake pedal. In emergency braking, press very firmly without releasingthe pressure.
MANUAL GEARBOX Reverse*
To change to reverse gear, lift the ring under the gear lever knob andpush the gear lever to the left then tothe front. Reverse gear can only be engaged when the vehicle is stationary withthe engine idling.
* According to engine.
02-02-2004
Page 134 of 173

02-02-2004
YOUR 607 IN DETAIL
130
ELECTRONICALLY CONTROLLED SUSPENSION The suspension adapts automatical- ly and instantly to different drivingstyles and road characteristics,improving the comfort of the occu-pants and the vehicle's road holdingcapabilities. The suspension favours smooth shock absorption, ensuring a com-fortable ride, but as soon as condi-tions demand a change (sporty dri-ving, tight bends, avoidance action,etc.) it automatically selects firmershock absorption, guaranteeing opti-mum road holding. Selecting the SPORT position
�Press switch 1, the
SPORT indicator light will
come on, accompaniedby an audible signal.
In this position, the suspension ismaintained in the SPORT position.
To return to automatic operation
� Press switch 1again. The
indicator light will go out and the AUTOindicator
light comes on, accompa-nied by an audible signal.
Operating check This is confirmed by the switch light
and the indicator lights. The switchlight comes on for approximatelythree seconds every time the ignitionis switched on. If the switch light flashes or if the indicator light comes on, accompa-nied by an audible signal and themessage ' Hydraulic suspension
pressure insufficient' , contact your
PEUGEOT dealer.
THE HANDBRAKE
To applyWhen parking on a slope, turn the wheels towards the kerb and applythe handbrake.
To release Pull the handle and press the button to release the handbrake and movethe vehicle.
Page 135 of 173

02-02-2004
YOUR 607 IN DETAIL129
Operating check
When a malfunction of the sys- tems occurs, the switch lightflashes and the warning lightcomes on, accompanied by anaudible signal and the mes-
sage 'ESP/ASR system faulty' on the
multi-function display.
Contact a PEUGEOT dealer to have the system checked.
Disarming the ASR/ESP systems In exceptional conditions (starting a vehicle which is bogged down, stuck
in snow, on soft ground...), it may be
advisable to disarm the ASR system,so that the wheels can move freelyand regain grip.
�Press the 'ESP OFF'
switch, located under thesteering wheel to the left.
The switch lights up and thewarning light comes on,accompanied by an audiblesignal and the message
'ASR/ESP system de-acti-vated' on the multiÐfunction
display : the ASR and ESP systems
no longer have any effect on theengine operation. These are triggered again :
� automatically if the ignition is
switched off,
� manually by pressing the switchagain.DYNAMIC STABILITY
CONTROL (ESP) AND
TRACTION CONTROL (ASR) These systems are linked and com-
plementary to the ABS system. In the event of a significant variation between the trajectory of the vehicle
and the path required by the driver,
the ESP system acts automaticallyon the engine and on the brake ofone or more wheels, to put the vehi-cle back on course. The traction control (ASR) system optimises drive, in order to avoid thewheels slipping, by acting on thebrakes of the drive wheels and onthe engine. It also enables the direc-tional stability of the vehicle to beimproved during acceleration. Operation of the ESP
and ASR systems
When one of the two sys-tems is in operation, thisindicator light flashes.
The ESP system offers exceptional safety in nor-mal driving, but this shouldnot encourage the driver totake extra risks or drive at
high speed. The correct functioning of this sys- tem depends on observation of themanufacturer's recommendationsregarding wheels (tyres and rims),the braking components and theelectronic components, as well asthe PEUGEOT assembly andoperation procedures. After an impact, have the system checked by a PEUGEOT dealer
Page 154 of 173

02-02-2004
PRACTICAL INFORMATION147
CHANGING A BULB Front lights
In the engine compartment, remove the style cover secured by one or two butterfly screws, a plastic retainer clip andtwo screws. Note:
handle the bulbs with a dry cloth.
1 - Dipped beam headlamps: H7-55W or Xenon bulb.
WARNING: RISK OF ELECTROCUTION Xenon bulbs must be replaced by a PEUGEOT
dealer.
2 - Main beam headlamps: H1-55W.
� Turn the protective cover of the faulty bulb a quarterof a turn and remove it.
� Disconnect the connector.
� Press the end of the securing clip to free it. Changethe bulb.
� When fitting the new bulb, ensure that the directionnotches are positioned correctly and the securing
clip is fixed properly. �
Reconnect the connector.
� Refit the protective cover.
The headlamps are fitted with polycarbonate glass with aprotective coating. Do not clean them with a dry or abra-
sive cloth, nor with a detergent or solvent product.
3 - Side lights: W 5 W.
� Pull the socket rearwards, remove the bulb and change it.
4 - Direction indicators: PY 21 W (amber).
� Turn the bulb holder a quarter turn and remove it.
� Change the bulb.
� Refit the style cover.
Front foglamps: H1 - 55 W.
Note: In certain climatic conditions (low temperature,
humidity), condensation on the inside surface of the
headlamp glass is normal ; it disappears a few minutes
after the lights are switched on.
Page 155 of 173
.
2 - Brake lights/side lights: P21/5 W.
� Detach the luggage net.
� Lift the boot carpet with the lifting hook. Sec")
02-02-2004
Rear lights Rear wing lights
1 - Direction indicators: PY 21 W (amber).
2 - Brake lights/side lights: P21/5 W.
� Detach the luggage net.
� Lift the boot carpet with the lifting hook. Secure this hook behindthe boot seal.
� Unclip the lower part of the silltrim, then dislodge it by pullingupwards.
� Remove the plastic retainer clipsecuring the side trim to the
floor. �
Unclip the side trim.
� Remove the two butterfly nutssecuring the light.
� Remove the eyelet.
� Take out the lamp.
� Turn the lamp holder a quarterturn.
� Change the faulty bulb.
� Lock the bulb holder in place.When refitting it, ensure that thelamp is correctly positioned andsecured.
PRACTICAL INFORMATION
148Direction indicator repeaters:
WY 5 W (amber).
� Push the repeater forwards orbackwards and release the
assembly.
� Hold the connector and turn thetransparent cover a quarter turn.
� Change the bulb.
Amber coloured bulbs
(direction indicators and side repeaters) must bereplaced with bulbs of
identical specification and
colour.
Page 156 of 173
.
2 - Brake lights/side lights: P21/5 W.
� Detach the luggage net.
� Lift the boot carpet with the lifting hook. Sec")
02-02-2004
Rear lights Rear wing lights
1 - Direction indicators: PY 21 W (amber).
2 - Brake lights/side lights: P21/5 W.
� Detach the luggage net.
� Lift the boot carpet with the lifting hook. Secure this hook behindthe boot seal.
� Unclip the lower part of the silltrim, then dislodge it by pullingupwards.
� Remove the plastic retainer clipsecuring the side trim to the
floor. �
Unclip the side trim.
� Remove the two butterfly nutssecuring the light.
� Remove the eyelet.
� Take out the lamp.
� Turn the lamp holder a quarterturn.
� Change the faulty bulb.
� Lock the bulb holder in place.When refitting it, ensure that thelamp is correctly positioned andsecured.
PRACTICAL INFORMATION
148Direction indicator repeaters:
WY 5 W (amber).
� Push the repeater forwards orbackwards and release the
assembly.
� Hold the connector and turn thetransparent cover a quarter turn.
� Change the bulb.
Amber coloured bulbs
(direction indicators and side repeaters) must bereplaced with bulbs of
identical specification and
colour.
Page 157 of 173
02-02-2004
149
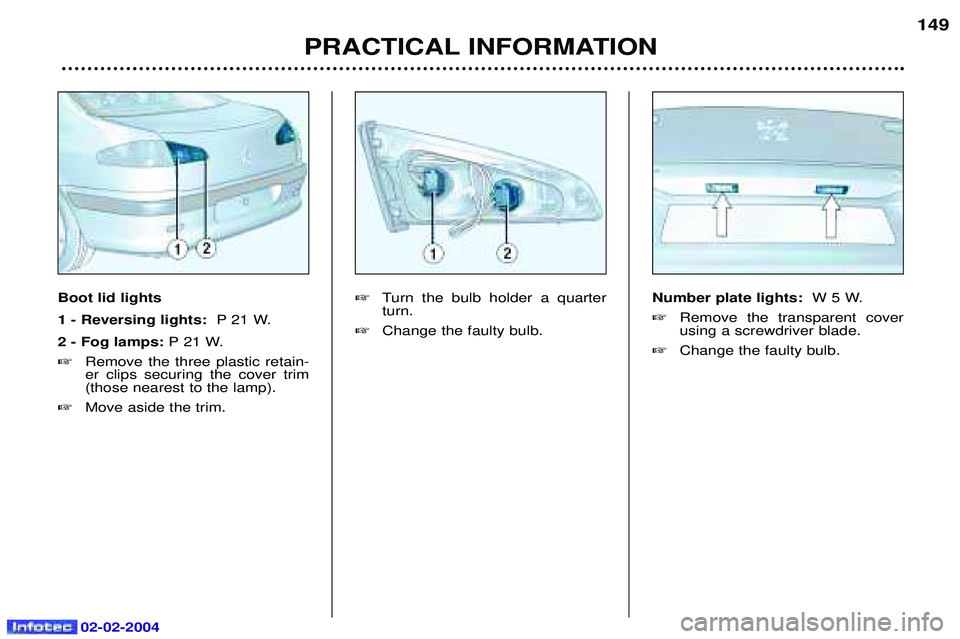
PRACTICAL INFORMATION
Boot lid lights 1 - Reversing lights: P 21 W.
2 - Fog lamps: P 21 W.
� Remove the three plastic retain- er clips securing the cover trim(those nearest to the lamp).
� Move aside the trim. �
Turn the bulb holder a quarterturn.
� Change the faulty bulb. Number plate lights:
W 5 W.
� Remove the transparent coverusing a screwdriver blade.
� Change the faulty bulb.