Page 22 of 296
Seat lifter (if so equipped for driver’s
seat)
Turn either dial to adjust the angle and height of
the seat cushion to the desired position.
Lumbar support (if so equipped for
driver’s seat)
The lumbar support feature provides lower back
support to the driver. Move the lever forward or
backward to adjust the seat lumbar area.
REAR SEAT ADJUSTMENT (Type A)
Folding
s1Pull outward on the 2 straps at the bottom of
the seat cushions.
s2Lift the front of the seat cushion up and
remove the seat cushion. Store the seat
cushion in a secure place.
WRS0131WRS0389WRS0180
1-4Safety—Seats, seat belts and supplemental air bags
ZREVIEW COPY:Ð2004 Xterra(xtr)
Owners Manual(owners)ÐUSA English(nna)
10/23/03Ðdebbie
X
Page 24 of 296

cDo not allow people to ride in any area
of your vehicle that is not equipped with
seats and seat belts. Be sure everyone
in your vehicle is in a seat and using a
seat belt properly. Never ride in the rear
seat unless the seat bottom cushions
are in place and latched.
cProperly secure all cargo with ropes or
straps to help prevent it from sliding or
shifting. In a sudden stop or collision,
unsecured cargo could cause personal
injury.
cWhen returning the seatbacks to the
upright position, be certain they are
completely secured. If they are not com-
pletely secured in the latched position,
passengers may be injured in an acci-
dent or sudden stop.
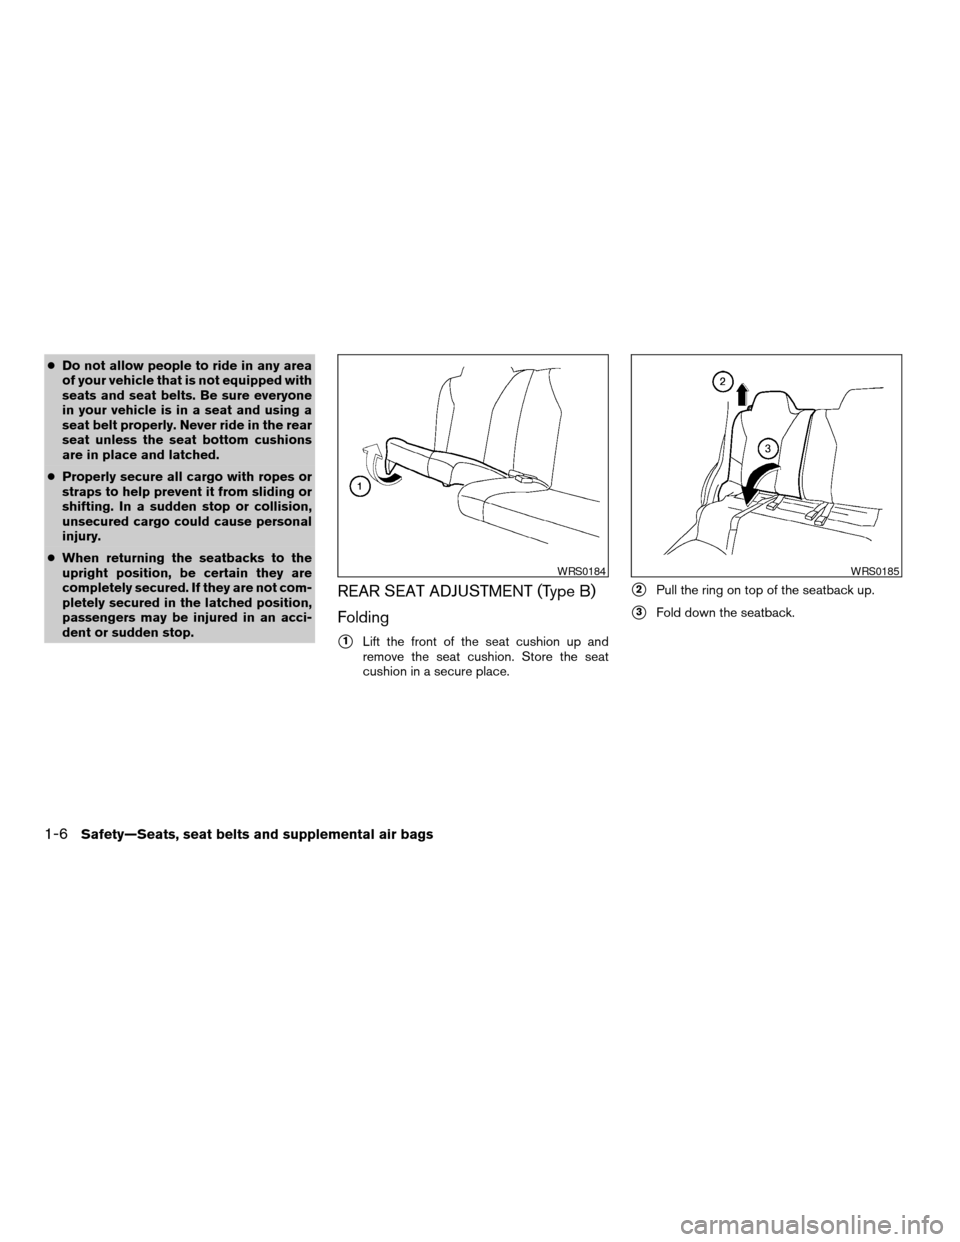
REAR SEAT ADJUSTMENT (Type B)
Folding
s1Lift the front of the seat cushion up and
remove the seat cushion. Store the seat
cushion in a secure place.
s2Pull the ring on top of the seatback up.
s3Fold down the seatback.
WRS0184WRS0185
1-6Safety—Seats, seat belts and supplemental air bags
ZREVIEW COPY:Ð2004 Xterra(xtr)
Owners Manual(owners)ÐUSA English(nna)
10/23/03Ðdebbie
X
Page 26 of 296

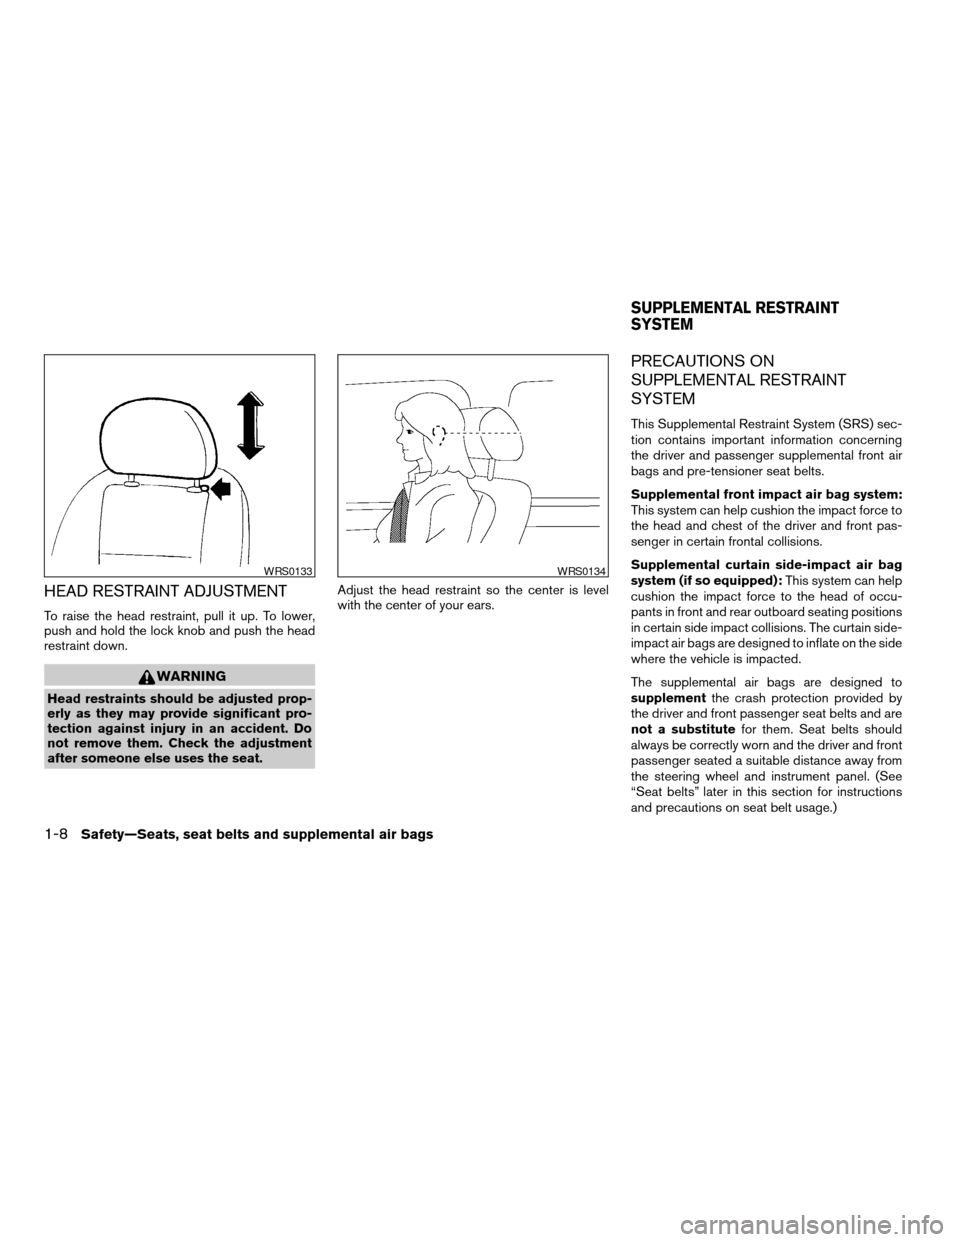
HEAD RESTRAINT ADJUSTMENT
To raise the head restraint, pull it up. To lower,
push and hold the lock knob and push the head
restraint down.
WARNING
Head restraints should be adjusted prop-
erly as they may provide significant pro-
tection against injury in an accident. Do
not remove them. Check the adjustment
after someone else uses the seat.Adjust the head restraint so the center is level
with the center of your ears.
PRECAUTIONS ON
SUPPLEMENTAL RESTRAINT
SYSTEM
This Supplemental Restraint System (SRS) sec-
tion contains important information concerning
the driver and passenger supplemental front air
bags and pre-tensioner seat belts.
Supplemental front impact air bag system:
This system can help cushion the impact force to
the head and chest of the driver and front pas-
senger in certain frontal collisions.
Supplemental curtain side-impact air bag
system (if so equipped):This system can help
cushion the impact force to the head of occu-
pants in front and rear outboard seating positions
in certain side impact collisions. The curtain side-
impact air bags are designed to inflate on the side
where the vehicle is impacted.
The supplemental air bags are designed to
supplementthe crash protection provided by
the driver and front passenger seat belts and are
not a substitutefor them. Seat belts should
always be correctly worn and the driver and front
passenger seated a suitable distance away from
the steering wheel and instrument panel. (See
“Seat belts” later in this section for instructions
and precautions on seat belt usage.)
WRS0133WRS0134
SUPPLEMENTAL RESTRAINT
SYSTEM
1-8Safety—Seats, seat belts and supplemental air bags
ZREVIEW COPY:Ð2004 Xterra(xtr)
Owners Manual(owners)ÐUSA English(nna)
10/23/03Ðdebbie
X
Page 51 of 296
2. Route the seat belt tongue through the child
restraint and insert it into the buckle until you
hear and feel the latch engage.
Be sure to follow the child restraint manu-
facturer’s instructions for belt routing.3. Remove all slack in the lap belt for a very
tight fit by pulling forcefully on the lap belt
adjustment.4. Before placing the child in the child restraint,
use force to tilt the child restraint from side
to side, and tug it forward to make sure it is
securely in place. It should not move more
than 1 inch (25mm) .
5. If it is not secure, try to tighten the belt again,
or put the restraint in another seat.
6. Check to make sure the child restraint is
properly secured prior to each use.
Front Facing — step 2
WRS0250
Front Facing — step 3
WRS0264
Front Facing — step 4
WRS0265
Safety—Seats, seat belts and supplemental air bags1-33
ZREVIEW COPY:Ð2004 Xterra(xtr)
Owners Manual(owners)ÐUSA English(nna)
10/23/03Ðdebbie
X
Page 52 of 296
Rear facing
When you install a child restraint in the rear
center seat, follow these steps:
1. Position the child restraint on the seat as
illustrated. Always follow the restraint manu-
facturer’s instructions.2. Route the seat belt tongue through the child
restraint and insert it into the buckle until you
hear and feel the latch engage.
Be sure to follow the child restraint manu-
facturer’s instructions for belt routing.3. Remove all slack in the lap belt for a very
tight fit by pulling forcefully on the lap belt
adjustment.
Rear Facing — step 1
WRS0266
Rear Facing — step 2
WRS0267
Rear Facing — step 3
WRS0268
1-34Safety—Seats, seat belts and supplemental air bags
ZREVIEW COPY:Ð2004 Xterra(xtr)
Owners Manual(owners)ÐUSA English(nna)
10/23/03Ðdebbie
X
Page 54 of 296
2. Route the seat belt tongue through the child
restraint and insert it into the buckle until you
hear and feel the latch engage.
Be sure to follow the child restraint manu-
facturer’s instructions for belt routing.3. Pull on the shoulder belt until all of the belt is
fully extended. At this time, the belt retractor
is in the automatic locking mode (child re-
straint mode) . It reverts back to emergency
locking mode when the belt is fully retracted.4. Allow the belt to retract. Pull up on the
shoulder belt to remove any slack in the belt.
Front Facing — step 2
WRS0250
Front Facing — step 3
WRS0251
Front Facing — step 4
WRS0146
1-36Safety—Seats, seat belts and supplemental air bags
ZREVIEW COPY:Ð2004 Xterra(xtr)
Owners Manual(owners)ÐUSA English(nna)
10/23/03Ðdebbie
X
Page 55 of 296

5. Before placing the child in the child restraint,
use force to tilt the child restraint from side
to side, and tug it forward to make sure it is
securely held in place. It should not move
more than 1 inch (25mm) .
6. Check that the retractor is in the automatic
locking mode by trying to pull more belt out
of the retractor. If you cannot pull any more
belt webbing out of the retractor, the retrac-
tor is in the automatic locking mode.
7. Check to make sure the child restraint is
properly secured prior to each use. If the belt
is not locked, repeat steps 3 through 6.After the child restraint is removed and the seat
belt is fully retracted, the automatic locking mode
(child restraint mode) is canceled.Rear facing
When you install a child restraint in a rear out-
board seat, follow these steps:
1. Position the child restraint on the seat. Al-
ways follow the restraint manufacturer’s in-
structions.
Front Facing — step 5
WRS0252
Rear Facing — step 1
WRS0273
Safety—Seats, seat belts and supplemental air bags1-37
ZREVIEW COPY:Ð2004 Xterra(xtr)
Owners Manual(owners)ÐUSA English(nna)
10/23/03Ðdebbie
X
Page 56 of 296
2. Route the seat belt tongue through the child
restraint and insert it into the buckle until you
hear and feel it engage.
Be sure to follow the child restraint manu-
facturer’s instructions for belt routing.3. Pull on the shoulder belt until all of the belt is
fully extended. At this time, the belt retractor
is in the automatic locking mode (child re-
straint mode) . It reverts back to emergency
locking mode when the belt is fully retracted.4. Allow the belt to retract. Pull up on the
shoulder belt to remove any slack in the belt.
Rear Facing — step 2
WRS0309
Rear Facing — step 3
WRS0260
Rear Facing — step 4
WRS0253
1-38Safety—Seats, seat belts and supplemental air bags
ZREVIEW COPY:Ð2004 Xterra(xtr)
Owners Manual(owners)ÐUSA English(nna)
10/23/03Ðdebbie
X