2004 NISSAN XTERRA wheel
[x] Cancel search: wheelPage 187 of 296
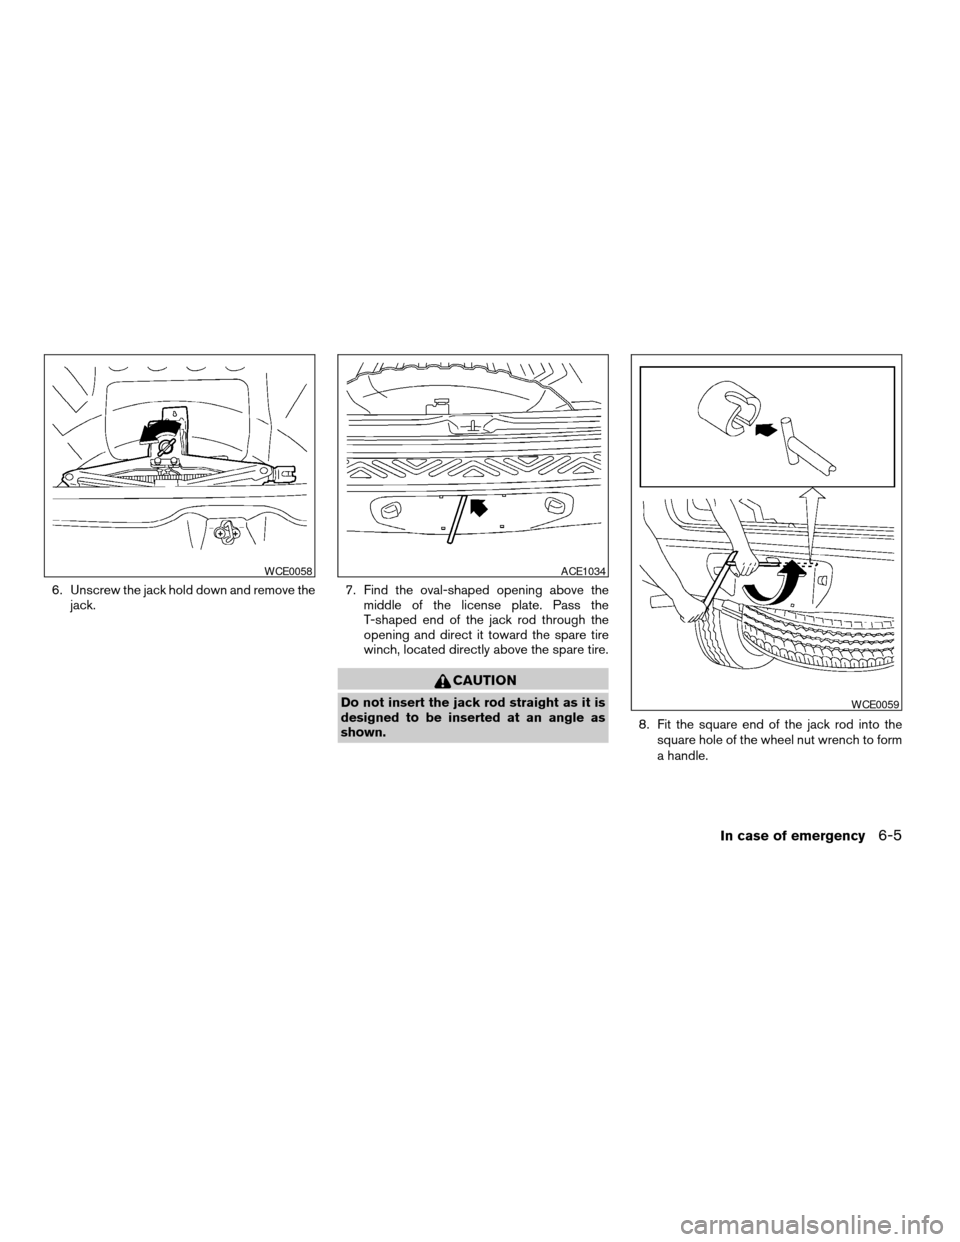
6. Unscrew the jack hold down and remove the
jack.7. Find the oval-shaped opening above the
middle of the license plate. Pass the
T-shaped end of the jack rod through the
opening and direct it toward the spare tire
winch, located directly above the spare tire.
CAUTION
Do not insert the jack rod straight as it is
designed to be inserted at an angle as
shown.8. Fit the square end of the jack rod into the
square hole of the wheel nut wrench to form
a handle.
WCE0058ACE1034
WCE0059
In case of emergency6-5
ZREVIEW COPY:Ð2004 Xterra(xtr)
Owners Manual(owners)ÐUSA English(nna)
10/23/03Ðdebbie
X
Page 188 of 296
9. Seat the T-shaped end of the jack rod into
the T-shaped opening of the tire winch. Ap-
ply pressure to keep the jack rod engaged in
the spare tire winch and turn the jack rod
counterclockwise to lower the spare tire.
10. Once the spare tire is completely lowered,
reach under the vehicle, remove the retainer
chain, and carefully slide the tire from under
the rear of the vehicle.
CAUTION
Be sure to center the spare tire suspend-
ing plate on the wheel and then lift the
spare tire.
Removing wheel cover
CAUTION
Do not use your hands to pry off wheel
caps or wheel covers. Doing so could re-
sult in personal injury.
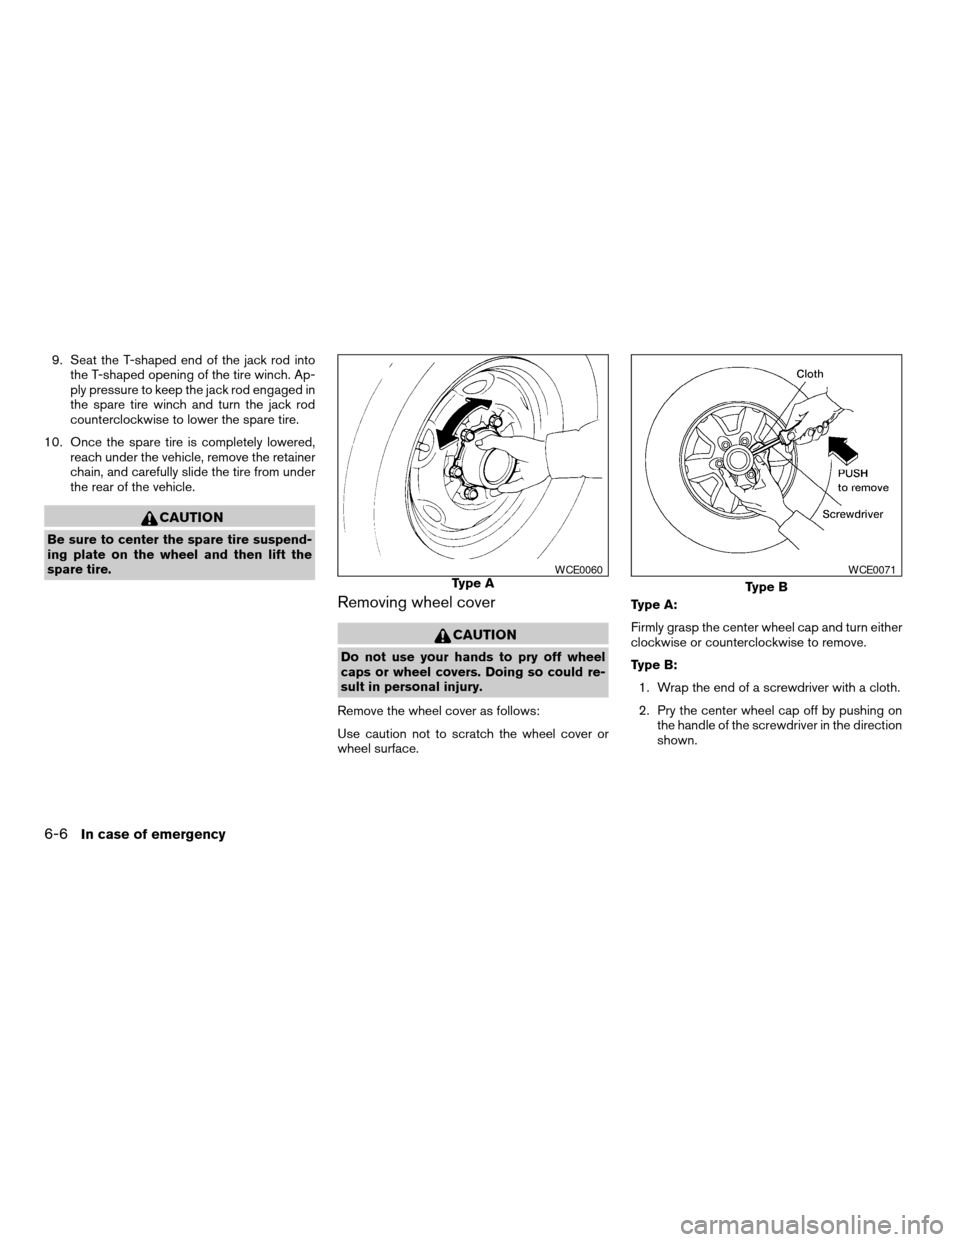
Remove the wheel cover as follows:
Use caution not to scratch the wheel cover or
wheel surface.Type A:
Firmly grasp the center wheel cap and turn either
clockwise or counterclockwise to remove.
Type B:
1. Wrap the end of a screwdriver with a cloth.
2. Pry the center wheel cap off by pushing on
the handle of the screwdriver in the direction
shown.
Type AWCE0060
Type B
WCE0071
6-6In case of emergency
ZREVIEW COPY:Ð2004 Xterra(xtr)
Owners Manual(owners)ÐUSA English(nna)
10/23/03Ðdebbie
X
Page 189 of 296
Jacking up vehicle and removing the
damaged tire
WARNING
cNever get under the vehicle while it is
supported only by the jack.
cUse only the jack provided with your
vehicle to lift the vehicle. Do not use the
jack provided with your vehicle on other
vehicles. The jack is designed for lifting
only your vehicle during a tire change.cUse the correct jack-up points. Never
use any other part of the vehicle for jack
support.
cNever jack up the vehicle more than
necessary.
cNever use blocks on or under the jack.
cDo not start or run the engine while
vehicle is on the jack. It may cause the
vehicle to move. This is especially true
for vehicles with limited slip
differentials.
cDo not allow passengers to stay in the
vehicle while it is on the jack.
cNever run the engine with a wheel(s) off
the ground. It may cause the vehicle to
move.
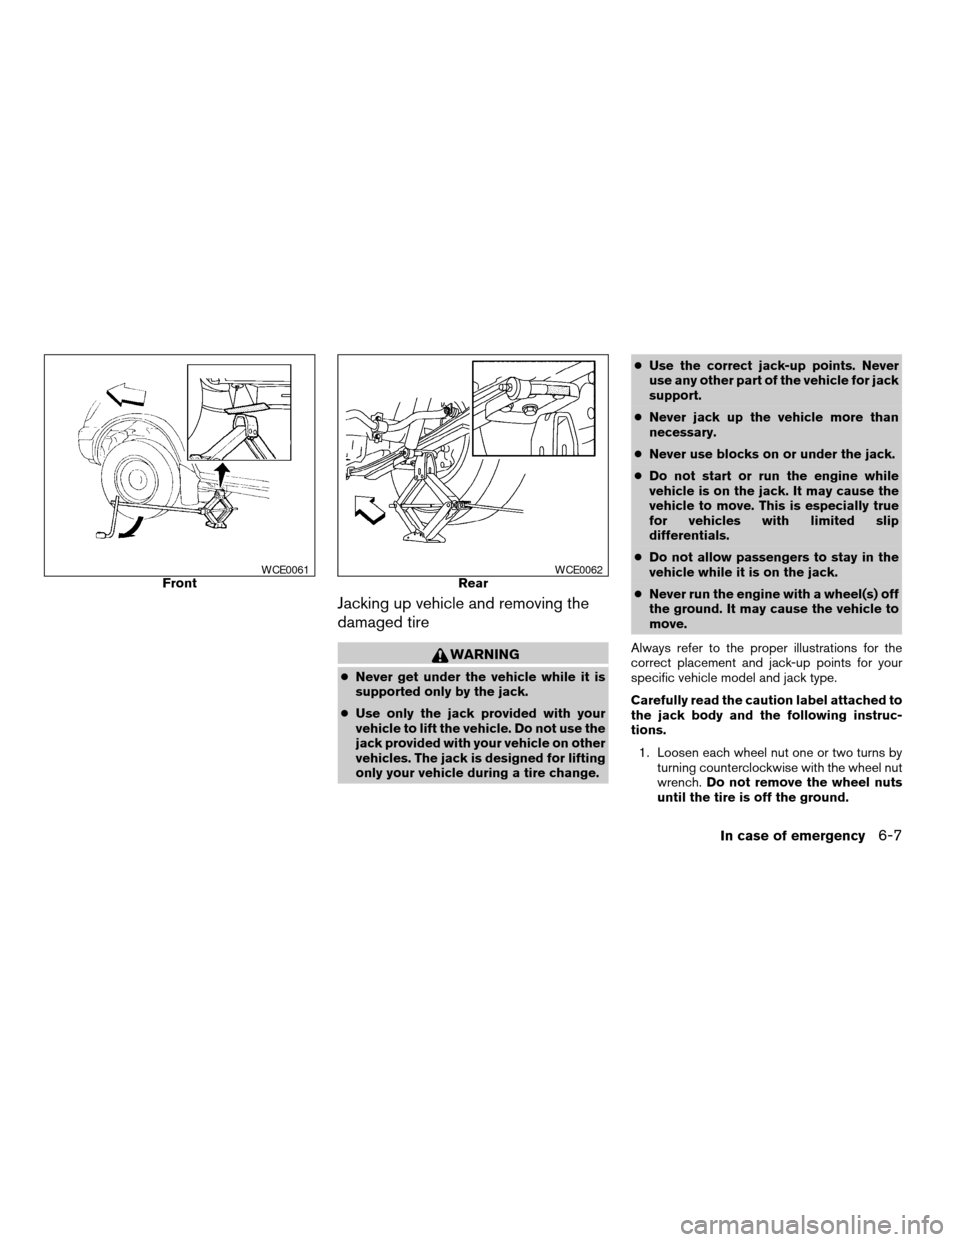
Always refer to the proper illustrations for the
correct placement and jack-up points for your
specific vehicle model and jack type.
Carefully read the caution label attached to
the jack body and the following instruc-
tions.
1. Loosen each wheel nut one or two turns by
turning counterclockwise with the wheel nut
wrench.Do not remove the wheel nuts
until the tire is off the ground.
FrontWCE0061RearWCE0062
In case of emergency6-7
ZREVIEW COPY:Ð2004 Xterra(xtr)
Owners Manual(owners)ÐUSA English(nna)
10/23/03Ðdebbie
X
Page 190 of 296

2. Place the jack directly under the jack-up
point as illustrated so the top of the jack
contacts the vehicle at the jack-up point.
Under some conditions there will not be
sufficient clearance to use the primary rear
jacking point on vehicles equipped with 15
inch wheels. If this occurs, use the alternate
jack-up point
s1for vehicles equipped with
15 inch wheels. When using the alternate
jack-up point, position the jack on the axle as
close as possible to the tire that needs to be
changed.The jack should be used on firm and
level ground.
3. To lift the vehicle, securely hold the jack lever
and rod. Carefully raise the vehicle until the
tire clears the ground.
When using alternate rear jack-up
point for 15 inch wheels, raise the ve-
hicle so that the tire is no more than 2
inches (50 mm) off the ground.
4. Remove the wheel nuts and then remove the
tire.
Installing the spare tire
The spare tire is designed for emergency
use. See specific instructions under the
heading “Wheels and tires” in the “Mainte-
nance and do-it-yourself” section of this
manual.
1. Clean any mud or dirt from the surface be-
tween the wheel and hub.
2. Carefully put the spare tire on and tighten
the wheel nuts finger tight.
3. With the wheel nut wrench, tighten wheel
nuts alternately and evenly as illustrated until
they are tight.
Rear (15 inch wheel alternate jack-up
point)
WCE0361WCE0063
6-8In case of emergency
ZREVIEW COPY:Ð2004 Xterra(xtr)
Owners Manual(owners)ÐUSA English(nna)
10/23/03Ðdebbie
X
Page 191 of 296
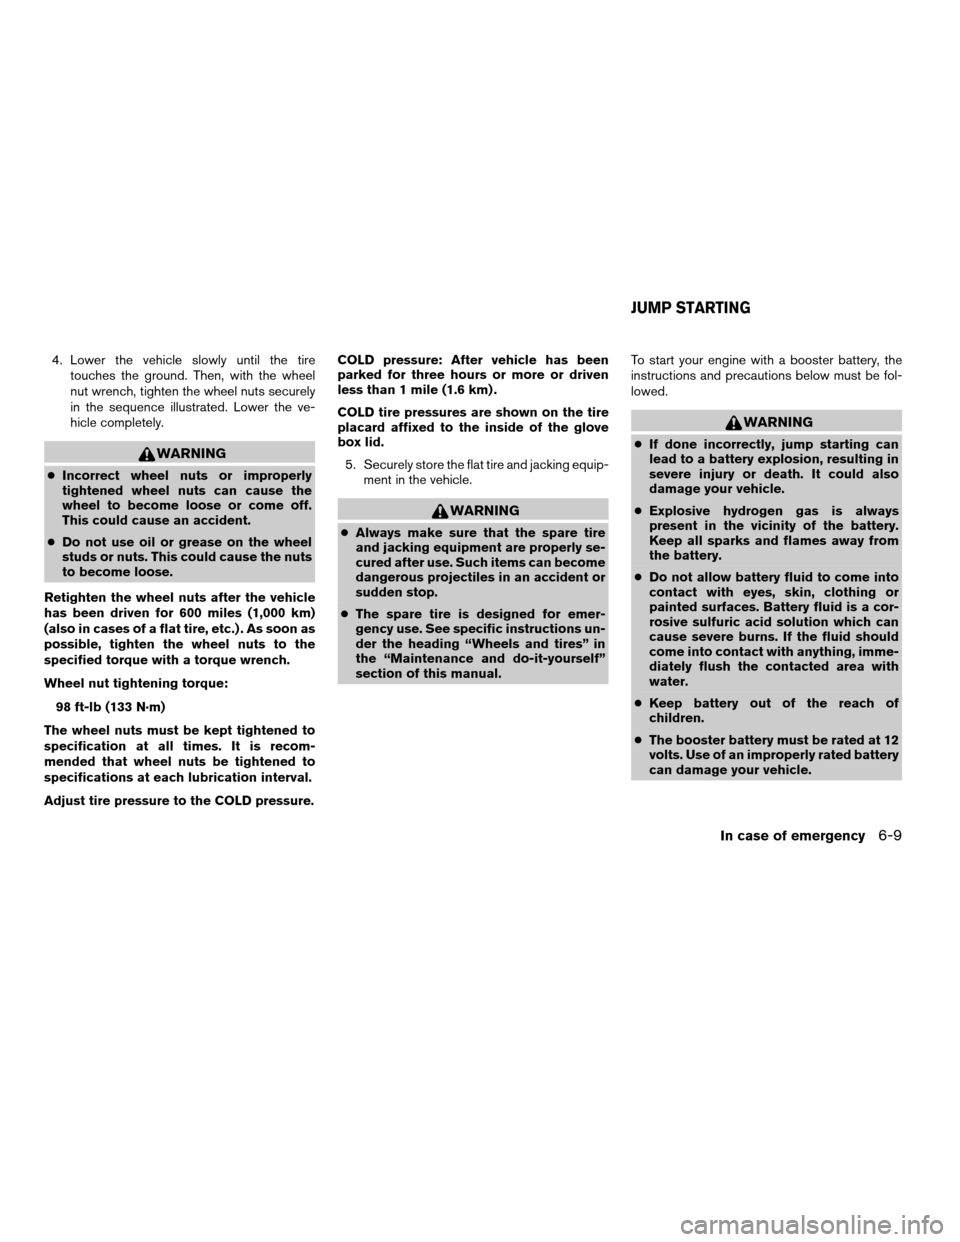
4. Lower the vehicle slowly until the tire
touches the ground. Then, with the wheel
nut wrench, tighten the wheel nuts securely
in the sequence illustrated. Lower the ve-
hicle completely.
WARNING
cIncorrect wheel nuts or improperly
tightened wheel nuts can cause the
wheel to become loose or come off.
This could cause an accident.
cDo not use oil or grease on the wheel
studs or nuts. This could cause the nuts
to become loose.
Retighten the wheel nuts after the vehicle
has been driven for 600 miles (1,000 km)
(also in cases of a flat tire, etc.) . As soon as
possible, tighten the wheel nuts to the
specified torque with a torque wrench.
Wheel nut tightening torque:
98 ft-lb (133 N·m)
The wheel nuts must be kept tightened to
specification at all times. It is recom-
mended that wheel nuts be tightened to
specifications at each lubrication interval.
Adjust tire pressure to the COLD pressure.COLD pressure: After vehicle has been
parked for three hours or more or driven
less than 1 mile (1.6 km) .
COLD tire pressures are shown on the tire
placard affixed to the inside of the glove
box lid.
5. Securely store the flat tire and jacking equip-
ment in the vehicle.
WARNING
cAlways make sure that the spare tire
and jacking equipment are properly se-
cured after use. Such items can become
dangerous projectiles in an accident or
sudden stop.
cThe spare tire is designed for emer-
gency use. See specific instructions un-
der the heading “Wheels and tires” in
the “Maintenance and do-it-yourself”
section of this manual.To start your engine with a booster battery, the
instructions and precautions below must be fol-
lowed.
WARNING
cIf done incorrectly, jump starting can
lead to a battery explosion, resulting in
severe injury or death. It could also
damage your vehicle.
cExplosive hydrogen gas is always
present in the vicinity of the battery.
Keep all sparks and flames away from
the battery.
cDo not allow battery fluid to come into
contact with eyes, skin, clothing or
painted surfaces. Battery fluid is a cor-
rosive sulfuric acid solution which can
cause severe burns. If the fluid should
come into contact with anything, imme-
diately flush the contacted area with
water.
cKeep battery out of the reach of
children.
cThe booster battery must be rated at 12
volts. Use of an improperly rated battery
can damage your vehicle.
JUMP STARTING
In case of emergency6-9
ZREVIEW COPY:Ð2004 Xterra(xtr)
Owners Manual(owners)ÐUSA English(nna)
10/23/03Ðdebbie
X
Page 195 of 296
CAUTION
cWhen towing, make sure that the trans-
mission, axles, steering system and
powertrain are in working condition. If
any unit is damaged, dollies must be
used.
cAlways attach safety chains before
towing.
For information about towing your vehicle behind
a recreational vehicle (RV) , refer to “Flat towing”
in the “Technical and consumer information” sec-
tion of this manual.
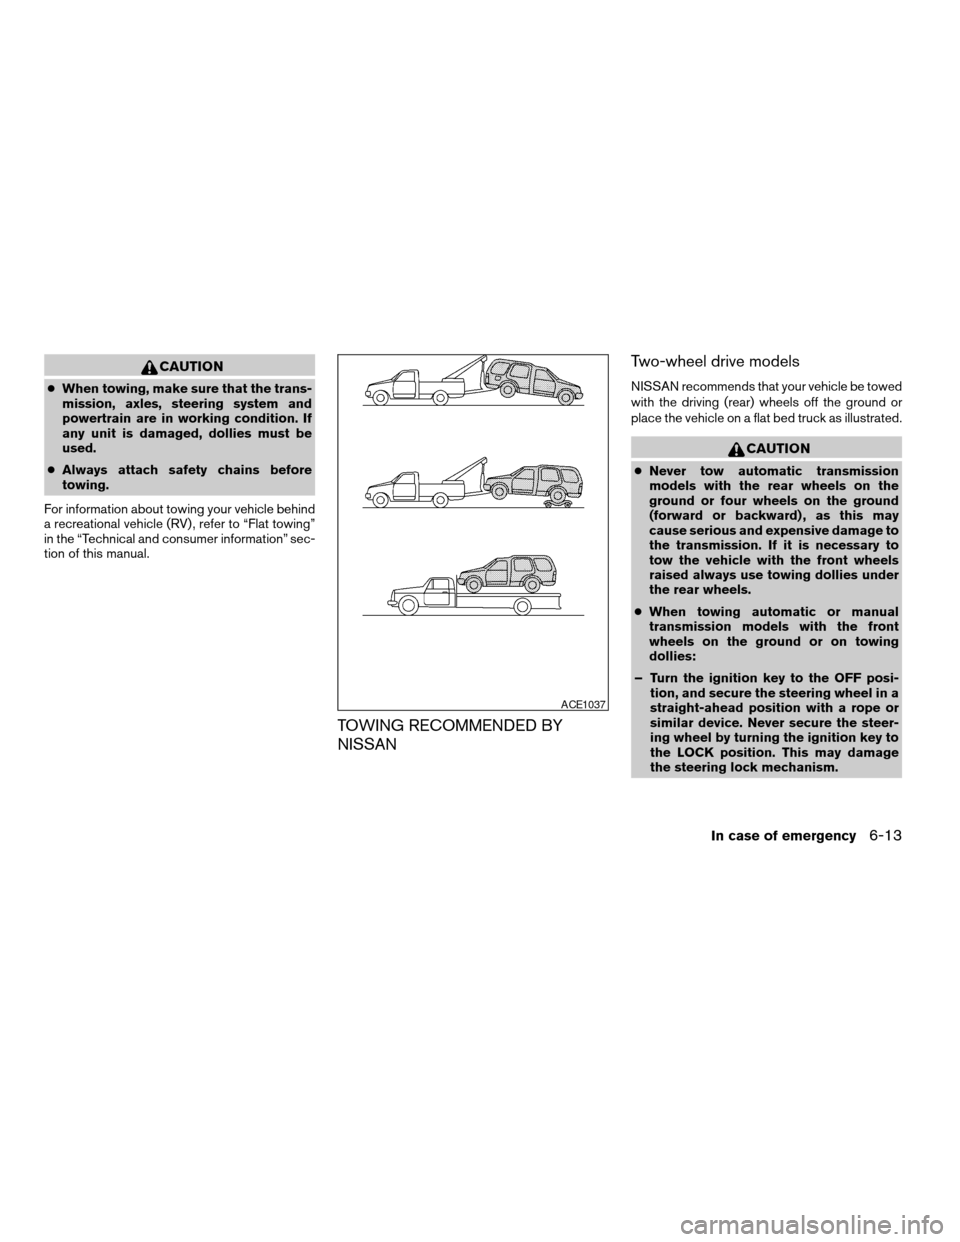
TOWING RECOMMENDED BY
NISSANTwo-wheel drive models
NISSAN recommends that your vehicle be towed
with the driving (rear) wheels off the ground or
place the vehicle on a flat bed truck as illustrated.
CAUTION
cNever tow automatic transmission
models with the rear wheels on the
ground or four wheels on the ground
(forward or backward) , as this may
cause serious and expensive damage to
the transmission. If it is necessary to
tow the vehicle with the front wheels
raised always use towing dollies under
the rear wheels.
cWhen towing automatic or manual
transmission models with the front
wheels on the ground or on towing
dollies:
– Turn the ignition key to the OFF posi-
tion, and secure the steering wheel in a
straight-ahead position with a rope or
similar device. Never secure the steer-
ing wheel by turning the ignition key to
the LOCK position. This may damage
the steering lock mechanism.
ACE1037
In case of emergency6-13
ZREVIEW COPY:Ð2004 Xterra(xtr)
Owners Manual(owners)ÐUSA English(nna)
10/23/03Ðdebbie
X
Page 196 of 296
cIf you have to tow manual transmission
models with the rear wheels on the
ground (if you do not use towing dol-
lies) or four wheels on the ground:
cAlways release the parking brake.
cMove the transmission shift lever to
the N (Neutral) position.
cObserve the following restricted tow-
ing speeds and distances for manual
transmission models only:
Speed: Below 60 MPH (97 km/h)
Distance: Less than 500 miles (805
km)
If the speed or distance must necessarily be
greater, remove the propeller shaft before towing
to prevent damage to the transmission.
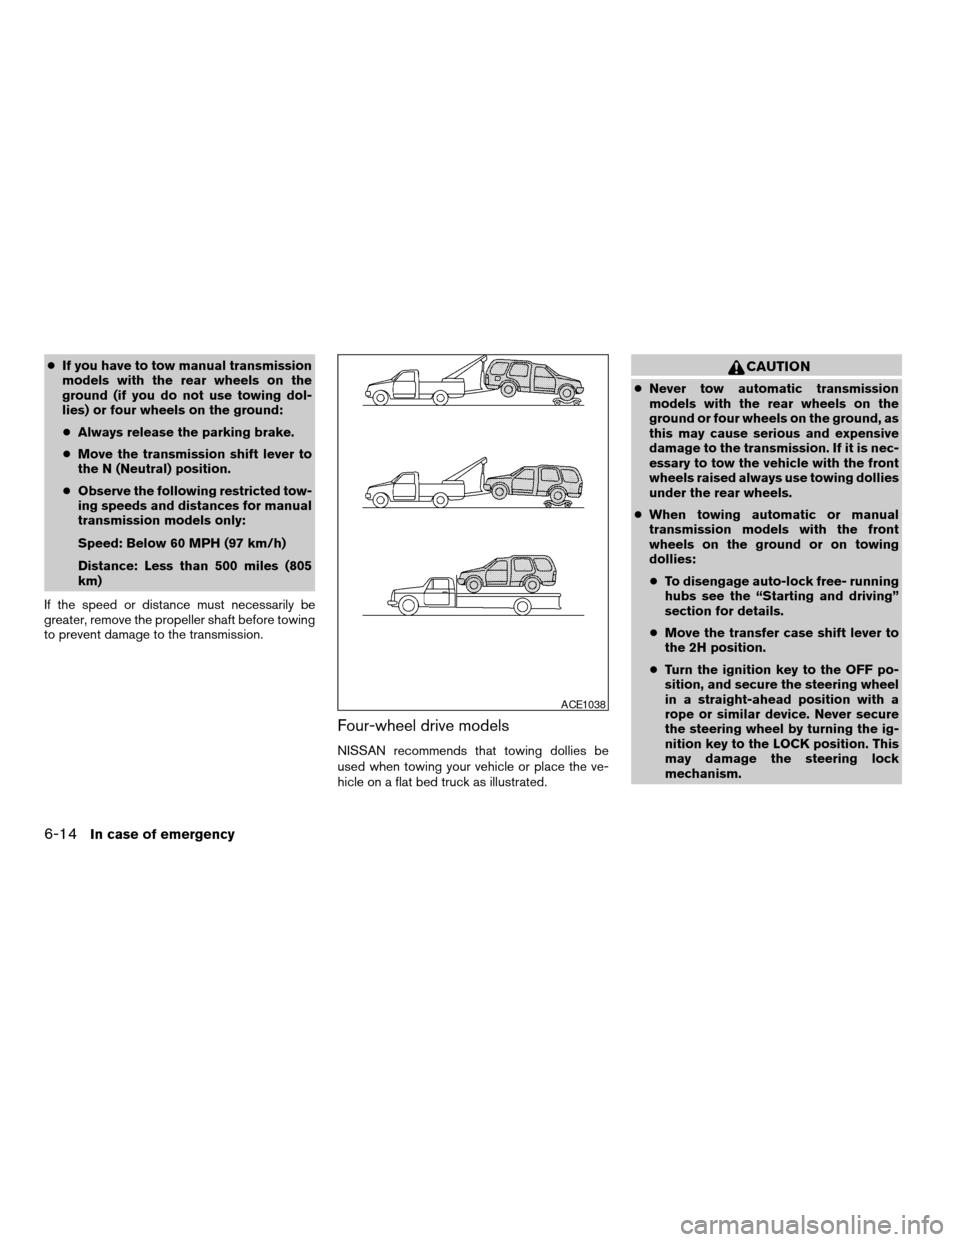
Four-wheel drive models
NISSAN recommends that towing dollies be
used when towing your vehicle or place the ve-
hicle on a flat bed truck as illustrated.
CAUTION
cNever tow automatic transmission
models with the rear wheels on the
ground or four wheels on the ground, as
this may cause serious and expensive
damage to the transmission. If it is nec-
essary to tow the vehicle with the front
wheels raised always use towing dollies
under the rear wheels.
cWhen towing automatic or manual
transmission models with the front
wheels on the ground or on towing
dollies:
cTo disengage auto-lock free- running
hubs see the “Starting and driving”
section for details.
cMove the transfer case shift lever to
the 2H position.
cTurn the ignition key to the OFF po-
sition, and secure the steering wheel
in a straight-ahead position with a
rope or similar device. Never secure
the steering wheel by turning the ig-
nition key to the LOCK position. This
may damage the steering lock
mechanism.
ACE1038
6-14In case of emergency
ZREVIEW COPY:Ð2004 Xterra(xtr)
Owners Manual(owners)ÐUSA English(nna)
10/23/03Ðdebbie
X
Page 197 of 296
cIf you have to tow manual transmission
models with the rear wheels on the
ground (if you do not use towing dol-
lies) or four wheels on the ground:
cTo disengage auto-lock free- running
hubs see the “Starting and driving”
section for details.
cMove the transfer case shift lever to
the 2H position.
cMove the transmission shift lever to
the N (Neutral) position.
cAlways release the parking brake.
cObserve the following restricted tow-
ing speeds and distances for manual
transmission models only:
Speed: Below 60 MPH (97 km/h)
Distance: Less than 500 miles (805
km)
If the speed or distance must necessarily be
greater, remove the propeller shaft before towing
to prevent damage to the transmission.VEHICLE RECOVERY (freeing a stuck
vehicle)
WARNING
cStand clear of a stuck vehicle.
cDo not spin your tires at high speed.
This could cause them to explode and
result in serious injury. Parts of your
vehicle could also overheat and be
damaged.
CAUTION
cTow chains or cables must be attached
only to the main structural members of
the vehicle.
cPulling devices should be routed so
they do not touch any part of the sus-
pension, steering, brake or cooling
systems.
cAlways pull the cable straight out from
the front or rear of the vehicle. Never
pull the vehicle at an angle.
cPulling devices such as ropes or canvas
straps are not recommended for use in
vehicle towing or recovery.
In case of emergency6-15
ZREVIEW COPY:Ð2004 Xterra(xtr)
Owners Manual(owners)ÐUSA English(nna)
10/23/03Ðdebbie
X