2004 NISSAN QUEST tow
[x] Cancel search: towPage 9 of 320

1. Engine hood (P. 3-14)
2. Headlight and turn signal switch
(P. 2-15)
3. Replacing bulbs (P. 8-28)
4. Windshield wiper and washer switch
(P. 2-13)
5. Windshield (P. 8-19)
6. Power windows (P. 2-36)
7. Door locks, keyfob, keys
(P. 3-3, 3-9, 3-2)
8. Mirrors (P. 3-23)
9. Tire pressure (P. 9-11)
10. Flat tire (P. 6-2)
11. Tire chains (P. 8-36)
12. Fog light switch (P. 2-19)
13. Tie down/towing hooks (P. 6-12)
See the page number indicated in paren-
theses for operating details.
LII0013
EXTERIOR FRONT
Illustrated table of contents0-3
ZREVIEW COPY:Ð2004 Quest(van)
Owners Manual(owners)ÐUSA English(nna)
10/08/03Ðtbrooks
X
Page 26 of 320
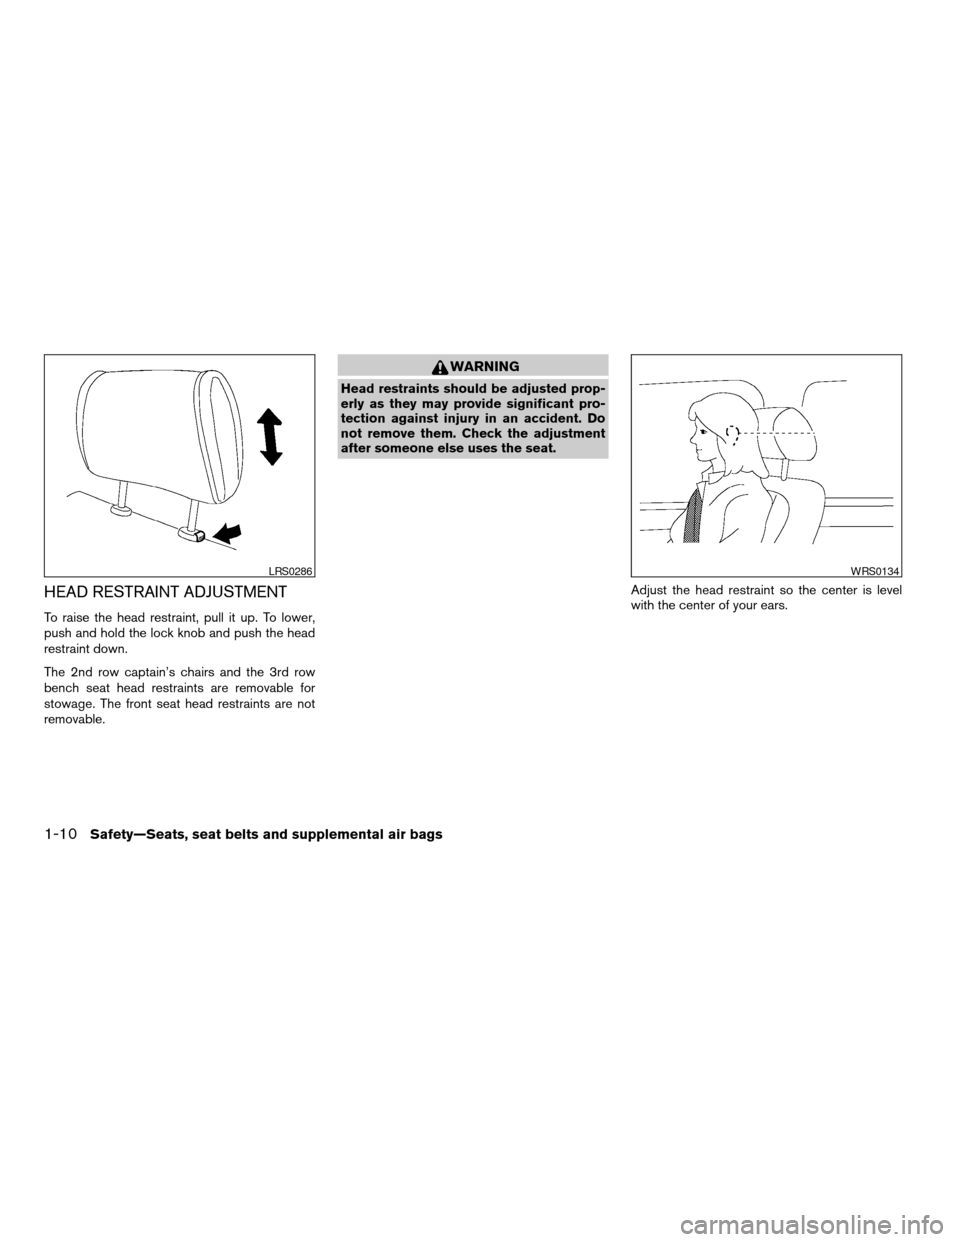
HEAD RESTRAINT ADJUSTMENT
To raise the head restraint, pull it up. To lower,
push and hold the lock knob and push the head
restraint down.
The 2nd row captain’s chairs and the 3rd row
bench seat head restraints are removable for
stowage. The front seat head restraints are not
removable.
WARNING
Head restraints should be adjusted prop-
erly as they may provide significant pro-
tection against injury in an accident. Do
not remove them. Check the adjustment
after someone else uses the seat.
Adjust the head restraint so the center is level
with the center of your ears.
LRS0286WRS0134
1-10Safety—Seats, seat belts and supplemental air bags
ZREVIEW COPY:Ð2004 Quest(van)
Owners Manual(owners)ÐUSA English(nna)
10/08/03Ðtbrooks
X
Page 28 of 320
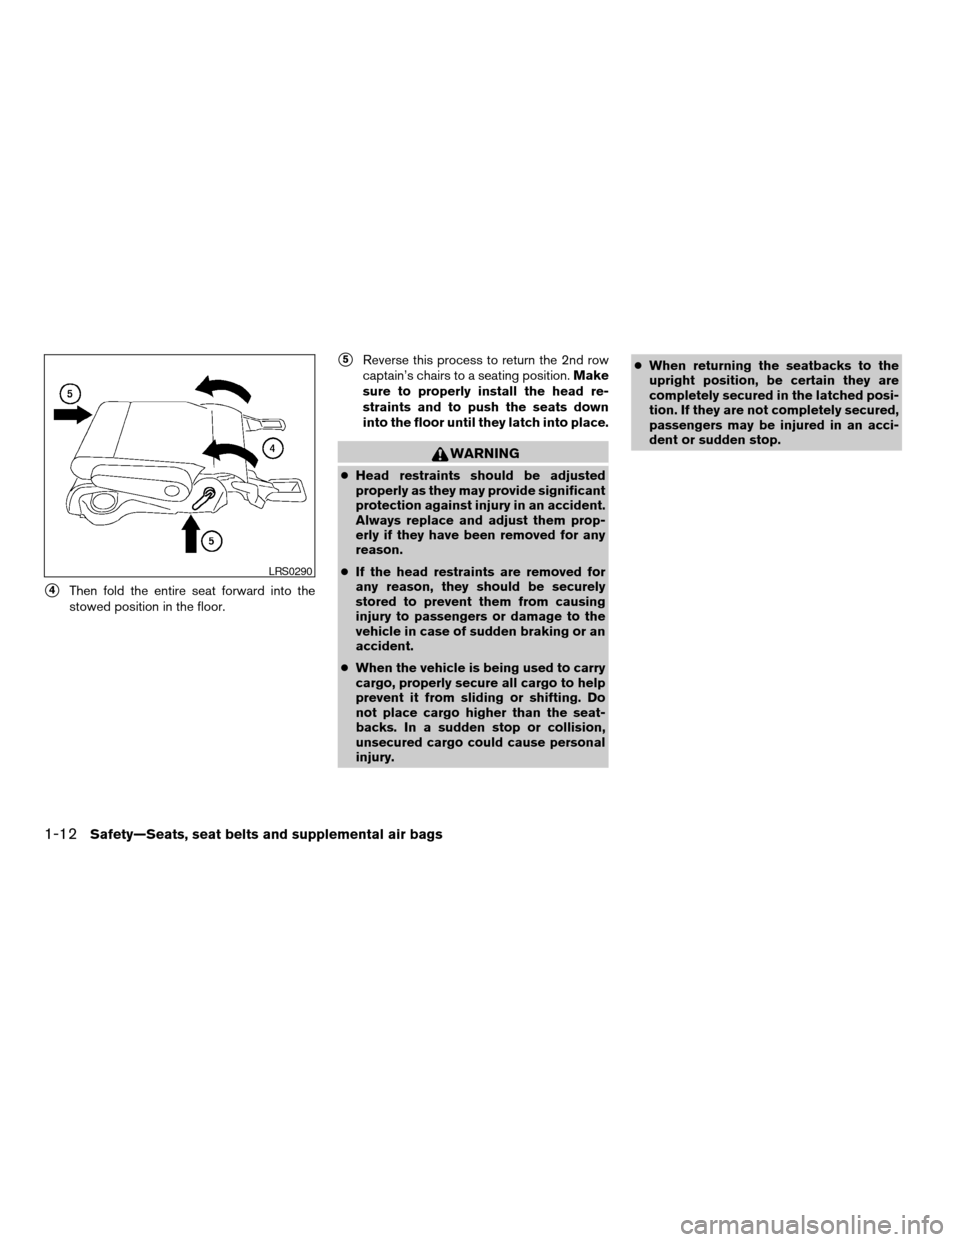
s4Then fold the entire seat forward into the
stowed position in the floor.
s5Reverse this process to return the 2nd row
captain’s chairs to a seating position.Make
sure to properly install the head re-
straints and to push the seats down
into the floor until they latch into place.
WARNING
cHead restraints should be adjusted
properly as they may provide significant
protection against injury in an accident.
Always replace and adjust them prop-
erly if they have been removed for any
reason.
cIf the head restraints are removed for
any reason, they should be securely
stored to prevent them from causing
injury to passengers or damage to the
vehicle in case of sudden braking or an
accident.
cWhen the vehicle is being used to carry
cargo, properly secure all cargo to help
prevent it from sliding or shifting. Do
not place cargo higher than the seat-
backs. In a sudden stop or collision,
unsecured cargo could cause personal
injury.cWhen returning the seatbacks to the
upright position, be certain they are
completely secured in the latched posi-
tion. If they are not completely secured,
passengers may be injured in an acci-
dent or sudden stop.
LRS0290
1-12Safety—Seats, seat belts and supplemental air bags
ZREVIEW COPY:Ð2004 Quest(van)
Owners Manual(owners)ÐUSA English(nna)
10/08/03Ðtbrooks
X
Page 29 of 320
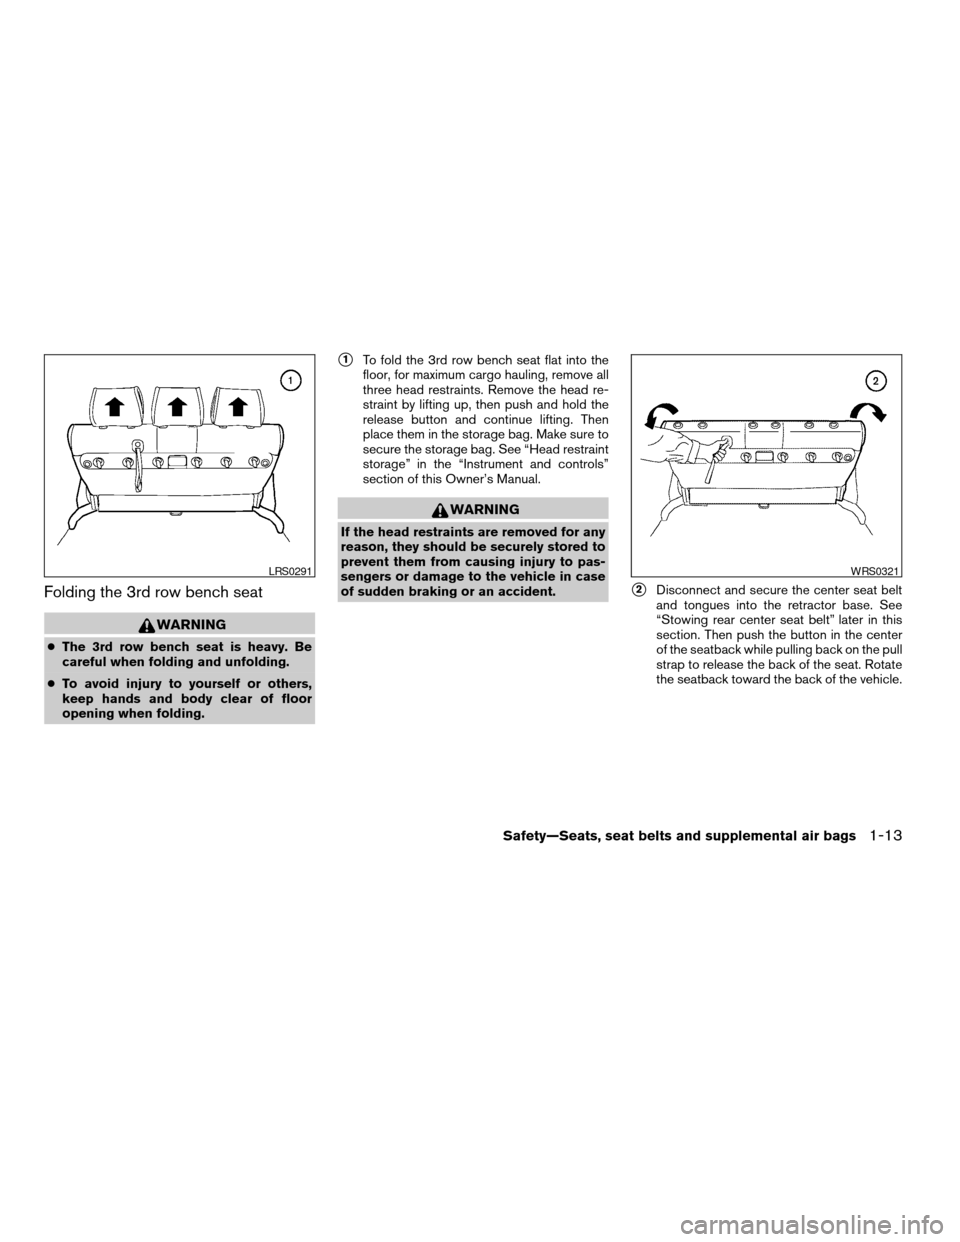
Folding the 3rd row bench seat
WARNING
cThe 3rd row bench seat is heavy. Be
careful when folding and unfolding.
cTo avoid injury to yourself or others,
keep hands and body clear of floor
opening when folding.
s1To fold the 3rd row bench seat flat into the
floor, for maximum cargo hauling, remove all
three head restraints. Remove the head re-
straint by lifting up, then push and hold the
release button and continue lifting. Then
place them in the storage bag. Make sure to
secure the storage bag. See “Head restraint
storage” in the “Instrument and controls”
section of this Owner’s Manual.
WARNING
If the head restraints are removed for any
reason, they should be securely stored to
prevent them from causing injury to pas-
sengers or damage to the vehicle in case
of sudden braking or an accident.
s2Disconnect and secure the center seat belt
and tongues into the retractor base. See
“Stowing rear center seat belt” later in this
section. Then push the button in the center
of the seatback while pulling back on the pull
strap to release the back of the seat. Rotate
the seatback toward the back of the vehicle.
LRS0291WRS0321
Safety—Seats, seat belts and supplemental air bags1-13
ZREVIEW COPY:Ð2004 Quest(van)
Owners Manual(owners)ÐUSA English(nna)
10/08/03Ðtbrooks
X
Page 30 of 320

s3Pull up on the lever located on the back of
the seat base. This will fold the seat base
toward the back of the vehicle.s4The entire seat will rotate toward you and
stow flat in the floor.s5The rear seat anchors are spring loaded and
can be folded into the side panels to maxi-
mize cargo space. The anchors are held in
the folded position by the items in the cargo
area. When the load is removed from the
cargo area, the rear seat anchors automati-
cally return to the unfolded position.
6. Reverse this process to return the bench
seat to a seating position.Make sure to
properly install the head restraints,
push the bench seat down into the
floor, and pull back on the seatback
until they latch into place.
LRS0292LRS0293LRS0285
1-14Safety—Seats, seat belts and supplemental air bags
ZREVIEW COPY:Ð2004 Quest(van)
Owners Manual(owners)ÐUSA English(nna)
10/08/03Ðtbrooks
X
Page 42 of 320
cNo unauthorized changes should be
made to any components or wiring of
the supplemental air bag system. This is
to prevent accidental inflation of the
supplemental air bag or damage to the
supplemental air bag system.
cDo not make unauthorized changes to
your vehicle’s electrical system, sus-
pension system or front end structure.
This could affect proper operation of
the supplemental front air bag system.
cTampering with the supplemental front
air bag system may result in serious
personal injury. Tampering includes
changes to the steering wheel and the
instrument panel assembly by placing
material over the steering wheel pad
and above the instrument panel or by
installing additional trim material
around the air bag system.cModifying or tampering with the front
passenger seat may result in serious
personal injury. For example, do not
change the front seats by placing mate-
rial on the seat cushion or by installing
additional trim material, such as seat
covers, on the seat. Additionally, do not
stow any objects under the front pas-
senger seat or the seat cushion and
seatback. Such objects may interfere
with the proper operation of the occu-
pant classification system (weight
sensor) .
cNo unauthorized changes should be
made to any components or wiring of
the seat belt system. This may affect the
supplemental front air bag system.
Tampering with the seat belt system
may result in serious personal injury.
cWork on and around the supplemental
front air bag system should be done by
a NISSAN dealer. Installation of electri-
cal equipment should also be done by a
NISSAN dealer. The Supplemental Re-
straint System (SRS) wiring should not
be modified or disconnected. Unautho-
rized electrical test equipment and
probing devices should not be used on
the air bag system.cA cracked windshield should be re-
placed immediately by a qualified re-
pair facility. A cracked windshield could
affect inflation of the supplemental air
bag system.
cThe SRS wiring harness connectors are
yellow and orange for easy
identification.
When selling your vehicle, we request that you
inform the buyer about the supplemental front air
bag system and guide the buyer to the appropri-
ate sections in this Owner’s Manual.
1-26Safety—Seats, seat belts and supplemental air bags
ZREVIEW COPY:Ð2004 Quest(van)
Owners Manual(owners)ÐUSA English(nna)
10/08/03Ðtbrooks
X
Page 51 of 320
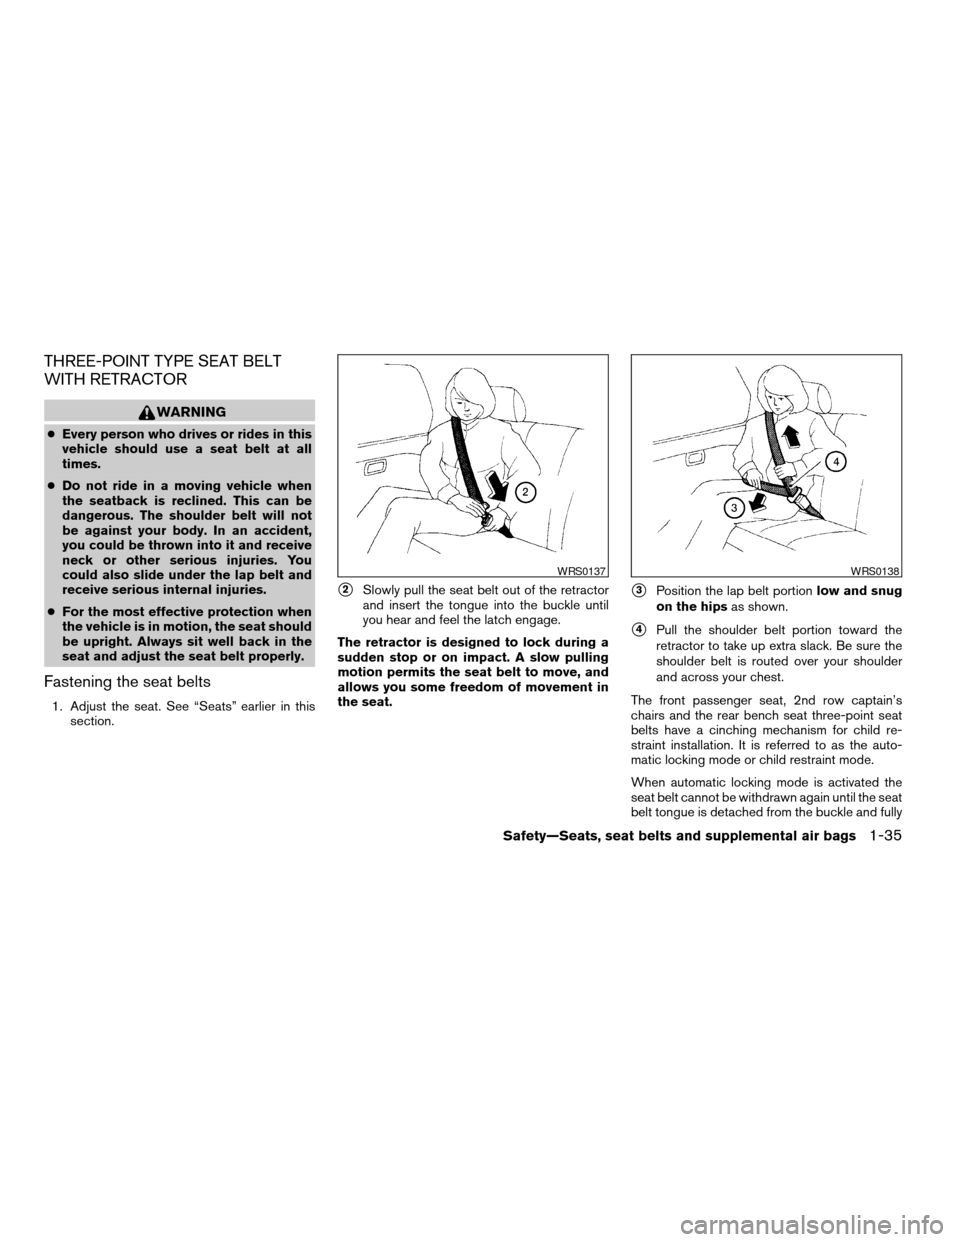
THREE-POINT TYPE SEAT BELT
WITH RETRACTOR
WARNING
cEvery person who drives or rides in this
vehicle should use a seat belt at all
times.
cDo not ride in a moving vehicle when
the seatback is reclined. This can be
dangerous. The shoulder belt will not
be against your body. In an accident,
you could be thrown into it and receive
neck or other serious injuries. You
could also slide under the lap belt and
receive serious internal injuries.
cFor the most effective protection when
the vehicle is in motion, the seat should
be upright. Always sit well back in the
seat and adjust the seat belt properly.
Fastening the seat belts
1. Adjust the seat. See “Seats” earlier in this
section.
s2Slowly pull the seat belt out of the retractor
and insert the tongue into the buckle until
you hear and feel the latch engage.
The retractor is designed to lock during a
sudden stop or on impact. A slow pulling
motion permits the seat belt to move, and
allows you some freedom of movement in
the seat.s3Position the lap belt portionlow and snug
on the hipsas shown.
s4Pull the shoulder belt portion toward the
retractor to take up extra slack. Be sure the
shoulder belt is routed over your shoulder
and across your chest.
The front passenger seat, 2nd row captain’s
chairs and the rear bench seat three-point seat
belts have a cinching mechanism for child re-
straint installation. It is referred to as the auto-
matic locking mode or child restraint mode.
When automatic locking mode is activated the
seat belt cannot be withdrawn again until the seat
belt tongue is detached from the buckle and fully
WRS0137WRS0138
Safety—Seats, seat belts and supplemental air bags1-35
ZREVIEW COPY:Ð2004 Quest(van)
Owners Manual(owners)ÐUSA English(nna)
10/08/03Ðtbrooks
X
Page 54 of 320
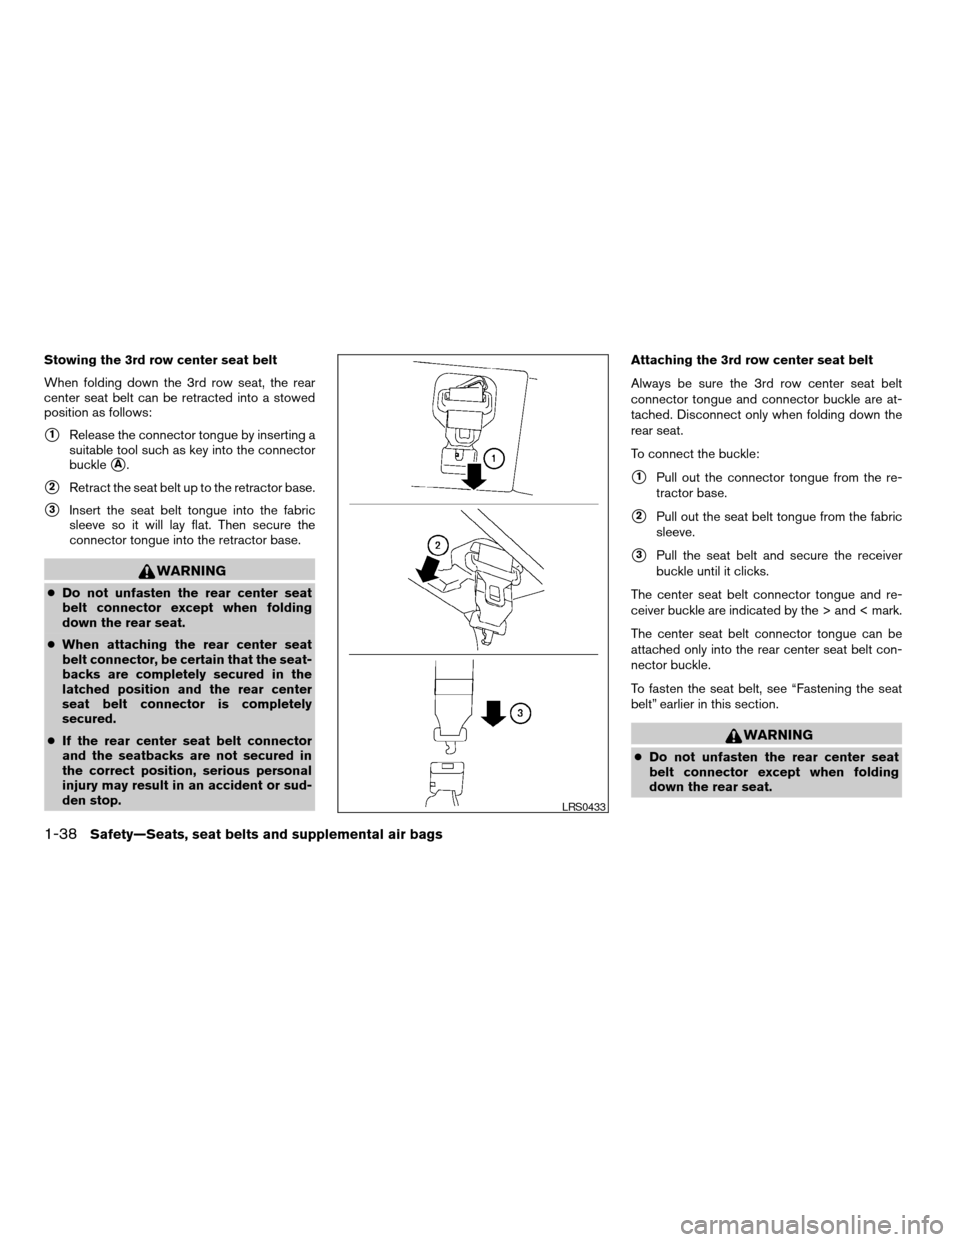
Stowing the 3rd row center seat belt
When folding down the 3rd row seat, the rear
center seat belt can be retracted into a stowed
position as follows:
s1Release the connector tongue by inserting a
suitable tool such as key into the connector
buckle
sA.
s2Retract the seat belt up to the retractor base.
s3Insert the seat belt tongue into the fabric
sleeve so it will lay flat. Then secure the
connector tongue into the retractor base.
WARNING
cDo not unfasten the rear center seat
belt connector except when folding
down the rear seat.
cWhen attaching the rear center seat
belt connector, be certain that the seat-
backs are completely secured in the
latched position and the rear center
seat belt connector is completely
secured.
cIf the rear center seat belt connector
and the seatbacks are not secured in
the correct position, serious personal
injury may result in an accident or sud-
den stop.Attaching the 3rd row center seat belt
Always be sure the 3rd row center seat belt
connector tongue and connector buckle are at-
tached. Disconnect only when folding down the
rear seat.
To connect the buckle:
s1Pull out the connector tongue from the re-
tractor base.
s2Pull out the seat belt tongue from the fabric
sleeve.
s3Pull the seat belt and secure the receiver
buckle until it clicks.
The center seat belt connector tongue and re-
ceiver buckle are indicated by the > and < mark.
The center seat belt connector tongue can be
attached only into the rear center seat belt con-
nector buckle.
To fasten the seat belt, see “Fastening the seat
belt” earlier in this section.
WARNING
cDo not unfasten the rear center seat
belt connector except when folding
down the rear seat.
LRS0433
1-38Safety—Seats, seat belts and supplemental air bags
ZREVIEW COPY:Ð2004 Quest(van)
Owners Manual(owners)ÐUSA English(nna)
10/08/03Ðtbrooks
X