2004 NISSAN QUEST start stop button
[x] Cancel search: start stop buttonPage 130 of 320
Power Close:
The door automatically moves from the fully open
position to the secondary position. When the
sliding door reaches the secondary position, the
cinching motor engages and pulls the door to its
primary latch position. Power close takes ap-
proximately 5 seconds. The power close feature
can be activated by the switches on the keyfob,
the overhead console and the door pillar.
cIf the inside or outside handle is activated
while the cinching motor is engaged, the
cinching motor will disengage and release
the latch.
cThe keyfob button must be held for 0.5 sec-
ond before the door closes.
cThe switch on the door pillar can only be
used to close the door if the main ON/OFF
switch is ON.
Reverse:
The door will reverse direction immediately dur-
ing power open or power close if the keyfob,
overhead console or door pillar switch is
pressed. A chime will sound to announce the
reversal.
Auto Reverse:
If an obstacle is detected during power open or
power close, a warning chime will sound and the
door will reverse direction and return to the fullopen or full close position. If a second obstacle is
detected, the door motion will stop and the clutch
mode will be engaged.
WARNING
There are some small distances immedi-
ately before the closed position which
cannot be detected. Make sure that all
passengers have their hands, etc., inside
the vehicle before closing the door.
Clutch Mode:
To help prevent unexpected slams due to gravity,
the clutch mode is engaged intermittently for up
to 6 seconds when power open or close is inter-
rupted due to multiple obstacles, low battery
voltage or the main ON/OFF switch turned to
OFF. The door must then be opened or closed
manually.
Restarting the power sliding door
Some power sliding door functions will become
disabled after the battery terminal is discon-
nected and/or the electrical supply is interrupted.
The following procedure must be used to restart
the power sliding door so that all functions are
enabled.
1. Turn the main on/off switch to ON.2. If the power sliding door is open, press and
hold the power sliding door switch on the
overhead console until the door closes.
3. Release the switch.
4. Press and hold the power sliding door
switch on the overhead console until the
door opens as far as it can.
5. Release the switch.
6. Press and hold the power sliding door
switch on the overhead console until the
door closes.
7. Release the switch.
The power sliding door should now work prop-
erly.
NOTE:
The restarting procedure must be com-
pleted for both the left-hand and right-
hand power sliding doors (if so equipped) .
3-8Pre-driving checks and adjustments
ZREVIEW COPY:Ð2004 Quest(van)
Owners Manual(owners)ÐUSA English(nna)
10/08/03Ðtbrooks
X
Page 134 of 320
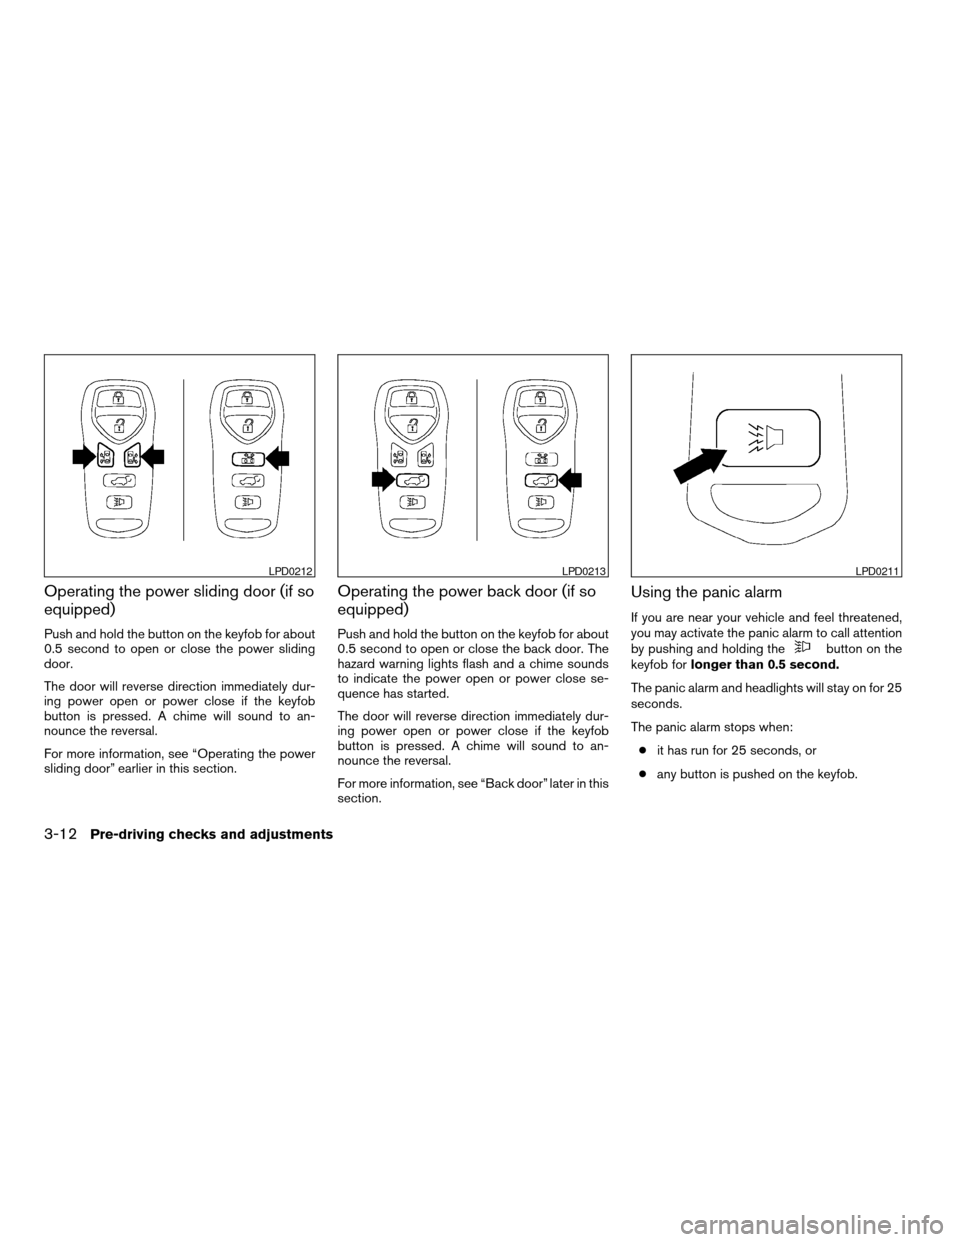
Operating the power sliding door (if so
equipped)
Push and hold the button on the keyfob for about
0.5 second to open or close the power sliding
door.
The door will reverse direction immediately dur-
ing power open or power close if the keyfob
button is pressed. A chime will sound to an-
nounce the reversal.
For more information, see “Operating the power
sliding door” earlier in this section.
Operating the power back door (if so
equipped)
Push and hold the button on the keyfob for about
0.5 second to open or close the back door. The
hazard warning lights flash and a chime sounds
to indicate the power open or power close se-
quence has started.
The door will reverse direction immediately dur-
ing power open or power close if the keyfob
button is pressed. A chime will sound to an-
nounce the reversal.
For more information, see “Back door” later in this
section.
Using the panic alarm
If you are near your vehicle and feel threatened,
you may activate the panic alarm to call attention
by pushing and holding the
button on the
keyfob forlonger than 0.5 second.
The panic alarm and headlights will stay on for 25
seconds.
The panic alarm stops when:
cit has run for 25 seconds, or
cany button is pushed on the keyfob.
LPD0212LPD0213LPD0211
3-12Pre-driving checks and adjustments
ZREVIEW COPY:Ð2004 Quest(van)
Owners Manual(owners)ÐUSA English(nna)
10/08/03Ðtbrooks
X
Page 139 of 320

NOTE:
To open, close or reverse the power back
door, the shift selector lever must be in P
(Park) . Also, the power back door will not
operate if battery voltage is low.
Power Open:
The power back door automatically moves from
the fully closed position to the fully open position
in approximately 6 seconds. The power open
feature can be activated by the switch on the
keyfob and the overhead console and by the
outside opener handle. The hazard lights flashand a chime sounds to indicate the power open
sequence has been started.
cThe back door can be opened by the over-
head console switch and the keyfob even if
the vehicle is locked. The door will individu-
ally unlock and open. Once the back door is
closed, its lock will align to the vehicle’s lock
or unlock status.
cThe keyfob button must be held for 0.5 sec-
ond before the door opens.
cThe back door must be unlocked to open it
with the outside opener handle.
cThe switch on the rear pillar cannot be used
to open the back door.
A warning chime will sound if the shift selector
lever is moved out of P (Park) during a power
open operation.
Power Close:
The power back door automatically moves from
the fully open position to the secondary position.
When the door reaches the secondary position,
the cinching motor engages and pulls the door to
its primary latch position. Power close takes ap-
proximately 8 seconds. The power close feature
can be activated by the switch on the keyfob, the
overhead console and the rear pillar. The hazard
lights flash and a chime sounds to indicate the
power close sequence has been started.cIf the outside opener handle is activated
while the cinching motor is engaged, the
cinching motor will disengage and release
the latch.
cThe keyfob button must be held for 0.5 sec-
ond before the door closes.
cThe switch on the rear pillar can only be used
to close the back door if the main ON/OFF
switch is ON.
Reverse:
The power back door will reverse direction imme-
diately during power open or power close if the
keyfob, overhead console or rear pillar switch is
pressed. A chime will sound to announce the
reversal.
Auto Reverse:
If an obstacle is detected during power open or
power close, a warning chime will sound and the
door will reverse direction and return to the full
open or full close position. If a second obstacle is
detected, the door motion will stop and the drive
motor will disengage. The back door will enter
manual mode.
A pinch strip is mounted on each side of the back
door. If an obstacle is detected by a pinch strip
during power close, the door will reverse direc-
tion and return to the full open position.
Overhead console switch
LPD0223
Pre-driving checks and adjustments3-17
ZREVIEW COPY:Ð2004 Quest(van)
Owners Manual(owners)ÐUSA English(nna)
10/08/03Ðtbrooks
X
Page 154 of 320
WARNING
cPositioning of the heating or air condi-
tioning controls and display controls
should not be done while driving in or-
der that full attention may be given to
the driving operation.
cDo not disassemble or modify this sys-
tem. If you do, it may result in accidents,
fire, or electrical shock.
cDo not use this system if you notice any
abnormality, such as a frozen screen or
lack of sound. Continued use of the
system may result in accident, fire or
electric shock.
cIn case you notice any foreign object in
the system hardware, spill liquid on it,
or notice smoke or smell coming from
it, stop using the system immediately
and contact your nearest NISSAN
dealer. Ignoring such conditions may
lead to accidents, fire or electrical
shock.
When you use this system, make sure the engine
is running.
If you use the system with the engine not
running (ignition ON or ACC) for a long
time, it will use up all the battery power,
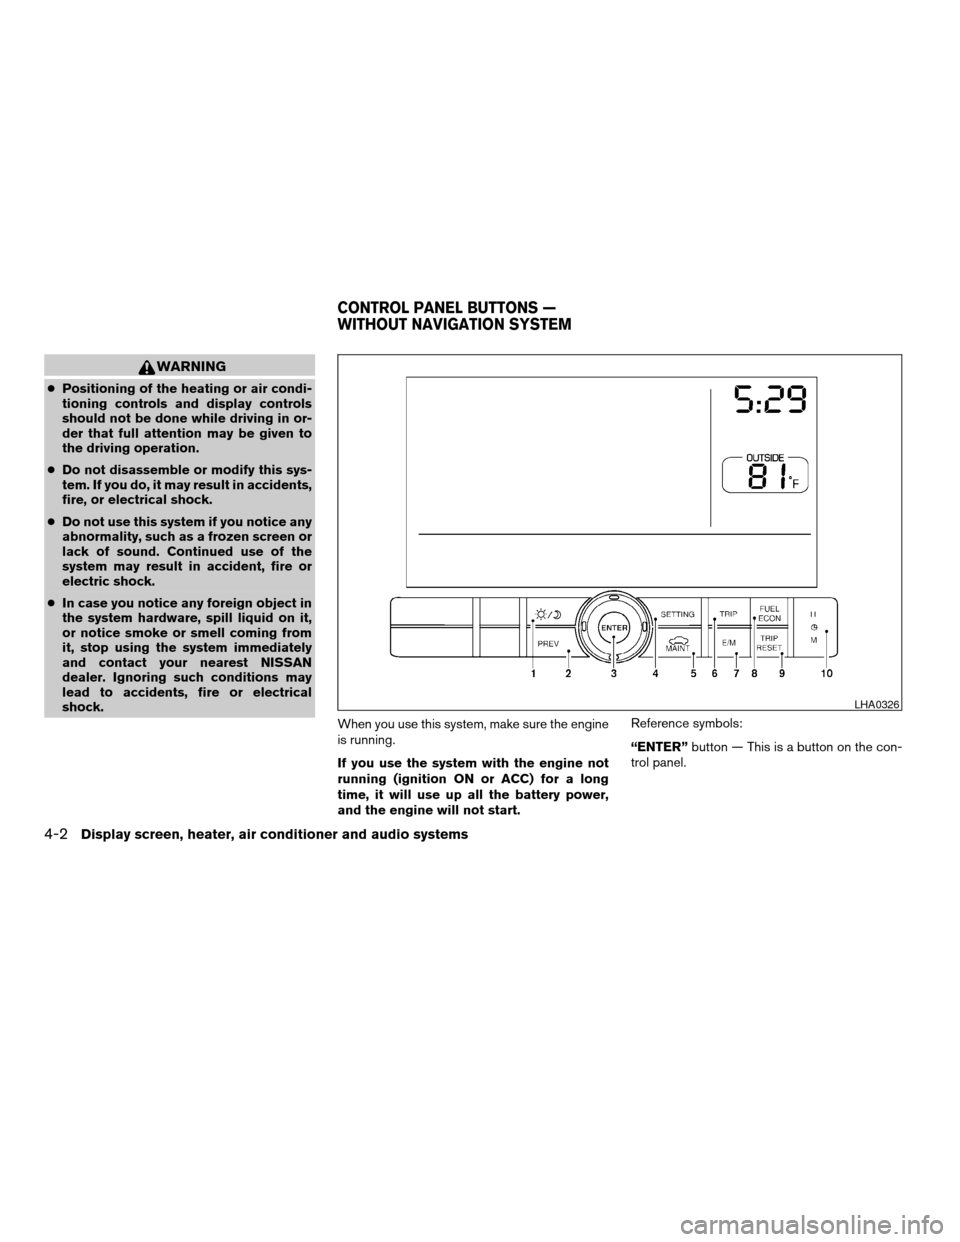
and the engine will not start.Reference symbols:
“ENTER”button — This is a button on the con-
trol panel.
LHA0326
CONTROL PANEL BUTTONS —
WITHOUT NAVIGATION SYSTEM
4-2Display screen, heater, air conditioner and audio systems
ZREVIEW COPY:Ð2004 Quest(van)
Owners Manual(owners)ÐUSA English(nna)
10/08/03Ðtbrooks
X
Page 189 of 320
equipped) mode, the PTY name of the current
tuned station is displayed. During this time if the
PTY data code is zero or the data is unreadable,
the display will show NONE.
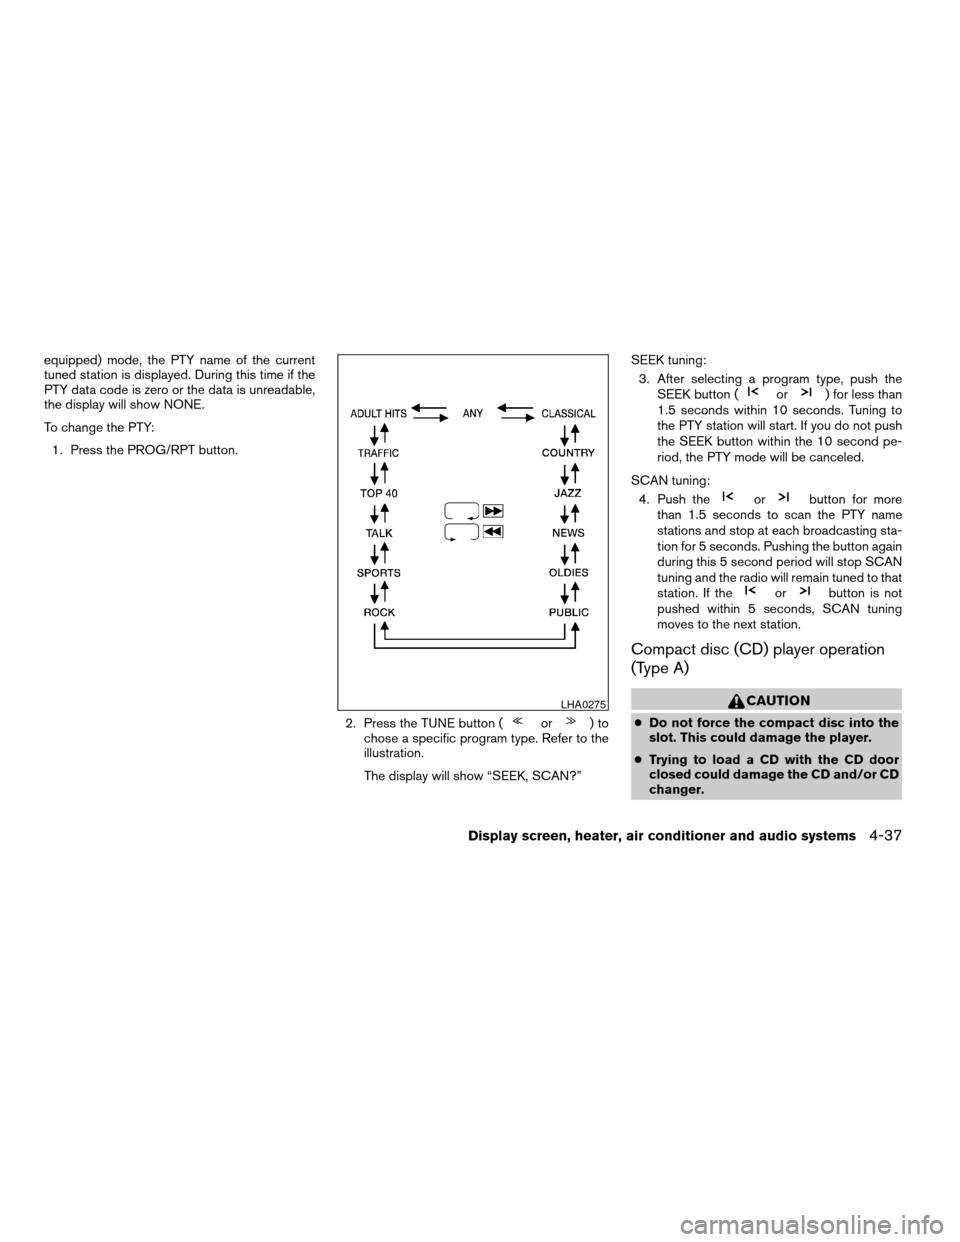
To change the PTY:
1. Press the PROG/RPT button.
2. Press the TUNE button (
or)to
chose a specific program type. Refer to the
illustration.
The display will show “SEEK, SCAN?”SEEK tuning:
3. After selecting a program type, push the
SEEK button (
or) for less than
1.5 seconds within 10 seconds. Tuning to
the PTY station will start. If you do not push
the SEEK button within the 10 second pe-
riod, the PTY mode will be canceled.
SCAN tuning:
4. Push the
orbutton for more
than 1.5 seconds to scan the PTY name
stations and stop at each broadcasting sta-
tion for 5 seconds. Pushing the button again
during this 5 second period will stop SCAN
tuning and the radio will remain tuned to that
station. If the
orbutton is not
pushed within 5 seconds, SCAN tuning
moves to the next station.
Compact disc (CD) player operation
(Type A)
CAUTION
cDo not force the compact disc into the
slot. This could damage the player.
cTrying to load a CD with the CD door
closed could damage the CD and/or CD
changer.
LHA0275
Display screen, heater, air conditioner and audio systems4-37
ZREVIEW COPY:Ð2004 Quest(van)
Owners Manual(owners)ÐUSA English(nna)
10/08/03Ðtbrooks
X
Page 190 of 320

Turn the ignition key to the ACC or ON position and
insert the compact disc into the slot with the label
side facing up. The compact disc will be guided
automatically into the slot and start playing.
If the radio is already operating, it will automati-
cally turn off and the compact disc will play.
If the system has been turned off while the com-
pact disc was playing, pushing the ON·OFF/VOL
control knob will start the compact disc.
3.1 in (8 cm) diameter compact discs can also be
used without an adapter.
CD button:
When the CD button is pushed with the system
off and the compact disc loaded, the system will
turn on and the compact disc will start to play.
When the CD button is pushed with the compact
disc loaded but the radio playing, the radio will
automatically be turned off and the compact disc
will start to play.
REW (Rewind) , FF (Fast
Forward):
When the
(rewind) or(fast forward)
button is pushed while the compact disc is being
played, the compact disc will play while rewind-
ing or fast forwarding. When the button is re-
leased, the compact disc will return to normal
play speed.
SEEK/TRACK:
When the
button is pushed for less than
1.5 seconds while a compact disc is playing, the
track being played returns to its beginning. Push
several times to skip back through tracks. The
compact disc will go back the number of times
the button is pushed.
When the
button is pushed for less than
1.5 seconds while a compact disc is playing, the
next track will start to play from its beginning.
Push several times to skip through tracks. The
compact disc will advance the number of times
the button is pushed. (When the last track on the
compact disc is skipped through, the first track
will be played.)
When the
orbutton is pushed for
more than 1.5 seconds, each track will play for
about 10 seconds. To stop playing, push
the
button.
REPEAT (RPT):
When the PROG/RPT button is pushed while the
compact disc is being played, the play pattern
can be changed as follows:
ALL DISC RPT!1 TRACK RPT!1 DISC RDM
!ALL DISC RPTALL DISC RPT: the entire disk will be repeated
1 TRACK RPT: the current track will be repeated
1 DISC RDM: all tracks will be played randomly
REAR AV:
Pushing the REAR AV button for less than 1.5
seconds turns the rear seat audio controller on.
Pushing it again will turn the rear seat audio
controller off. If the vehicle is not equipped with a
rear seat audio controller, the display will show
“REAR AV N/A”.
If a DVD is loaded in the DVD entertainment
system (if so equipped) , pushing the REAR AV
button for more than 1.5 seconds will turn the
DVD player on.
When the REAR AV button is pushed for more
than 1.5 seconds with a DVD loaded and another
audio source playing, the other source will auto-
matically be turned off and the DVD will start to
play.
(SPEAKER CONTROL) button:
Push this button to turn the rear speakers off and
headphones on. Push this button again to turn
rear seat speakers back on and headphones off.
4-38Display screen, heater, air conditioner and audio systems
ZREVIEW COPY:Ð2004 Quest(van)
Owners Manual(owners)ÐUSA English(nna)
10/08/03Ðtbrooks
X
Page 192 of 320

When thebutton is pushed for less than 1.5
seconds while the compact disc is playing, the
next track will start to play from its beginning.
Push several times to skip through tracks. The
compact disc will advance the number of times
the button is pushed. (When the last track on the
compact disc is skipped through, the first track
will be played.)
When pushing the
orbutton for more
than 1.5 seconds, each track will play for about
10 seconds. To stop playing, push
the
button again.
CD select buttons:
To play another CD that has been loaded, push a
CD select button (1 - 6) .
REPEAT (RPT):
When the PROG/RPT play button is pushed
while the compact disc is played, the play pattern
can be changed as follows:
ALL DISC RPT!1 DISC RPT!1 TRACK RPT
!ALL DISC RDM!1 DISC RDM!ALL DISC
RPT
ALL DISC RPT: All discs loaded will be repeated.
1 DISC RPT: The disc that is currently playing will
be repeated.
1 TRACK RPT: The track that is currently playing
will be repeatedALL DISC RDM: Tracks from all discs will be
played randomly
1 DISC RDM: Tracks from the disc that is cur-
rently playing will be played randomly
REAR AV:
Pushing the REAR AV button for less than 1.5
seconds turns the rear seat audio controller on.
Pushing it again will turn the rear seat audio
controller off. If the vehicle is not equipped with a
rear seat audio controller, the display will show
“REAR AV N/A”.
If a DVD is loaded in the DVD entertainment
system (if so equipped) , pushing the REAR AV
button for more than 1.5 seconds will turn the
DVD player on.
When the REAR AV button is pushed for more
than 1.5 seconds with a DVD loaded and another
audio source playing, the other source will auto-
matically be turned off and the DVD will start to
play.
(SPEAKER CONTROL) button:
Push this button to turn the rear speakers off and
headphones on. Push this button again to turn
rear seat speakers back on and headphones off.
CD EJECT:
Current disc:
cPress the slot number (1 - 6) for the desired
disc, then press the
button. The com-
pact disc will be ejected. If the disc is not
removed within 15 seconds, the disc will
reload (except 3.1 in [8 cm] diameter com-
pact discs) .
All discs:
cPress and hold the
button for more
than 1.5 seconds. The compact discs will be
ejected one by one. If a disc is not removed
within 15 seconds, or the
button is
pressed again during the eject sequence,
the entire disc eject sequence will be can-
celed.
When this button is pushed while the compact
disc is being played, the compact disc will eject
and the last source will be played.
CD IN indicator:
The slot numbers (1 - 6) will illuminate if CDs
have been loaded into the changer.
4-40Display screen, heater, air conditioner and audio systems
ZREVIEW COPY:Ð2004 Quest(van)
Owners Manual(owners)ÐUSA English(nna)
10/08/03Ðtbrooks
X
Page 201 of 320
If the DVD player is off and a DVD is inserted, the
DVD player will automatically turn on.
CAUTION
Do not force the compact disc into the
slot. This could damage the player.
MODE select button:
Push the Mode button to select Audio/Video
source between DVD and AUX input (input jacks
on the faceplate, Red = right channel audio input,
White = left channel audio input, and Yellow =
Video input) .
The display will show the “AUX” in the upper left
corner of the display for 4 seconds once the
Mode is changed to AUX.
To use the input jacks, refer to “Auxiliary input
jacks” in this section.
orPLAY:
When the PLAY/PAUSE button on the player or
the PLAY button on the remote control is pushed,
the player will play.
In play mode, the display will briefly show
on the upper left corner of the display.
FF (Fast Forward) , REW
(Remote control only):
Push FAST FORWARD/FAST REVERSE but-
tons to carry out the fast forward or fast reverse
presentation at 5 times normal play speed.
Push FAST FORWARD/FAST REVERSE but-
tons again or PLAY button to resume the normal
play speed.
NEXT CHAPTER/
PREVIOUS CHAPTER
(Remote control only):
When the
(NEXT CHAPTER) button is
pushed while the DVD is being played, the pro-
gram next to the present one will start to play from
its beginning. Push several times to skip through
programs. The DVD will advance the number of
times the button is pushed. When
the
(PREVIOUS CHAPTER) button is
pushed, the program being played returns to its
beginning. Push several times to skip back
through programs. The DVD will go back the
number of times the button is pushed.
orPAUSE:
When the PLAY/PAUSE button on the player or
the PAUSE button on the remote control is
pushed, the player will pause playing of the me-
dia. In pause mode, the player will show
onthe upper left corner of the display until the player
is changed to another mode.
STOP:
Push the STOP button once to stop playing the
media. The display will show
in the upper
left corner of the display for 4 seconds, and the
last disc position will be stored. When the PLAY
button is pushed again, it will resume at the
stored disc track and time position.
If the STOP button is pushed again when the
player is already in Stop mode, it will reinitialize
the pointer to the beginning of the disc. In effect it
will ignore the last stored disc position and upon
receipt of the next play message it will begin at
the Title Menu, or at “the beginning of the disc”.
EJECT:
When the EJECT button is pushed with the DVD
loaded, it will be ejected.
The display will show the EJECT symbol
in
the upper left corner of the display for 4 seconds
once the EJECT button is pushed.
If the DVD is not loaded, the display will show
“NO DISC”.
If the DVD comes out and is not removed within
25 seconds, it will be pulled back into the slot to
protect it.
Display screen, heater, air conditioner and audio systems4-49
ZREVIEW COPY:Ð2004 Quest(van)
Owners Manual(owners)ÐUSA English(nna)
10/08/03Ðtbrooks
X