2004 NISSAN QUEST steering wheel
[x] Cancel search: steering wheelPage 193 of 320

CD CARE AND CLEANING
cHandle a CD by its edges. Do not bend the
disc. Never touch the surface of the disc.
cAlways place the discs in the storage case
when they are not being used.
c
To clean a disc, wipe the surface from the center
to the outer edge using a clean, soft cloth. Do
not wipe the disc using a circular motion.
cDo not use a conventional record cleaner or
alcohol intended for industrial use.
cA new disc may be rough on the inner and
outer edges. Remove the rough edges by
rubbing the inner and outer edges with the
side of a pen or pencil as illustrated.
1. Volume control switch
2. MODE select switch
3. POWER on/off switch
4. Tuning switch
STEERING WHEEL SWITCH FOR
AUDIO CONTROL (if so equipped)
The audio system can be operated using the
controls on the steering wheel.
POWER on/off switch
With the ignition key turned to the ACC or ON
position, push the POWER switch to turn the
audio system on or off.
MODE select switch
Push the mode select switch to change the mode
in the following sequence: AM, FM, SAT and CD.
Volume control switch
Push the volume control switch up or down to
increase or decrease the volume.
Tuning
Memory change (radio):
Push the tuning switch (
or) for less
than 1.5 seconds to change the radio frequency.
Seek tuning (radio):
Push the tuning switch (
or) for
more than 1.5 seconds to seek the next or previ-
ous radio station.
FF, REW:
Push the tuning switch (
or) for less
1.5 seconds to return to the beginning of the
present program or skip to the next program.
Push several times to skip back or skip through
programs.
To stop the FF or REW function, press the
orbutton for less than 1.5 seconds again.
LHA0049LHA0269
Display screen, heater, air conditioner and audio systems4-41
ZREVIEW COPY:Ð2004 Quest(van)
Owners Manual(owners)ÐUSA English(nna)
10/08/03Ðtbrooks
X
Page 210 of 320
WARNING
cIf the low tire pressure warning light
flashes while driving, avoid sudden
steering maneuvers or abrupt braking,
reduce vehicle speed, pull off the road
to a safe location and stop the vehicle
as soon as possible. Serious vehicle
damage could occur and may lead to an
accident and could result in serious
personal injury. Check the tire pressure
for all four tires. Adjust the tire pressure
to the recommended COLD tire pres-
sure shown on the Tire and Loading
Information label to turn the low tire
pressure warning light OFF. If you have
a flat tire, replace it with a spare tire as
soon as possible. (See “Flat tire” in the
“In case of emergency” section for
changing a flat tire.)
cWhen a spare tire is mounted or a wheel
is replaced, tire pressure will not be
indicated and the low tire pressure
warning system will not function. Con-
tact your NISSAN dealer as soon as
possible for tire replacement and/or
system resetting.cDo not inject any tire liquid or aerosol
tire sealant into the tires, as this may
cause a malfunction of the tire pressure
sensors.
CAUTION
Do not place metalized film or any metal
parts (antenna, etc.) on the windows. This
may cause poor reception of the signals
from the tire pressure sensors, and the
low tire pressure warning system will not
function properly.
FCC Notice:
Changes or modifications not expressly ap-
proved by the manufacturer compliance
could void the user’s authority to operate
the equipment.
This device complies with Part 15 of the
FCC Rules and RSS-210 of Industry
Canada.
Operation is subject to the following two
conditions: (1) This device may not cause
harmful interface, and (2) this device must
accept any interference received, including
interference that may cause undesired op-
eration of the device.
AVOIDING COLLISION AND
ROLLOVER
WARNING
Failure to operate this vehicle in a safe
and prudent manner may result in loss of
control or an accident.
Be alert and drive defensively at all times. Obey
all traffic regulations. Avoid excessive speed,
high speed cornering, or sudden steering ma-
neuvers, because these driving practices could
cause you to lose control of your vehicle.As with
any vehicle, loss of control could result in a
collision with other vehicles or objects, or
cause the vehicle to roll over, particularly if
the loss of control causes the vehicle to
slide sideways.Be attentive at all times, and
avoid driving when tired. Never drive when under
the influence of alcohol or drugs (including pre-
scription or over-the-counter drugs which may
cause drowsiness) . Always wear your seat belt
as outlined in the “Safety – Seats, seat belts and
supplemental air bags” section of this manual,
and also instruct your passengers to do so.
Seat belts help reduce the risk of injury in colli-
sions and rollovers.In a rollover crash, an
unbelted or improperly belted person is
significantly more likely to be injured or
killed than a person wearing a seat belt.
5-4Starting and driving
ZREVIEW COPY:Ð2004 Quest(van)
Owners Manual(owners)ÐUSA English(nna)
10/08/03Ðtbrooks
X
Page 211 of 320
DRINKING ALCOHOL/DRUGS AND
DRIVING
WARNING
Never drive under the influence of alcohol
or drugs. Alcohol in the bloodstream re-
duces coordination, delays reaction time
and impairs judgement. Driving after
drinking alcohol increases the likelihood
of being involved in an accident injuring
yourself and others. Additionally, if you
are injured in an accident, alcohol can
increase the severity of the injury.
NISSAN is committed to safe driving. However,
you must choose not to drive under the influence
of alcohol. Every year thousands of people are
injured or killed in alcohol-related accidents. Al-
though the local laws vary on what is considered
to be legally intoxicated, the fact is that alcohol
affects all people differently and most people
underestimate the effects of alcohol.
Remember, drinking and driving don’t mix! And
that is true for drugs, too (over-the-counter, pre-
scription, and illegal drugs) . Don’t drive if your
ability to operate your vehicle is impaired by alco-
hol, drugs, or some other physical condition.
AUTOMATIC TRANSMISSION
The ignition lock is designed so the key cannot be
turned to LOCK position and removed until the
shift selector lever is moved to the P (Park) posi-
tion.
When removing the key from the ignition, make
sure the shift selector lever is in the P (Park)
position.
If the selector lever is not returned to P (Park)
position, the key cannot be move to the LOCK
position.
When the key cannot be turned to the LOCK
position, proceed as follows to remove the key.1. Move the shift selector lever into the P (Park)
position.
2. Turn the ignition key slightly toward the ON
position.
3. Turn the key to the LOCK position.
4. Remove the key.
The shift selector lever is designed so it cannot
moved out of P (Park) and into any of the other
gear positions if the ignition key is turned to OFF
position or if the key is removed from the switch.
The shift selector lever can be moved if the
ignition switch is in the ACC position. This
allows the vehicle to be moved if the bat-
tery is discharged. The shift selector lever
can also be moved if the ignition switch is
in the ON position and the foot brake pedal
is depressed.
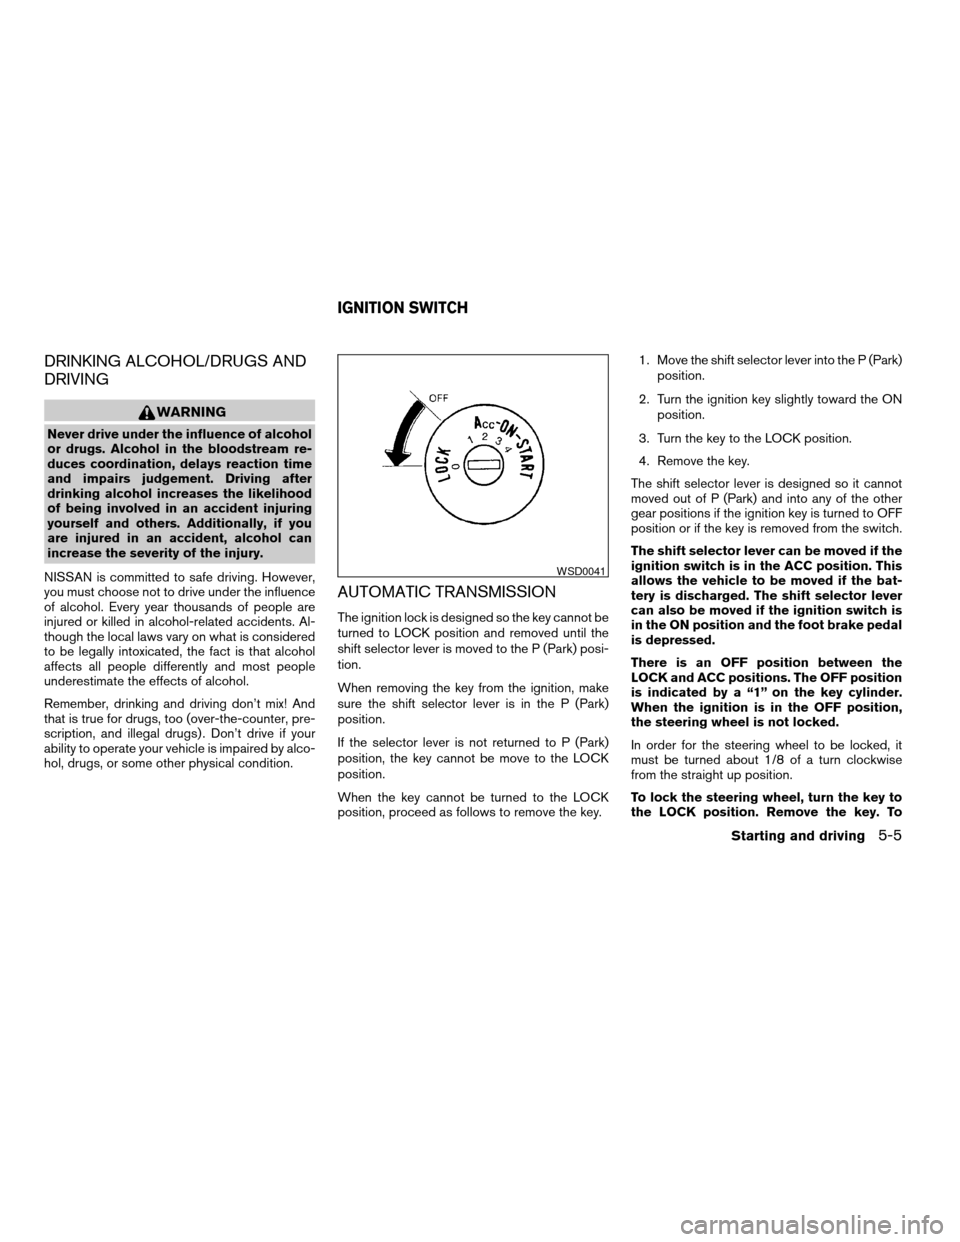
There is an OFF position between the
LOCK and ACC positions. The OFF position
is indicated by a “1” on the key cylinder.
When the ignition is in the OFF position,
the steering wheel is not locked.
In order for the steering wheel to be locked, it
must be turned about 1/8 of a turn clockwise
from the straight up position.
To lock the steering wheel, turn the key to
the LOCK position. Remove the key. To
WSD0041
IGNITION SWITCH
Starting and driving5-5
ZREVIEW COPY:Ð2004 Quest(van)
Owners Manual(owners)ÐUSA English(nna)
10/08/03Ðtbrooks
X
Page 212 of 320
unlock the steering wheel, insert the key
and turn it gently while rotating the steer-
ing wheel slightly right and left.
WARNING
Never remove or turn the key to the LOCK
position while driving. The steering wheel
will lock. This may cause the driver to lose
control of the vehicle and could result in
serious vehicle damage or personal injury.
KEY POSITIONS
LOCK: Normal parking position (0)
OFF: (Not used) (1)
ACC: (Accessories) (2)
This position activates electrical accessories
such as the radio when the engine is not running.
ON: Normal operating position (3)
This position turns on the ignition system and the
electrical accessories.
START: (4)
This position starts the engine. As soon as the
engine has started, release the key. It automati-
cally returns to the ON position.
NISSAN VEHICLE IMMOBILIZER
SYSTEM (NVIS)
The NISSAN Vehicle Immobilizer System (NVIS)
will not allow the engine to start without the use of
the registered NVIS key.
If the engine fails to start using the registered
NVIS key, it may be due to interference caused by
another NVIS key, an automated toll road device
or automated payment device on the key ring.
Restart the engine using the following proce-
dures:
1. Leave the ignition switch in the ON position
for approximately 5 seconds.
2. Turn the ignition switch to the OFF or LOCK
position and wait approximately 5 seconds.
3. Repeat step 1 and 2 again.
4. Restart the engine while holding the device
(which may have caused the interference)
separate from the registered NVIS key.
If this procedure allows the engine to start,
NISSAN recommends placing the registered
NVIS key on a separate key ring to avoid interfer-
ence from other devices.cMake sure the area around the vehicle is
clear.
cCheck fluid levels such as engine oil, cool-
ant, brake fluid, and window washer fluid as
frequently as possible, or at least whenever
you refuel.
cCheck that all windows and lights are clean.
cVisually inspect tires for their appearance
and condition. Also check tires for proper
inflation.
cLock all doors.
cPosition seat and adjust head restraints.
cAdjust inside and outside mirrors.
cFasten seat belts and ask all passengers to
do likewise.
cCheck the operation of warning lights when
the key is turned to the ON (3) position. See
“Warning/indicator lights and audible re-
minders” in the “Instruments and controls”
section of this manual.
BEFORE STARTING THE ENGINE
5-6Starting and driving
ZREVIEW COPY:Ð2004 Quest(van)
Owners Manual(owners)ÐUSA English(nna)
10/08/03Ðtbrooks
X
Page 215 of 320

4. Move the shift selector lever to P (Park) or N
(Neutral) to restart the vehicle (P is pre-
ferred) . Move the shift selector lever to P
(Park) to park the vehicle and turn the igni-
tion key to the LOCK position to remove the
key.
P (Park):
Use this selector position when the vehicle is
parked or when starting the engine. Make sure
the vehicle is completely stopped.The brake
pedal must be depressed to move the se-
lector lever from N (Neutral) or any drive
position to P (Park) .Apply the parking brake.
When parking on a hill, apply the parking brake
first, then move the shift selector lever into the P
(Park) position.
R (Reverse):
CAUTION
Use this position only when the vehicle is
completely stopped.
Use this position to back up. Make sure the
vehicle is completely stopped before selecting
the R (Reverse) position.The brake pedal
must be depressed to move the selector
lever from P (Park) , N (Neutral) or any drive
position to R (Reverse) .N (Neutral):
Neither forward nor reverse gear is engaged. The
engine can be started in this position. You may
shift to N (Neutral) and restart a stalled engine
while the vehicle is moving.
D (Drive):
Use this position for all normal forward driving.
L (Low gear):
Use this position when climbing steep hills slowly
or slow driving through deep snow, sand or mud,
or for maximum engine braking on steep downhill
grades.
Do not shift into the L position at speeds above
65 MPH (105 km/h) . Do not exceed 65 MPH
(105 km/h) in the L position.
Shift lock release
If the battery is discharged, the shift selector lever
may not be moved from the P (Park) position even
with the brake pedal depressed.
To move the shift selector lever, release the shift
lock. The shift selector lever can be moved to N
(Neutral) . However, the steering wheel will be
locked unless the ignition switch is turned to the
ON position. This allows the vehicle to be moved
if the battery is discharged.
WSD0083
Starting and driving5-9
ZREVIEW COPY:Ð2004 Quest(van)
Owners Manual(owners)ÐUSA English(nna)
10/08/03Ðtbrooks
X
Page 216 of 320
To push the shift lock release, complete the fol-
lowing procedure:
1. Turn the ignition key to the LOCK position
and remove the key
2. Apply the parking brake.
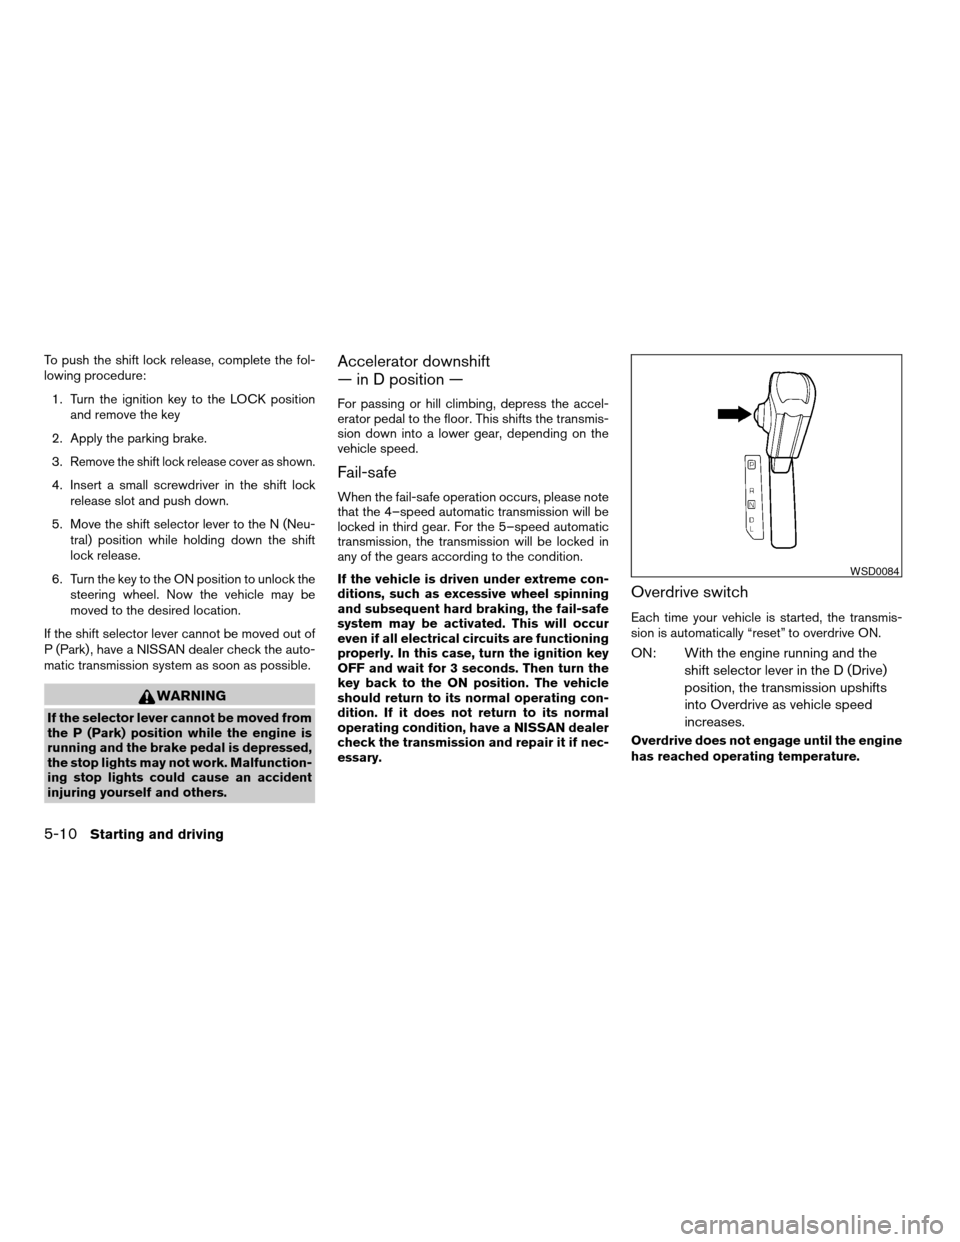
3.
Remove the shift lock release cover as shown.
4. Insert a small screwdriver in the shift lock
release slot and push down.
5. Move the shift selector lever to the N (Neu-
tral) position while holding down the shift
lock release.
6. Turn the key to the ON position to unlock the
steering wheel. Now the vehicle may be
moved to the desired location.
If the shift selector lever cannot be moved out of
P (Park) , have a NISSAN dealer check the auto-
matic transmission system as soon as possible.
WARNING
If the selector lever cannot be moved from
the P (Park) position while the engine is
running and the brake pedal is depressed,
the stop lights may not work. Malfunction-
ing stop lights could cause an accident
injuring yourself and others.
Accelerator downshift
— in D position —
For passing or hill climbing, depress the accel-
erator pedal to the floor. This shifts the transmis-
sion down into a lower gear, depending on the
vehicle speed.
Fail-safe
When the fail-safe operation occurs, please note
that the 4–speed automatic transmission will be
locked in third gear. For the 5–speed automatic
transmission, the transmission will be locked in
any of the gears according to the condition.
If the vehicle is driven under extreme con-
ditions, such as excessive wheel spinning
and subsequent hard braking, the fail-safe
system may be activated. This will occur
even if all electrical circuits are functioning
properly. In this case, turn the ignition key
OFF and wait for 3 seconds. Then turn the
key back to the ON position. The vehicle
should return to its normal operating con-
dition. If it does not return to its normal
operating condition, have a NISSAN dealer
check the transmission and repair it if nec-
essary.
Overdrive switch
Each time your vehicle is started, the transmis-
sion is automatically “reset” to overdrive ON.
ON: With the engine running and the
shift selector lever in the D (Drive)
position, the transmission upshifts
into Overdrive as vehicle speed
increases.
Overdrive does not engage until the engine
has reached operating temperature.
WSD0084
5-10Starting and driving
ZREVIEW COPY:Ð2004 Quest(van)
Owners Manual(owners)ÐUSA English(nna)
10/08/03Ðtbrooks
X
Page 218 of 320
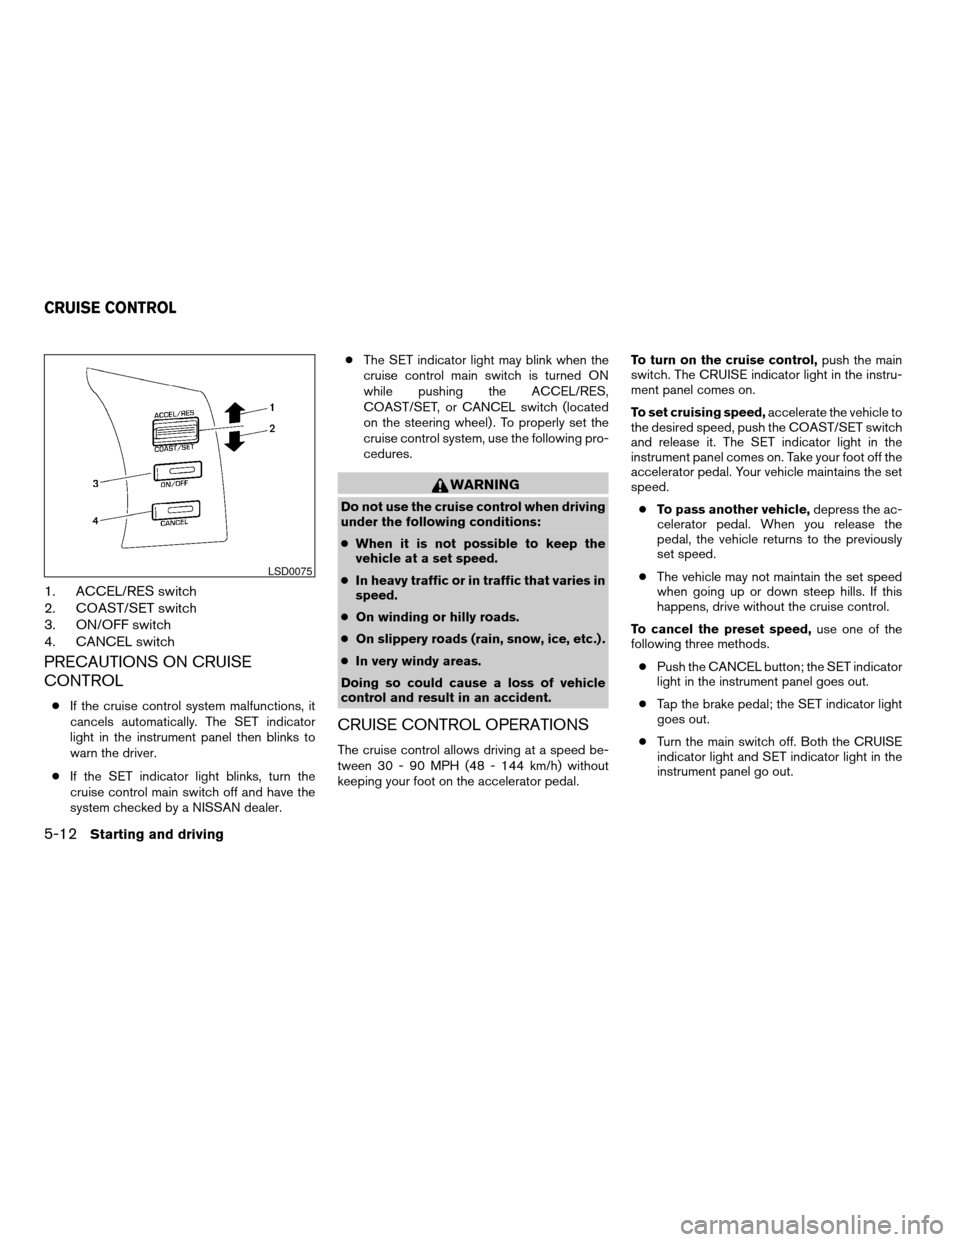
1. ACCEL/RES switch
2. COAST/SET switch
3. ON/OFF switch
4. CANCEL switch
PRECAUTIONS ON CRUISE
CONTROL
cIf the cruise control system malfunctions, it
cancels automatically. The SET indicator
light in the instrument panel then blinks to
warn the driver.
cIf the SET indicator light blinks, turn the
cruise control main switch off and have the
system checked by a NISSAN dealer.cThe SET indicator light may blink when the
cruise control main switch is turned ON
while pushing the ACCEL/RES,
COAST/SET, or CANCEL switch (located
on the steering wheel) . To properly set the
cruise control system, use the following pro-
cedures.
WARNING
Do not use the cruise control when driving
under the following conditions:
cWhen it is not possible to keep the
vehicle at a set speed.
cIn heavy traffic or in traffic that varies in
speed.
cOn winding or hilly roads.
cOn slippery roads (rain, snow, ice, etc.) .
cIn very windy areas.
Doing so could cause a loss of vehicle
control and result in an accident.
CRUISE CONTROL OPERATIONS
The cruise control allows driving at a speed be-
tween 30 - 90 MPH (48 - 144 km/h) without
keeping your foot on the accelerator pedal.To turn on the cruise control,push the main
switch. The CRUISE indicator light in the instru-
ment panel comes on.
To set cruising speed,accelerate the vehicle to
the desired speed, push the COAST/SET switch
and release it. The SET indicator light in the
instrument panel comes on. Take your foot off the
accelerator pedal. Your vehicle maintains the set
speed.
cTo pass another vehicle,depress the ac-
celerator pedal. When you release the
pedal, the vehicle returns to the previously
set speed.
cThe vehicle may not maintain the set speed
when going up or down steep hills. If this
happens, drive without the cruise control.
To cancel the preset speed,use one of the
following three methods.
cPush the CANCEL button; the SET indicator
light in the instrument panel goes out.
cTap the brake pedal; the SET indicator light
goes out.
cTurn the main switch off. Both the CRUISE
indicator light and SET indicator light in the
instrument panel go out.
LSD0075
CRUISE CONTROL
5-12Starting and driving
ZREVIEW COPY:Ð2004 Quest(van)
Owners Manual(owners)ÐUSA English(nna)
10/08/03Ðtbrooks
X
Page 221 of 320
WARNING
cDo not stop or park the vehicle over
flammable materials such as dry grass,
waste paper or rags. They may ignite
and cause a fire.
cSafe parking procedures require that
both the parking brake be set and the
transmission placed into P (Park) . Fail-
ure to do so could cause the vehicle to
move unexpectedly or roll away and re-
sult in an accident. Make sure the shift
lever has been pushed as far forward as
it can go and cannot be moved without
depressing the foot brake pedal.
cNever leave the engine running while
the vehicle is unattended.
cDo not leave children unattended inside
the vehicle. They could unknowingly ac-
tivate switches or controls. Unattended
children could become involved in seri-
ous accidents.
1. Firmly apply the parking brake.
2. Move the shift selector lever to the P (Park)
position.3. To help prevent the vehicle from rolling into
traffic when parked on an incline, it is a good
practice to turn the wheels as illustrated.
cHEADED DOWNHILL WITH CURB:sA
Turn the wheels into the curb and move the
vehicle forward until the curb side wheel
gently touches the curb.
cHEADED UPHILL WITH CURB:
sB
Turn the wheels away from the curb and
move the vehicle back until the curb side
wheel gently touches the curb.
cHEADED UPHILL OR DOWNHILL, NO
CURB:
sC
Turn the wheels toward the side of the road
so the vehicle will move away from the cen-
ter of the road if it moves.
4. Turn the ignition key to the LOCK position
and remove the key.The power assisted steering is designed to use a
hydraulic pump, driven by the engine, to assist
steering.
If the engine stops or the drive belt breaks, you
will still have control of the vehicle. However,
much greater steering effort is needed, especially
in sharp turns and at low speeds.
WARNING
If the engine is not running or is turned off
while driving, the power assist for the
steering will not work. Steering will be
much harder to operate.
PARKING/PARKING ON HILLS POWER STEERING
Starting and driving5-15
ZREVIEW COPY:Ð2004 Quest(van)
Owners Manual(owners)ÐUSA English(nna)
10/08/03Ðtbrooks
X