2004 NISSAN PATROL combination meter
[x] Cancel search: combination meterPage 26 of 579
CAUTION:
+Disconnect both battery cables in advance.
+Disconnect air bag system line in advance.
+Never tamper with or force air bag lid open, as this may adversely affect air bag performance.
+Be careful not to scratch pad and other parts.
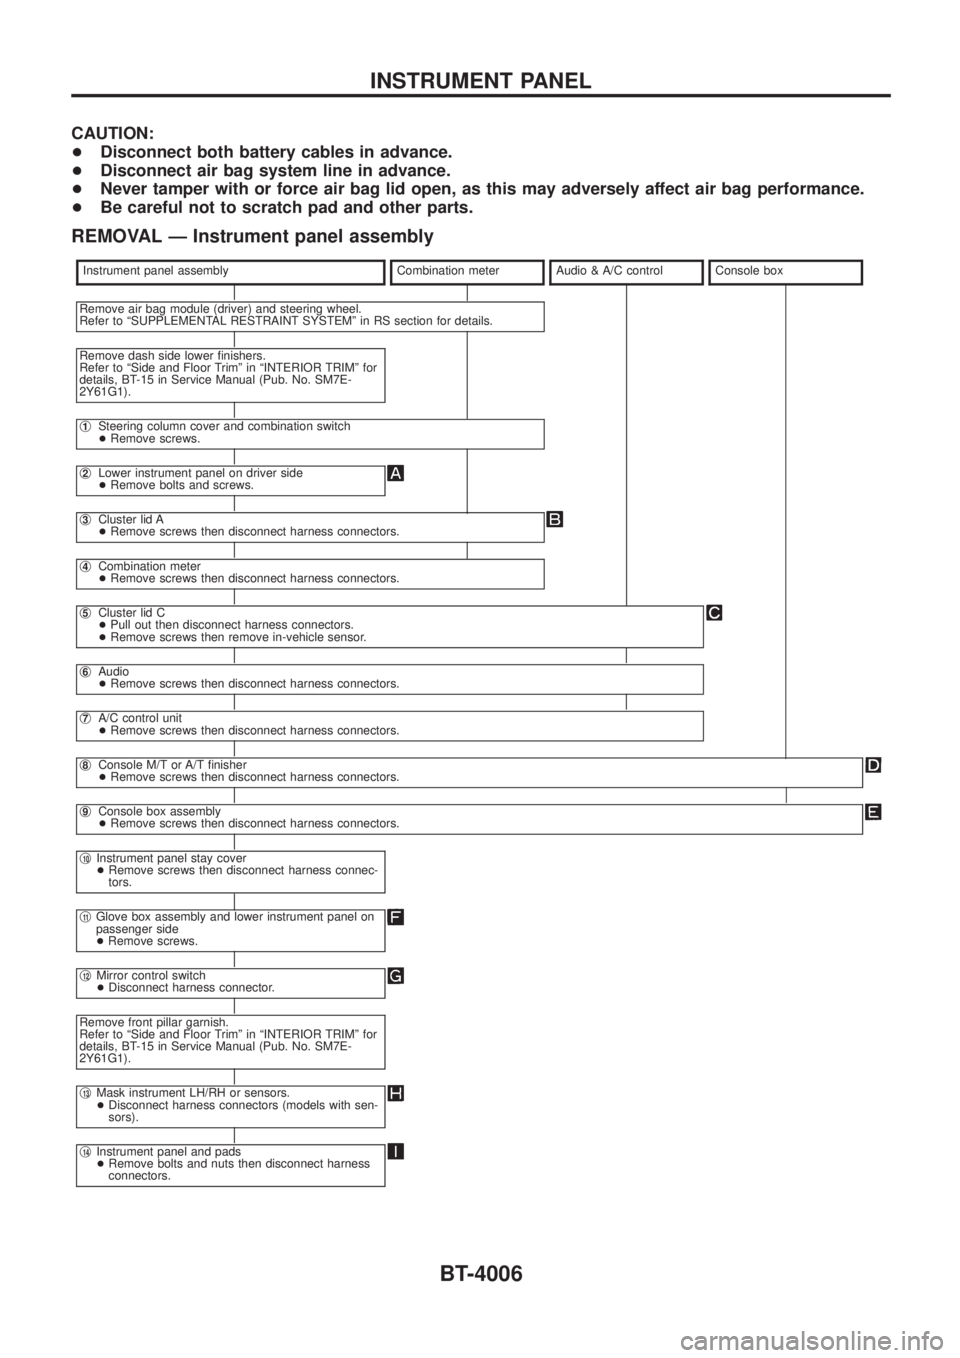
REMOVAL Ð Instrument panel assembly
Instrument panel assemblyCombination meterAudio & A/C controlConsole box
Remove air bag module (driver) and steering wheel.
Refer to ªSUPPLEMENTAL RESTRAINT SYSTEMº in RS section for details.
Remove dash side lower ®nishers.
Refer to ªSide and Floor Trimº in ªINTERIOR TRIMº for
details, BT-15 in Service Manual (Pub. No. SM7E-
2Y61G1).
j1Steering column cover and combination switch
+Remove screws.
j2Lower instrument panel on driver side
+Remove bolts and screws.
j3Cluster lid A
+Remove screws then disconnect harness connectors.
j4Combination meter
+Remove screws then disconnect harness connectors.
j5Cluster lid C
+Pull out then disconnect harness connectors.
+Remove screws then remove in-vehicle sensor.
j6Audio
+Remove screws then disconnect harness connectors.
j7A/C control unit
+Remove screws then disconnect harness connectors.
j8Console M/T or A/T ®nisher
+Remove screws then disconnect harness connectors.
j9Console box assembly
+Remove screws then disconnect harness connectors.
j10Instrument panel stay cover
+Remove screws then disconnect harness connec-
tors.
j11Glove box assembly and lower instrument panel on
passenger side
+Remove screws.
j12Mirror control switch
+Disconnect harness connector.
Remove front pillar garnish.
Refer to ªSide and Floor Trimº in ªINTERIOR TRIMº for
details, BT-15 in Service Manual (Pub. No. SM7E-
2Y61G1).
j13Mask instrument LH/RH or sensors.
+Disconnect harness connectors (models with sen-
sors).
j14Instrument panel and pads
+Remove bolts and nuts then disconnect harness
connectors.
INSTRUMENT PANEL
BT-4006
Page 54 of 579
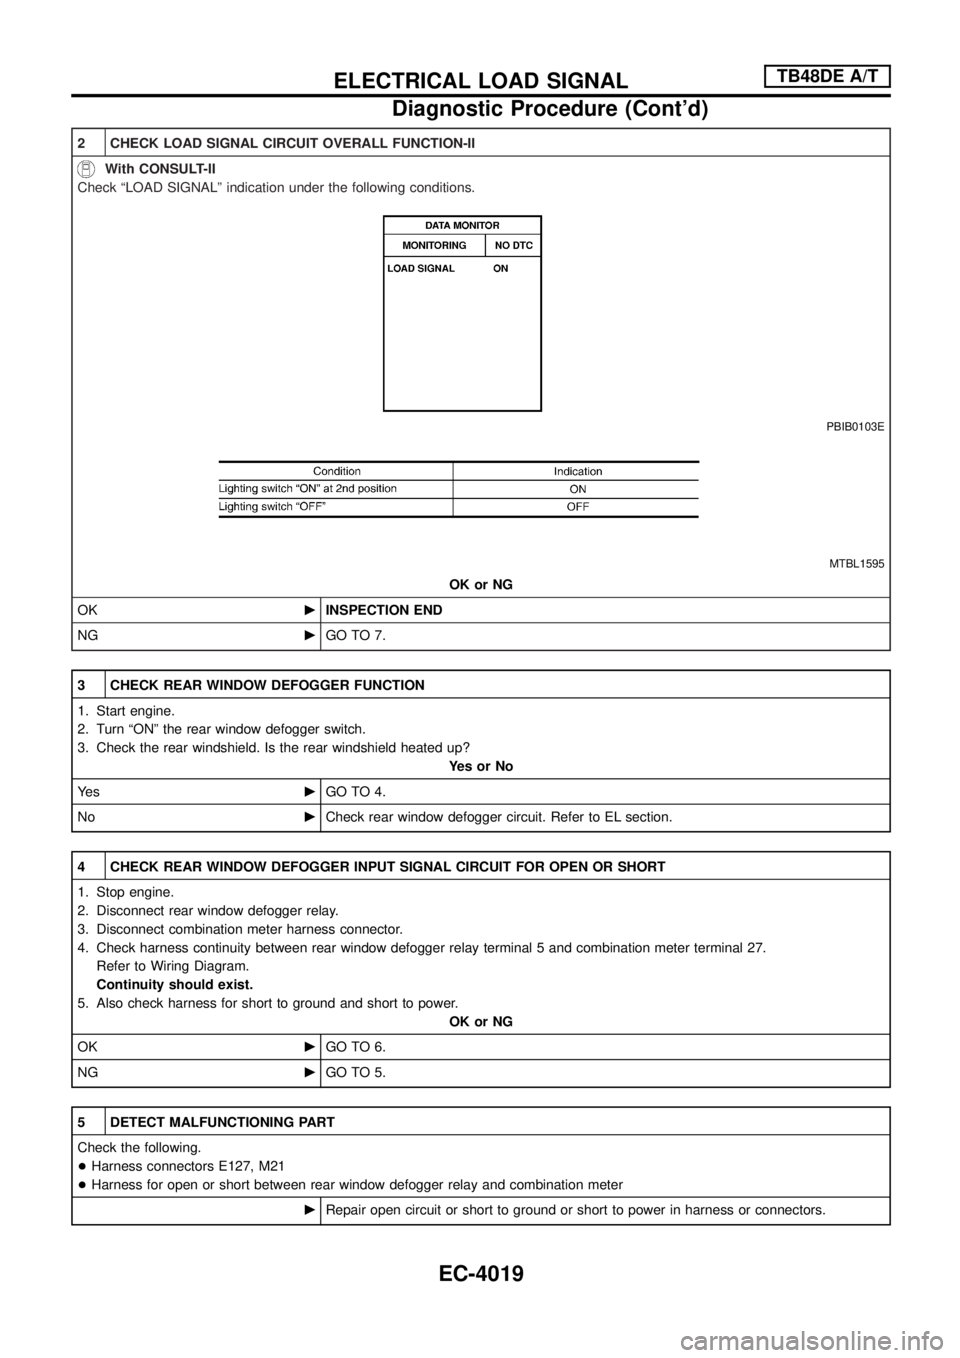
2 CHECK LOAD SIGNAL CIRCUIT OVERALL FUNCTION-II
With CONSULT-II
Check ªLOAD SIGNALº indication under the following conditions.
PBIB0103E
MTBL1595
OK or NG
OKcINSPECTION END
NGcGO TO 7.
3 CHECK REAR WINDOW DEFOGGER FUNCTION
1. Start engine.
2. Turn ªONº the rear window defogger switch.
3. Check the rear windshield. Is the rear windshield heated up?
YesorNo
Ye scGO TO 4.
NocCheck rear window defogger circuit. Refer to EL section.
4 CHECK REAR WINDOW DEFOGGER INPUT SIGNAL CIRCUIT FOR OPEN OR SHORT
1. Stop engine.
2. Disconnect rear window defogger relay.
3. Disconnect combination meter harness connector.
4. Check harness continuity between rear window defogger relay terminal 5 and combination meter terminal 27.
Refer to Wiring Diagram.
Continuity should exist.
5. Also check harness for short to ground and short to power.
OK or NG
OKcGO TO 6.
NGcGO TO 5.
5 DETECT MALFUNCTIONING PART
Check the following.
+Harness connectors E127, M21
+Harness for open or short between rear window defogger relay and combination meter
cRepair open circuit or short to ground or short to power in harness or connectors.
ELECTRICAL LOAD SIGNALTB48DE A/T
Diagnostic Procedure (Cont'd)
EC-4019
Page 55 of 579
6 CHECK COMBINATION METER
Refer to EL section.
OK or NG
OKcGO TO 11.
NGcReplace combination meter.
7 CHECK HEADLAMP FUNCTION
1. Start engine.
2. Lighting switch ªONº at 2nd position.
3. Check that headlamp high beams are illuminated.
OK or NG
OKcGO TO 8.
NGcCheck headlamp circuit. Refer to EL section.
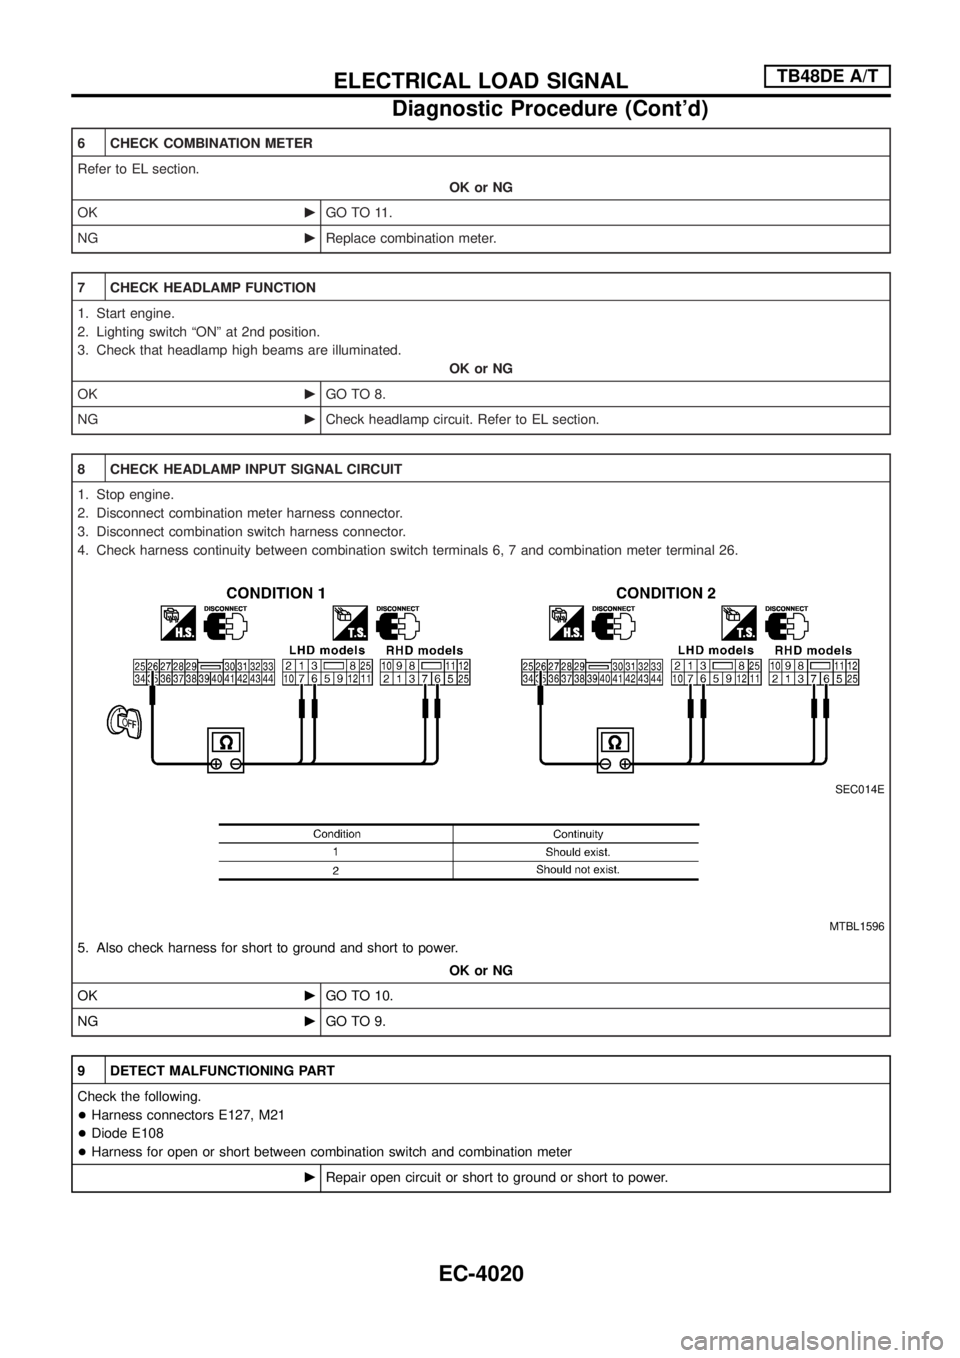
8 CHECK HEADLAMP INPUT SIGNAL CIRCUIT
1. Stop engine.
2. Disconnect combination meter harness connector.
3. Disconnect combination switch harness connector.
4. Check harness continuity between combination switch terminals 6, 7 and combination meter terminal 26.
SEC014E
MTBL1596
5. Also check harness for short to ground and short to power.
OK or NG
OKcGO TO 10.
NGcGO TO 9.
9 DETECT MALFUNCTIONING PART
Check the following.
+Harness connectors E127, M21
+Diode E108
+Harness for open or short between combination switch and combination meter
cRepair open circuit or short to ground or short to power.
ELECTRICAL LOAD SIGNALTB48DE A/T
Diagnostic Procedure (Cont'd)
EC-4020
Page 56 of 579
10 CHECK COMBINATION METER
Refer to EL section.
OK or NG
OKcGO TO 11.
NGcReplace combination meter.
11 CHECK INTERMITTENT INCIDENT
Refer to ªTROUBLE DIAGNOSIS FOR INTERMITTENT INCIDENTº, EC-125 in Service Manual (Publication No. SM1E-Y61EG1).
cINSPECTION END
ELECTRICAL LOAD SIGNALTB48DE A/T
Diagnostic Procedure (Cont'd)
EC-4021
Page 63 of 579
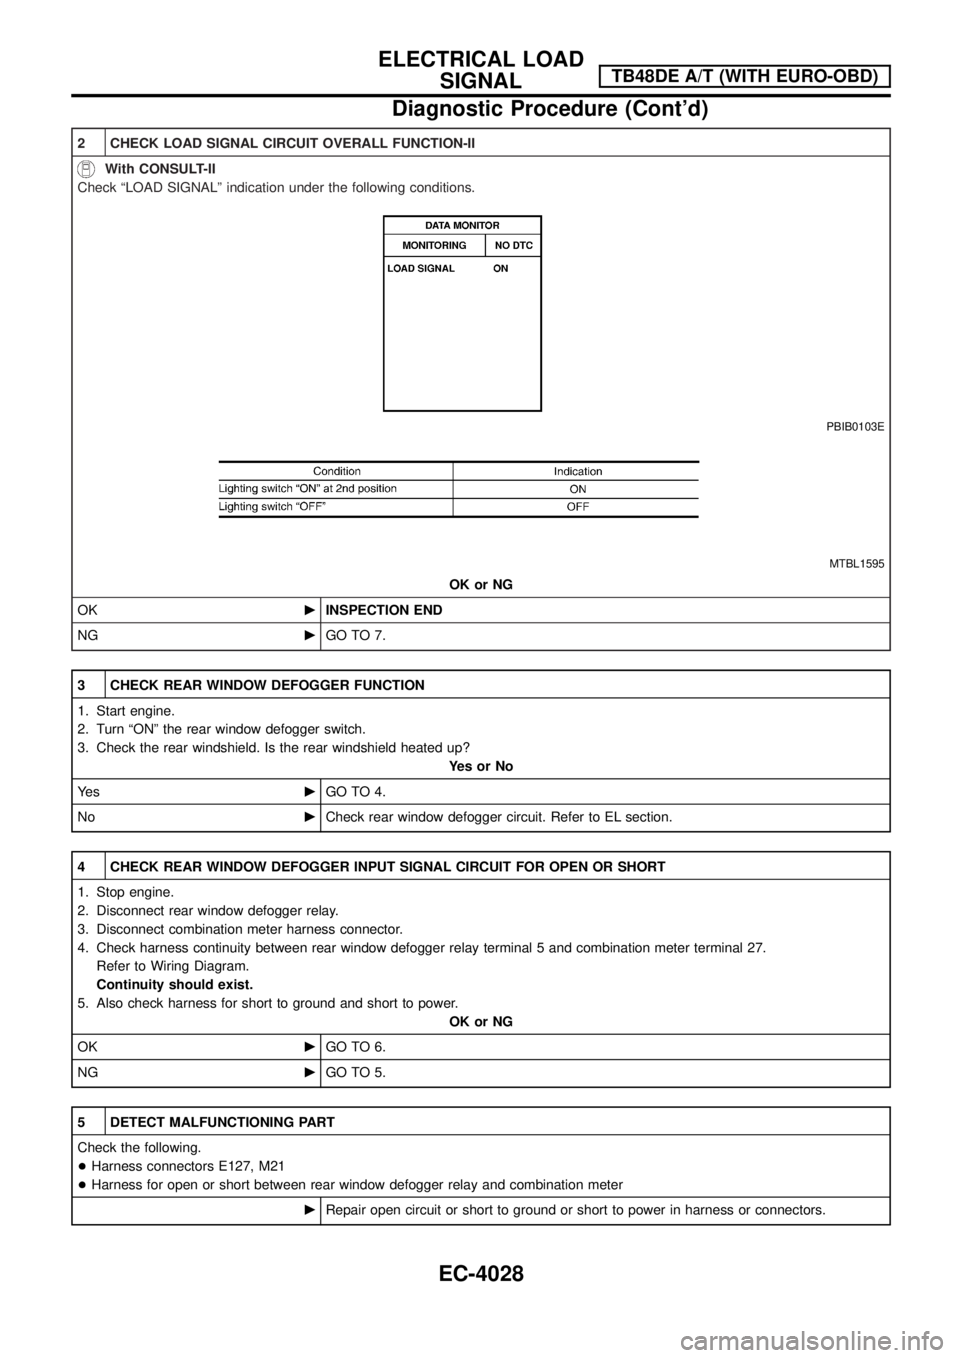
2 CHECK LOAD SIGNAL CIRCUIT OVERALL FUNCTION-II
With CONSULT-II
Check ªLOAD SIGNALº indication under the following conditions.
PBIB0103E
MTBL1595
OK or NG
OKcINSPECTION END
NGcGO TO 7.
3 CHECK REAR WINDOW DEFOGGER FUNCTION
1. Start engine.
2. Turn ªONº the rear window defogger switch.
3. Check the rear windshield. Is the rear windshield heated up?
YesorNo
Ye scGO TO 4.
NocCheck rear window defogger circuit. Refer to EL section.
4 CHECK REAR WINDOW DEFOGGER INPUT SIGNAL CIRCUIT FOR OPEN OR SHORT
1. Stop engine.
2. Disconnect rear window defogger relay.
3. Disconnect combination meter harness connector.
4. Check harness continuity between rear window defogger relay terminal 5 and combination meter terminal 27.
Refer to Wiring Diagram.
Continuity should exist.
5. Also check harness for short to ground and short to power.
OK or NG
OKcGO TO 6.
NGcGO TO 5.
5 DETECT MALFUNCTIONING PART
Check the following.
+Harness connectors E127, M21
+Harness for open or short between rear window defogger relay and combination meter
cRepair open circuit or short to ground or short to power in harness or connectors.
ELECTRICAL LOAD
SIGNALTB48DE A/T (WITH EURO-OBD)
Diagnostic Procedure (Cont'd)
EC-4028
Page 64 of 579
6 CHECK COMBINATION METER
Refer to EL section.
OK or NG
OKcGO TO 11.
NGcReplace combination meter.
7 CHECK HEADLAMP FUNCTION
1. Start engine.
2. Lighting switch ªONº at 2nd position.
3. Check that headlamp high beams are illuminated.
OK or NG
OKcGO TO 8.
NGcCheck headlamp circuit. Refer to EL section.
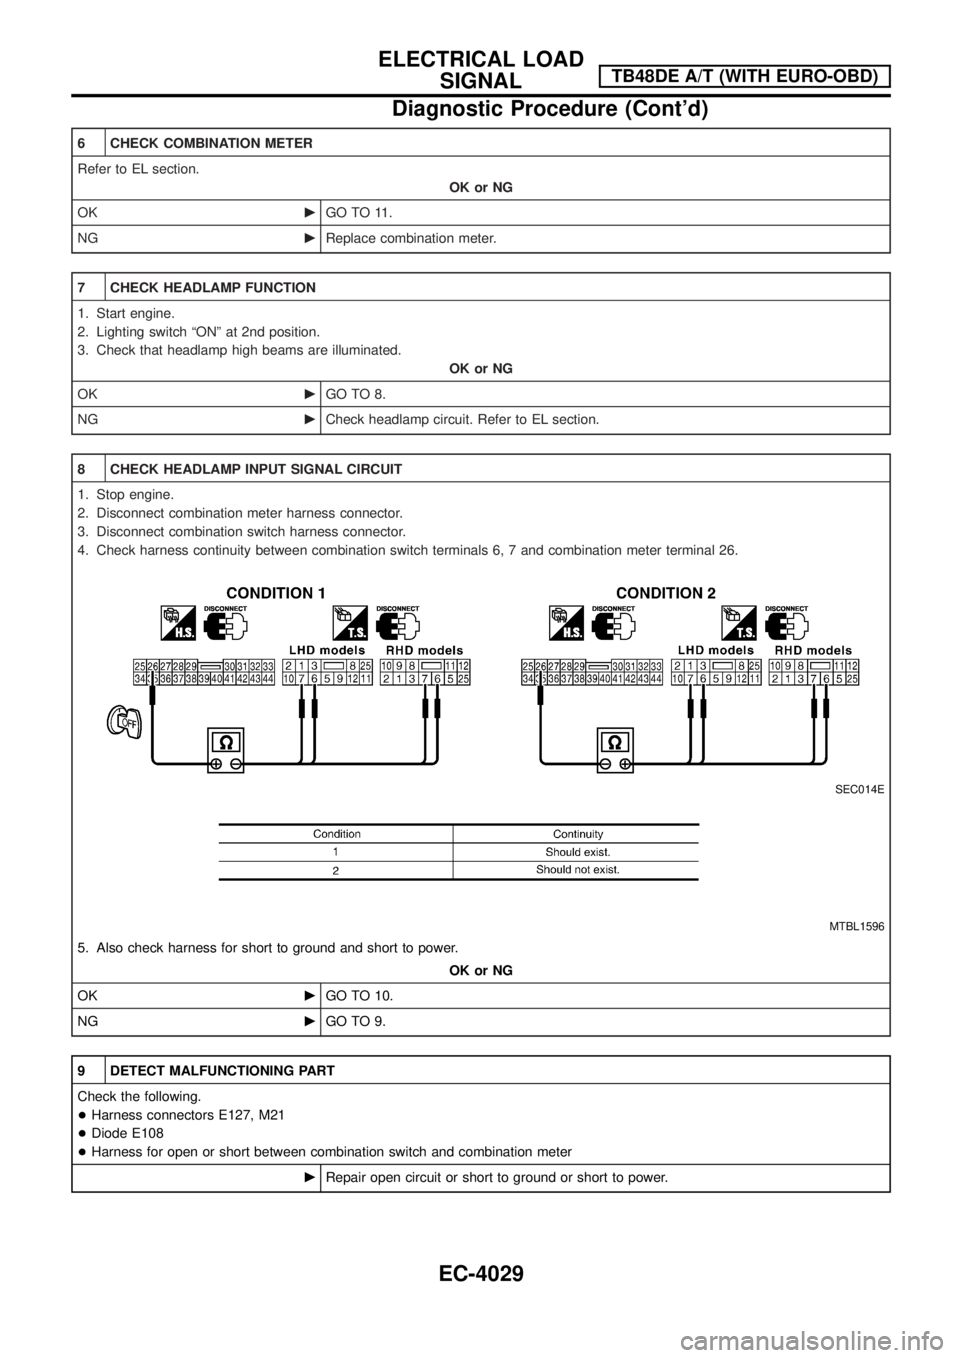
8 CHECK HEADLAMP INPUT SIGNAL CIRCUIT
1. Stop engine.
2. Disconnect combination meter harness connector.
3. Disconnect combination switch harness connector.
4. Check harness continuity between combination switch terminals 6, 7 and combination meter terminal 26.
SEC014E
MTBL1596
5. Also check harness for short to ground and short to power.
OK or NG
OKcGO TO 10.
NGcGO TO 9.
9 DETECT MALFUNCTIONING PART
Check the following.
+Harness connectors E127, M21
+Diode E108
+Harness for open or short between combination switch and combination meter
cRepair open circuit or short to ground or short to power.
ELECTRICAL LOAD
SIGNALTB48DE A/T (WITH EURO-OBD)
Diagnostic Procedure (Cont'd)
EC-4029
Page 65 of 579
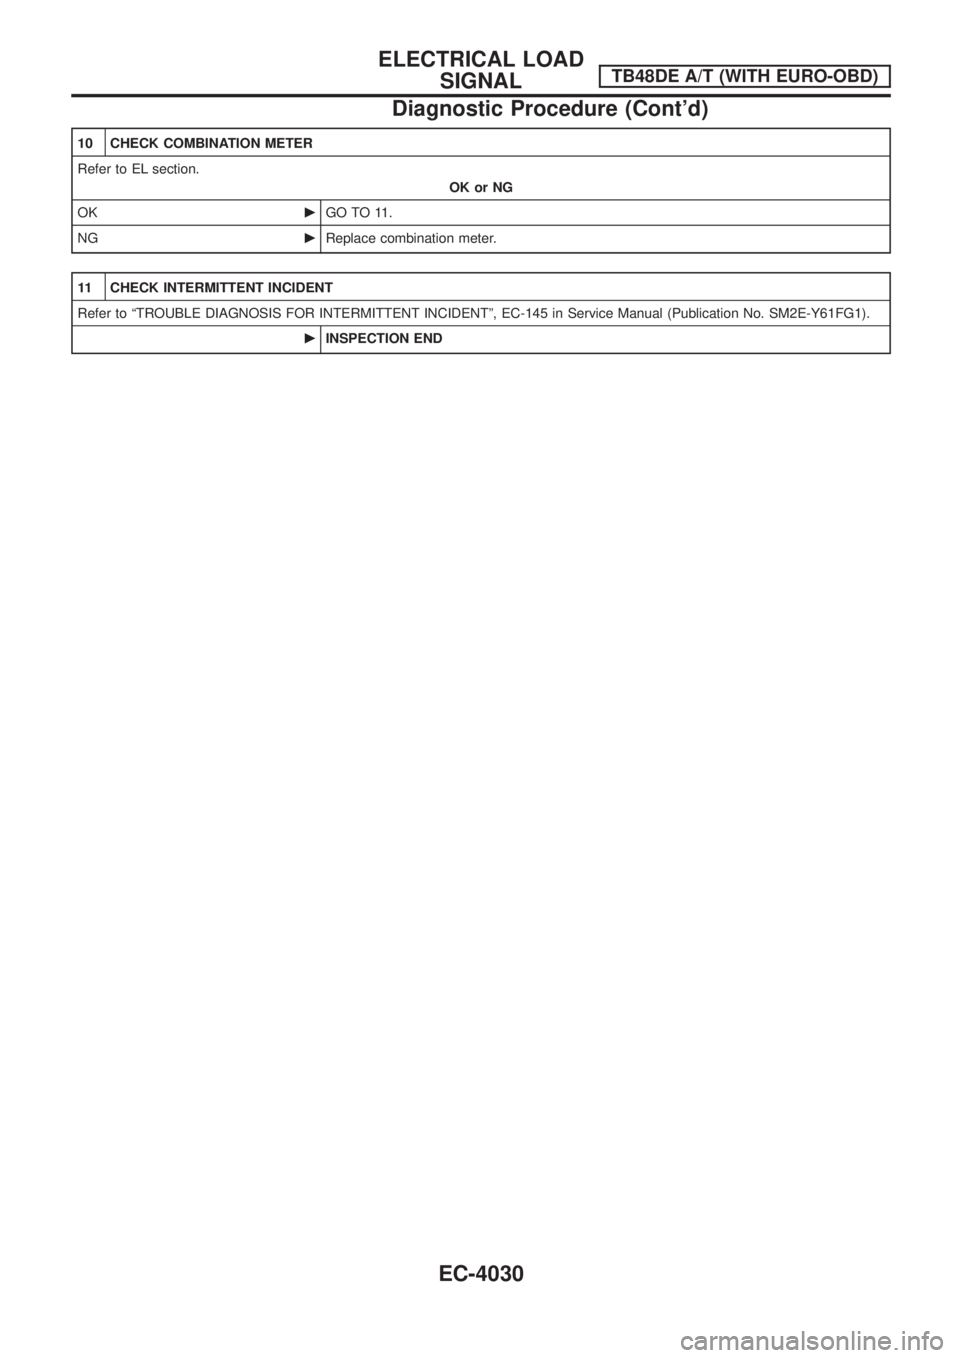
10 CHECK COMBINATION METER
Refer to EL section.
OK or NG
OKcGO TO 11.
NGcReplace combination meter.
11 CHECK INTERMITTENT INCIDENT
Refer to ªTROUBLE DIAGNOSIS FOR INTERMITTENT INCIDENTº, EC-145 in Service Manual (Publication No. SM2E-Y61FG1).
cINSPECTION END
ELECTRICAL LOAD
SIGNALTB48DE A/T (WITH EURO-OBD)
Diagnostic Procedure (Cont'd)
EC-4030
Page 97 of 579
Wiring Diagram Ð F/FOG Ð/RHD Models for
Europe and China..................................................4062
Wiring Diagram Ð F/FOG Ð/LHD Models for
Europe ...................................................................4063
REAR FOG LAMP/WAGON AND HARDTOP
MODELS ....................................................................4064
Wiring Diagram Ð R/FOG Ð/For Europe and
China......................................................................4064
TURN SIGNAL AND HAZARD WARNING LAMPS/
WAGON AND HARDTOP MODELS .........................4067
Schematic ..............................................................4067
Wiring Diagram Ð TURN Ð/Type A .....................4068
Wiring Diagram Ð TURN Ð/Type B .....................4073
Wiring Diagram Ð TURN Ð/Type C.....................4075
Wiring Diagram Ð TURN Ð/Type D.....................4077
ILLUMINATION/WAGON AND HARDTOP
MODELS ....................................................................4079
Schematic ..............................................................4079
Wiring Diagram Ð ILL Ð ......................................4080
INTERIOR ROOM LAMP/WAGON AND HARDTOP
MODELS Ð With Timer Ð .......................................4088
Schematic/LHD Models Except for China .............4088
Wiring Diagram Ð ROOM/L Ð/LHD Models
Except for China ....................................................4089
Wiring Diagram Ð ROOM/L Ð/RHD Models for
Europe ...................................................................4092
INTERIOR ROOM LAMP/WAGON AND HARDTOP
MODELS Ð Without Timer Ð .................................4094
Wiring Diagram Ð ROOM/L Ð/RHD Models........4094
METER AND GAUGES/WAGON AND HARDTOP
MODELS ....................................................................4095
Combination Meter ................................................4095
Schematic ..............................................................4096
Wiring Diagram Ð METER Ð...............................4097
COMPASS AND THERMOMETER/WAGON AND
HARDTOP MODELS .................................................4099
Wiring Diagram Ð COMPAS Ð ............................4099
WARNING LAMPS/WAGON AND HARDTOP
MODELS ....................................................................4100
Schematic ..............................................................4100
Wiring Diagram Ð WARN Ð ................................4102
WARNING CHIME/WAGON AND HARDTOP
MODELS .................................................................... 4113
Wiring Diagram Ð CHIME Ð/Except for Europe
and with Theft Warning System Models................ 4113
Wiring Diagram Ð CHIME Ð/LHD Models for
Europe ................................................................... 4114
Wiring Diagram Ð CHIME Ð/RHD Models for
Europe ................................................................... 4115
Wiring Diagram Ð CHIME Ð/With Theft Warning
System Models ...................................................... 4116 FRONT WIPER AND WASHER/WAGON AND
HARDTOP MODELS
................................................. 4117
Wiring Diagram Ð WIPER Ð ............................... 4117
REAR WIPER AND WASHER/WAGON AND
HARDTOP MODELS ................................................. 4118
Wiring Diagram Ð WIP/R Ð ................................. 4118
HEADLAMP WASHER/WAGON AND HARDTOP
MODELS ....................................................................4122
Wiring Diagram Ð HLC Ð ....................................4122
HORN/WAGON AND HARDTOP MODELS ..............4124
Wiring Diagram Ð HORN Ð.................................4124
WIPER DEICER/WAGON AND HARDTOP
MODELS ....................................................................4125
Wiring Diagram Ð DEICER Ð..............................4125
REAR WINDOW DEFOGGER/WAGON AND
HARDTOP MODELS .................................................4126
Wiring Diagram Ð DEF Ð/LHD Models Without
Theft Warning System ...........................................4126
Wiring Diagram Ð DEF Ð/RHD Models Except
for Europe and With Theft Warning System .........4128
Wiring Diagram Ð DEF Ð/LHD Models With
Theft Warning System ...........................................4130
Wiring Diagram Ð DEF Ð/RHD Models for
Europe ...................................................................4132
Wiring Diagram Ð DEF Ð/RHD Models With
Theft Warning System ...........................................4134
AUDIO/WAGON AND HARDTOP MODELS .............4136
Schematic/LHD Models with Sub-harness ............4136
Wiring Diagram Ð AUDIO Ð/LHD Models with
Sub-harness...........................................................4137
Schematic/RHD Models with Sub-harness ...........4140
Wiring Diagram Ð AUDIO Ð/RHD Models with
Sub-harness...........................................................4141
Schematic/LHD Models without Sub-harness .......4144
Wiring Diagram Ð AUDIO Ð/LHD Models
without Sub-harness ..............................................4145
Schematic/RHD Models without Sub-harness ......4149
Wiring Diagram Ð AUDIO Ð/RHD Models
without Sub-harness ..............................................4150
Wiring Diagram Ð CD AUTO CHANGER Ð ........4154
Wiring Diagram Ð REMOTE Ð ............................4155
Wiring Diagram Ð P/ANT Ð/LHD Models............4159
Wiring Diagram Ð P/ANT Ð/RHD Models ...........4160
TELEPHONE (PRE WIRE) ........................................4161
Wiring Diagram Ð PHONE Ð ..............................4161
NAVIGATION SYSTEM .............................................4162
System Description ................................................4162
Precautions for NAVI Control Unit Replacement ..4173
Component Parts And Harness Connector
Location .................................................................4173
Schematic ..............................................................4174
Wiring Diagram Ð NAVI Ð ...................................4175
CONTENTS(Cont'd)
EL-4002