Page 253 of 306
SDI1439
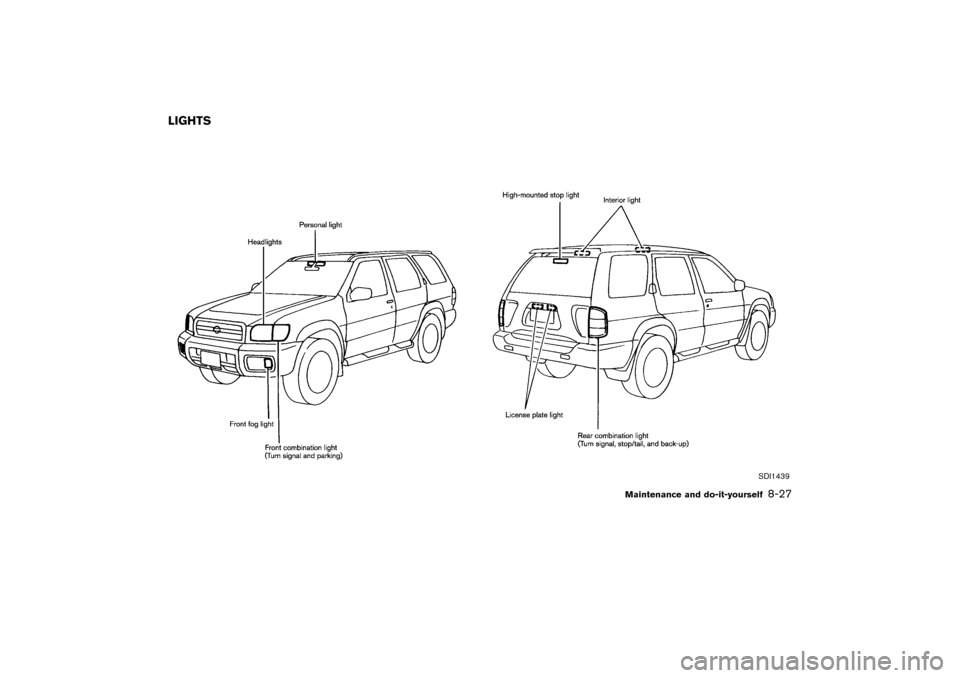
LIGHTS
Maintenance and do-it-yourself
8-27
�
04.3.9/R50-D/V5
�
Page 254 of 306
 bulb. A
bulb can be replaced inside the engine compart-
ment without removing the headlight assembly.
CA")
HEADLIGHTSThe headlight is a semi-sealed beam type which
uses a replaceable headlight (halogen) bulb. A
bulb can be replaced inside the engine compart-
ment without removing the headlight assembly.
CAUTION
�High pressure halogen gas is sealed
inside the halogen bulb. The bulb
may break if the glass envelope is
scratched or the bulb is dropped.
�When handling the bulb, do not touch
the glass envelope.Removing the headlight bulb1. Disconnect the battery negative cable.
2. Disconnect the electrical connector from the
rear end of the bulb.
3. Pull off the rubber cap.
4. Push and turn the retaining pin to loosen it.
5. Remove the headlight bulb. Do not shake or
rotate the bulb when removing it.6. Install the new bulb in the reverse order of
removal.
Aiming is not necessary after replacing the
bulb. When aiming adjustment is neces-
sary, contact your NISSAN dealer.
CAUTION
�Do not touch the bulb.
�Use the same number and wattage as
originally installed:
Wattage 60/55
Bulb No. HB2
�Do not leave the bulb out of the
headlight reflector for a long period
of time as dust, moisture, and smoke
may enter the headlight body and
affect the performance of the head-
light.
SDI1126
8-28
Maintenance and do-it-yourself
�
04.3.9/R50-D/V5
�
Page 255 of 306
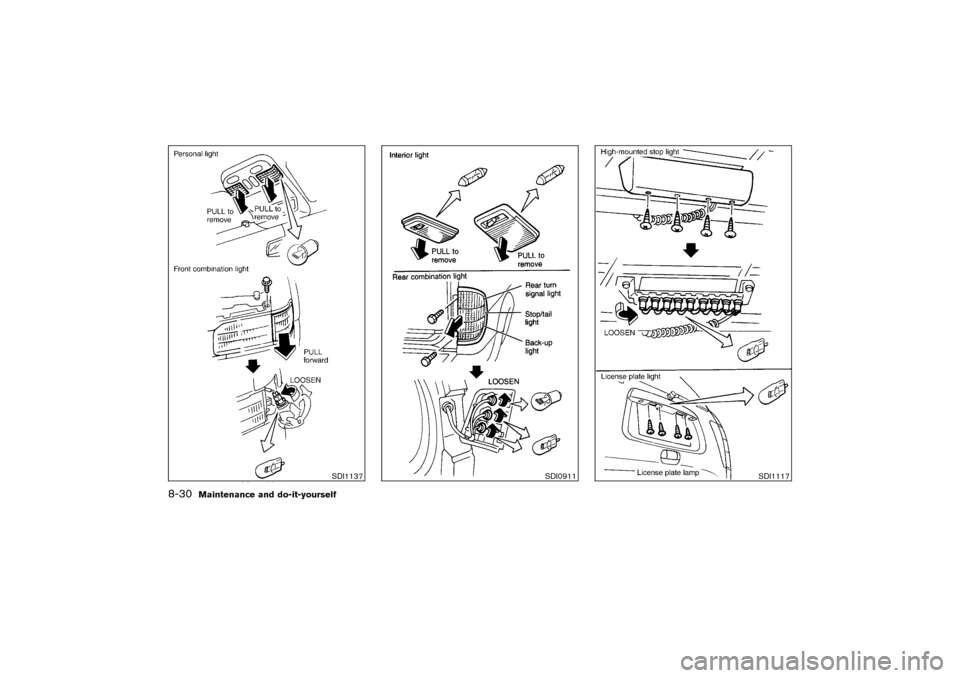
Replacement proceduresAll other lights are either type A, B, C or D. When
replacing a bulb, first remove the lens and/or
cover.
Item Wattage (W) BulbNo.
Front combination light 21/5 7443
Front fog light (H3 type) 55
Rear combination light
Turn signal 27 1156NA
Stop/Tail 21/5 7443
Back-up 18 921
High mounted stop light 5 168
License plate light 5 168
Interior light 10 —
Vanity mirror light 1.4 —
Personal light 8 —
Bulbidentification
MDI0006
Maintenance and do-it-yourself
8-29
�
04.3.9/R50-D/V5
�
Page 256 of 306
SDI1137
SDI0911
SDI1117
8-30
Maintenance and do-it-yourself
�
04.3.9/R50-D/V5
�
Page 257 of 306
 often and always prior to long distance
trips. The recommended tire pressure specifica-
tions are shown on th")
TIRE PRESSURE
Tire inflation pressureCheck the pressure of the tires (including the
spare) often and always prior to long distance
trips. The recommended tire pressure specifica-
tions are shown on the Tire and Loading Infor-
mation label under the “Recommended Cold
Tire Inflation Pressure” heading. The tire and
Loading Information label is affixed to the driver
side center pillar. Tire pressures should be
checked regularly because:
�Most tires naturally lose air over time.
�Tires can lose air suddenly when driven over
potholes or other objects or if the vehicle
strikes a curbwhile parking.
The tire pressures should be check when the
tires are cold. The tires are considered COLD
after the vehicle has been parked for 3 or more
hours, or driven less than 1 mile (1.6 km) at
moderate speeds.
Incorrect tire pressure, including under in-
flation, may adversely affect tire life and
vehicle handling.
SDI0980A
SDI0333B
WHEELS AND TIRES
Maintenance and do-it-yourself
8-31
�
04.3.9/R50-D/V5
�
Page 258 of 306

WARNING
�Improperly inflated tires can fail sud-
denly and cause an accident.
�The vehicle weight capacity is indi-
cated on the Tire and Loading Infor-
mation label. Do not load your ve-
hicle beyond this capacity. Over-
loading your vehicle may result in
reduced tire life, unsafe operating
conditions due to premature tire mal-
functions, or unfavorable handling
characteristics and could also lead to
a serious accident. Loading beyond
the specified capacity may also result
in a malfunction of other vehicle
components.
�Before taking a long trip, or when-
ever you heavily load your vehicle,
use a tire pressure gauge to ensure
that the tire pressures are at the
specified level.
�Do not drive your vehicle over 85
MPH (137 km/h) unless it is equippedwith high-speed capability tires. Driv-
ing faster than 85 MPH (137 km/h)
may result in tire malfunction, loss of
control and possible injury.
�For additional information regarding
tires, refer to “Important Tire Safety
Information” (US) or “Tire Safety In-
formation” (Canada) in the Warranty
Information Booklet.
Low tire pressure warning system
(if so equipped)The low tire pressure warning system monitors
the tire pressure of all tires (except the spare tire)
by sending a signal from a sensor that is installed
in each wheel. For more details, refer to “Low tire
pressure warning light” in the “2. Instruments
and controls” section, “Low tire pressure warn-
ing system” in the “5. Starting and driving”
section, and “Flat tire” in the “6. In case of
emergency” section. The low tire pressure warn-
ing system will activate only when the vehicle is
driven at speeds above 20 MPH (32 km/h).
8-32
Maintenance and do-it-yourself
�
04.3.9/R50-D/V5
�
Page 259 of 306

Tire and loading information label
�1Seating capacity: The maximum number of
occupants that can be seated in the vehicle.
�2Vehicle load limit: See loading information in
the Technical and consumer information sec-
tion.
�3Original tire size: The size of the tires origi-
nally installed on the vehicle at the factory.
�4Recommended cold tire inflation pressure:
Inflate the tires to this pressure when the tires
are cold. Tires are considered COLD after
the vehicle has been parked for 3 or more
hours, or driven less than 1 mile (1.6 km) at
moderate speeds. The recommended cold
tire inflation is set by the manufacturer to
provide the best tire wear and vehicle han-
dling characteristics based on the vehicles
GVWR.
�5Tire size — refer to “Tire labeling” later in this
section.
�6
and
�7
(if so equipped) Spare tire size or
compact spare
tire size (if so
equipped)
Checking the tire pressure1. Remove the valve stem cap from the tire.
2. Press the pressure gauge squarely onto the
valve stem. Do not press too hard or force the
valve stem sideways, or air will escape. If the
hissing sound of air escaping from the tire is
heard while checking the pressure, reposition
the gauge to eliminate this leakage.
3. Remove the gauge.
4. Read the tire pressure on the gauge stem
and compare it to the specification shown on
SDI1574
Maintenance and do-it-yourself
8-33
�
04.3.9/R50-D/V5
�
Page 260 of 306

the Tire and Loading Information label.
5. Add air to the tire as needed. If too much air
is added, press the core of the valve stem
briefly with the tip of the gauge stem to
release pressure. Recheck the pressure and
add or release air as needed.
6. Install the valve stem cap.
7. Check the pressure of all other tires, includ-
ing the spare. (Refer to the “Wheels and
tires” section.)
TIRE LABELINGFederal law requires tire manufacturers to place
standardized information on the sidewall of all
tires. This information identifies and describes
the fundamental characteristics of the tire and
also provides the tire identification number (TIN)
for safety standard certification. The TIN can be
used to identify the tire in case of a recall in case
of recall.
�1Tire size (example: P215/60R16 94H)
1 P: The “P” indicates the tire is designed for
passenger vehicles.
2. Three-digit number (215): This number gives
the width in millimeters of the tire from side-
wall edge to sidewall edge.
(Not all tires have this information.)
3. Two-digit number (60): This number, known
as the aspect ratio, gives the tire’s ratio of
height to width.
4. R: The “R” stands for radial.
5. Two-digit number (16): This number is the
wheel or rim diameter in inches.
SDI1575
SDI1606
8-34
Maintenance and do-it-yourself
�
04.3.9/R50-D/V5
�
 BulbNo.
Front combination light 21/5 7443
Front fog lig")