2004 NISSAN FRONTIER trailer
[x] Cancel search: trailerPage 115 of 296
FUEL FILLER CAP
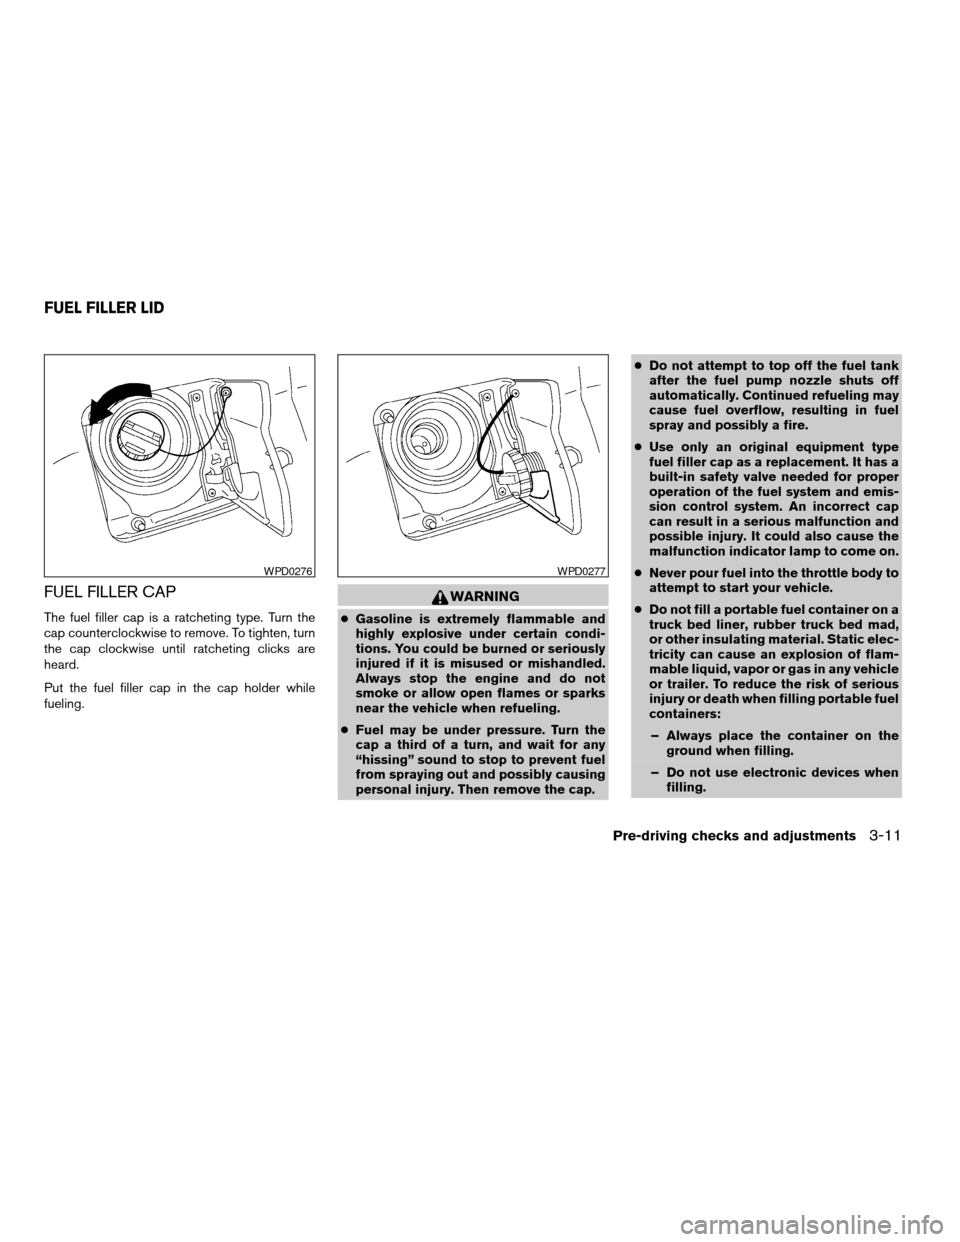
The fuel filler cap is a ratcheting type. Turn the
cap counterclockwise to remove. To tighten, turn
the cap clockwise until ratcheting clicks are
heard.
Put the fuel filler cap in the cap holder while
fueling.
WARNING
cGasoline is extremely flammable and
highly explosive under certain condi-
tions. You could be burned or seriously
injured if it is misused or mishandled.
Always stop the engine and do not
smoke or allow open flames or sparks
near the vehicle when refueling.
cFuel may be under pressure. Turn the
cap a third of a turn, and wait for any
“hissing” sound to stop to prevent fuel
from spraying out and possibly causing
personal injury. Then remove the cap.cDo not attempt to top off the fuel tank
after the fuel pump nozzle shuts off
automatically. Continued refueling may
cause fuel overflow, resulting in fuel
spray and possibly a fire.
cUse only an original equipment type
fuel filler cap as a replacement. It has a
built-in safety valve needed for proper
operation of the fuel system and emis-
sion control system. An incorrect cap
can result in a serious malfunction and
possible injury. It could also cause the
malfunction indicator lamp to come on.
cNever pour fuel into the throttle body to
attempt to start your vehicle.
cDo not fill a portable fuel container on a
truck bed liner, rubber truck bed mad,
or other insulating material. Static elec-
tricity can cause an explosion of flam-
mable liquid, vapor or gas in any vehicle
or trailer. To reduce the risk of serious
injury or death when filling portable fuel
containers:
– Always place the container on the
ground when filling.
– Do not use electronic devices when
filling.
WPD0276WPD0277
FUEL FILLER LID
Pre-driving checks and adjustments3-11
ZREVIEW COPY:Ð2004 Truck/Frontier(d22)
Owners Manual(owners)ÐUSA English(nna)
11/21/03Ðdebbie
X
Page 173 of 296
cPush and hold the RES/ACCEL switch.
When the vehicle attains the speed you de-
sire, release the switch.
cPush and release the RES/ACCEL switch.
Each time you do this, the set speed in-
creases by about 1 MPH (1.6 km/h) .
To reset at a slower cruising speed,use one
of the following three methods.
cLightly tap the brake pedal. When the ve-
hicle attains the desired speed, push the
COAST/SET switch and release it.
cPush and hold the COAST/SET switch. Re-
lease the switch when the vehicle slows to
the desired speed.
cPush and release the COAST/SET switch.
Each time you do this, the set speed de-
creases by about 1 MPH (1.6 km/h) .
To resume the preset speed,push and re-
lease the RES/ACCEL switch. The vehicle re-
turns to the last set cruising speed when the
vehicle speed is over 25 MPH (40 km/h) .CAUTION
During the first 1,200 miles (2,000 km) ,
follow these recommendations to obtain
maximum engine performance and en-
sure the future reliability and economy of
your new vehicle. Failure to follow these
recommendations may result in short-
ened engine life and reduced engine
performance.
cAvoid driving for long periods at constant
speed, either fast or slow, and do not run the
engine over 4,000 rpm.
cDo not accelerate at full throttle in any gear.
cAvoid quick starts.
cAvoid hard braking as much as possible.
cDo not tow a trailer for the first 500 miles
(800 km) . Your engine, axle or other parts
could be damaged.cAccelerate slowly and smoothly. Maintain
cruising speeds with a constant accelerator
position.
cDrive at moderate speeds on the highway.
Driving at high speed lowers fuel economy.
cAvoid unnecessary stopping and braking.
Maintain a safe distance behind other ve-
hicles.
cUse a proper gear range which suits road
conditions. On level roads, shift into high
gear as soon as possible.
cAvoid unnecessary engine idling.
cKeep your engine tuned up.
cFollow the recommended periodic mainte-
nance schedule.
cKeep the tires inflated to the correct pres-
sure. Low tire pressure increases tire wear
and lowers fuel economy.
cKeep the front wheels in correct alignment.
Improper alignment increases tire wear and
lowers fuel economy.
cAir conditioner operation lowers fuel
economy. Use the air conditioner only when
necessary.
BREAK-IN SCHEDULE INCREASING FUEL ECONOMY
Starting and driving5-21
ZREVIEW COPY:Ð2004 Truck/Frontier(d22)
Owners Manual(owners)ÐUSA English(nna)
11/21/03Ðdebbie
X
Page 223 of 296
4. Remove the dipstick and wipe it clean with
lint-free paper.
5. Reinsert the dipstick into the dipstick tube
as far as it will go.
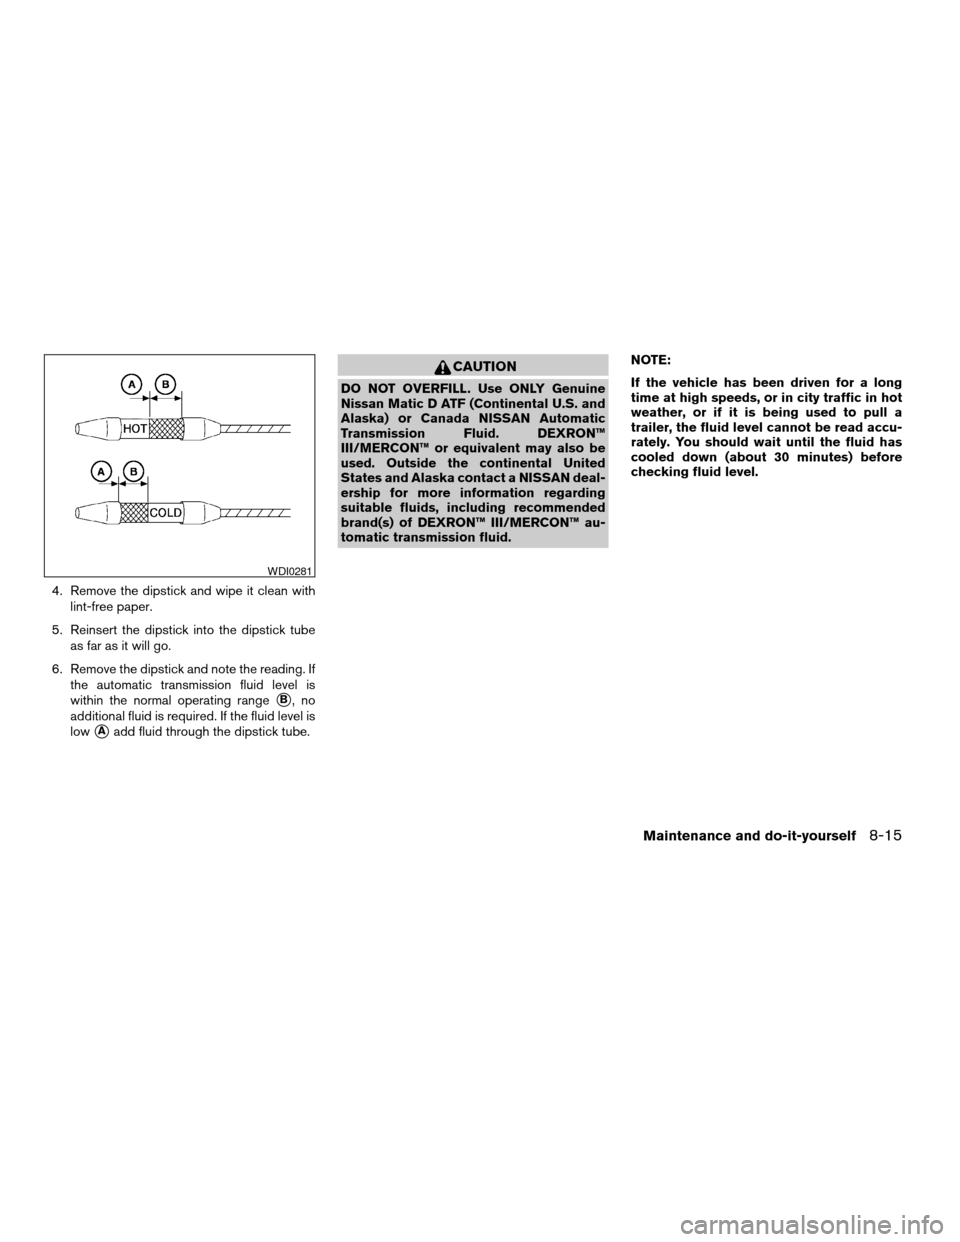
6. Remove the dipstick and note the reading. If
the automatic transmission fluid level is
within the normal operating range
sB,no
additional fluid is required. If the fluid level is
low
sAadd fluid through the dipstick tube.
CAUTION
DO NOT OVERFILL. Use ONLY Genuine
Nissan Matic D ATF (Continental U.S. and
Alaska) or Canada NISSAN Automatic
Transmission Fluid. DEXRON™
III/MERCON™ or equivalent may also be
used. Outside the continental United
States and Alaska contact a NISSAN deal-
ership for more information regarding
suitable fluids, including recommended
brand(s) of DEXRON™ III/MERCON™ au-
tomatic transmission fluid.NOTE:
If the vehicle has been driven for a long
time at high speeds, or in city traffic in hot
weather, or if it is being used to pull a
trailer, the fluid level cannot be read accu-
rately. You should wait until the fluid has
cooled down (about 30 minutes) before
checking fluid level.
WDI0281
Maintenance and do-it-yourself8-15
ZREVIEW COPY:Ð2004 Truck/Frontier(d22)
Owners Manual(owners)ÐUSA English(nna)
11/21/03Ðdebbie
X
Page 254 of 296
Observe the following precautions if the TEM-
PORARY USE ONLY spare tire must be used,
Otherwise, your vehicle could be damaged or
involved in an accident:
WARNING
cThe spare tire should be used for emer-
gency use only. It should be replaced
with the standard tire at the first oppor-
tunity to avoid possible tire or differen-
tial damage.
cDrive carefully while the TEMPORARY
USE ONLY spare tire is installed. Avoid
sharp turns and abrupt braking while
driving.
cPeriodically check spare tire inflation
pressure. Always keep the pressure of
the TEMPORARY USE ONLY spare tire
at 60 psi (420 kPa, 4.2 bar) .
cWith the TEMPORARY USE ONLY spare
tire installed do not drive the vehicle at
speeds faster than 50 MPH (80 km/h) .cWhen driving on roads covered with
snow or ice, the TEMPORARY USE
ONLY spare tire should be used on the
front wheels and the original tire used
on the rear wheels (drive wheels) . Use
tire chains only on the two rear original
tires.
cTire tread of the TEMPORARY USE
ONLY spare tire will wear at a faster rate
than the standard tire. Replace the
spare tire as soon as the tread wear
indicators appear.
cDo not use the spare tire on other
vehicles.
cDo not use more than one spare tire at
the same time.
cDo not tow a trailer when the TEMPO-
RARY USE ONLY spare tire is installed.
CAUTION
cWith the spare tire installed the
transfer control lever must be in the 2H
position to prevent the transfer case
and differential gears from being
damaged.cDo not use tire chains on a TEMPO-
RARY USE ONLY spare tire. Tire chains
will not fit properly and may cause dam-
age to the vehicle.
cBecause the TEMPORARY USE ONLY
spare tire is smaller than the original
tire, ground clearance is reduced. To
avoid damage to the vehicle, do not
drive over obstacles. Also, do not drive
the vehicle through an automatic car
wash since it may get caught.
8-46Maintenance and do-it-yourself
ZREVIEW COPY:Ð2004 Truck/Frontier(d22)
Owners Manual(owners)ÐUSA English(nna)
11/21/03Ðdebbie
X
Page 255 of 296

9 Technical and consumer information
Capacities and recommended fuel/lubricants.........9-2
Fuel recommendation...........................9-3
Engine oil and oil filter recommendation...........9-5
Recommended SAE viscosity number............9-6
Air conditioner system refrigerant and
lubricant recommendations......................9-6
Specifications.....................................9-7
Engine........................................9-7
Wheels and tires...............................9-8
Dimensions and weights........................9-9
When traveling or registering your vehicle in
another country..................................9-10
Vehicle identification..............................9-10
Vehicle identification number (VIN) plate.........9-10
Vehicle identification number
(chassis number)..............................9-10
Engine serial number...........................9-11
F.M.V.S.S. certification label....................9-11
Emission control information label...............9-12
Tire placard...................................9-12
Air conditioner specification label................9-12
Installing front license plate........................9-13
Vehicle loading information........................9-13Terms........................................9-13
Determining vehicle load capacity...............9-14
Securing the load..............................9-14
Loading tips..................................9-14
Truck-camper loading information..................9-15
Crew Cab Models.............................9-15
King Cab models..............................9-15
Special Body vehicles..........................9-15
Location for center of gravity....................9-15
Vehicle load weight capacity....................9-16
Measurement of weights.......................9-18
Towing a trailer...................................9-18
Maximum load limits...........................9-18
Towing load/specification chart.................9-20
Towing safety.................................9-21
Flat towing....................................9-23
Uniform tire quality grading........................9-23
Emission control system warranty..................9-24
Reporting safety defects (US only).................9-25
Readiness for inspection/maintenance (I/M) test.....9-25
Dynamometer testing for Inspection/
Maintenance (I/M) test (US only)................9-26
Owner’s Manual/Service Manual order information . . . 9-27
In the event of a collision.......................9-28
ZREVIEW COPY:Ð2004 Truck/Frontier(d22)
Owners Manual(owners)ÐUSA English(nna)
11/21/03Ðdebbie
X
Page 260 of 296
Change intervals
The oil and oil filter change intervals for your
engine are based on the use of the specified
quality oils and filters. Using engine oil and filters
that are not of the specified quality, or exceeding
recommended oil and filter change intervals
could reduce engine life. Damage to the engine
caused by improper maintenance or use of incor-
rect oil and filter quality and/or viscosity is not
covered by the NISSAN new vehicle warranty.
Your engine was filled with a high-quality engine
oil when it was built. You do not have to change
the oil before the first recommended change
interval. Oil and filter change intervals depend
upon how you use your vehicle.
Operation under the following conditions may
require more frequent oil and filter changes:
crepeated short distance driving at cold out-
side temperatures
cdriving in dusty conditions
cextensive idling
ctowing a trailer
RECOMMENDED SAE VISCOSITY
NUMBER
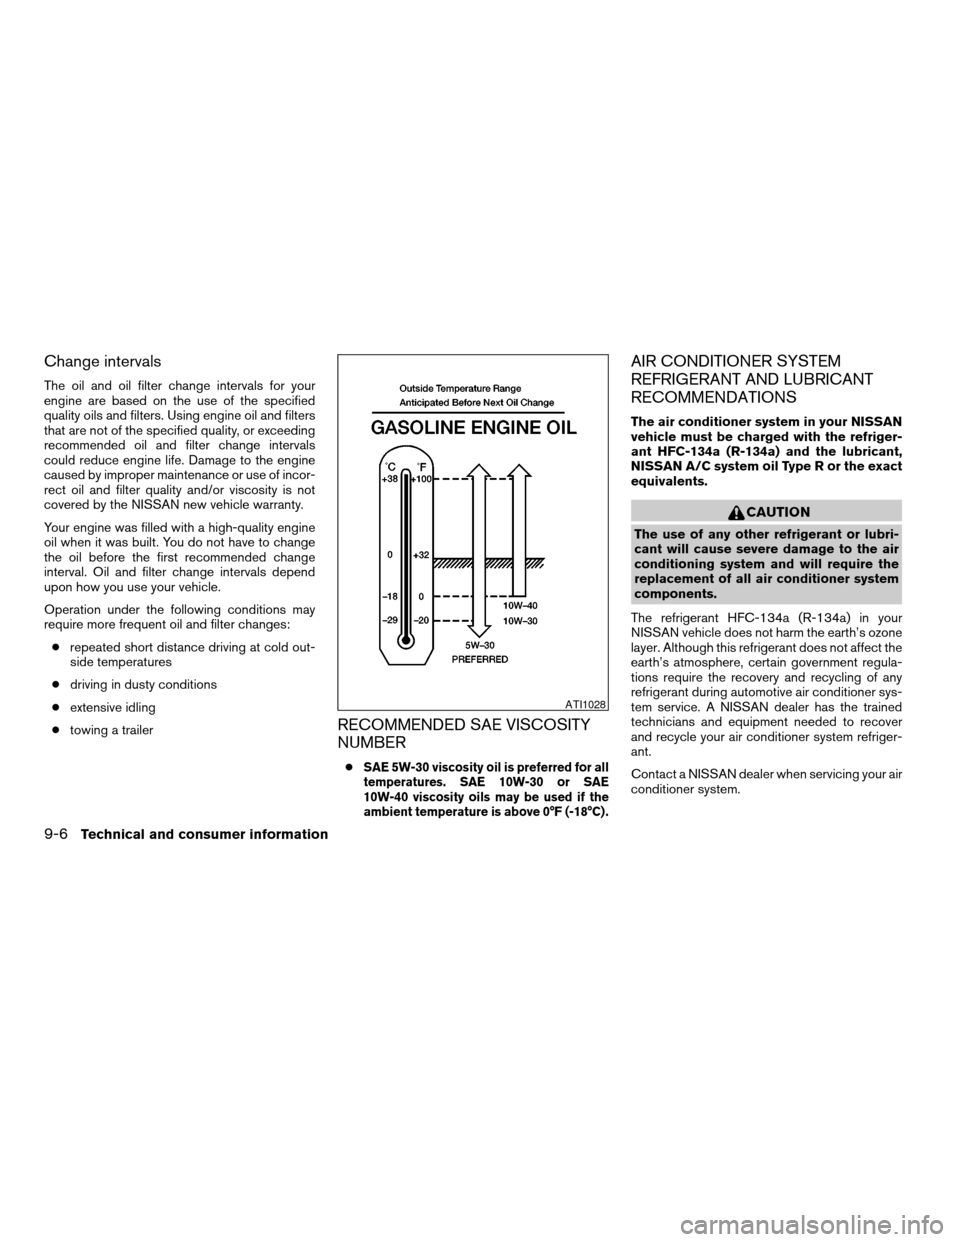
cSAE 5W-30 viscosity oil is preferred for all
temperatures. SAE 10W-30 or SAE
10W-40 viscosity oils may be used if the
ambient temperature is above 0°F (-18°C) .
AIR CONDITIONER SYSTEM
REFRIGERANT AND LUBRICANT
RECOMMENDATIONS
The air conditioner system in your NISSAN
vehicle must be charged with the refriger-
ant HFC-134a (R-134a) and the lubricant,
NISSAN A/C system oil Type R or the exact
equivalents.
CAUTION
The use of any other refrigerant or lubri-
cant will cause severe damage to the air
conditioning system and will require the
replacement of all air conditioner system
components.
The refrigerant HFC-134a (R-134a) in your
NISSAN vehicle does not harm the earth’s ozone
layer. Although this refrigerant does not affect the
earth’s atmosphere, certain government regula-
tions require the recovery and recycling of any
refrigerant during automotive air conditioner sys-
tem service. A NISSAN dealer has the trained
technicians and equipment needed to recover
and recycle your air conditioner system refriger-
ant.
Contact a NISSAN dealer when servicing your air
conditioner system.
ATI1028
9-6Technical and consumer information
ZREVIEW COPY:Ð2004 Truck/Frontier(d22)
Owners Manual(owners)ÐUSA English(nna)
11/21/03Ðdebbie
X
Page 270 of 296
WARNING
Improper loading may be dangerous. If a
load is too far back, it can affect handling
characteristics. If a load is too far forward,
the front axle may be overloaded.
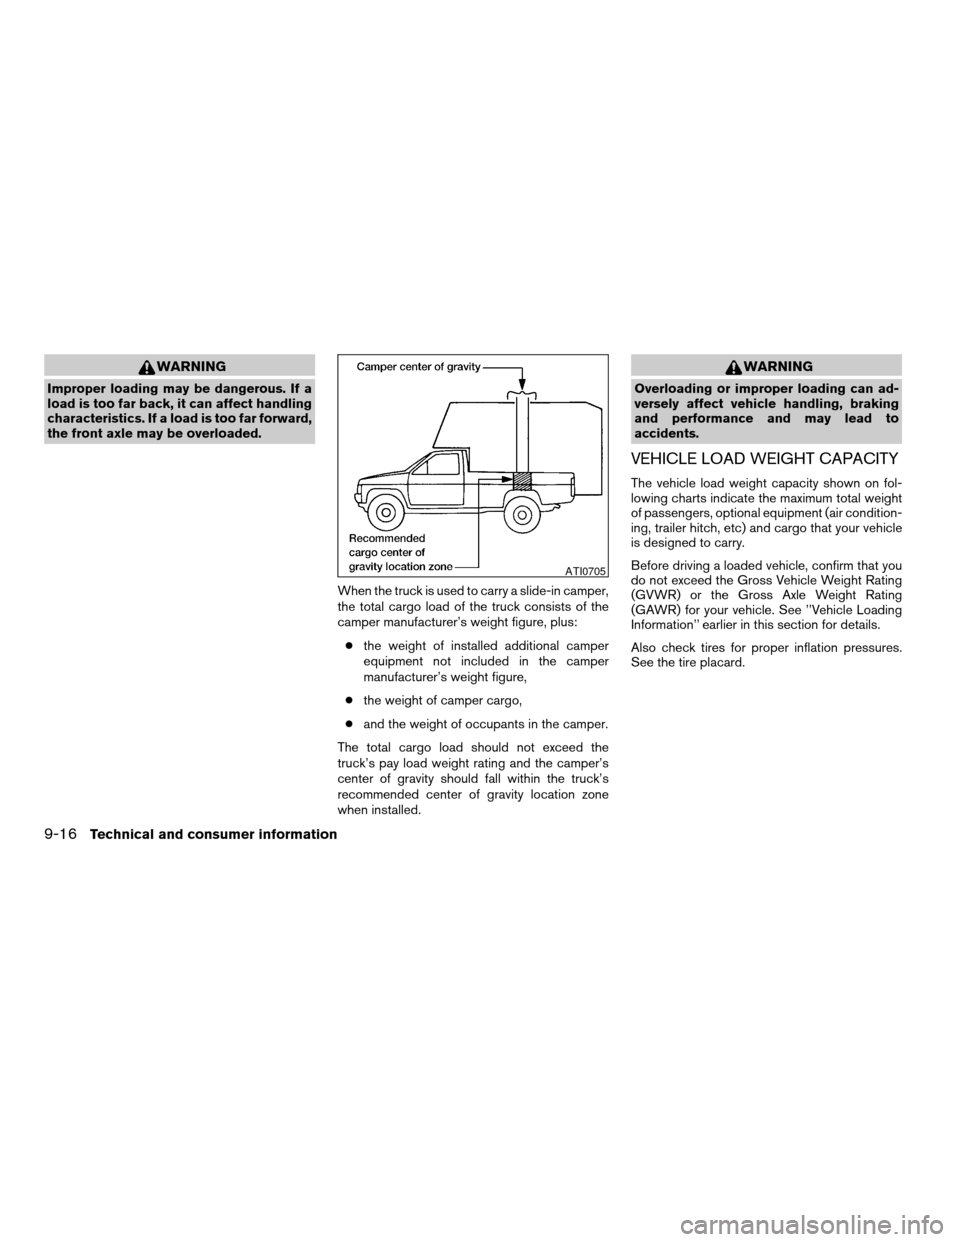
When the truck is used to carry a slide-in camper,
the total cargo load of the truck consists of the
camper manufacturer’s weight figure, plus:
cthe weight of installed additional camper
equipment not included in the camper
manufacturer’s weight figure,
cthe weight of camper cargo,
cand the weight of occupants in the camper.
The total cargo load should not exceed the
truck’s pay load weight rating and the camper’s
center of gravity should fall within the truck’s
recommended center of gravity location zone
when installed.
WARNING
Overloading or improper loading can ad-
versely affect vehicle handling, braking
and performance and may lead to
accidents.
VEHICLE LOAD WEIGHT CAPACITY
The vehicle load weight capacity shown on fol-
lowing charts indicate the maximum total weight
of passengers, optional equipment (air condition-
ing, trailer hitch, etc) and cargo that your vehicle
is designed to carry.
Before driving a loaded vehicle, confirm that you
do not exceed the Gross Vehicle Weight Rating
(GVWR) or the Gross Axle Weight Rating
(GAWR) for your vehicle. See ’’Vehicle Loading
Information’’ earlier in this section for details.
Also check tires for proper inflation pressures.
See the tire placard.
ATI0705
9-16Technical and consumer information
ZREVIEW COPY:Ð2004 Truck/Frontier(d22)
Owners Manual(owners)ÐUSA English(nna)
11/21/03Ðdebbie
X
Page 272 of 296
MEASUREMENT OF WEIGHTS
Secure loose items to prevent weight shifts that
could affect the balance of your vehicle. When
the vehicle is loaded, drive to a scale and weigh
the front and the rear wheels separately to deter-
mine axle loads. Individual axle loads should not
exceed either of the gross axle weight ratings
(GAWR) . The total of the axle loads should not
exceed the gross vehicle weight rating (GVWR) .
These ratings are given on the vehicle certifica-
tion label. If weight ratings are exceeded, move or
remove items to bring all weights below the rat-
ings.Your new vehicle was designed to be used pri-
marily to carry passengers and cargo. Remember
that towing a trailer places additional loads on
your vehicle’s engine, drive train, steering, brak-
ing and other systems.
ANissan Trailer Towing Guide (U.S. only)is
available from a NISSAN dealer. This guide in-
cludes information on trailer towing ability and the
special equipment required for proper towing.
MAXIMUM LOAD LIMITS
Maximum trailer loads
Never allow the total trailer load to exceed the
value specified in the following Towing
Load/Specification Chart found later in this sec-
tion. The total trailer load equals trailer weight
plus its cargo weight.
cWhen towing a trailer load of 1,000 lbs.
(454 kg) or more, trailers with a brake sys-
tem MUST be used.
The maximum GCWR (Gross Combined Weight
Rating) should not exceed the value specified in
the following Towing Load/ Specification Chart.
The GCWR equals the combined weight of the
towing vehicle (including passengers and cargo)
plus the total trailer load. Towing loads greaterthan these or using improper towing equipment
could adversely affect vehicle handling, braking
and performance.
The ability of your vehicle to tow a trailer is not
only related to the maximum trailer loads, but also
the places you plan to tow. Tow weights appro-
priate for level highway driving may have to be
reduced on very steep grades or in low traction
situations (for example, on slippery boat ramps) .
Temperature conditions can also affect towing.
For example, towing a heavy trailer in high outside
temperatures on graded roads can affect engine
performance and cause overheating.CAUTION
Vehicle damage resulting from improper
towing procedures are not covered by
NISSAN warranties. A NISSAN Trailer
Towing Guide (U.S. only) containing infor-
mation on trailer towing ability and the
special equipment required may be ob-
tained from a NISSAN dealer.
TOWING A TRAILER
9-18Technical and consumer information
ZREVIEW COPY:Ð2004 Truck/Frontier(d22)
Owners Manual(owners)ÐUSA English(nna)
11/21/03Ðdebbie
X