2004 NISSAN FRONTIER change wheel
[x] Cancel search: change wheelPage 31 of 296
els, the supplemental air bag system has dual
stage inflators for both the driver and passenger
air bags. The system monitors information from
the crash zone sensor, the diagnosis sensor unit
and seat belt buckle sensors that detect if the
seat belts are fastened. Inflator operation is
based on the severity of a collision and whether
the seat belts are being used. Only one front air
bag may inflate in a crash, depending on the
crash severity and whether the front occupants
are belted or unbelted. This does not indicate
improper performance of the system. If you have
any questions about the performance of your air
bag system, please contact your NISSAN dealer.
When the supplemental front air bag inflates, a
fairly loud noise may be heard, followed by the
release of smoke. This smoke is not harmful and
does not indicate a fire. Care should be taken to
not inhale it, as it may cause irritation and chok-
ing. Those with a history of a breathing condition
should get fresh air promptly.
Supplemental front air bags, along with the use of
seat belts, help to cushion the impact force on
the face and chest of the front occupants. They
can help save lives and reduce serious injuries.
However, an inflating front air bag may cause
facial abrasions or other injuries. Front air bags
do not provide restraint to the lower body.Seat belts should be correctly worn and the
driver and passenger seated upright as far as
practical away from the steering wheel or instru-
ment panel. The supplemental front air bags in-
flate quickly in order to help protect the front
occupants. Because of this, the force of the front
air bag inflating can increase the risk of injury if
the occupant is too close to, or is against, the
front air bag module during inflation.
The front air bags deflate quickly after a collision.
The supplemental front air bags operate
only when the ignition switch is in the ON
or START position.
After turning the ignition key to the ON
position, the supplemental air bag warning
light illuminates. The supplemental air bag
warning light will turn off after about 7
seconds if the system is operational.
WARNING
cDo not place any objects on the steer-
ing wheel pad or on the instrument
panel. Also, do not place any objects
between any occupant and the steering
wheel or instrument panel. Such ob-
jects may become dangerous projec-
tiles and cause injury if the supplemen-
tal front air bag inflates.cImmediately after inflation, several
front air bag system components will be
hot. Do not touch them; you may se-
verely burn yourself.
cNo unauthorized changes should be
made to any components or wiring of
the supplemental air bag system. This is
to prevent accidental inflation of the
supplemental air bag or damage to the
supplemental air bag system.
cDo not make unauthorized changes to
your vehicle’s electrical system, sus-
pension system or front end structure.
This could affect proper operation of
the supplemental front air bag system.
cTampering with the supplemental front
air bag system may result in serious
personal injury. Tampering includes
changes to the steering wheel and the
instrument panel assembly by placing
material over the steering wheel pad
and above the instrument panel or by
installing additional trim material
around the air bag system.
Safety—Seats, seat belts and supplemental air bags1-13
ZREVIEW COPY:Ð2004 Truck/Frontier(d22)
Owners Manual(owners)ÐUSA English(nna)
11/21/03Ðdebbie
X
Page 123 of 296

4 Heater, air conditioner and audio
systems
Ventilators........................................4-2
Heater and air conditioner (manual)..................4-2
Controls.......................................4-3
Heater operation...............................4-4
Air conditioner operation (if so equipped).........4-5
Air flow charts..................................4-6
Servicing air conditioner............................4-9
Audio system....................................4-10
Radio........................................4-10
FM radio reception............................4-10
AM radio reception............................4-10Audio operation precautions....................4-11
FM-AM radio with compact disc (CD) player
(if so equipped)...............................4-12
FM-AM radio with compact disc (CD)
changer (if so equipped).......................4-16
CD care and cleaning..........................4-28
Steering wheel switch for audio control
(if so equipped)...............................4-28
Antenna......................................4-29
Car phone or CB radio............................4-29
ZREVIEW COPY:Ð2004 Truck/Frontier(d22)
Owners Manual(owners)ÐUSA English(nna)
11/21/03Ðdebbie
X
Page 156 of 296
CAUTION
Do not place metalized film or any metal
parts (antenna, etc.) on the windows. This
may cause poor reception of the signals
from the tire pressure sensors, and the
low tire pressure warning system will not
function properly.
FCC Notice:
Changes or modifications not expressly ap-
proved by the manufacturer compliance
could void the user’s authority to operate
the equipment.
This device complies with Part 15 of the
FCC Rules and RSS-210 of Industry
Canada.
Operation is subject to the following two
conditions: (1) This device may not cause
harmful interface, and (2) this device must
accept any interference received, including
interference that may cause undesired op-
eration of the device.
ON-PAVEMENT AND OFF-ROAD
DRIVING PRECAUTIONS
Utility vehicles have a significantly higher
rollover rate than other types of vehicles.
They have higher ground clearance than passen-
ger cars to make them capable of performing in a
variety of on-pavement and off-road applications.
This gives them a higher center of gravity than
ordinary cars. An advantage of higher ground
clearance is a better view of the road, allowing
you to anticipate problems. However, they are not
designed for cornering at the same speeds as
conventional two-wheel drive vehicles any more
than low-slung sports cars are designed to per-
form satisfactorily under off-road conditions. If at
all possible, avoid sharp turns at high speeds. As
with other vehicles of this type, failure to operate
this vehicle correctly may result in loss of control
or vehicle rollover. In a rollover crash, an unbelted
person is significantly more likely to die than a
person wearing a seat belt.
Be sure to read the driving safety precautions
later in this section.
AVOIDING COLLISION AND
ROLLOVER
WARNING
Failure to operate this vehicle in a safe
and prudent manner may result in loss of
control or an accident.
Be alert and drive defensively at all times. Obey
all traffic regulations. Avoid excessive speed,
high speed cornering, or sudden steering ma-
neuvers, because these driving practices could
cause you to lose control of your vehicle.As with
any vehicle, loss of control could result in a
collision with other vehicles or objects, or
cause the vehicle to roll over, particularly if
the loss of control causes the vehicle to
slide sideways.Be attentive at all times, and
avoid driving when tired. Never drive when under
the influence of alcohol or drugs (including pre-
scription or over-the-counter drugs which may
cause drowsiness) . Always wear your seat belt
as outlined in the “Safety – Seats, seat belts and
supplemental air bags” section of this manual,
and also instruct your passengers to do so.
Seat belts help reduce the risk of injury in colli-
sions and rollovers.In a rollover crash, an
unbelted or improperly belted person is
significantly more likely to be injured or
killed than a person wearing a seat belt.
5-4Starting and driving
ZREVIEW COPY:Ð2004 Truck/Frontier(d22)
Owners Manual(owners)ÐUSA English(nna)
11/21/03Ðdebbie
X
Page 169 of 296
CAUTION
cDo not rest your foot on the clutch pedal
while driving. This may cause clutch
damage.
cFully depress the clutch pedal before
shifting to help prevent transmission
damage.
cStop your vehicle completely before
shifting into R (Reverse) .
cWhen the vehicle is stopped with the
engine running (for example, at a stop
light) , shift to N (Neutral) and release
the clutch pedal with the foot brake
applied.
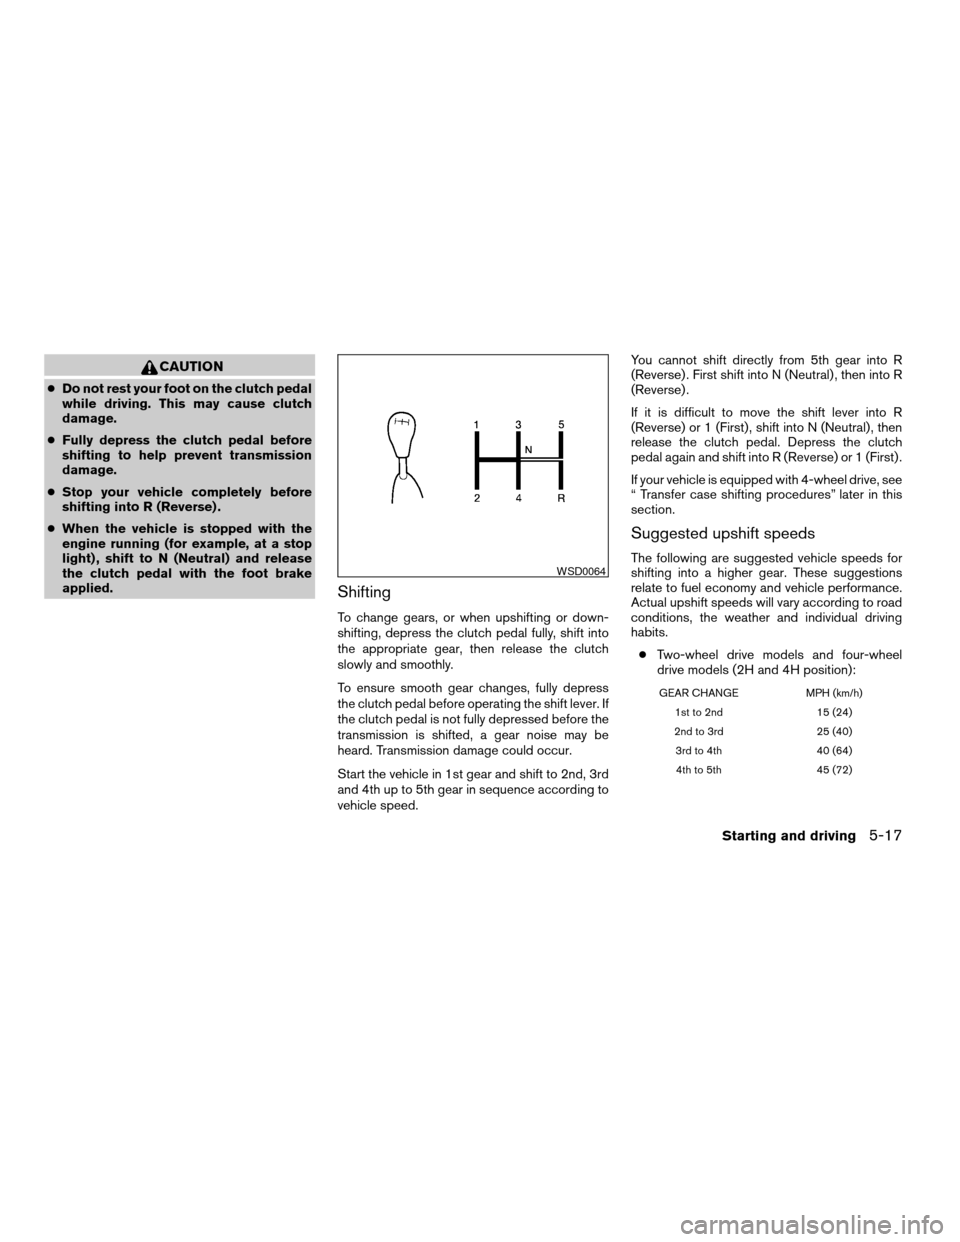
Shifting
To change gears, or when upshifting or down-
shifting, depress the clutch pedal fully, shift into
the appropriate gear, then release the clutch
slowly and smoothly.
To ensure smooth gear changes, fully depress
the clutch pedal before operating the shift lever. If
the clutch pedal is not fully depressed before the
transmission is shifted, a gear noise may be
heard. Transmission damage could occur.
Start the vehicle in 1st gear and shift to 2nd, 3rd
and 4th up to 5th gear in sequence according to
vehicle speed.You cannot shift directly from 5th gear into R
(Reverse) . First shift into N (Neutral) , then into R
(Reverse) .
If it is difficult to move the shift lever into R
(Reverse) or 1 (First) , shift into N (Neutral) , then
release the clutch pedal. Depress the clutch
pedal again and shift into R (Reverse) or 1 (First) .
If your vehicle is equipped with 4-wheel drive, see
“ Transfer case shifting procedures” later in this
section.
Suggested upshift speeds
The following are suggested vehicle speeds for
shifting into a higher gear. These suggestions
relate to fuel economy and vehicle performance.
Actual upshift speeds will vary according to road
conditions, the weather and individual driving
habits.
cTwo-wheel drive models and four-wheel
drive models (2H and 4H position):
GEAR CHANGE MPH (km/h)
1st to 2nd 15 (24)
2nd to 3rd 25 (40)
3rd to 4th 40 (64)
4th to 5th 45 (72)
WSD0064
Starting and driving5-17
ZREVIEW COPY:Ð2004 Truck/Frontier(d22)
Owners Manual(owners)ÐUSA English(nna)
11/21/03Ðdebbie
X
Page 170 of 296
c4–wheel drive model (4L position):
GEAR CHANGE MPH (km/h)
1st to 2nd 8 (13)
2nd to 3rd 12 (19)
3rd to 4th 20 (32)
4th to 5th 22 (35)
Suggested maximum speed in each
gear
Downshift to a lower gear if the engine is not
running smoothly, or if you need to accelerate.
Do not exceed the maximum suggested speed
(shown below) in any gear. For level road driving,
use the highest gear suggested for that speed.
Always observe posted speed limits, and drive
according to the road conditions, which will en-
sure safe operation. Do not over-rev the engine
when shifting to a lower gear as it may cause
engine damage or loss of vehicle control.
Allowable maximum speed in each gear:
2–wheel drive models
GEAR CHANGE MPH (km/h)
1st 30 (48)
2nd 55 (88)
3rd 80 (129)
4th —
5th —
4–wheel drive models
2H/4H position
GEAR CHANGE MPH (km/h)
1st 25 (40)
2nd 43 (69)
3rd 68 (109)
4th —
5th —
4L position
GEAR CHANGE MPH (km/h)
1st 12 (19)
2nd 22 (35)
3rd 30 (48)
4th —
5th —
WARNING
cBe sure the parking brake is fully re-
leased before driving. Failure to do so
can cause brake failure and lead to an
accident.
cDo not release the parking brake from
outside the vehicle.
cDo not use the gear shift in place of the
parking brake. When parking, be sure
the parking brake is fully engaged.
cDo not leave children unattended in a
vehicle. They could release the parking
brake and cause an accident.
PARKING BRAKE
5-18Starting and driving
ZREVIEW COPY:Ð2004 Truck/Frontier(d22)
Owners Manual(owners)ÐUSA English(nna)
11/21/03Ðdebbie
X
Page 189 of 296
CHANGING A FLAT TIRE
If you have a flat tire, follow the instructions be-
low.
Stopping the vehicle
1. Safely move the vehicle off the road and
away from traffic.
2. Turn on the hazard warning flashers.
3. Park on a level surface and apply the parking
brake. Shift the manual transmission into R
(Reverse) , or the automatic transmission
into P (Park) .
WARNING
cThe transfer control lever must
be in the 2H, 4H or 4L position.
cDo not leave the transfer control lever in
the N (Neutral) position. Otherwise, the
vehicle could roll unexpectedly even if
the manual transmission is in any gear
or the automatic transmission is in the
P (Park) position. This could result in
serious personal injury or property
damage.
4. Turn off the engine.5. Raise the hood to warn other traffic and to
signal professional road assistance person-
nel that you need assistance.
6. Have all passengers get out of the vehicle
and stand in a safe place, away from traffic
and clear of the vehicle.
WARNING
cMake sure the parking brake is securely
applied and the manual transmission is
shifted into R (Reverse) , or the auto-
matic transmission into P (Park) .
cNever change tires when the vehicle is
on a slope, ice or slippery areas. This is
hazardous.
cNever change tires if oncoming traffic is
close to your vehicle. Wait for profes-
sional road assistance.
cWhen a spare tire is mounted or a wheel
is replaced, the low tire pressure warn-
ing system will not function. Contact
your NISSAN dealer as soon possible
for tire replacement and/or system re-
setting. (For models with the low tire
pressure warning system)
Blocking wheels
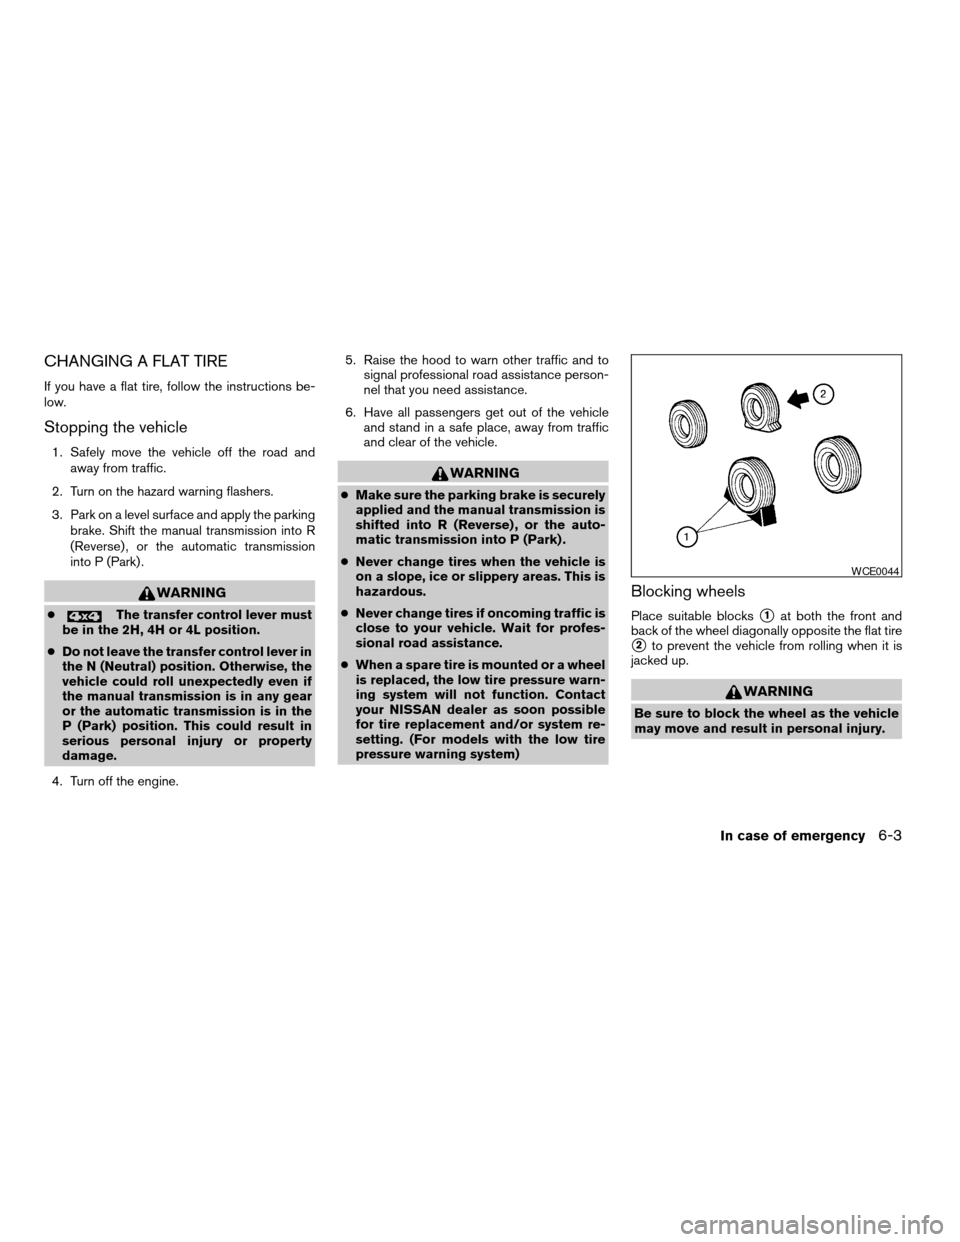
Place suitable blockss1at both the front and
back of the wheel diagonally opposite the flat tire
s2to prevent the vehicle from rolling when it is
jacked up.
WARNING
Be sure to block the wheel as the vehicle
may move and result in personal injury.
WCE0044
In case of emergency6-3
ZREVIEW COPY:Ð2004 Truck/Frontier(d22)
Owners Manual(owners)ÐUSA English(nna)
11/21/03Ðdebbie
X
Page 192 of 296
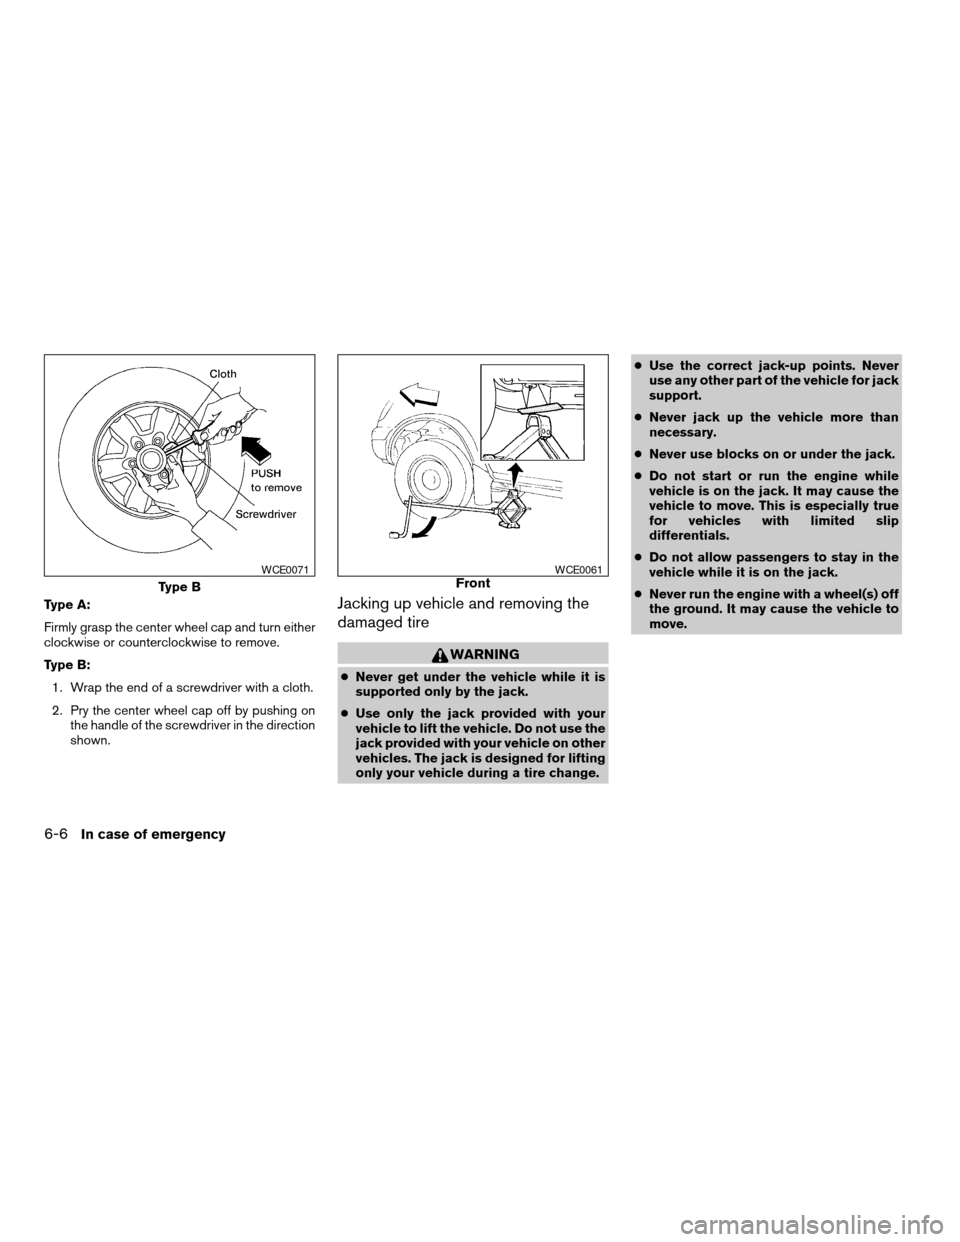
Type A:
Firmly grasp the center wheel cap and turn either
clockwise or counterclockwise to remove.
Type B:
1. Wrap the end of a screwdriver with a cloth.
2. Pry the center wheel cap off by pushing on
the handle of the screwdriver in the direction
shown.Jacking up vehicle and removing the
damaged tire
WARNING
cNever get under the vehicle while it is
supported only by the jack.
cUse only the jack provided with your
vehicle to lift the vehicle. Do not use the
jack provided with your vehicle on other
vehicles. The jack is designed for lifting
only your vehicle during a tire change.cUse the correct jack-up points. Never
use any other part of the vehicle for jack
support.
cNever jack up the vehicle more than
necessary.
cNever use blocks on or under the jack.
cDo not start or run the engine while
vehicle is on the jack. It may cause the
vehicle to move. This is especially true
for vehicles with limited slip
differentials.
cDo not allow passengers to stay in the
vehicle while it is on the jack.
cNever run the engine with a wheel(s) off
the ground. It may cause the vehicle to
move.
Type B
WCE0071FrontWCE0061
6-6In case of emergency
ZREVIEW COPY:Ð2004 Truck/Frontier(d22)
Owners Manual(owners)ÐUSA English(nna)
11/21/03Ðdebbie
X
Page 193 of 296

Always refer to the proper illustrations for the
correct placement and jack-up points for your
specific vehicle model and jack type.
Carefully read the caution label attached to
the jack body and the following instruc-
tions.
1. Loosen each wheel nut one or two turns by
turning counterclockwise with the wheel nut
wrench.Do not remove the wheel nuts
until the tire is off the ground.2. Place the jack directly under the jack-up
point as illustrated so the top of the jack
contacts the vehicle at the jack-up point.
Under some conditions there will not be
sufficient clearance to use the primary rear
jacking point on vehicles equipped with 15
inch wheels. If this occurs, use the alternate
jack-up point
s1for vehicles equipped with
15 inch wheels. When using the alternate
jack-up point, position the jack on the axle as
close as possible to the tire that needs to be
changed.
Rear (4–wheel drive models)
WCE0072
Rear (2–wheel drive models)
WCE0073
Rear (15 inch wheel alternate jack-up
point)
WCE0361
In case of emergency6-7
ZREVIEW COPY:Ð2004 Truck/Frontier(d22)
Owners Manual(owners)ÐUSA English(nna)
11/21/03Ðdebbie
X