2004 NISSAN FRONTIER warning
[x] Cancel search: warningPage 53 of 296
INSTALLATION ON REAR BENCH
SEAT OUTBOARD POSITIONS
(Crew Cab models only)
WARNING
cThe three-point belt in your vehicle is
equipped with a locking mode retractor
which must be used when installing a
child restraint.
cFailure to use the retractor’s locking
mode will result in the child restraint
not being properly secured. The re-
straint could tip over or otherwise be
unsecured and cause injury to the child
in a sudden stop or collision.
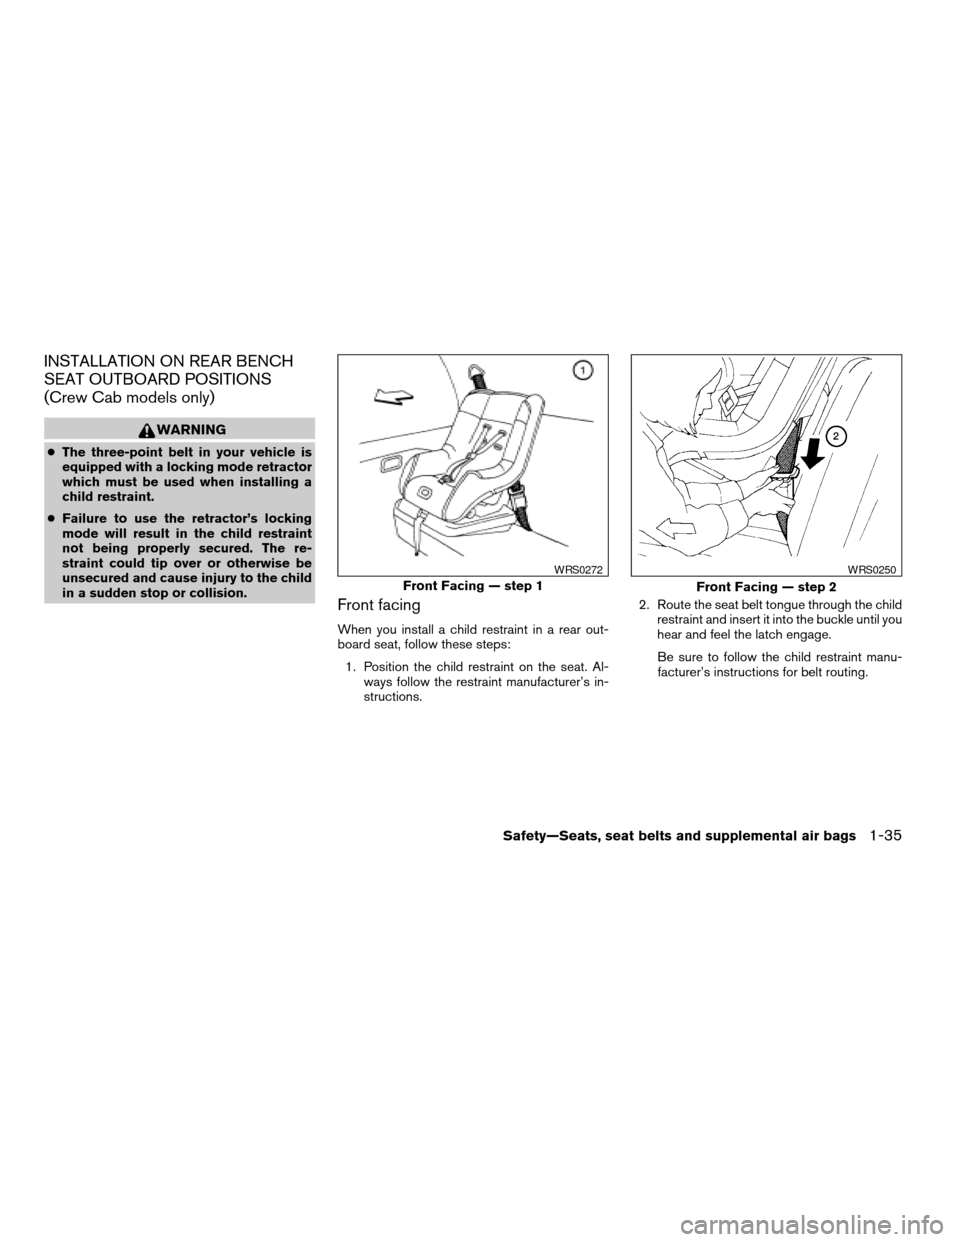
Front facing
When you install a child restraint in a rear out-
board seat, follow these steps:
1. Position the child restraint on the seat. Al-
ways follow the restraint manufacturer’s in-
structions.2. Route the seat belt tongue through the child
restraint and insert it into the buckle until you
hear and feel the latch engage.
Be sure to follow the child restraint manu-
facturer’s instructions for belt routing.
Front Facing — step 1
WRS0272
Front Facing — step 2
WRS0250
Safety—Seats, seat belts and supplemental air bags1-35
ZREVIEW COPY:Ð2004 Truck/Frontier(d22)
Owners Manual(owners)ÐUSA English(nna)
11/21/03Ðdebbie
X
Page 58 of 296
WARNING
cAttach LATCH system compatible child
restraints only at the locations shown. If
a child restraint is not secured properly,
your child could be seriously injured or
killed in an accident.
cDo not secure a child restraint in the
center rear seating position (Crew Cab
models) using the LATCH system an-
chors. The child restraint will not be
secured properly.cFollow all other instructions concern-
ing proper installation of child re-
straints and the use of air bag ON/OFF
switches (if so equipped) outlined in
this manual.
cThe LATCH system anchors are de-
signed to withstand only those loads
imposed by correctly fitted child re-
straints. Under no circumstance are
they to be used for adult seat belts or
harnesses.Some child restraints include two rigid or
webbing-mounted attachments that can be con-
nected to two anchors located at certain seating
positions in your vehicle. This system is known as
the LATCH (Lower Anchors and Tethers for CHil-
dren) system. This system may also be referred to
as the ISOFIX or ISOFIX compatible system.
With this system, you do not have to use a vehicle
seat belt to secure the child restraint. Your vehicle
is equipped with special anchor points that are
used with LATCH system compatible child re-
straints. Check your child restraint for a label
stating that it is compatible with the LATCH sys-
tem. This information may also be in the child
restraint owner’s manual. If you have such a child
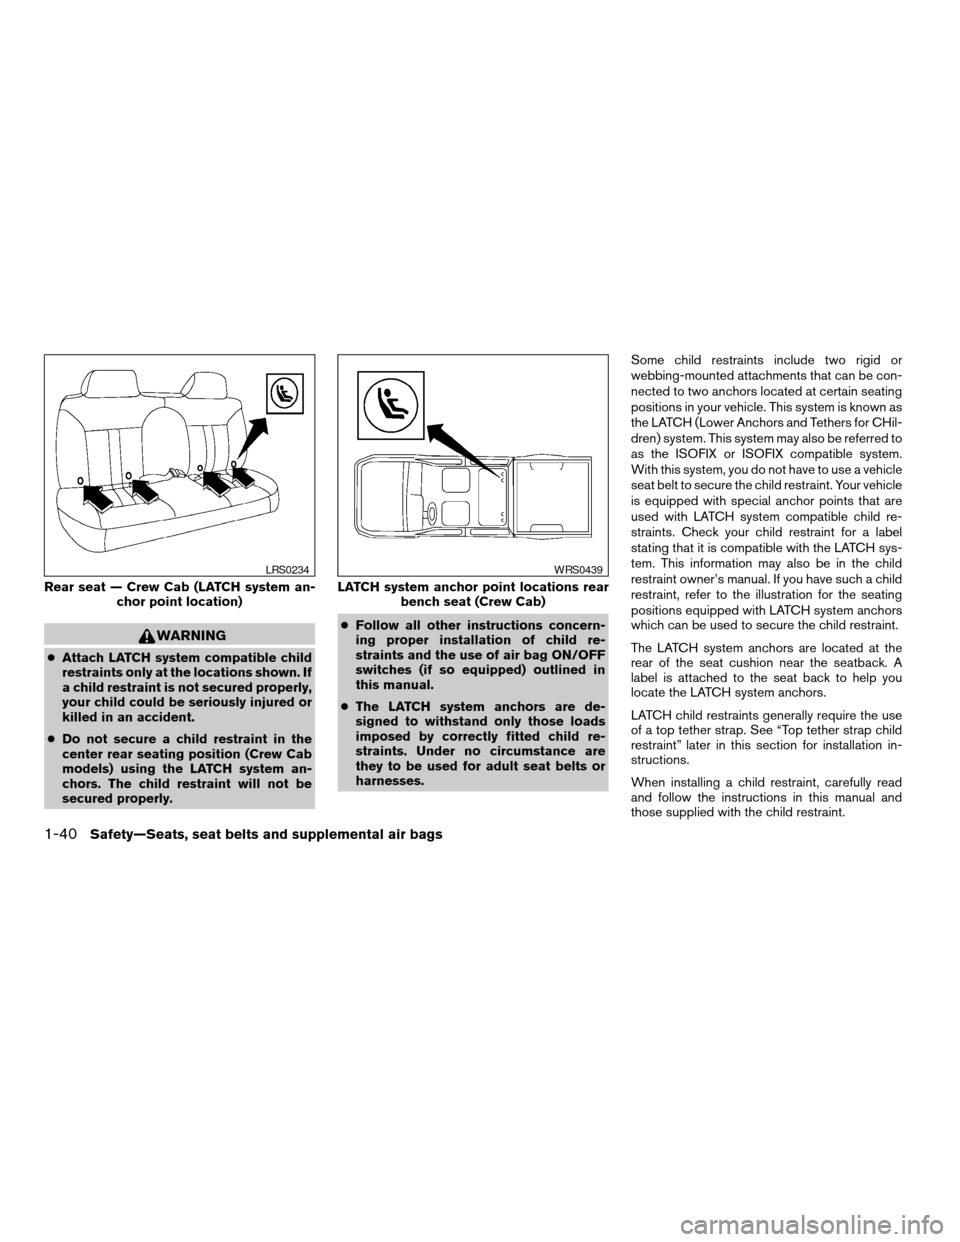
restraint, refer to the illustration for the seating
positions equipped with LATCH system anchors
which can be used to secure the child restraint.
The LATCH system anchors are located at the
rear of the seat cushion near the seatback. A
label is attached to the seat back to help you
locate the LATCH system anchors.
LATCH child restraints generally require the use
of a top tether strap. See “Top tether strap child
restraint” later in this section for installation in-
structions.
When installing a child restraint, carefully read
and follow the instructions in this manual and
those supplied with the child restraint.
Rear seat — Crew Cab (LATCH system an-
chor point location)
LRS0234
LATCH system anchor point locations rear
bench seat (Crew Cab)
WRS0439
1-40Safety—Seats, seat belts and supplemental air bags
ZREVIEW COPY:Ð2004 Truck/Frontier(d22)
Owners Manual(owners)ÐUSA English(nna)
11/21/03Ðdebbie
X
Page 59 of 296
When you install a LATCH system compatible
child restraint to the lower anchor attachments,
follow these steps:
WARNING
Inspect the lower anchors by inserting
your fingers into the lower anchor area
and feeling to make sure there are no
obstructions over the LATCH system an-
chors, such as seat belt webbing or seat
cushion material. The child restraint will
not be secured properly if the LATCH sys-
tem anchors are obstructed.
1. To install the LATCH system compatible
child restraint, insert the child restraint
LATCH system anchor attachments into the
anchor points on the seat. If the child re-
straint is equipped with a top tether, see
“Top tether strap child restraint” later in this
section for installation instructions.
2. After attaching the child restraint and before
placing the child in it, use force to tilt the
child restraint from side to side and tug it
forward to make sure that the child restraint
is securely held in place. It should not move
more than 1 inch.
3. Check to make sure that the child restraint is
properly secured prior to each use.
TOP TETHER STRAP CHILD
RESTRAINT
If your child restraint has a top tether strap, it must
be secured to the provided anchor point. Secure
the child restraint with a seat belt. Secure the top
tether strap to the anchor bracket which provides
the straightest installation of the tether strap.
Tighten the strap according to the manufactur-
er’s instructions to remove any slack.
WARNING
Child restraint anchor points are designed
to withstand only those loads imposed by
correctly fitted child restraints. Under no
circumstances are they to be used for
adult seat belts or harnesses.
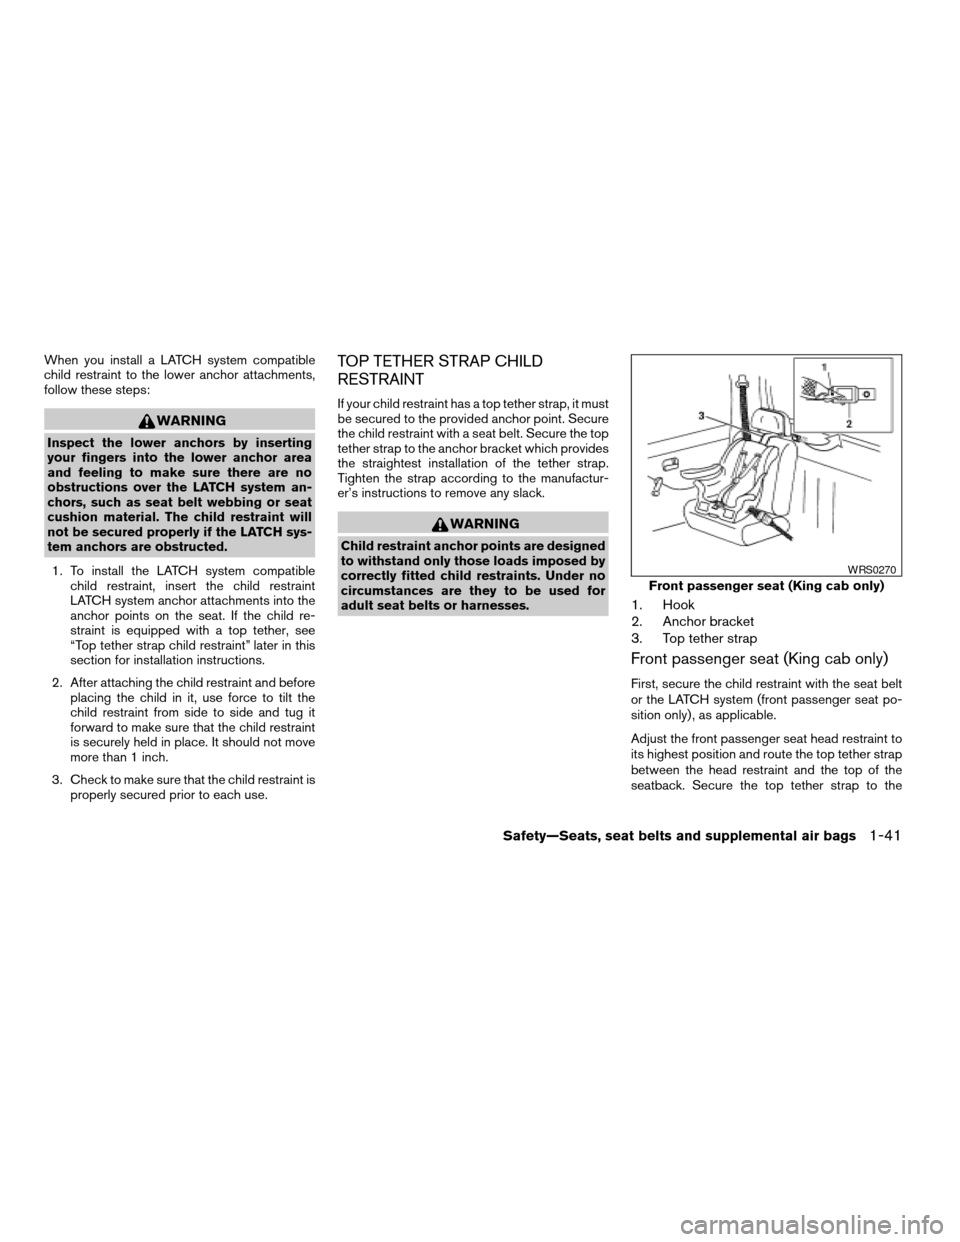
1. Hook
2. Anchor bracket
3. Top tether strap
Front passenger seat (King cab only)
First, secure the child restraint with the seat belt
or the LATCH system (front passenger seat po-
sition only) , as applicable.
Adjust the front passenger seat head restraint to
its highest position and route the top tether strap
between the head restraint and the top of the
seatback. Secure the top tether strap to the
Front passenger seat (King cab only)
WRS0270
Safety—Seats, seat belts and supplemental air bags1-41
ZREVIEW COPY:Ð2004 Truck/Frontier(d22)
Owners Manual(owners)ÐUSA English(nna)
11/21/03Ðdebbie
X
Page 61 of 296
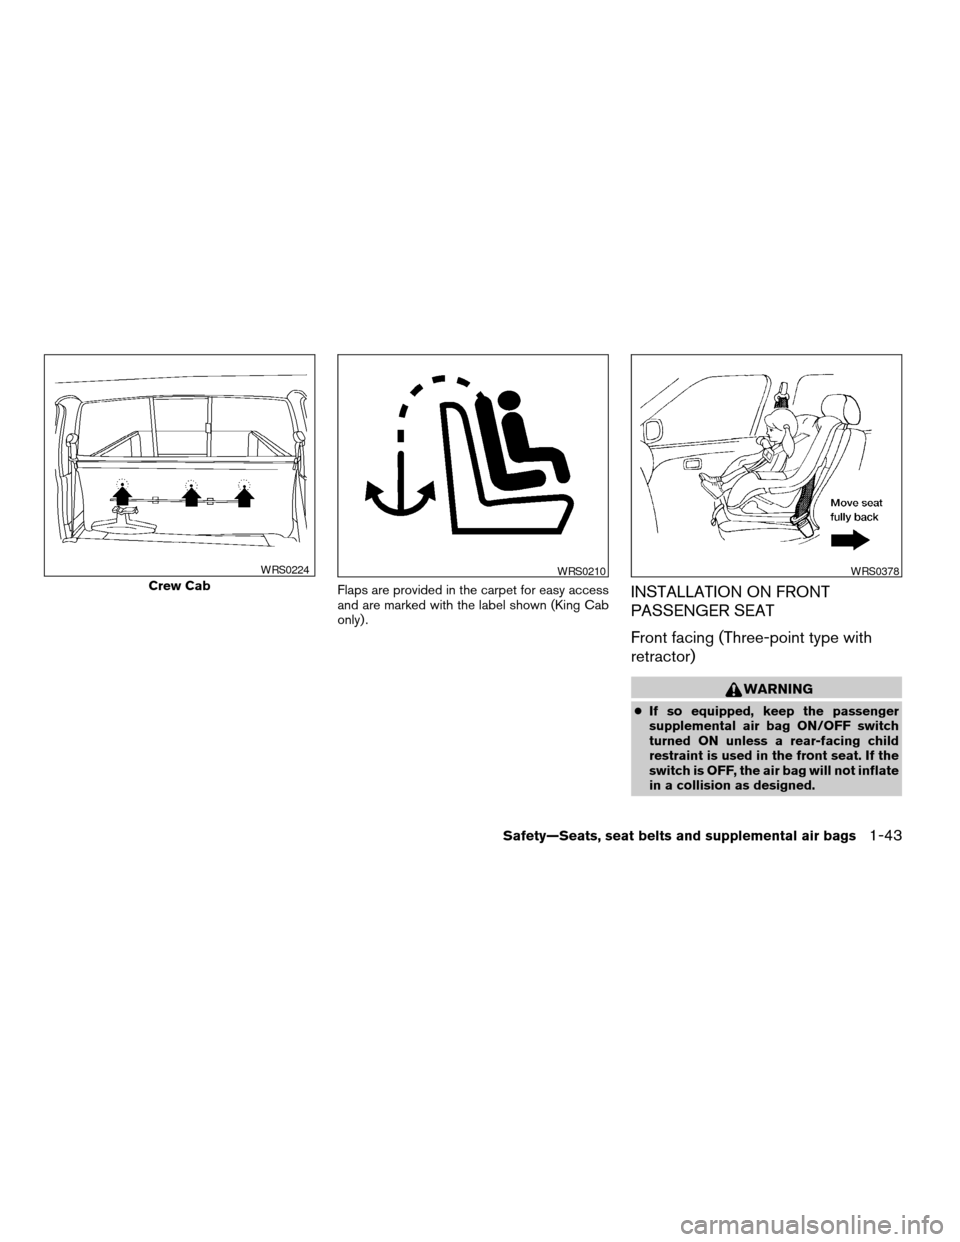
Flaps are provided in the carpet for easy access
and are marked with the label shown (King Cab
only) .INSTALLATION ON FRONT
PASSENGER SEAT
Front facing (Three-point type with
retractor)
WARNING
cIf so equipped, keep the passenger
supplemental air bag ON/OFF switch
turned ON unless a rear-facing child
restraint is used in the front seat. If the
switch is OFF, the air bag will not inflate
in a collision as designed.
Crew Cab
WRS0224WRS0210WRS0378
Safety—Seats, seat belts and supplemental air bags1-43
ZREVIEW COPY:Ð2004 Truck/Frontier(d22)
Owners Manual(owners)ÐUSA English(nna)
11/21/03Ðdebbie
X
Page 62 of 296
cNISSAN recommends that the child re-
straint be installed in the rear seat
(Crew Cab models) . However, if you
must install a forward-facing child re-
straint in the front passenger seat,
move the passenger seat to the rear-
most position.
cNever install a rear facing child restraint
in the front seating position of Crew
Cab models. Install a rear-facing child
restraint in the rear seat only. The force
of the inflating air bag could cause se-
rious injury or kill the child in the child
restraint.
cThe three-point seat belt in your vehicle
is equipped with an automatic locking
mode retractor which must be used
when installing a child restraint.
cFailure to use the retractor’s locking
mode will result in the child restraint
not being properly secured. The re-
straint could tip over or otherwise be
unsecured and cause injury to the child
in a sudden stop or collision.cIf the supplemental air bag warning
light located in the instrument panel
next to the speedometer comes on
when the passenger supplemental air
bag OFF indicator light is also illumi-
nated, something may be wrong with
the supplemental air bag system. Do
not use a child restraint in the front
passenger seat until the system is
checked by your NISSAN dealer.
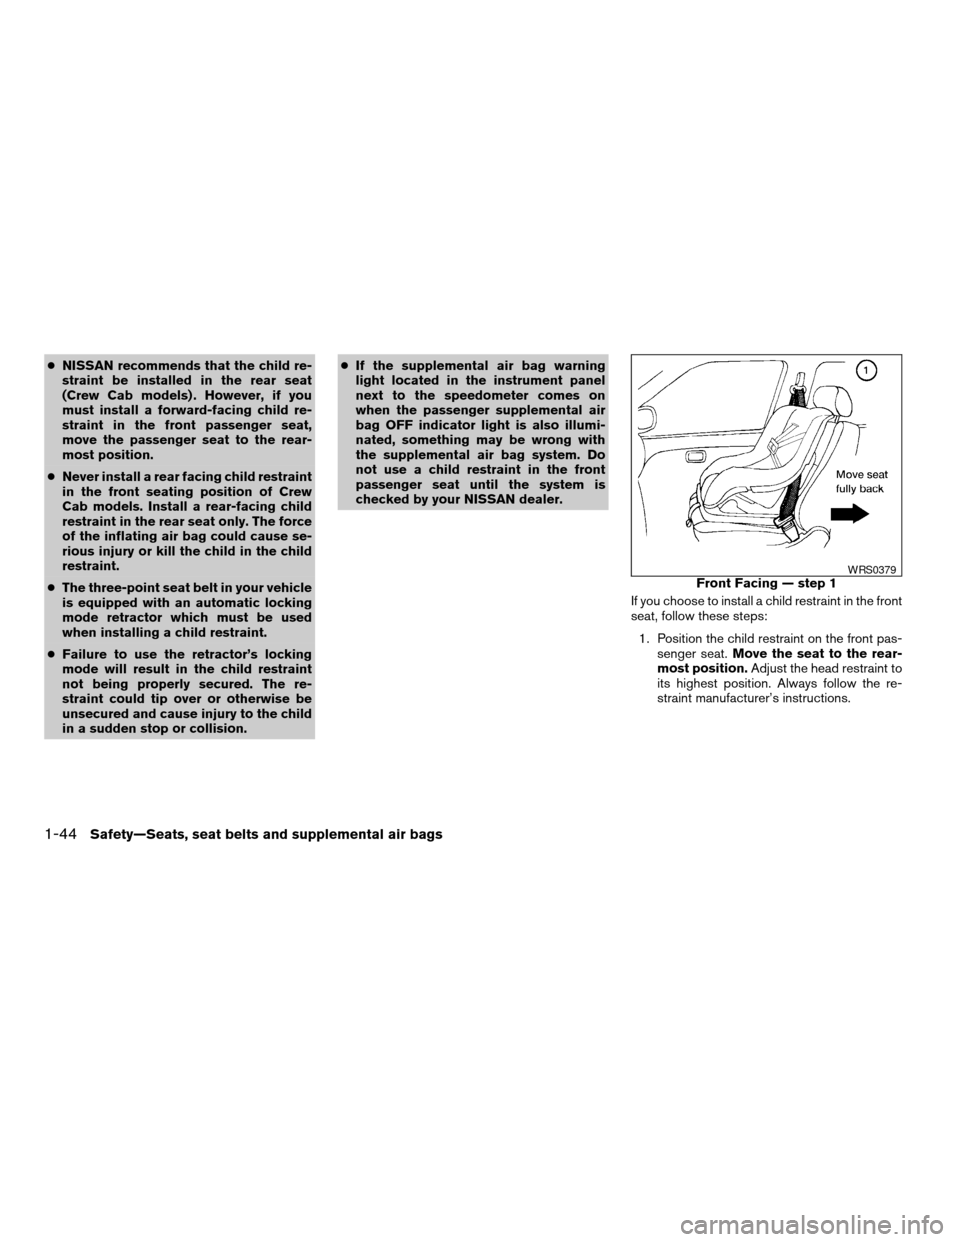
If you choose to install a child restraint in the front
seat, follow these steps:
1. Position the child restraint on the front pas-
senger seat.Move the seat to the rear-
most position.Adjust the head restraint to
its highest position. Always follow the re-
straint manufacturer’s instructions.
Front Facing — step 1WRS0379
1-44Safety—Seats, seat belts and supplemental air bags
ZREVIEW COPY:Ð2004 Truck/Frontier(d22)
Owners Manual(owners)ÐUSA English(nna)
11/21/03Ðdebbie
X
Page 64 of 296
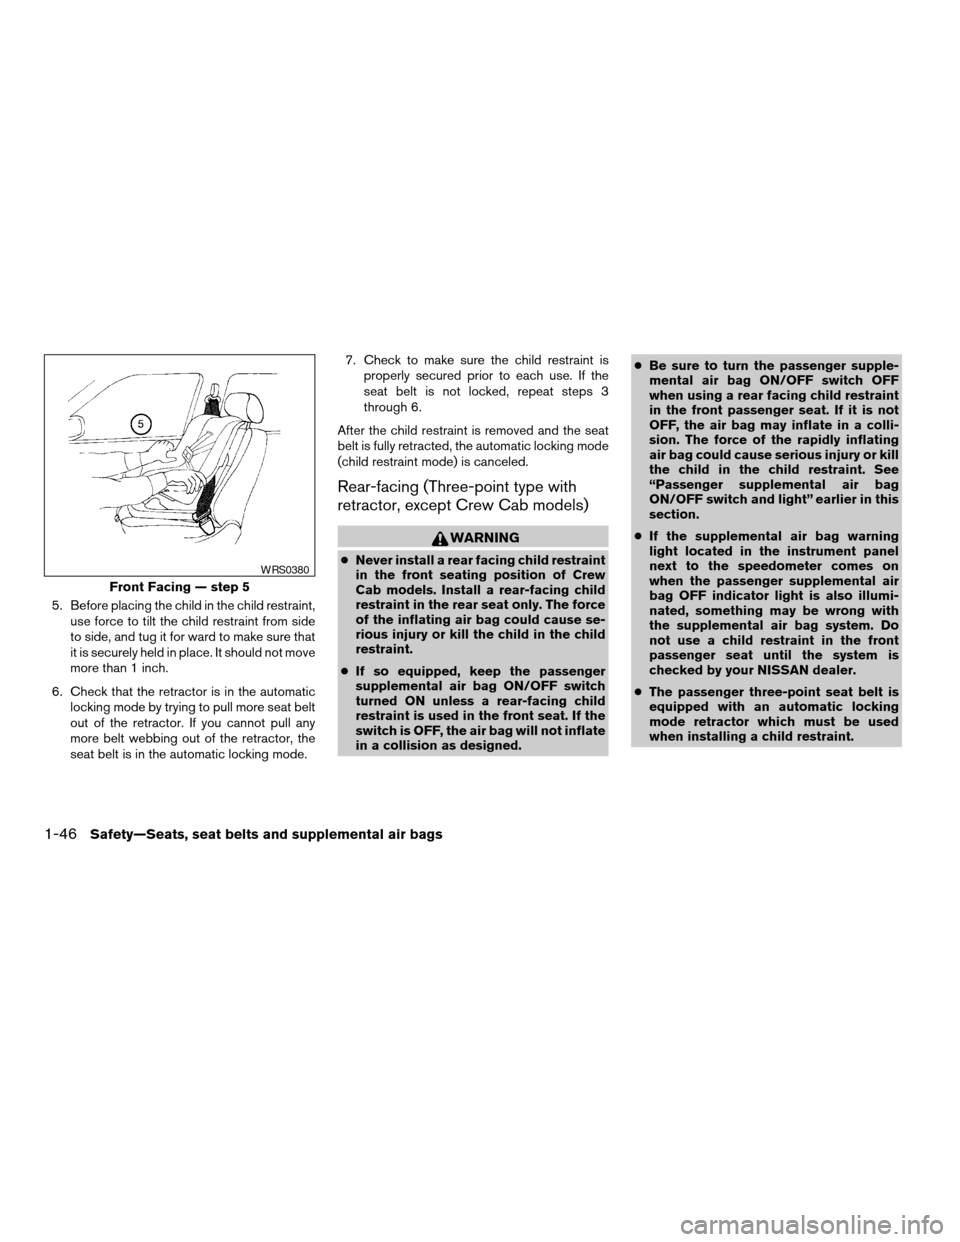
5. Before placing the child in the child restraint,
use force to tilt the child restraint from side
to side, and tug it for ward to make sure that
it is securely held in place. It should not move
more than 1 inch.
6. Check that the retractor is in the automatic
locking mode by trying to pull more seat belt
out of the retractor. If you cannot pull any
more belt webbing out of the retractor, the
seat belt is in the automatic locking mode.7. Check to make sure the child restraint is
properly secured prior to each use. If the
seat belt is not locked, repeat steps 3
through 6.
After the child restraint is removed and the seat
belt is fully retracted, the automatic locking mode
(child restraint mode) is canceled.
Rear-facing (Three-point type with
retractor, except Crew Cab models)
WARNING
cNever install a rear facing child restraint
in the front seating position of Crew
Cab models. Install a rear-facing child
restraint in the rear seat only. The force
of the inflating air bag could cause se-
rious injury or kill the child in the child
restraint.
cIf so equipped, keep the passenger
supplemental air bag ON/OFF switch
turned ON unless a rear-facing child
restraint is used in the front seat. If the
switch is OFF, the air bag will not inflate
in a collision as designed.cBe sure to turn the passenger supple-
mental air bag ON/OFF switch OFF
when using a rear facing child restraint
in the front passenger seat. If it is not
OFF, the air bag may inflate in a colli-
sion. The force of the rapidly inflating
air bag could cause serious injury or kill
the child in the child restraint. See
“Passenger supplemental air bag
ON/OFF switch and light” earlier in this
section.
cIf the supplemental air bag warning
light located in the instrument panel
next to the speedometer comes on
when the passenger supplemental air
bag OFF indicator light is also illumi-
nated, something may be wrong with
the supplemental air bag system. Do
not use a child restraint in the front
passenger seat until the system is
checked by your NISSAN dealer.
cThe passenger three-point seat belt is
equipped with an automatic locking
mode retractor which must be used
when installing a child restraint.
Front Facing — step 5
WRS0380
1-46Safety—Seats, seat belts and supplemental air bags
ZREVIEW COPY:Ð2004 Truck/Frontier(d22)
Owners Manual(owners)ÐUSA English(nna)
11/21/03Ðdebbie
X
Page 69 of 296

2 Instruments and controls
Instrument panel...................................2-2
Meters and gauges................................2-3
Speedometer and odometer.....................2-3
Tachometer....................................2-5
Engine coolant temperature gauge...............2-5
Fuel gauge....................................2-6
Compass and outside temperature display
(if so equipped)...................................2-6
Outside temperature display.....................2-7
Compass display...............................2-7
Warning/indicator lights and audible reminders.......2-9
Checking bulbs................................2-9
Warning lights................................2-10
Indicator lights................................2-13
Audible reminders.............................2-15
Security system (if so equipped)...................2-16
Vehicle security system.........................2-16
Windshield wiper and washer switch...............2-18
Switch operation..............................2-18
Rear window defroster switch (Crew Cab models
only)............................................2-19
Headlight and turn signal switch....................2-20
Headlight control switch........................2-20
Daytime running light system (Canada only)......2-21Instrument brightness control...................2-21
Turn signal switch.............................2-22
Fog light switch (if so equipped)................2-22
Hazard warning flasher switch.....................2-22
Cargo lamp switch...............................2-23
Horn............................................2-23
Vehicle dynamic control (VDC) off switch
(if so equipped)..................................2-24
Power outlet.....................................2-24
Dual 12 volt power outlets (if so equipped)..........2-25
Storage.........................................2-26
Storage compartment..........................2-26
Storage trays (if so equipped)...................2-26
Cup holders..................................2-27
Glove box....................................2-28
Console box..................................2-28
Grocery hooks (King Cab only)..................2-29
Tubular roof rack (if so equipped)................2-30
Windows........................................2-32
Power windows (if so equipped)................2-32
Manual windows..............................2-34
Rear sliding window (if so equipped)............2-34
Interior lights.....................................2-34
Map lights (if so equipped)........................2-35
ZREVIEW COPY:Ð2004 Truck/Frontier(d22)
Owners Manual(owners)ÐUSA English(nna)
11/21/03Ðdebbie
X
Page 70 of 296
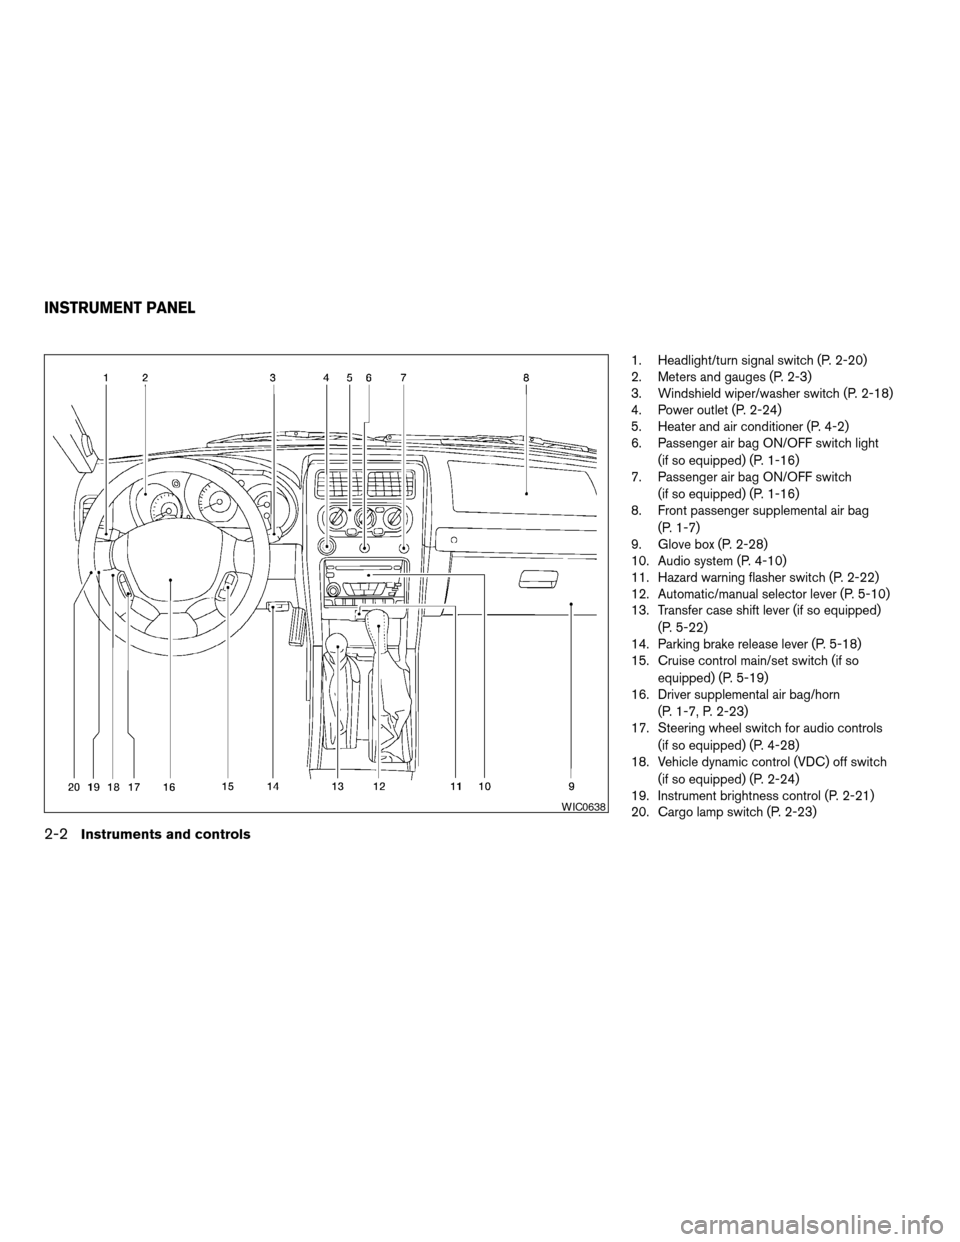
1. Headlight/turn signal switch (P. 2-20)
2. Meters and gauges (P. 2-3)
3. Windshield wiper/washer switch (P. 2-18)
4. Power outlet (P. 2-24)
5. Heater and air conditioner (P. 4-2)
6. Passenger air bag ON/OFF switch light
(if so equipped) (P. 1-16)
7. Passenger air bag ON/OFF switch
(if so equipped) (P. 1-16)
8. Front passenger supplemental air bag
(P. 1-7)
9. Glove box (P. 2-28)
10. Audio system (P. 4-10)
11. Hazard warning flasher switch (P. 2-22)
12. Automatic/manual selector lever (P. 5-10)
13. Transfer case shift lever (if so equipped)
(P. 5-22)
14. Parking brake release lever (P. 5-18)
15. Cruise control main/set switch (if so
equipped) (P. 5-19)
16. Driver supplemental air bag/horn
(P. 1-7, P. 2-23)
17. Steering wheel switch for audio controls
(if so equipped) (P. 4-28)
18. Vehicle dynamic control (VDC) off switch
(if so equipped) (P. 2-24)
19. Instrument brightness control (P. 2-21)
20. Cargo lamp switch (P. 2-23)
WIC0638
INSTRUMENT PANEL
2-2Instruments and controls
ZREVIEW COPY:Ð2004 Truck/Frontier(d22)
Owners Manual(owners)ÐUSA English(nna)
11/21/03Ðdebbie
X