2004 NISSAN FRONTIER window
[x] Cancel search: windowPage 128 of 296

5. Turn the temperature control dial to the de-
sired position.
Dehumidified defogging
This mode is used to defog the windows and
dehumidify the air.
1. Turn the air flow control dial to the
position.
2. Turn the fan control dial to the desired posi-
tion.
3. Push the
button. The indicator light
comes on.
When the
,or positions in between
are selected, the air conditioner automatically
turns on (however, the indicator light will not
illuminate) if the outside temperature is more than
36°F (2°C) . The air conditioning system will con-
tinue to operate until the fan control dial is turned
to OFF or the vehicle is shut off, even if the air flow
control dial is turned to a position other than
the
position. This dehumidifies the air
which helps defog the windshield. The
mode automatically turns off, allowing outside air
to be drawn into the passenger compartment to
further improve the defogging performance.4. Turn the temperature control dial to the de-
sired position.
Operating tips
cKeep the windows closed while the air con-
ditioner is in operation.
cAfter parking in the sun, drive for 2 or 3
minutes with the windows open to vent hot
air from the passenger compartment. Then,
close the windows. This allows the air con-
ditioner to cool the interior more quickly.
cThe air conditioning system should be
operated for approximately 10 minutes
at least once a month. This helps pre-
vent damage to the system due to lack
of lubrication.
cIf the engine coolant temperature
gauge indicates engine coolant tem-
perature over the normal range, turn
the air conditioner off. See “If your
vehicle overheats” in the “In case of
emergency” section of this manual.
AIR FLOW CHARTS
The following charts show the button and dial
positions forMAXIMUM AND QUICKheating,
cooling or defrosting.The air recirculation
button should always be in the OFF posi-
tion for heating and defrosting.
4-6Heater, air conditioner and audio systems
ZREVIEW COPY:Ð2004 Truck/Frontier(d22)
Owners Manual(owners)ÐUSA English(nna)
11/21/03Ðdebbie
X
Page 136 of 296

pressed, and stops at the next broadcasting sta-
tion. If using thebutton, once the highest
broadcasting station is reached, the radio contin-
ues in the SEEK mode at the lowest broadcasting
station. If using the
button, once the lowest
broadcasting station is reached, the radio contin-
ues in the SEEK mode at the highest broadcast-
ing station.
Manual tuning
Use the
andbuttons for manual
tuning. To move quickly through the channels,
hold either of the tuning buttons down.
SCAN tuning
Push and hold the SEEK/TRACK tuning button
(
or) for more than 1.5 seconds.
SCAN illuminates in the display window, and the
radio station blinks. SCAN tuning begins from
low to high frequencies or high to low frequen-
cies, depending on which button is pressed.
SCAN tuning stops at each broadcasting station
for 5 seconds. When scanning, SCAN is solid
and the radio station blinks. When temporarily
stopped on a station, SCAN blinks and the sta-
tion display is solid. Pushing the button again
during this 5 second period stops SCAN tuning
and the radio remains tuned to that station.Station memory operations
Each preset mode (A, B or C) has 6 presets,
capable of storing any combination of AM and FM
stations.Press the PRESET ABC button to change be-
tween the presets:
A!B!C
The radio displays icon A, B or C to indicate
which set of presets is active.
To store a radio station in a preset:
1. Select the desired preset by pressing PRE-
SET ABC.
2. Tune to the desired station.
3. Press the desired station select button for
more than 3 seconds. For example, in the
illustrations, ch2 is to be memorized. The
radio mutes when the select button is
pushed.
4. When the indicator illuminates in the display
and the sound resumes, memorizing is com-
plete.
5. Other station select buttons can be set in
the same manner.
If the battery cable is disconnected, or if the radio
fuse opens, the radio memory is canceled. In that
case, reset the desired stations.
Compact disc (CD) player operation
Turn the ignition key to the ACC or ON position,
and carefully insert the compact disc into the slot
LHA0119
4-14Heater, air conditioner and audio systems
ZREVIEW COPY:Ð2004 Truck/Frontier(d22)
Owners Manual(owners)ÐUSA English(nna)
11/21/03Ðdebbie
X
Page 137 of 296
with the label side up. The compact disc is auto-
matically pulled into the slot and starts to play.
If the radio is already operating, it automatically
turns off and the compact disc begins to play.
CAUTION
Do not force a compact disc into the CD
insert slot. This could damage the CD
and/or CD changer/player.
CD button
When the CD button is pushed with a compact
disc loaded and the radio playing, the radio turns
off and the compact disc starts to play.
Track up/down, FF/REV
(rewind) buttons
Track up/down
When the
button is pushed and released
while the compact disc is playing, the selection
following the present one starts to play from the
beginning. Push the
button several times to
skip several selections. Each time the button is
pushed, the CD advances 1 additional selection.
The number appears in the display window.
(When the last selection on the compact disc is
skipped, the first selection is played.)When the
button is pushed and released, the
selection being played returns to the beginning.
Push the
button several times to skip back
several selections. Each time the button is
pushed, the CD moves back 1 selection.
If the play pattern is in MIX mode when the
orbutton is pushed the next selection will be
chosen at random.
FF (Fast Forward)/REV (Reverse)
When the
orbutton is pushed and held
while the compact disc is playing, the compact
disc plays at an increased speed while fast for-
warding or rewinding. When the button is re-
leased, the compact disc returns to normal play
speed.
MENU
When the
button is pushed while the com-
pact disc is playing, the play pattern changes as
follows:
RPT:The current selection is repeated.
MIX:Selections are played at random, not fol-
lowing the sequence on the compact disc. The
same program may be repeated twice. If the
button is pushed in the MIX mode, selections will
be chosen at random.Blank(no symbol): All selections are played
repeatedly in sequence.
When a new compact disc is inserted, the
play pattern automatically changes to ALL.
CD EJECT button
When the
button is pushed with a com-
pact disc loaded, the compact disc ejects.
When the
button is pushed while the com-
pact disc is playing, the compact disc ejects and
the system turns off.
DISC indicator light
This light
comes on when a compact disc
is loaded into the player.
Heater, air conditioner and audio systems4-15
ZREVIEW COPY:Ð2004 Truck/Frontier(d22)
Owners Manual(owners)ÐUSA English(nna)
11/21/03Ðdebbie
X
Page 140 of 296
Adjusting tone quality and speaker balance
Press the AUDIO button to enter the audio adjust
mode:
Bass!Mid!Treb!Fade!Bal
Press the TUNE/FF-REV (
or)or
SEEK/TRACK (or) to adjust to the de-
sired levels. The display will return to the regular
radio display after 7 seconds, or you may press
the AUDIO button again to return to the regular
radio display.
Clock operation
Pressing the CLOCK button displays the clock
with the radio on or off. Press the CLOCK button
again to turn off the clock display.
Clock set
1. Press and hold the CLOCK button until it
beeps (>2 seconds) .
2. The hours will start flashing. Press
TUNE/FF-REV (
or)or
SEEK/TRACK (or) to adjust the
hours.
3. Press the CLOCK button to switch to the
minute adjustment.
4. Press TUNE/FF-REV (
or)or
SEEK/TRACK (or) to adjust the min-
utes.5. Press the CLOCK button again to exit the
clock set mode.
The display will return to the regular clock display
after 7 seconds, or you may press the CLOCK
button again to return to the regular clock display.
FM-AM radio operation
FM-AM band select
Push the AM or the FM button to change from AM
to FM reception.
The FM stereo indicator, ST, illuminates during
FM stereo reception. When the stereo broadcast
signal is weak, the radio automatically changes
from stereo to monaural reception.
TUNE/FF—REV
WARNING
The radio should not be tuned while driv-
ing so full attention may be given to ve-
hicle operation.
Use the
andbuttons for manual
tuning. To move quickly through the channels,
hold the tuning buttons down.
SEEK tuning
Push SEEK/TRACK tuning button (
or).
SEEK tuning begins from low to high frequencies
or high to low frequencies, depending on which
button is pressed, and stops at the next broad-
casting station. If using the up button, once the
highest broadcasting station is reached, the ra-
dio continues in the SEEK mode at the lowest
broadcasting station. If using the down button,
once the lowest broadcasting station is reached,
the radio continues in the SEEK mode at the
highest broadcasting station.
SCAN tuning
Push the SCAN button. SCAN illuminates in the
display window. SCAN tuning begins from low to
high frequencies. SCAN tuning stops for 5 sec-
onds at each broadcasting station that has suffi-
cient signal strength. When scanning, SCAN
blinks in the display. Pushing the SCAN button
again during this 5 second period stops SCAN
tuning and the radio remains tuned to that station.
4-18Heater, air conditioner and audio systems
ZREVIEW COPY:Ð2004 Truck/Frontier(d22)
Owners Manual(owners)ÐUSA English(nna)
11/21/03Ðdebbie
X
Page 146 of 296

7. Repeat steps 2–5 until all discs are loaded,
then the last loaded disc will begin to play.
The display shows the Disc number, Track
number and Elapsed Time.
Selected disc loading
1. Press an available disc select button whose
indicator is off. The display shows“Please
Wait”.
2. Thegreenindicator starts blinking and the
display shows“Insert Disc”for 15 sec-
onds.
3. Insert the CD. The display shows“Loading
Disc”.
4. The CD will play after the disc is set to a play
position.
5. The indicator color changes fromblinking
greentosolid greenand the display
shows the Disc icon, Disc number, Track
number and Elapsed Time.
If a disc is not inserted within 15 seconds or if the
load button is pressed during load sequence, the
entire disc load sequence will be canceled.
Disc play
Press the CD button. If a CD is loaded and the
radio is playing, the radio turns off and the last
loaded disc starts to play.Selected disc play
1. Press the disc select button whose disc icon
is displayed.
2. The indicator blinksgreenduring the
change and the display shows“Changing
Disc”.
3. The CD plays after the disc is set to a play
position.4. The indicator changes fromblinking green
tosolid greenand the display shows the
Disc number, Track number and Elapsed
Time.
FF (fast forward) REW
(rewind) buttons
When the TUNE/FF-REV (
or) but-
ton is pressed while the compact disc is playing,
the compact disc plays at an increased speed
while fast forwarding or rewinding. When the
button is released, the CD returns to normal play
speed.
SEEK/TRACK buttons
When
is pressed while the compact disc is
playing, the selection following the present one
starts to play from the beginning. Press
sev-
eral times to skip several selections. Each time
the button is pressed, the CD advances 1 addi-
tional selection. The track number appears in the
display window. (When the last selection on the
compact disc is skipped, the first selection is
played.)
When
is pressed, the selection being played
returns to the beginning. Pressseveral times
to skip back several selections. Each time the
button is pressed, the CD moves back 1 selec-
LHA0076
4-24Heater, air conditioner and audio systems
ZREVIEW COPY:Ð2004 Truck/Frontier(d22)
Owners Manual(owners)ÐUSA English(nna)
11/21/03Ðdebbie
X
Page 156 of 296
CAUTION
Do not place metalized film or any metal
parts (antenna, etc.) on the windows. This
may cause poor reception of the signals
from the tire pressure sensors, and the
low tire pressure warning system will not
function properly.
FCC Notice:
Changes or modifications not expressly ap-
proved by the manufacturer compliance
could void the user’s authority to operate
the equipment.
This device complies with Part 15 of the
FCC Rules and RSS-210 of Industry
Canada.
Operation is subject to the following two
conditions: (1) This device may not cause
harmful interface, and (2) this device must
accept any interference received, including
interference that may cause undesired op-
eration of the device.
ON-PAVEMENT AND OFF-ROAD
DRIVING PRECAUTIONS
Utility vehicles have a significantly higher
rollover rate than other types of vehicles.
They have higher ground clearance than passen-
ger cars to make them capable of performing in a
variety of on-pavement and off-road applications.
This gives them a higher center of gravity than
ordinary cars. An advantage of higher ground
clearance is a better view of the road, allowing
you to anticipate problems. However, they are not
designed for cornering at the same speeds as
conventional two-wheel drive vehicles any more
than low-slung sports cars are designed to per-
form satisfactorily under off-road conditions. If at
all possible, avoid sharp turns at high speeds. As
with other vehicles of this type, failure to operate
this vehicle correctly may result in loss of control
or vehicle rollover. In a rollover crash, an unbelted
person is significantly more likely to die than a
person wearing a seat belt.
Be sure to read the driving safety precautions
later in this section.
AVOIDING COLLISION AND
ROLLOVER
WARNING
Failure to operate this vehicle in a safe
and prudent manner may result in loss of
control or an accident.
Be alert and drive defensively at all times. Obey
all traffic regulations. Avoid excessive speed,
high speed cornering, or sudden steering ma-
neuvers, because these driving practices could
cause you to lose control of your vehicle.As with
any vehicle, loss of control could result in a
collision with other vehicles or objects, or
cause the vehicle to roll over, particularly if
the loss of control causes the vehicle to
slide sideways.Be attentive at all times, and
avoid driving when tired. Never drive when under
the influence of alcohol or drugs (including pre-
scription or over-the-counter drugs which may
cause drowsiness) . Always wear your seat belt
as outlined in the “Safety – Seats, seat belts and
supplemental air bags” section of this manual,
and also instruct your passengers to do so.
Seat belts help reduce the risk of injury in colli-
sions and rollovers.In a rollover crash, an
unbelted or improperly belted person is
significantly more likely to be injured or
killed than a person wearing a seat belt.
5-4Starting and driving
ZREVIEW COPY:Ð2004 Truck/Frontier(d22)
Owners Manual(owners)ÐUSA English(nna)
11/21/03Ðdebbie
X
Page 161 of 296
cMake sure the area around the vehicle is
clear.
cCheck fluid levels such as engine oil, cool-
ant, brake and clutch fluid, and window
washer fluid as frequently as possible, or at
least whenever you refuel.
cCheck that all windows and lights are clean.
cVisually inspect tires for their appearance
and condition. Also check tires for proper
inflation.
cLock all doors.
cPosition seat and adjust head restraints.
cAdjust inside and outside mirrors.
cFasten seat belts and ask all passengers to
do likewise.
cCheck the operation of warning lights when
the key is turned to the ON (3) position. See
“Warning/indicator lights and audible re-
minders” in the “Instruments and controls”
section of this manual.1. Apply the parking brake.
2.Automatic transmission:
Move the shift selector lever to P (Park) or N
(Neutral) . P (Park) is recommended.
The shift selector lever cannot be
moved out of P (Park) and into any of
the other gear positions if the ignition
key is turned to the OFF position or if
the key is removed from the ignition
switch.
The starter is designed not to operate if
the shift selector lever is in any of the
driving positions.
Manual transmission:
Move the shift lever to N (Neutral) . Depress
the clutch pedal to the floor while cranking
the engine.
The starter is designed not to operate
unless the clutch pedal is fully de-
pressed.
3. Crank the enginewith your foot off the
accelerator pedalby turning the ignition
key to START. Release the key when the
engine starts. If the engine starts, but fails to
run, repeat the above procedure.cIf the engine is very hard to start in ex-
tremely cold weather or when restarting,
depress the accelerator pedal a little (ap-
proximately 1/3 to the floor) and hold it
and then crank the engine. Release the
key and the accelerator pedal when the
engine starts.
cIf the engine is very hard to start because
it is flooded, depress the accelerator
pedal all the way to the floor and hold it.
Crank the engine for 5-6 seconds. After
cranking the engine, release the accel-
erator pedal. Crank the enginewith your
foot off the accelerator pedalby turn-
ing the ignition key to START. Release the
key when the engine starts. If the engine
starts, but fails to run, repeat the above
procedure.
CAUTION
Do not operate the starter for more than
15 seconds at a time. If the engine does
not start, turn the key off and wait 10
seconds before cranking again, otherwise
the starter could be damaged.
BEFORE STARTING THE ENGINE STARTING THE ENGINE
Starting and driving5-9
ZREVIEW COPY:Ð2004 Truck/Frontier(d22)
Owners Manual(owners)ÐUSA English(nna)
11/21/03Ðdebbie
X
Page 174 of 296
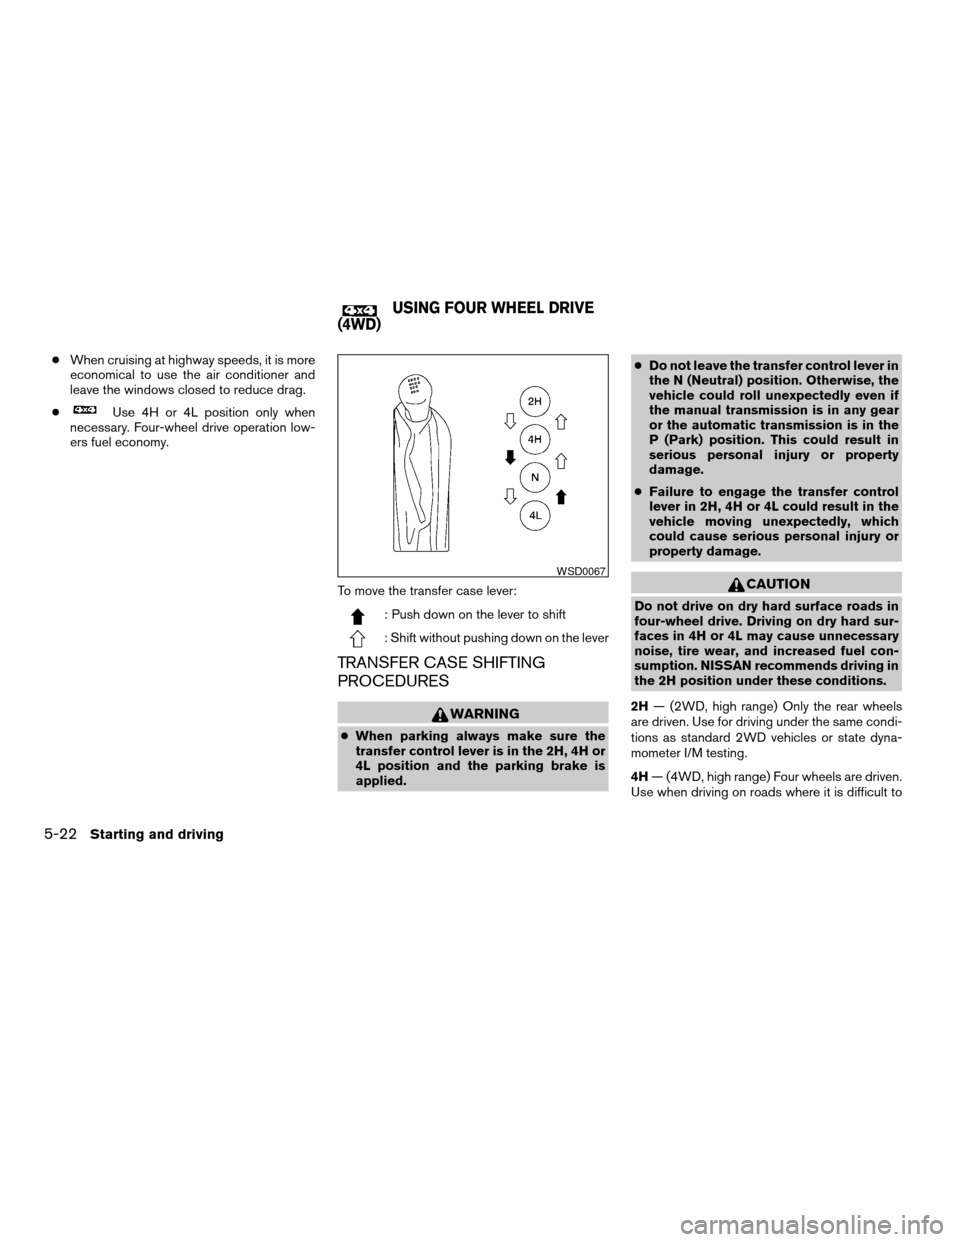
cWhen cruising at highway speeds, it is more
economical to use the air conditioner and
leave the windows closed to reduce drag.
c
Use 4H or 4L position only when
necessary. Four-wheel drive operation low-
ers fuel economy.
To move the transfer case lever:
: Push down on the lever to shift
: Shift without pushing down on the lever
TRANSFER CASE SHIFTING
PROCEDURES
WARNING
cWhen parking always make sure the
transfer control lever is in the 2H, 4H or
4L position and the parking brake is
applied.cDo not leave the transfer control lever in
the N (Neutral) position. Otherwise, the
vehicle could roll unexpectedly even if
the manual transmission is in any gear
or the automatic transmission is in the
P (Park) position. This could result in
serious personal injury or property
damage.
cFailure to engage the transfer control
lever in 2H, 4H or 4L could result in the
vehicle moving unexpectedly, which
could cause serious personal injury or
property damage.
CAUTION
Do not drive on dry hard surface roads in
four-wheel drive. Driving on dry hard sur-
faces in 4H or 4L may cause unnecessary
noise, tire wear, and increased fuel con-
sumption. NISSAN recommends driving in
the 2H position under these conditions.
2H— (2WD, high range) Only the rear wheels
are driven. Use for driving under the same condi-
tions as standard 2WD vehicles or state dyna-
mometer I/M testing.
4H— (4WD, high range) Four wheels are driven.
Use when driving on roads where it is difficult to
WSD0067
USING FOUR WHEEL DRIVE
(4WD)
5-22Starting and driving
ZREVIEW COPY:Ð2004 Truck/Frontier(d22)
Owners Manual(owners)ÐUSA English(nna)
11/21/03Ðdebbie
X