2004 NISSAN ARMADA lock
[x] Cancel search: lockPage 276 of 344
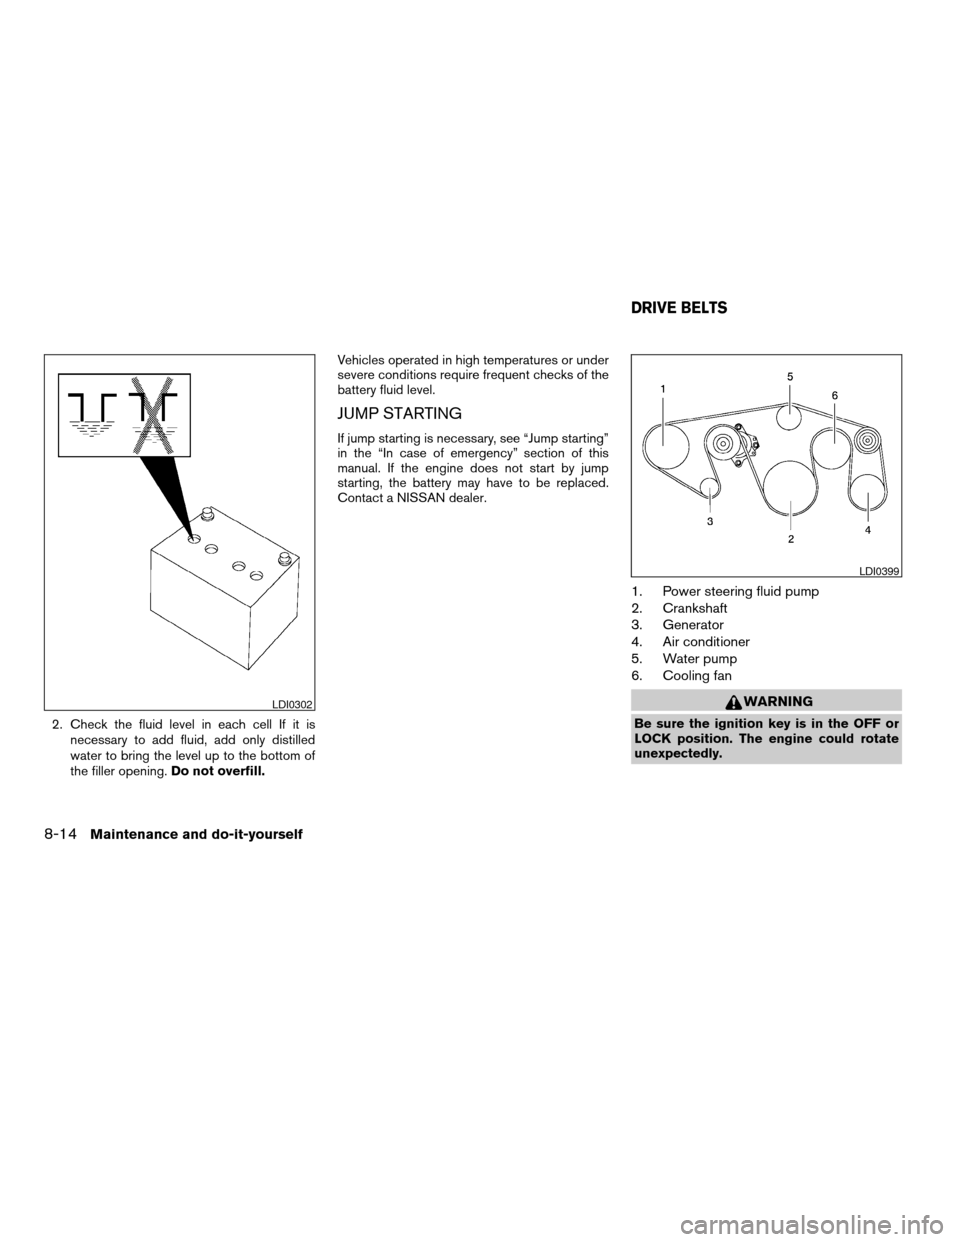
2. Check the fluid level in each cell If it is
necessary to add fluid, add only distilled
water to bring the level up to the bottom of
the filler opening.Do not overfill.Vehicles operated in high temperatures or under
severe conditions require frequent checks of the
battery fluid level.
JUMP STARTING
If jump starting is necessary, see “Jump starting”
in the “In case of emergency” section of this
manual. If the engine does not start by jump
starting, the battery may have to be replaced.
Contact a NISSAN dealer.
1. Power steering fluid pump
2. Crankshaft
3. Generator
4. Air conditioner
5. Water pump
6. Cooling fan
WARNING
Be sure the ignition key is in the OFF or
LOCK position. The engine could rotate
unexpectedly.
LDI0302
LDI0399
DRIVE BELTS
8-14Maintenance and do-it-yourself
ZREVIEW COPY:Ð2004 Pathfinder Armada
(wzw)
Owners Manual(owners)ÐUSA English(nna)
01/14/04Ðtbrooks
X
Page 284 of 344
BRAKE BOOSTER
Check the brake booster function as follows:
1. With the engine off, press and release the
brake pedal several times. When brake
pedal movement (distance of travel) remains
the same from one pedal application to the
next, continue on to the next step.
2. While depressing the brake pedal, start the
engine. The pedal height should drop a little.
3. With the brake pedal depressed, stop the
engine. Keep the pedal depressed for about
30 seconds. The pedal height should not
change.
4. Run the engine for one minute without de-
pressing the brake pedal, then turn it off.
Depress the brake pedal several times. The
pedal travel distance will decrease gradually
with each depression as the vacuum is re-
leased from the booster.
If the brakes do not operate properly, have the
brakes checked by a NISSAN dealer.
ENGINE COMPARTMENT
CAUTION
Never use a fuse of a higher or lower
amperage rating than specified on the
fuse box cover. This could damage the
electrical system or cause a fire.
If any electrical equipment does not come on,
check for an open fuse.
1. Be sure the ignition switch and the headlight
switch are OFF.
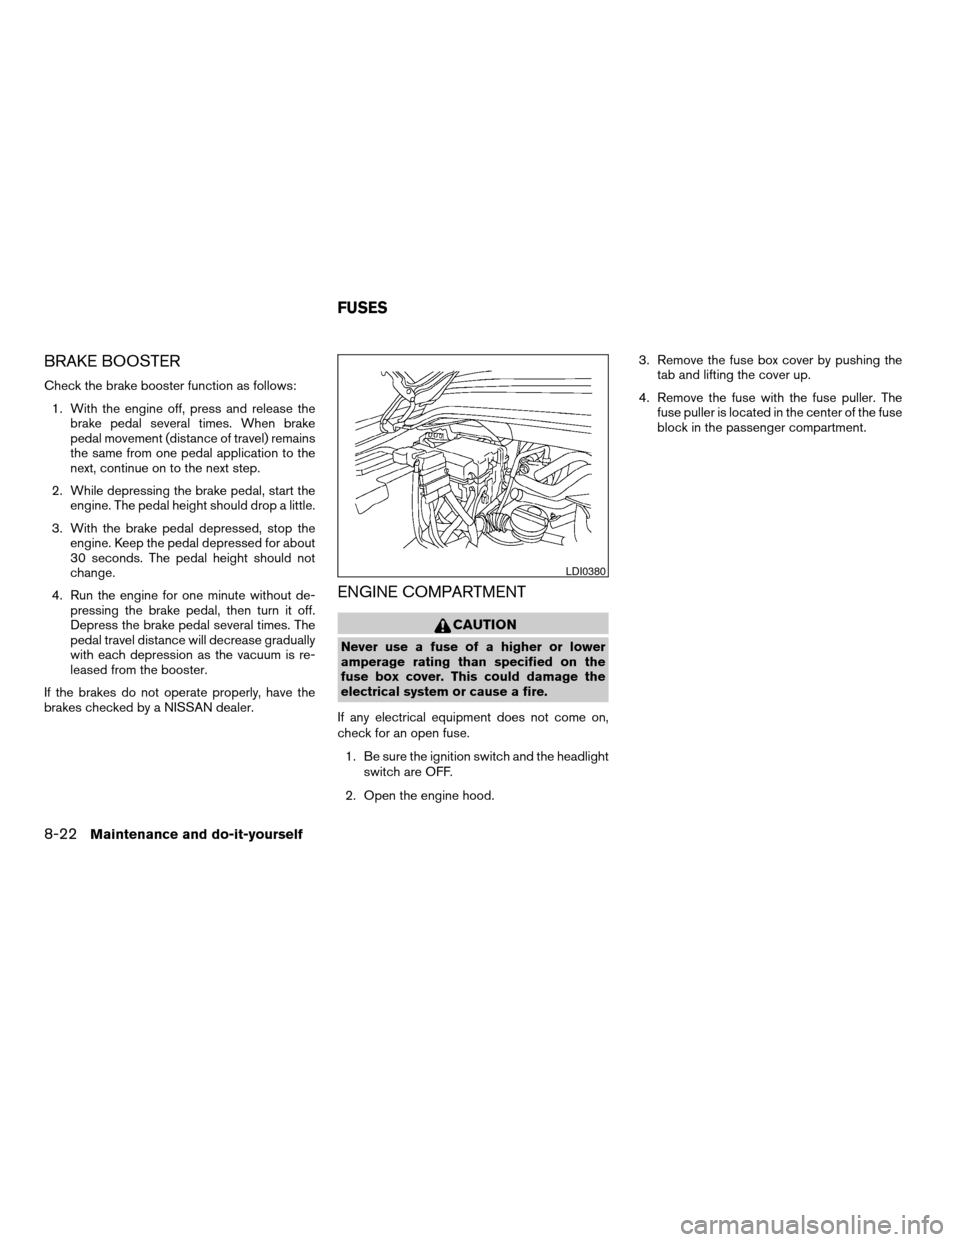
2. Open the engine hood.3. Remove the fuse box cover by pushing the
tab and lifting the cover up.
4. Remove the fuse with the fuse puller. The
fuse puller is located in the center of the fuse
block in the passenger compartment.
LDI0380
FUSES
8-22Maintenance and do-it-yourself
ZREVIEW COPY:Ð2004 Pathfinder Armada
(wzw)
Owners Manual(owners)ÐUSA English(nna)
01/14/04Ðtbrooks
X
Page 286 of 344

Replace the battery in the keyfob as follows:
s1Open the lid using a coin.
s2Remove the battery.
s3Install a new battery with the “+” facing
down.Recommended battery: Sanyo CR2025 or
equivalent.
s4Close the lid securely.5. Press the LOCK button, then the UNLOCK
button two or three times to check the key-
fob operation.
If the battery is removed for any reason
other than replacement, perform step 5.
cAn improperly disposed battery can
hurt the environment. Always confirm
local regulations for battery disposal.
cThe keyfob is water-resistant; how-
ever, if it does get wet, immediately
wipe completely dry.
cThe operational range of the keyfob
extends to approximately 33 ft (10 m)
from the vehicle. This range may vary
with conditions.
FCC Notice:
Changes or modifications not expressly ap-
proved by the manufacturer for compliance
could void the user’s authority to operate
the equipment.
This device complies with Part 15 of the FCC
Rules and RSS-210 of Industry Canada.
Operation is subject to the following two
conditions: (1) This device may not cause
harmful interference, and (2) this device
must accept any interference received, in-
cluding interference that may cause undes-
ired operation of the device.
LPD0214
KEYFOB BATTERY REPLACEMENT
8-24Maintenance and do-it-yourself
ZREVIEW COPY:Ð2004 Pathfinder Armada
(wzw)
Owners Manual(owners)ÐUSA English(nna)
01/14/04Ðtbrooks
X
Page 288 of 344
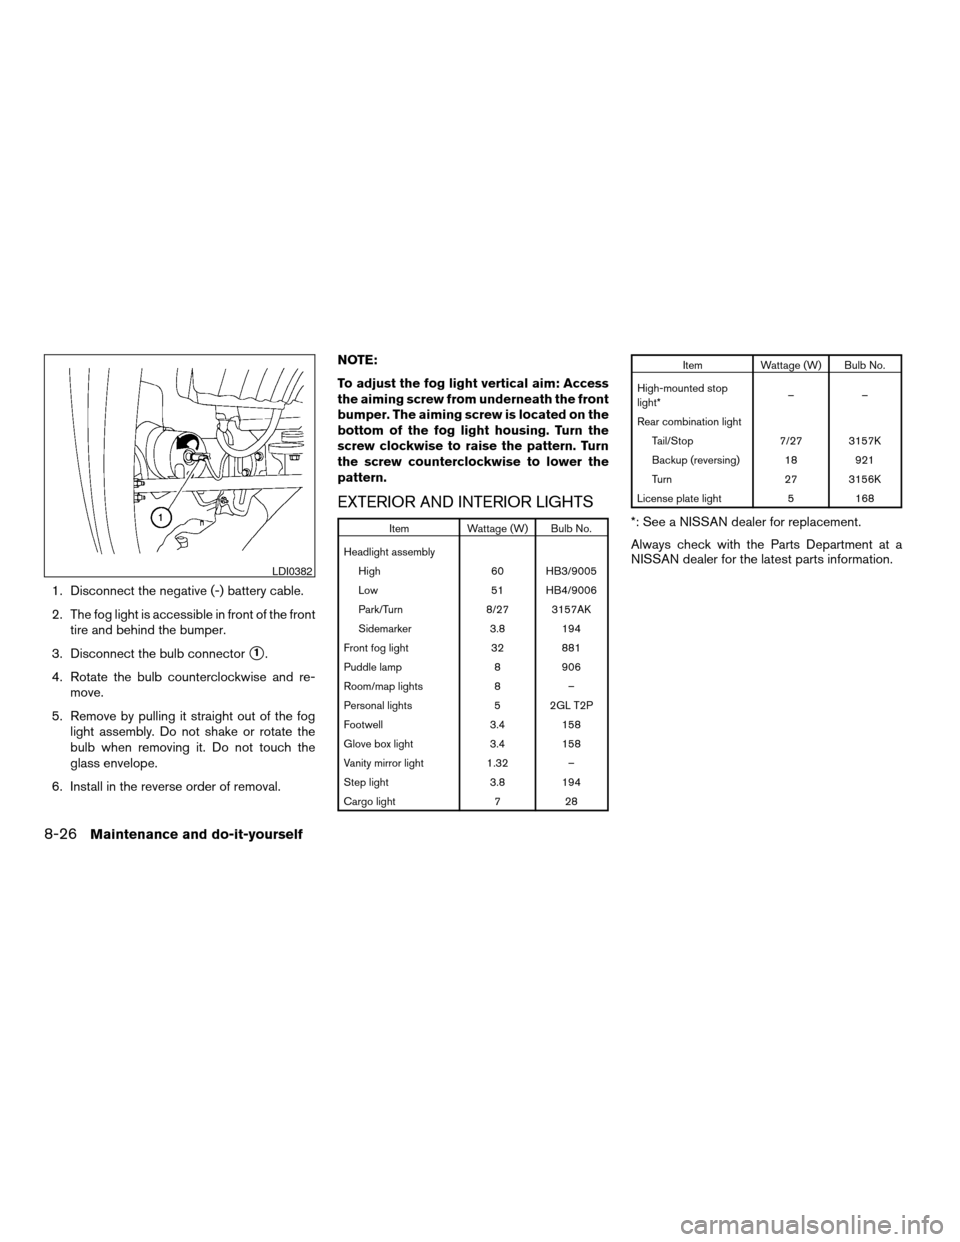
1. Disconnect the negative (-) battery cable.
2. The fog light is accessible in front of the front
tire and behind the bumper.
3. Disconnect the bulb connector
s1.
4. Rotate the bulb counterclockwise and re-
move.
5. Remove by pulling it straight out of the fog
light assembly. Do not shake or rotate the
bulb when removing it. Do not touch the
glass envelope.
6. Install in the reverse order of removal.NOTE:
To adjust the fog light vertical aim: Access
the aiming screw from underneath the front
bumper. The aiming screw is located on the
bottom of the fog light housing. Turn the
screw clockwise to raise the pattern. Turn
the screw counterclockwise to lower the
pattern.
EXTERIOR AND INTERIOR LIGHTS
Item Wattage (W) Bulb No.
Headlight assembly
High 60 HB3/9005
Low 51 HB4/9006
Park/Turn 8/27 3157AK
Sidemarker 3.8 194
Front fog light 32 881
Puddle lamp 8 906
Room/map lights 8 –
Personal lights 5 2GL T2P
Footwell 3.4 158
Glove box light 3.4 158
Vanity mirror light 1.32 –
Step light 3.8 194
Cargo light 7 28
Item Wattage (W) Bulb No.
High-mounted stop
light*––
Rear combination light
Tail/Stop 7/27 3157K
Backup (reversing) 18 921
Turn 27 3156K
License plate light 5 168
*: See a NISSAN dealer for replacement.
Always check with the Parts Department at a
NISSAN dealer for the latest parts information.
LDI0382
8-26Maintenance and do-it-yourself
ZREVIEW COPY:Ð2004 Pathfinder Armada
(wzw)
Owners Manual(owners)ÐUSA English(nna)
01/14/04Ðtbrooks
X
Page 309 of 344
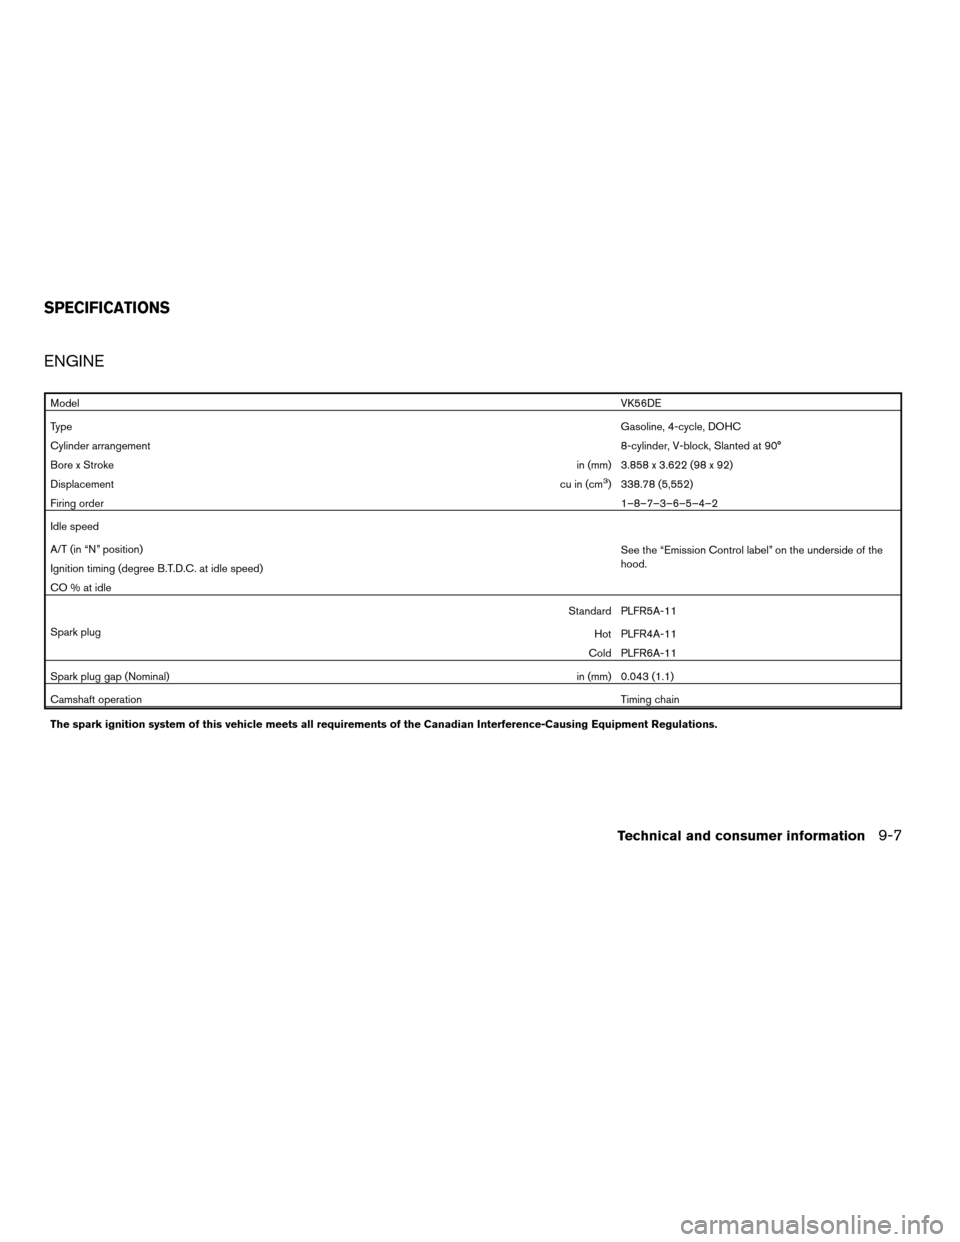
ENGINE
ModelVK56DE
TypeGasoline, 4-cycle, DOHC
Cylinder arrangement8-cylinder, V-block, Slanted at 90°
Bore x Strokein (mm) 3.858 x 3.622 (98 x 92)
Displacementcu in (cm
3) 338.78 (5,552)
Firing order1–8–7–3–6–5–4–2
Idle speed
See the “Emission Control label” on the underside of the
hood. A/T (in “N” position)
Ignition timing (degree B.T.D.C. at idle speed)
CO % at idle
Spark plugStandard PLFR5A-11
Hot PLFR4A-11
Cold PLFR6A-11
Spark plug gap (Nominal)in (mm) 0.043 (1.1)
Camshaft operationTiming chain
The spark ignition system of this vehicle meets all requirements of the Canadian Interference-Causing Equipment Regulations.
SPECIFICATIONS
Technical and consumer information9-7
ZREVIEW COPY:Ð2004 Pathfinder Armada
(wzw)
Owners Manual(owners)ÐUSA English(nna)
01/14/04Ðtbrooks
X
Page 319 of 344
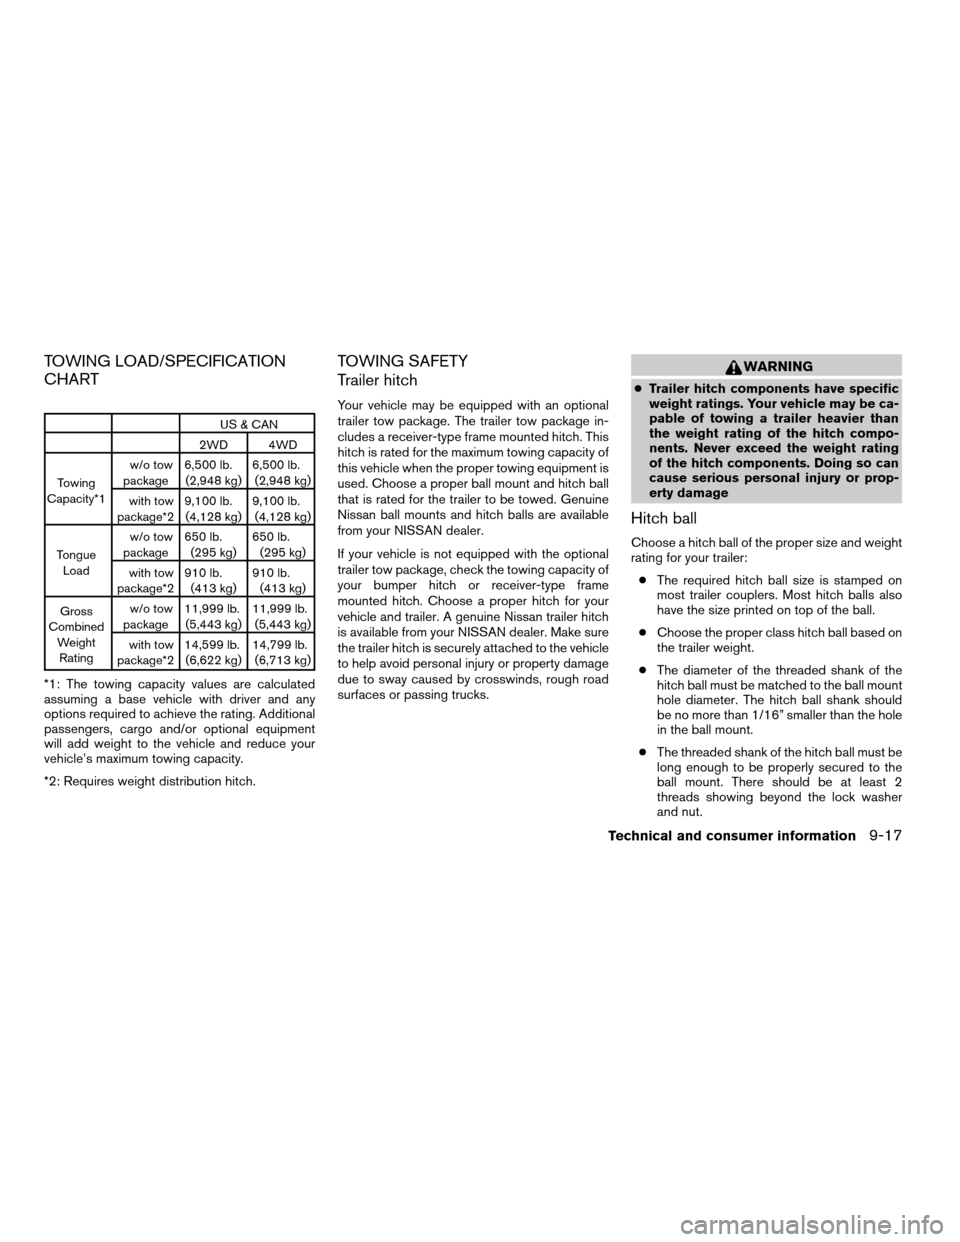
TOWING LOAD/SPECIFICATION
CHART
US & CAN
2WD 4WD
Towing
Capacity*1w/o tow
package6,500 lb.
(2,948 kg)6,500 lb.
(2,948 kg)
with tow
package*29,100 lb.
(4,128 kg)9,100 lb.
(4,128 kg)
Tongue
Loadw/o tow
package650 lb.
(295 kg)650 lb.
(295 kg)
with tow
package*2910 lb.
(413 kg)910 lb.
(413 kg)
Gross
Combined
Weight
Ratingw/o tow
package11,999 lb.
(5,443 kg)11,999 lb.
(5,443 kg)
with tow
package*214,599 lb.
(6,622 kg)14,799 lb.
(6,713 kg)
*1: The towing capacity values are calculated
assuming a base vehicle with driver and any
options required to achieve the rating. Additional
passengers, cargo and/or optional equipment
will add weight to the vehicle and reduce your
vehicle’s maximum towing capacity.
*2: Requires weight distribution hitch.
TOWING SAFETY
Trailer hitch
Your vehicle may be equipped with an optional
trailer tow package. The trailer tow package in-
cludes a receiver-type frame mounted hitch. This
hitch is rated for the maximum towing capacity of
this vehicle when the proper towing equipment is
used. Choose a proper ball mount and hitch ball
that is rated for the trailer to be towed. Genuine
Nissan ball mounts and hitch balls are available
from your NISSAN dealer.
If your vehicle is not equipped with the optional
trailer tow package, check the towing capacity of
your bumper hitch or receiver-type frame
mounted hitch. Choose a proper hitch for your
vehicle and trailer. A genuine Nissan trailer hitch
is available from your NISSAN dealer. Make sure
the trailer hitch is securely attached to the vehicle
to help avoid personal injury or property damage
due to sway caused by crosswinds, rough road
surfaces or passing trucks.
WARNING
cTrailer hitch components have specific
weight ratings. Your vehicle may be ca-
pable of towing a trailer heavier than
the weight rating of the hitch compo-
nents. Never exceed the weight rating
of the hitch components. Doing so can
cause serious personal injury or prop-
erty damage
Hitch ball
Choose a hitch ball of the proper size and weight
rating for your trailer:
cThe required hitch ball size is stamped on
most trailer couplers. Most hitch balls also
have the size printed on top of the ball.
cChoose the proper class hitch ball based on
the trailer weight.
cThe diameter of the threaded shank of the
hitch ball must be matched to the ball mount
hole diameter. The hitch ball shank should
be no more than 1/16” smaller than the hole
in the ball mount.
cThe threaded shank of the hitch ball must be
long enough to be properly secured to the
ball mount. There should be at least 2
threads showing beyond the lock washer
and nut.
Technical and consumer information9-17
ZREVIEW COPY:Ð2004 Pathfinder Armada
(wzw)
Owners Manual(owners)ÐUSA English(nna)
01/14/04Ðtbrooks
X
Page 324 of 344

cAlways secure items in the trailer to prevent
load shift while driving.
cLoad the trailer so approximately 60% of the
trailer load is in the front half and 40% is in
the back half.
cCheck your hitch, trailer tire pressure, ve-
hicle tire pressure, trailer light operation, and
trailer wheel lug nuts every time you attach a
trailer to the vehicle.
cBe certain your rearview mirrors conform to
all federal, state or local regulations. If not,
install any mirrors required for towing before
driving the vehicle.
Trailer towing tips
In order to gain skill and an understanding of the
vehicle’s behavior, you should practice turning,
stopping and backing up in an area which is free
from traffic. Steering stability and braking perfor-
mance will be somewhat different than under
normal driving conditions.
cAlways secure items in the trailer to prevent
load shift while driving.
cAvoid abrupt starts, acceleration or stops.
cAvoid sharp turns or lane changes.
cAlways drive your vehicle at a moderate
speed.cWhen backing up, hold the bottom of the
steering wheel with one hand. Move your
hand in the direction in which you want the
trailer to go. Make small corrections and
back slowly. If possible, have someone
guide you when you are backing.
cAlways block the wheels on both vehicle and
trailer when parking. Parking on a slope is
not recommended; however, if you must do
so, first block the wheels and apply the park-
ing brake, and then move the transmission
shift selector lever into the P (Park) position.
If you move the shift selector lever to the P
(Park) position before blocking the wheels
and applying the parking brake, transmission
damage could occur.
cWhen going down a hill, shift into a lower gear
and use the engine braking effect. When go-
ing up a long grade, downshift the transmis-
sion to a lower gear and reduce speed to
reduce chances of engine overloading and/or
overheating. However, for long steep grades,
do not stay in 1st gear when driving above 35
MPH (56 km/h) or 2nd gear when driving
above 58 MPH (93 km/h) .
cIf the engine coolant rises to an extremely
high temperature when the air conditioner
system is on, turn off the air conditioner.
Coolant heat can be additionally vented byopening the windows, switching the fan
control to high and setting the temperature
control to the HOT position.
cTrailer towing requires more fuel than normal
circumstances.
cAvoid towing a trailer for your vehicle’s first
500 miles (805 km) .
cFor the first 500 miles (805 km) that you do
tow, do not drive over 50 MPH (80 km/h) .
cHave your vehicle serviced more often than
at intervals specified in the recommended
Maintenance Schedule in the “NISSAN Ser-
vice and Maintenance Guide”.
cWhen making a turn, your trailer wheels will
be closer to the inside of the turn than your
vehicle wheels. To compensate for this,
make a larger than normal turning radius
during the turn.
cCrosswinds and rough roads will adversely
affect vehicle/trailer handling, possibly caus-
ing vehicle sway. When being passed by
larger vehicles, be prepared for possible
changes in crosswinds that could affect ve-
hicle handling. If swaying does occur, firmly
grip the steering wheel, steer straight ahead,
and immediately (but gradually) reduce ve-
hicle speed. This combination will help sta-
bilize the vehicle. Never increase speed.
9-22Technical and consumer information
ZREVIEW COPY:Ð2004 Pathfinder Armada
(wzw)
Owners Manual(owners)ÐUSA English(nna)
01/14/04Ðtbrooks
X
Page 331 of 344

10 Index
4WD warning light...............2-15
A
Adjusting pedal position............3-17
Air bag
(See supplemental restraint system).....1-14
Air bag system
Front (See supplemental front impact
air bag system)...............1-22
Air bag warning labels.............1-30
Air bag warning light...........1-30, 2-16
Air cleaner housing filter............8-16
Air conditioner
Air conditioner operation..........4-15
Air conditioner service...........4-24
Air conditioner specification label.....9-11
Air conditioner system refrigerant and
lubrication recommendations........9-6
Heater and air conditioner
controls................4-12, 4-21
Rear seat air conditioner..........4-23
Servicing air conditioner..........4-24
Air flow charts..................4-16
Alarm system
(See vehicle security system).........2-20
Anchor point locations.............1-59
Antenna.....................4-41
Anti-lock brake system (ABS).........5-25
Anti-lock brake warning light..........2-13
Audible reminders................2-19Audio system..................4-24
AM-FM-SAT radio with compact disc (CD)
changer...................4-32
Compact Disc (CD) changer.......4-35
Compact disc (CD) player.........4-30
FM-AM radio with compact disc (CD)
player....................4-27
Radio....................4-24
Rear audio controls.............4-40
Steering wheel audio control switch. . . .4-38
Autolight switch.................2-25
Automatic
Automatic drive positioner.........3-20
Automatic power window switch.....2-48
Automatic transmission position indicator
light.....................2-17
Driving with automatic transmission.....5-9
Transmission selector lever lock release .5-13
Automatic anti-glare inside mirror.......3-18
Automatic transmission fluid temperature
gauge.......................2-7
AUX jack.....................4-37
B
Back door....................3-10
Back door release...............3-14
Battery......................8-13
Charge warning light............2-14
Battery replacement
(See remote keyless entry system). . . .3-9, 8-24Before starting the engine............5-8
Belts (See drive belts).............8-14
Brake
Anti-lock brake system (ABS).......5-25
Brake booster................8-22
Brake fluid..................8-11
Brake light (See stop light).........8-26
Brake pedal.................8-21
Brake system................5-24
Brake warning light.............2-13
Brake wear indicators........2-19, 8-21
Parking brake check............8-21
Parking brake operation..........5-14
Self-adjusting brakes............8-21
Break-in schedule................5-16
Brightness control
Instrument panel..............2-27
Bulb check/instrument panel..........2-12
Bulb replacement................8-26
C
Capacities and recommended fuel/lubricants .9-2
Captain’s chair adjustment (2nd row)......1-5
Car phone or CB radio.............4-50
Cargo light...................2-53
Cargo net....................2-44
Cargo (See vehicle loading information) . . .9-12
CD care and cleaning.............4-38
CD changer (See audio system)........4-35
CD player (See audio system).........4-30
ZREVIEW COPY:Ð2004 Pathfinder Armada
(wzw)
Owners Manual(owners)ÐUSA English(nna)
01/21/04Ðtbrooks
X