2004 NISSAN ALTIMA power steering fluid
[x] Cancel search: power steering fluidPage 14 of 264

QR25DE engine
1. Power steering fluid reservoir (P. 8-14)
2. Spark plug caps (P. 8-19)
3. Brake fluid reservoir (P. 8-15)
4. Clutch fluid reservoir (M/T model)
(P. 8-15)
5. Air cleaner (P. 8-20)
6. Battery (P. 8-17)
7. Fuse/fusible link box (P. 8-26)
8. Transmission dipstick (A/T models)
(P. 8-13)
9. Engine oil dipstick (P. 8-9)
10. Radiator cap (P. 8-8)
11. Fuse block (P. 8-26)
12. Windshield washer fluid reservoir
(P. 8-16)
13. Coolant reservoir (P. 8-8)
14. Engine oil filler cap (P. 8-9)
NOTE:
Engine cover removed for clarity.
See the page number indicated in paren-
theses for operating details.
LDI0073
ENGINE COMPARTMENT LOCATIONS
0-8Illustrated table of contents
ZREVIEW COPY:Ð2004 Altima(l30)
Owners Manual(owners)ÐUSA English(nna)
10/13/03Ðtbrooks
X
Page 15 of 264

VQ35DE engine
1. Power steering fluid reservoir (P. 8-14)
2. Engine oil filler cap (P. 8-9)
3. Brake fluid reservoir (P. 8-15)
4. Clutch fluid reservoir (M/T model)
(P. 8-15)
5. Air cleaner (P. 8-20)
6. Battery (P. 8-17)
7. Fuse/fusible link box (P. 8-26)
8. Transmission dipstick (A/T models)
(P. 8-13)
9. Engine oil dipstick (P. 8-9)
10. Radiator cap (P. 8-8)
11. Fuse block (P. 8-26)
12. Windshield washer fluid reservoir
(P. 8-16)
13. Coolant reservoir (P. 8-8)
NOTE:
Engine cover removed for clarity.
See the page number indicated in paren-
theses for operating details.
WDI0400
Illustrated table of contents0-9
ZREVIEW COPY:Ð2004 Altima(l30)
Owners Manual(owners)ÐUSA English(nna)
10/13/03Ðtbrooks
X
Page 167 of 264

The brake system has two separate hydraulic
circuits. If one circuit malfunctions, you will still
have braking at two wheels.
BRAKE PRECAUTIONS
Vacuum assisted brakes
The brake booster aids braking by using engine
vacuum. If the engine stops, you can stop the
vehicle by depressing the brake pedal. However,
greater foot pressure on the brake pedal will be
required to stop the vehicle and stopping dis-
tance will be longer.
Using the brakes
Avoid resting your foot on the brake pedal while
driving. This will overheat the brakes, wear out the
brake linings and pads faster, and reduce gas
mileage.
To help reduce brake wear and to prevent the
brakes from overheating, reduce speed and
downshift to a lower gear before going down a
slope or long grade. Overheated brakes may
reduce braking performance and could result in
loss of vehicle control.
WARNING
cWhile driving on a slippery surface, be
careful when braking, accelerating or
downshifting. Abrupt braking or accel-
erating could cause the wheels to skid
and result in an accident.
cIf the engine is not running or is turned
off while driving, the power assist for
the brakes will not work. Braking will be
harder.
Parking brake bedding
The parking brake shoes must be “bedded down”
whenever the stopping effect of the parking
brake is weakened or whenever the parking brake
shoes and/or drum/rotors are replaced, in order
to assure the best brake performance.
This procedure is described in the vehicle service
manual and can be performed by a NISSAN
dealer.
Wet brakes
When the vehicle is washed or driven through
water, the brakes may get wet. As a result, your
braking distance will be longer and the vehicle
may pull to one side during braking.
To dry the brakes, drive the vehicle at a safe
speed while lightly pressing the brake pedal toheat up the brakes. Do this until the brakes return
to normal. Avoid driving the vehicle at high
speeds until the brakes function correctly.
ANTI-LOCK BRAKE SYSTEM (ABS)
(if so equipped)
The anti-lock brake system controls the brakes so
the wheels do not lock when braking abruptly or
when braking on slippery surfaces. The system
detects the rotation speed at each wheel and
varies the brake fluid pressure to prevent each
wheel from locking and sliding. By preventing
wheel lockup, the system helps the driver main-
tain steering control and helps to minimize swerv-
ing and spinning on slippery surfaces.
Using the system
Depress the brake pedal and hold it down.
WARNING
Do not pump the brake pedal. Doing so
may result in increased stopping
distances.
Normal operation
The anti-lock brake system does not operate at
speeds below3-6MPH(5-10km/h) . (The
speeds vary according to road conditions.)
BRAKE SYSTEM
Starting and driving5-17
ZREVIEW COPY:Ð2004 Altima(l30)
Owners Manual(owners)ÐUSA English(nna)
10/13/03Ðtbrooks
X
Page 191 of 264

8 Maintenance and do-it-yourself
Maintenance requirements..........................8-2
General maintenance..............................8-2
Explanation of general maintenance items.........8-2
Maintenance precautions...........................8-5
Engine compartment check locations................8-6
Engine cooling system.............................8-8
Checking engine coolant level...................8-8
Changing engine coolant........................8-9
Engine oil.........................................8-9
Checking engine oil level........................8-9
Changing engine oil...........................8-10
Changing engine oil filter.......................8-12
Automatic transmission fluid.......................8-13
Temperature conditions for checking.............8-13
Power steering fluid...............................8-14
Brake and clutch fluid.............................8-15
Brake fluid....................................8-15
Clutch fluid...................................8-15
Window washer fluid.............................8-16
Window washer fluid reservoir..................8-16
Battery..........................................8-17
Jump starting.................................8-18
Drive belts.......................................8-18
Spark plugs......................................8-19Replacing spark plugs.........................8-19
Air cleaner.......................................8-20
In-cabin microfilter (if so equipped)..............8-21
Windshield wiper blades..........................8-24
Cleaning.....................................8-24
Replacing....................................8-24
Parking brake and brake pedal.....................8-25
Checking parking brake........................8-25
Checking brake pedal..........................8-25
Brake booster.................................8-26
Fuses...........................................8-26
Engine compartment...........................8-26
Passenger compartment.......................8-28
Keyfob battery replacement........................8-29
Lights...........................................8-30
Headlights....................................8-30
Front park/turn/sidemarker light.................8-30
Fog lights (if so equipped)......................8-30
Exterior and interior lights.......................8-31
Wheels and tires.................................8-38
Tire pressure..................................8-38
Types of tires..................................8-39
Tire chains....................................8-40
Changing wheels and tires.....................8-40
ZREVIEW COPY:Ð2004 Altima(l30)
Owners Manual(owners)ÐUSA English(nna)
10/13/03Ðtbrooks
X
Page 194 of 264

Windshield wiper and washer*Check that
the wipers and washer operate properly and that
the wipers do not streak.
Windshield defrosterCheck that the air
comes out of the defroster outlets properly and in
sufficient quantity when operating the heater or
air conditioner.
Under the hood and vehicle
The maintenance items listed here should be
checked periodically (for example, each time you
check the engine oil or refuel) .
Automatic transmission fluid level*Check
the level after putting the selector lever in P with
the engine idling at operating temperature.
Battery*Check the fluid level in each cell. It
should be between the MAX and MIN lines. Ve-
hicles operated in high temperatures or under
severe conditions require frequent checks of the
battery fluid level.
Brake and clutch fluid levels*Make sure that
the brake and clutch fluid level is between the
MIN and MAX lines on the reservoir.
Engine coolant level*Check the coolant level
when the engine is cold.
Engine drive belts*Make sure the drive belts
are not frayed, worn, cracked or oily.Engine oil level*Check the level after parking
the vehicle on a level surface with the engine off.
Wait more than 10 minutes for the oil to drain
back into the oil pan.
Exhaust systemMake sure there are no loose
supports, cracks or holes. If the sound of the
exhaust seems unusual or there is a smell of
exhaust fumes, immediately have the exhaust
system inspected by a NISSAN dealer. See the
carbon monoxide warning in the “Starting and
driving” section of this manual.
Fluid leaksCheck under the vehicle for fuel, oil,
water or other fluid leaks after the vehicle has
been parked for a while. Water dripping from the
air conditioner after use is normal. If you should
notice any leaks or if gasoline fumes are evident,
check for the cause and have it corrected imme-
diately.
Power steering fluid level* and linesCheck
the level when the fluid is cold, with the engine
off. Check the lines for proper attachment, leaks,
cracks, etc.
Radiator and hosesCheck the front of the
radiator and clean off any dirt, insects, leaves,
etc., that may have accumulated. Make sure the
hoses have no cracks, deformation, rot or loose
connections.UnderbodyThe underbody is frequently ex-
posed to corrosive substances such as those
used on icy roads or to control dust. It is very
important to remove these substances from the
underbody, otherwise rust may form on the floor
pan, frame, fuel lines and exhaust system. At the
end of winter, the underbody should be thor-
oughly flushed with plain water, in those areas
where mud and dirt may have accumulated. See
the “Appearance and care” section of this
manual.
Windshield washer fluid*Check that there is
adequate fluid in the reservoir.
8-4Maintenance and do-it-yourself
ZREVIEW COPY:Ð2004 Altima(l30)
Owners Manual(owners)ÐUSA English(nna)
10/13/03Ðtbrooks
X
Page 196 of 264

QR25DE engine
1. Power steering fluid reservoir
2. Spark plug caps
3. Brake fluid reservoir
4. Clutch fluid reservoir (M/T model)
5. Air cleaner
6. Battery
7. Fuel/Fusible link box
8. Transmission dipstick (A/T models)
9. Engine oil dipstick
10. Radiator cap
11. Fuse block
12. Windshield washer fluid reservoir
13. Coolant reservoir
14. Engine oil filler cap
NOTE:
Engine cover removed for clarity.
LDI0073
ENGINE COMPARTMENT CHECK
LOCATIONS
8-6Maintenance and do-it-yourself
ZREVIEW COPY:Ð2004 Altima(l30)
Owners Manual(owners)ÐUSA English(nna)
10/13/03Ðtbrooks
X
Page 197 of 264

VQ35DE engine
1. Power steering fluid reservoir
2. Engine oil filler cap
3. Brake fluid reservoir
4. Clutch fluid reservoir (M/T model)
5. Air cleaner
6. Battery
7. Fuse/Fusible link box
8. Transmission dipstick (A/T models)
9. Engine oil dipstick
10. Radiator cap
11. Fuse block
12. Windshield washer fluid reservoir
13. Coolant reservoir
NOTE:
Engine cover removed for clarity.
WDI0400
Maintenance and do-it-yourself8-7
ZREVIEW COPY:Ð2004 Altima(l30)
Owners Manual(owners)ÐUSA English(nna)
10/13/03Ðtbrooks
X
Page 204 of 264

4. Remove the dipstick and wipe it clean with
lint-free paper.
5. Reinsert the dipstick into the dipstick tube
as far as it will go.
6. Remove the dipstick and note the reading. If
the automatic transmission fluid level is
within the normal operating range
sB,no
additional fluid is required. If the fluid level is
low
sAadd fluid through the dipstick tube.
CAUTION
DO NOT OVERFILL. Use ONLY Genuine
Nissan Matic D ATF (Continental U.S. and
Alaska) or Canada NISSAN Automatic
Transmission Fluid. Dexron™ III/Mercon™
or equivalent may also be used. Outside
the continental United States and Alaska
contact a NISSAN dealership for more in-
formation regarding suitable fluids, in-
cluding recommended brand(s) of
Dexron™ III/Mercon™ automatic trans-
mission fluid.
NOTE:
If the vehicle has been driven for a long
time at high speeds, or in city traffic in hot
weather, or if it is being used to pull a
trailer, the fluid level cannot be read accu-
rately. You should wait until the fluid has
cooled down (about 30 minutes) before
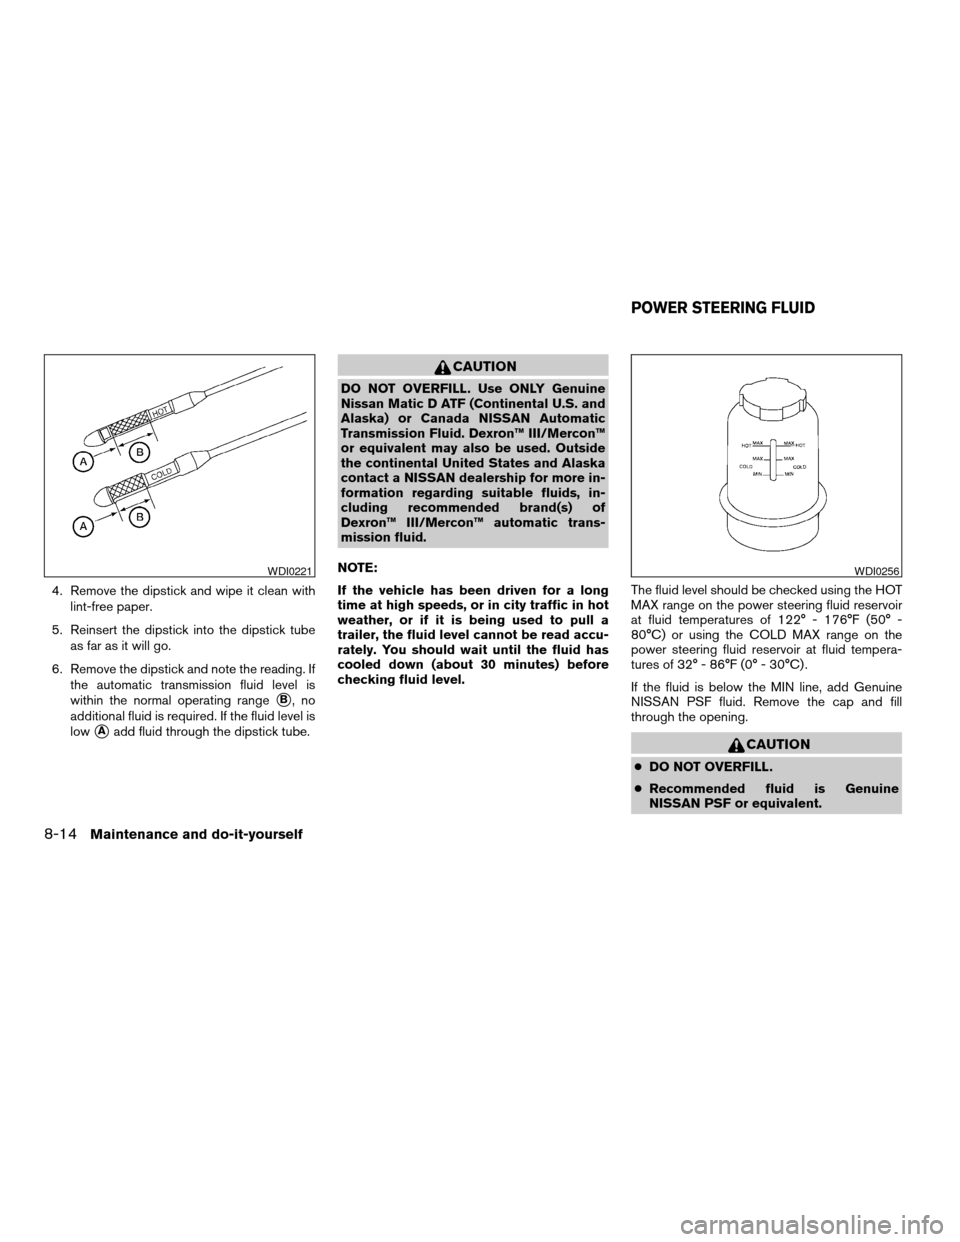
checking fluid level.The fluid level should be checked using the HOT
MAX range on the power steering fluid reservoir
at fluid temperatures of 122° - 176°F (50° -
80°C) or using the COLD MAX range on the
power steering fluid reservoir at fluid tempera-
tures of 32° - 86°F (0° - 30°C) .
If the fluid is below the MIN line, add Genuine
NISSAN PSF fluid. Remove the cap and fill
through the opening.
CAUTION
cDO NOT OVERFILL.
cRecommended fluid is Genuine
NISSAN PSF or equivalent.
WDI0221WDI0256
POWER STEERING FLUID
8-14Maintenance and do-it-yourself
ZREVIEW COPY:Ð2004 Altima(l30)
Owners Manual(owners)ÐUSA English(nna)
10/13/03Ðtbrooks
X