Page 212 of 314

212 Practical hintsWhere will I find ...?
�Where will I find ...?First aid kit
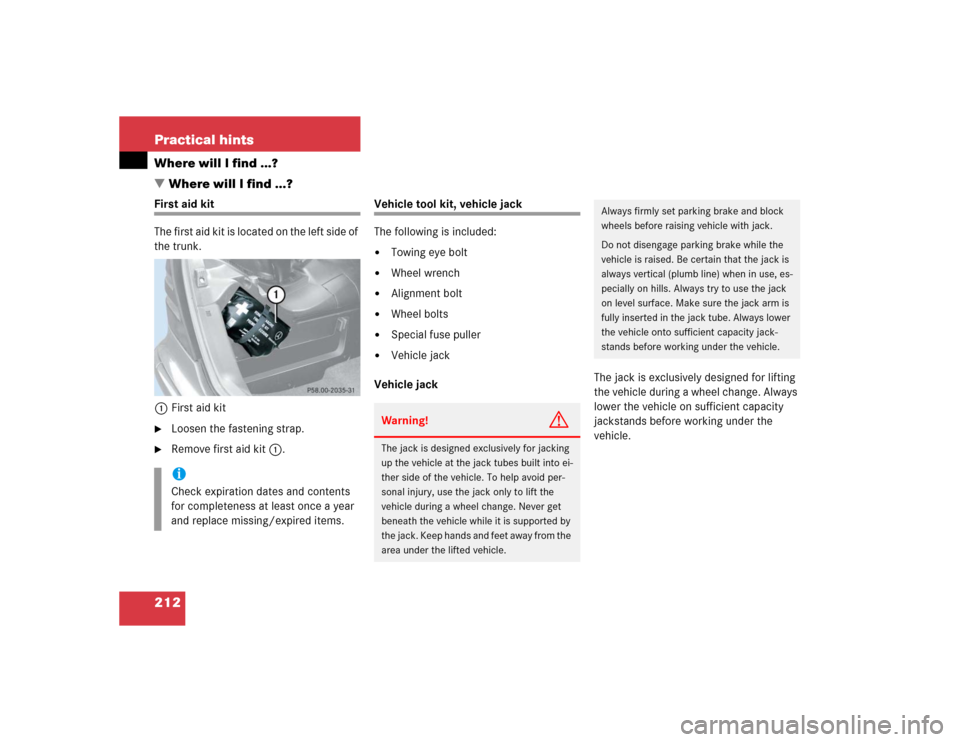
The first aid kit is located on the left side of
the trunk.
1First aid kit�
Loosen the fastening strap.
�
Remove first aid kit1.
Vehicle tool kit, vehicle jack
The following is included:�
Towing eye bolt
�
Wheel wrench
�
Alignment bolt
�
Wheel bolts
�
Special fuse puller
�
Vehicle jack
Vehicle jackThe jack is exclusively designed for lifting
the vehicle during a wheel change. Always
lower the vehicle on sufficient capacity
jackstands before working under the
vehicle.
iCheck expiration dates and contents
for completeness at least once a year
and replace missing/expired items.
Warning!
G
The jack is designed exclusively for jacking
up the vehicle at the jack tubes built into ei-
ther side of the vehicle. To help avoid per-
sonal injury, use the jack only to lift the
vehicle during a wheel change. Never get
beneath the vehicle while it is supported by
the jack. Keep hands and feet away from the
area under the lifted vehicle.
Always firmly set parking brake and block
wheels before raising vehicle with jack.
Do not disengage parking brake while the
vehicle is raised. Be certain that the jack is
always vertical (plumb line) when in use, es-
pecially on hills. Always try to use the jack
on level surface. Make sure the jack arm is
fully inserted in the jack tube. Always lower
the vehicle onto sufficient capacity jack-
stands before working under the vehicle.
Page 246 of 314

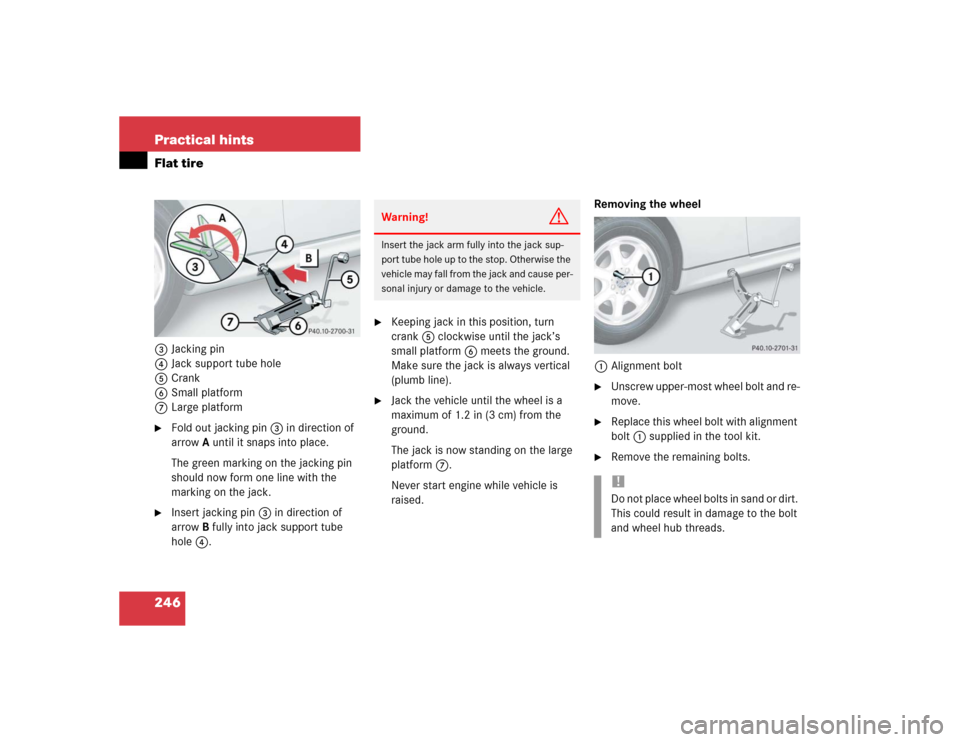
246 Practical hintsFlat tire3Jacking pin
4Jack support tube hole
5Crank
6Small platform
7Large platform�
Fold out jacking pin3 in direction of
arrowA until it snaps into place.
The green marking on the jacking pin
should now form one line with the
marking on the jack.
�
Insert jacking pin3 in direction of
arrowB fully into jack support tube
hole4.
�
Keeping jack in this position, turn
crank5 clockwise until the jack’s
small platform6 meets the ground.
Make sure the jack is always vertical
(plumb line).
�
Jack the vehicle until the wheel is a
maximum of 1.2 in (3 cm) from the
ground.
The jack is now standing on the large
platform7.
Never start engine while vehicle is
raised.Removing the wheel
1Alignment bolt
�
Unscrew upper-most wheel bolt and re-
move.
�
Replace this wheel bolt with alignment
bolt1 supplied in the tool kit.
�
Remove the remaining bolts.
Warning!
G
Insert the jack arm fully into the jack sup-
port tube hole up to the stop. Otherwise the
vehicle may fall from the jack and cause per-
sonal injury or damage to the vehicle.
!Do not place wheel bolts in sand or dirt.
This could result in damage to the bolt
and wheel hub threads.
Page 248 of 314

248 Practical hintsFlat tire
�
Unscrew the alignment bolt, install last
wheel bolt and tighten slightly.
Lowering the vehicle
�
Lower vehicle by turning crank coun-
terclockwise until vehicle is resting ful-
ly on its own weight.
�
Pull the jack out of the jack support
tube.
�
Install jack tube cover.1 - 5Wheel bolts
�
Tighten the five wheel bolts evenly, fol-
lowing the diagonal sequence illustrat-
ed (1to5), until all bolts are tight.
Observe a tightening torque of 80 lb-ft
(110 Nm).
Warning!
G
Always replace wheel bolts that are dam-
aged or rusted.
Never apply oil or grease to wheel bolts.
Damaged wheel hub threads should be re-
paired immediately. Do not continue to drive
under these circumstances! Contact an au-
thorized Mercedes-Benz Center or call
Roadside Assistance.
Incorrect mounting bolts or improperly
tightened mounting bolts can cause the
wheel to come off. This could cause an acci-
dent. Be sure to use the correct mounting
bolts.
Warning!
G
Use only genuine equipment
Mercedes-Benz wheel bolts. Other wheel
bolts may come loose.
Do not tighten the wheel bolts when the ve-
hicle is raised. Otherwise the vehicle could
tip over.
Warning!
G
Have the tightening torque checked after
changing a wheel. The wheels could come
loose if they are not tightened to a torque of
80 lb-ft (110 Nm).
Page 287 of 314

287 Technical terms
ABS
(A
ntilock B
rake S
ystem)
Prevents the wheels from locking up
during braking so that the vehicle can
continue to be steered.
Alignment bolt
Metal pin with thread. The centering
pin is an aid used when changing a tire
to align the wheel with the wheel hub.
BabySmart
TM airbag deactivation
system
This system detects if a special system
compatible child restraint seat is in-
stalled on the passenger seat. The sys-
tem will automatically deactivate the
passenger front airbag when such a
seat is properly installed (indicator
lamp7 in the center console lights
up). See your authorized
Mercedes-Benz Center for availability.BabySmart
TM compatible child seats
Special restraint system for children.
The sensor system for the passenger
seat prevents deployment of the pas-
senger front airbag if a BabySmart
TM
compatible child seat is installed.
BAS
(B
rake A
ssist S
ystem)
System for potentially reducing braking
distances in emergency braking situa-
tions. The system is activated when it
senses an emergency based on how
fast the brake is applied.
CAC
(C
ustomer A
ssistance C
enter)
Mercedes-Benz customer service cen-
ter, which can help you with any ques-
tions about your vehicle and provide
assistance in the event of a break-
down.CAN system
(C
ontroller A
rea N
etwork)
Data bus network serving to control ve-
hicle functions such as door locking or
windshield wiping.
Cockpit
All instruments, switches, buttons and
indicator/warning lamps in the passen-
ger compartment needed for vehicle
operation and monitoring.
Collapsible tire
An especially compact spare tire that
must be inflated with a provided air
pump before using. It should only be
used to bring the vehicle to the nearest
service station.
Cruise control
Driving convenience system for auto-
matically maintaining the vehicle speed
set by the driver.
Page 310 of 314

310 IndexV
Vehicle
Battery 251
Locking 23
Lowering 248
Proper use of 14
Towing 256, 258, 259
Unlocking 23
Unlocking in an emergency 216
Vehicle battery 251
Vehicle care 192
Cloth upholstery 197
Cup holder 196
Engine cleaning 194
Gear selector lever 196
Hard plastic trim items 196
Headlamps 194
Instrument cluster 196
Leather upholstery 197
Light alloy wheels 196
Ornamental moldings 194
Paintwork 193Plastic and rubber parts 197
Power washer 193
Rear window cleaning 195
Seat belts 197
Steering wheel 196
Tail lamps 194
Tar stains 193
Turn signals 194
Vehicle washing 194
Window cleaning 195
Wiper blades 195
Vehicle Identification Number (VIN) 266
Vehicle lighting
Checking 173
Vehicle tool kit 212
Alignment bolt 212
Spare fuses 212
Special fuse puller 212
Towing eye bolt 212
Vehicle jack 212
Wheel bolts 212
Wheel wrench 212
Vehicle washing 194VIN (Vehicle Identification Number) 266,
291
Voice control system* 25, 291
Hands-free microphone 25
W
Warning sounds
Drivers seat belts 57
Parking brake 42
Warranty coverage 265
Washer fluid see Windshield washer fluid
Washing the vehicle 192
Wear pattern (tires) 187
Weights 276
Wheel change
Tightening torque 248
Wheels
Rotating 187
Tires and wheels 185
Wind screen 135, 291
Installing 135
Removing 135