Page 19 of 314
19 At a glance
Cockpit
Item
Page
1
Combination switch�
Turn signals
43
�
Windshield wipers
44
�
High beam
43
2
Cruise control lever
136
3
Instrument cluster
20, 89
4
Voice control system* le-
ver (see separate operat-
ing instructions)
5
Steering lock with ignition
29
6
Overhead control panel
25
7
Glove box
139
8
Center console
23, 24
9
Horn
a
Steering wheel adjustment
handle*
34
b
Hood lock release
174
c
Exterior lamp switch
43
Page 174 of 314

174 OperationEngine compartment
�Engine compartmentHood
Opening
1Hood release
�
Pull hood release1 downwards.
The hood is unlocked.
2Lever for opening the hood
�
Push lever2 on the hood upwards.
�
Open the hood (do not pull up on the
lever) and then release it.
The hood will be automatically held
open at shoulder height by gas-filled
struts.
Warning!
G
Do not pull the release lever while the vehi-
cle is in motion. Otherwise the hood could
be forced open by passing air flow.
!To avoid damage to the windshield wip-
ers or hood, never open the hood if the
wiper arms are folded forward away
from the windshield.
Warning!
G
To help prevent personal injury, stay clear of
moving parts when the hood is open and the
engine is running. Make sure the hood is
properly closed before driving. When closing
the hood, use extreme caution not to catch
hands or fingers.
The radiator fan may continue to run for ap-
proximately 30 seconds or even restart af-
ter the engine has been turned off. Stay
clear of fan blades.
Page 205 of 314

205 Practical hints
What to do if …
Problem
Possible cause
Suggested solution
?
The yellow “CHECK ENGINE”
malfunction indicator lamp
comes on while driving.
There is a malfunction in:�
The fuel management system
�
The ignition system
�
The emission control system
�
Systems which affect emissions
Such malfunctions may result in excessive
emissions values and may switch the engine
to its limp-home (emergency operation)
mode.
�
Have the vehicle checked as soon as
possible by an authorized
Mercedes-Benz Center.
An on-board diagnostic connector is
used by the service station to link the
vehicle to the shop diagnostics sys-
tem. It allows the accurate identifica-
tion of system malfunctions through
the readout of diagnostic trouble
codes. It is located in the passenger
compartment near the engine hood
release.
The fuel cap is not closed tight.
�
Check the fuel cap.
Your gas tank is empty.
�
After refuelling, start the engine three
or four times in succession.
The limp-home mode is canceled. You do
not need to have your vehicle checked.
<
The red seat belt warning lamp il-
luminates for a brief period after
starting the engine.
The warning lamp reminds you to fasten seat
belts.
�
Fasten your seat belt.
Page 229 of 314
229 Practical hints
Replacing bulbs
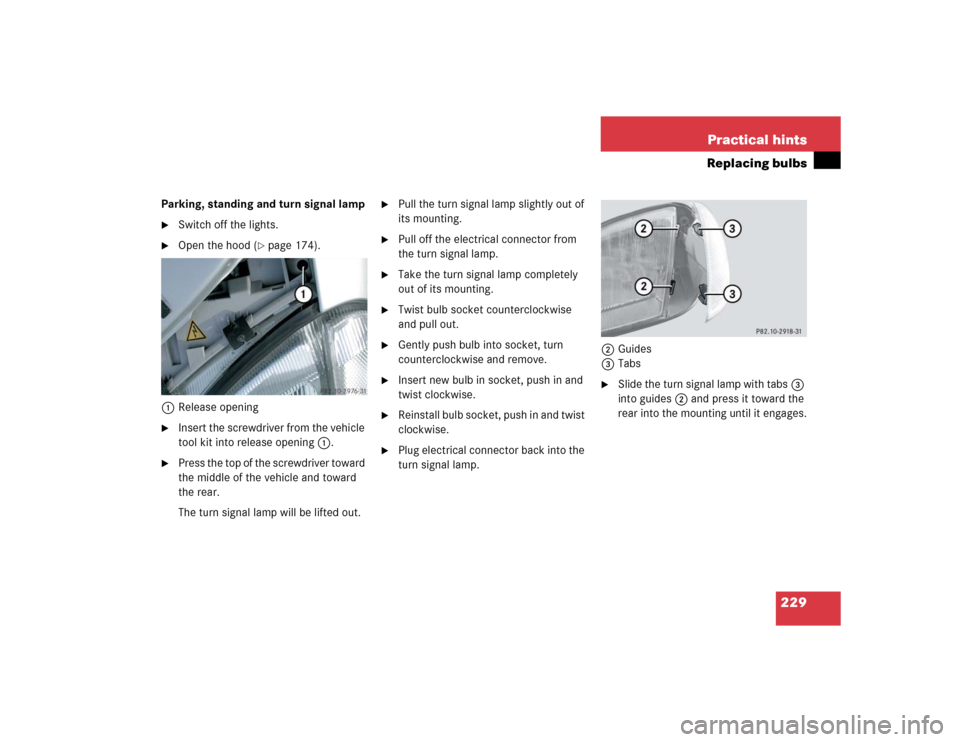
Parking, standing and turn signal lamp�
Switch off the lights.
�
Open the hood (
�page 174).
1Release opening
�
Insert the screwdriver from the vehicle
tool kit into release opening1.
�
Press the top of the screwdriver toward
the middle of the vehicle and toward
the rear.
The turn signal lamp will be lifted out.
�
Pull the turn signal lamp slightly out of
its mounting.
�
Pull off the electrical connector from
the turn signal lamp.
�
Take the turn signal lamp completely
out of its mounting.
�
Twist bulb socket counterclockwise
and pull out.
�
Gently push bulb into socket, turn
counterclockwise and remove.
�
Insert new bulb in socket, push in and
twist clockwise.
�
Reinstall bulb socket, push in and twist
clockwise.
�
Plug electrical connector back into the
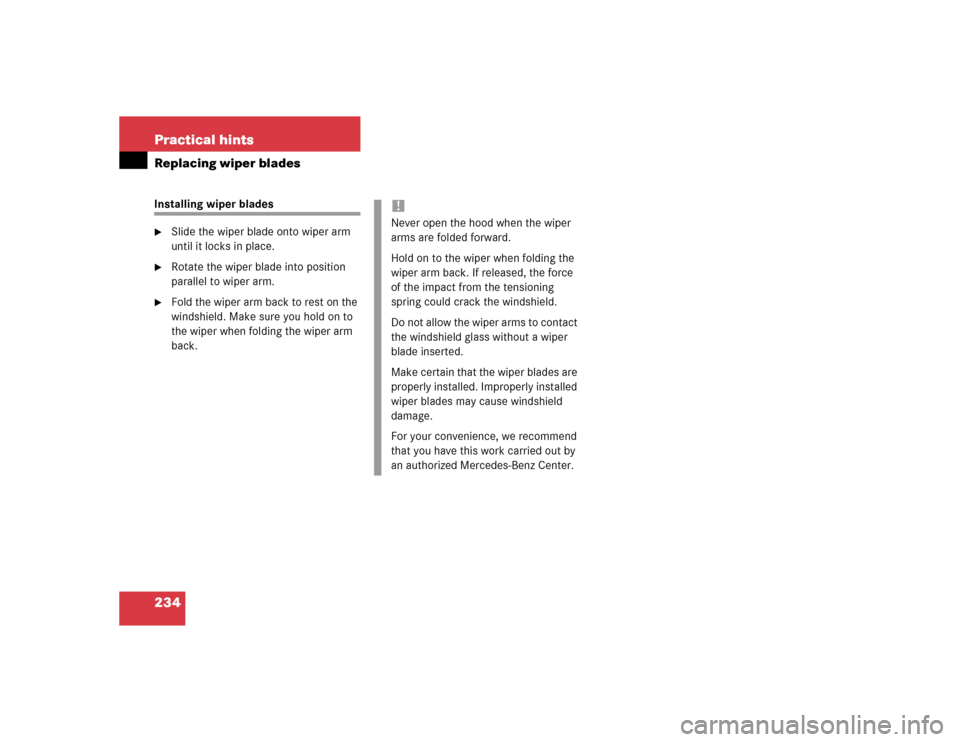
turn signal lamp.2Guides
3Tabs
�
Slide the turn signal lamp with tabs3
into guides2 and press it toward the
rear into the mounting until it engages.
Page 234 of 314
234 Practical hintsReplacing wiper bladesInstalling wiper blades�
Slide the wiper blade onto wiper arm
until it locks in place.
�
Rotate the wiper blade into position
parallel to wiper arm.
�
Fold the wiper arm back to rest on the
windshield. Make sure you hold on to
the wiper when folding the wiper arm
back.
!Never open the hood when the wiper
arms are folded forward.
Hold on to the wiper when folding the
wiper arm back. If released, the force
of the impact from the tensioning
spring could crack the windshield.
Do not allow the wiper arms to contact
the windshield glass without a wiper
blade inserted.
Make certain that the wiper blades are
properly installed. Improperly installed
wiper blades may cause windshield
damage.
For your convenience, we recommend
that you have this work carried out by
an authorized Mercedes-Benz Center.