Page 106 of 314

106 Controls in detailClimate controlAir recirculation mode
Switch to air recirculation mode to prevent
unpleasant odors from entering the vehicle
from the outside. This setting cuts off the
intake of outside air and recirculates the
air in the passenger compartment.
Activating�
Press buttonÐ (
�page 102).
The indicator lamp on theÐ button
comes on.Deactivating
�
Press buttonÐ (
�page 102).
The indicator lamp on theÐ button
goes out.
The air recirculation mode is deactivated
automatically:
�
after five minutes if the outside temper-
ature is below approximately 41°F
(5 °C)
�
after five minutes if the air conditioning
is turned off
�
after 30 minutes if the outside temper-
ature is above approximately 41°F
(5 °C)
At outside temperatures above 79°F
(26 °C), the system will not automatically
switch back to outside air. A quantity of
outside air is added after approximately
30 minutes.
Air conditioning
The air conditioning is operational while
the engine is running and cools the interior
air to the temperature set by the operator.
Warning!
G
When the outside temperature is below
41°F (5°C), only switch to air recirculation
mode for short periods to prevent window
fogging.iThe air recirculation mode is activated
automatically at high outside tempera-
tures.
iCondensation may drip out from under-
neath the vehicle. This is normal and
not an indication of a malfunction.
Page 107 of 314
 function of the climate
control system. The air in the vehicle will
then no longer b")
107 Controls in detail
Climate control
Deactivating
It is possible to deactivate the air condi-
tioning (cooling) function of the climate
control system. The air in the vehicle will
then no longer be cooled or dehumidified. �
Press button± (
�page 102).
The indicator lamp on the button±
lights up.Activating
Moist air can fog up the windows. You can
dehumidify the air with the air condition-
ing.
�
Press button± again (
�page 102).
The indicator lamp on the ±button
goes out.
The air conditioning uses the refrigerant
R134a. This refrigerant is free of CFCs
which are harmful to the ozone layer.
Residual heat
With the engine switched off, it is possible
to continue to heat or ventilate the interior
for up to 30 minutes. This feature makes
use of the residual heat produced by the
engine.
Activating�
Turn the key in the steering lock to
position1or0, or remove it from the
starter switch.
�
Press buttonÐ (
�page 102).
The indicator lamp on the buttonÐ
comes on.
Warning!
G
While driving, deactivate the air conditioning
only temporarily to prevent window fogging.
Page 110 of 314
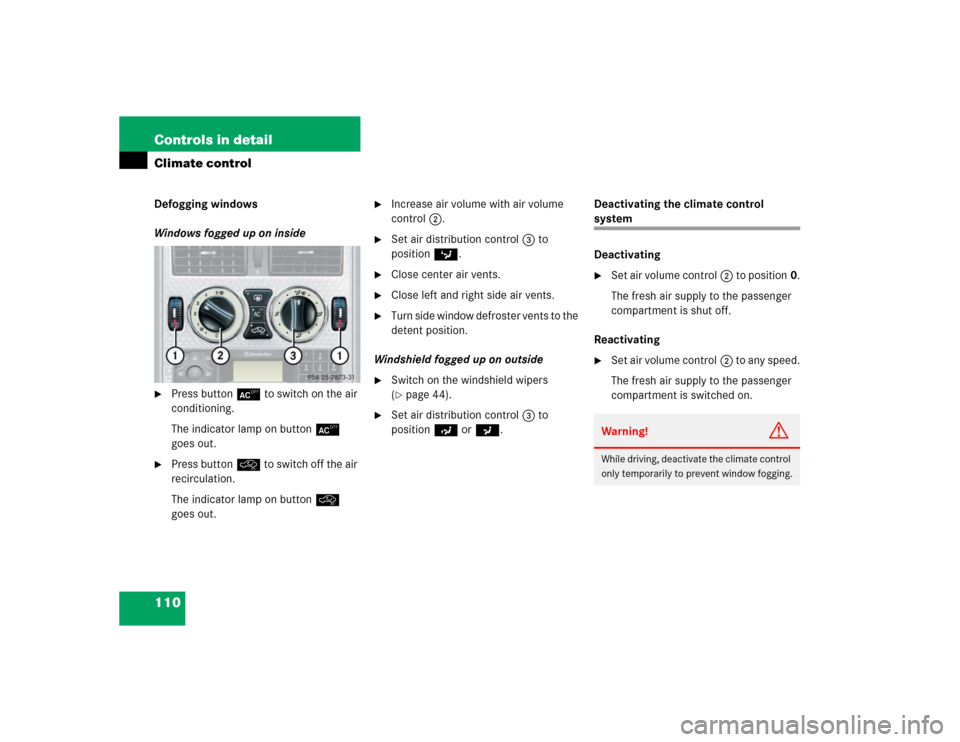
110 Controls in detailClimate controlDefogging windows
Windows fogged up on inside�
Press button± to switch on the air
conditioning.
The indicator lamp on button±
goes out.
�
Press buttonÐ to switch off the air
recirculation.
The indicator lamp on buttonÐ
goes out.
�
Increase air volume with air volume
control2.
�
Set air distribution control3 to
positionc.
�
Close center air vents.
�
Close left and right side air vents.
�
Turn side window defroster vents to the
detent position.
Windshield fogged up on outside
�
Switch on the windshield wipers
(�page 44).
�
Set air distribution control3 to
positiond ora.Deactivating the climate control
system
Deactivating�
Set air volume control2 to position0.
The fresh air supply to the passenger
compartment is shut off.
Reactivating
�
Set air volume control2 to any speed.
The fresh air supply to the passenger
compartment is switched on.Warning!
G
While driving, deactivate the climate control
only temporarily to prevent window fogging.
Page 111 of 314

111 Controls in detail
Audio system
�Audio system
Audio and telephone, operation
These instructions are intended to help
you become acquainted with your
Mercedes-Benz car radio. They contain
useful tips and a detailed description of the
user functions.
Operating safety
Warning!
G
In order to avoid distraction which could
lead to an accident, the driver should enter
system settings with the vehicle at a stand-
still and operate the systems only when road
and traffic conditions permit. Always pay full
attention to traffic conditions first before
operating system controls while driving.
Bear in mind that at a speed of just 30 mph
(approximately 50 km / h), your car is cover-
ing a distance of approximately 50 feet (ap-
proximately 14 m) every second.
Warning!
G
Any alterations made to electronic compo-
nents can cause malfunctions.
The radio, cassette deck, CD changer*, tele-
phone* and voice control system* are inter-
connected. When one of the components is
not operational or has not been
removed / replaced properly, the function of
other components may be impaired.
This conditions might seriously impair the
operating safety of your vehicle.
We recommend that you have any service
work on electronic components carried out
by an authorized Mercedes-Benz Center.
Page 121 of 314

121 Controls in detail
Audio system
CD mode
General notes on CD mode
Should excessively high temperatures oc-
cur while the audio system is in CD mode, TEMP HIGH
will appear in the display and
muting will take place. The unit will then
switch back to radio mode until the tem-
perature has decreased to a safe operating
level.
Should excessively low temperatures oc-
cur while the audio system is in CD mode,
TEMP LOW
will be displayed, but the CD will
still be played. It will be sensitive to skip-
ping if you are driving over rough roads.
Handle CDs carefully to prevent interfer-
ence during playback.
Avoid fingerprints and dust on CDs. Do not
write on the CDs or apply any label to the
CDs.
Clean CDs from time to time with a com-
mercially available cleaning cloth. No sol-
vents, anti-static sprays, etc. should be
used. Replace the CD in its container after use.
Protect CDs from heat and direct sunlight.
Only use CDs which bear the label shown
and that conform to the compact disc dig-
ital audio standard (IEC 60908). You can
therefore only use CDs with a maximum
thickness of 1.3 mm.
!Your CD drive has been designed to
play CDs which correspond to the EN
60908 standard. If you insert thicker
data carriers, e.g. ones that have data
on both sides (one side with DVD data,
the other side with audio data), they
cannot be ejected and will damage the
drive.
Use of CDs which do not meet this
standard may cause damage to the CD
changer. Do not play single-CDs
(80 mm) with an adapter.
Warning!
G
The CD changer* is a Class 1 laser product.
There is a danger of invisible laser radiation
if the cover is opened or damaged.
Do not remove the cover. The CD changer*
does not contain any parts which can be ser-
viced by the user. For safety reasons, have
any service work which may be necessary
performed only by qualified personnel.
Page 128 of 314

128 Controls in detailPower windows
�Power windowsOpening and closing the windows
The side windows can be opened and
closed electrically. The switches for the
side windows are on the lower part of the
center console.
1Power window switch
�
Turn key in the steering lock to
position1 or2.Opening the windows
�
Press switch at the symbolk to the
resistance point.
The corresponding window will move
downwards until you release the
switch.
Closing the windows
�
Press switch at the symbolj.
The corresponding window will move
upwards until you release the switch.
Fully opening the windows (Ex-
press-open)
�
Press switch at the symbolk past
the resistance point and release.
The corresponding window opens com-
pletely.
Stopping windows
�
Briefly press switch atk orj.
Warning!
G
When closing the windows, make sure there
is no danger of anyone being harmed by the
closing procedure.
The closing of the door windows can be im-
mediately halted by releasingj.
When leaving the vehicle, always remove the
key from steering lock and lock your vehicle.
Do not leave children unattended in the ve-
hicle, or with access to an unlocked vehicle.
Unsupervised use of vehicle equipment can
cause an accident and/or serious personal
injury.iThe power windows can also be
operated with the retractable hardtop
switch (
�page 132).
Page 130 of 314

130 Controls in detailRetractable hardtop
�Retractable hardtopOpening and closing the retractable hardtop
For safety reasons, the retractable hardtop
can only be opened and closed when the
vehicle is standing still.
Warning!
G
Before operating the switch for the retract-
able hardtop make sure no persons are in-
jured by the moving parts (retractable
hardtop, roof frame, and trunk lid) due to in-
attention.
Hands must never be placed near the roof
frame, upper windshield area, retractable
hardtop, shelf behind roll bars, or trunk lid
while the retractable hardtop is being raised
or lowered. Serious personal injury may oc-
cur.
If potential danger exists, release the re-
tractable hardtop switch. This immediately
interrupts the raising or lowering procedure.
You then can operate the retractable hard-
top switch to raise or lower the retractable
hardtop away from the danger zone.
!Never sit or place heavy objects on the
rear shelf. Doing so could cause dam-
age to the retractable hardtop and the
rear shelf.Warning!
G
When leaving the vehicle, always remove the
key from the steering lock and lock the vehi-
cle. Do not leave children unattended in the
vehicle, or with access to an unlocked vehi-
cle. Unsupervised use of vehicle equipment
may cause an accident and/or serious per-
sonal injury.
Page 132 of 314

132 Controls in detailRetractable hardtopOpening the retractable hardtopRetractable hardtop switchBefore pulling on the retractable hardtop
switch, you must ensure�
the parking brake is engaged
(�page 47)
�
the luggage cover is closed, see lug-
gage cover
�
the trunk lid is closed
�
the ignition is switched on (key in steer-
ing lock position2)
�
Pull the retractable hardtop switch as
indicated by the arrow until the retract-
able hardtop is completely lowered into
its trunk storage compartment and the
indicator lamp in the retractable hard-
top switch goes out.
If you continuously pull on the retract-
able hardtop switch or release and pull
it again within approximately
30 seconds, the door windows will
close.
However, the door windows can also be
closed/opened later on.
�
Pull on the retractable hardtop switch
twice forward/backward. Pull on the
switch only briefly the first time. The
second time, pull on the switch until
the door windows have reached the de-
sired height.
The rear quarter windows cannot be raised
with the retractable hardtop lowered.
iFor safety reasons, the retractable
hardtop cannot be opened while driv-
ing.
Make sure the retractable hardtop is
dry before you open it. Otherwise water
may enter the trunk interior.!If the indicator lamp in the retractable
hardtop switch flashes slowly, a mal-
function has occurred in the system.
If the indicator lamp in the retractable
hardtop switch flashes rapidly, the
trunk lid and/or luggage cover may be
open and need to be closed.Warning!
G
To prevent possible accidents, drive the ve-
hicle only with the retractable hardtop either
completely closed and locked, or fully low-
ered into its storage compartment.