Page 80 of 314

80 Controls in detailLocking and unlockingActivating�
Check that the ignition is switched on.
All the lamps in the instrument cluster
light up.
�
Press and hold upper part1 of the
central locking switch for approximate-
ly five seconds.
The automatic central locking is acti-
vated.
Deactivating
�
Check that the ignition is switched on.
All the lamps in the instrument cluster
light up.
�
Press and hold lower part2 of the
central locking switch for approximate-
ly five seconds.
The automatic central locking is deacti-
vated.
Locking and unlocking from the inside
You can lock or unlock the vehicle from in-
side using the central locking switch. This
can be useful, for example, if you want to
unlock the passenger door from the inside
or want to lock the vehicle before starting
to drive.Locking
�
Press upper part1 of central locking
switch (
�page 79).
If all the doors are closed, the vehicle
locks.
Unlocking
�
Press lower part2 of central locking
switch (
�page 79).
The vehicle unlocks.
Warning!
G
When leaving the vehicle, always remove the
key from the steering lock and lock the vehi-
cle. Do not leave children unattended in the
vehicle, or with access to an unlocked vehi-
cle. Unsupervised use of vehicle equipment
may cause an accident and/or serious per-
sonal injury.
iYou can open a locked door from the
inside. Open door only when conditions
are safe to do so.
If the vehicle was previously centrally
locked using the remote control, it will
not unlock using the central locking
switch.
Page 83 of 314
83 Controls in detail
Lighting
�Lighting
For notes on how to switch on the head-
lamps and use the turn signals, see the
“Getting started” section (
�page 43).
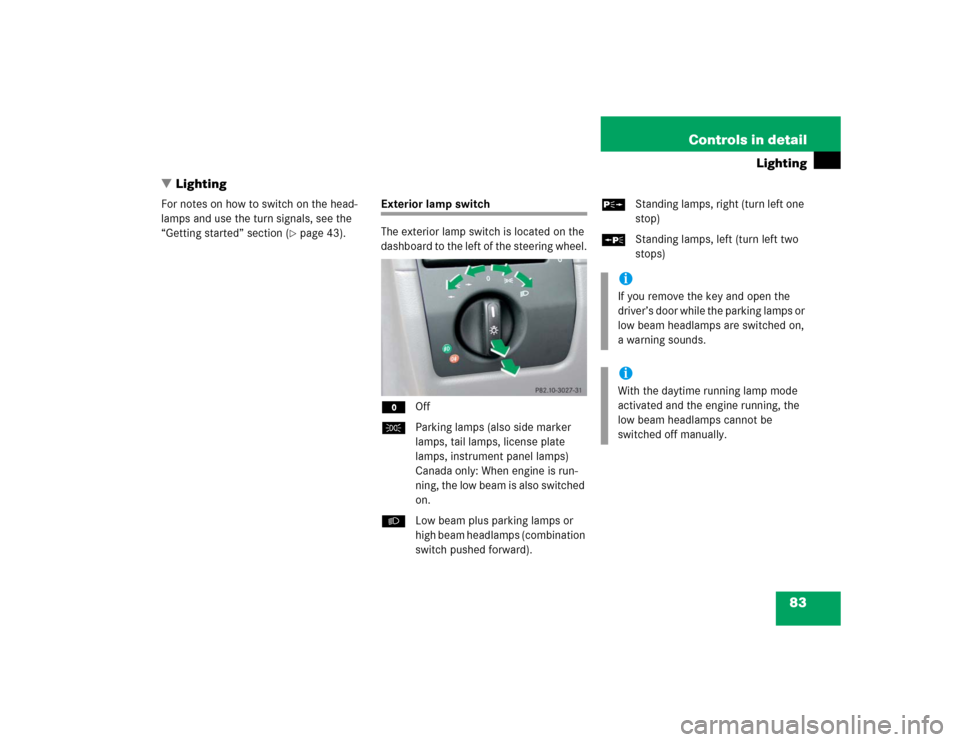
Exterior lamp switch
The exterior lamp switch is located on the
dashboard to the left of the steering wheel.
MOff
CParking lamps (also side marker
lamps, tail lamps, license plate
lamps, instrument panel lamps)
Canada only: When engine is run-
ning, the low beam is also switched
on.
BLow beam plus parking lamps or
high beam headlamps (combination
switch pushed forward).ˆStanding lamps, right (turn left one
stop)
‚Standing lamps, left (turn left two
stops)
iIf you remove the key and open the
driver’s door while the parking lamps or
low beam headlamps are switched on,
a warning sounds.iWith the daytime running lamp mode
activated and the engine running, the
low beam headlamps cannot be
switched off manually.
Page 85 of 314
85 Controls in detail
Lighting
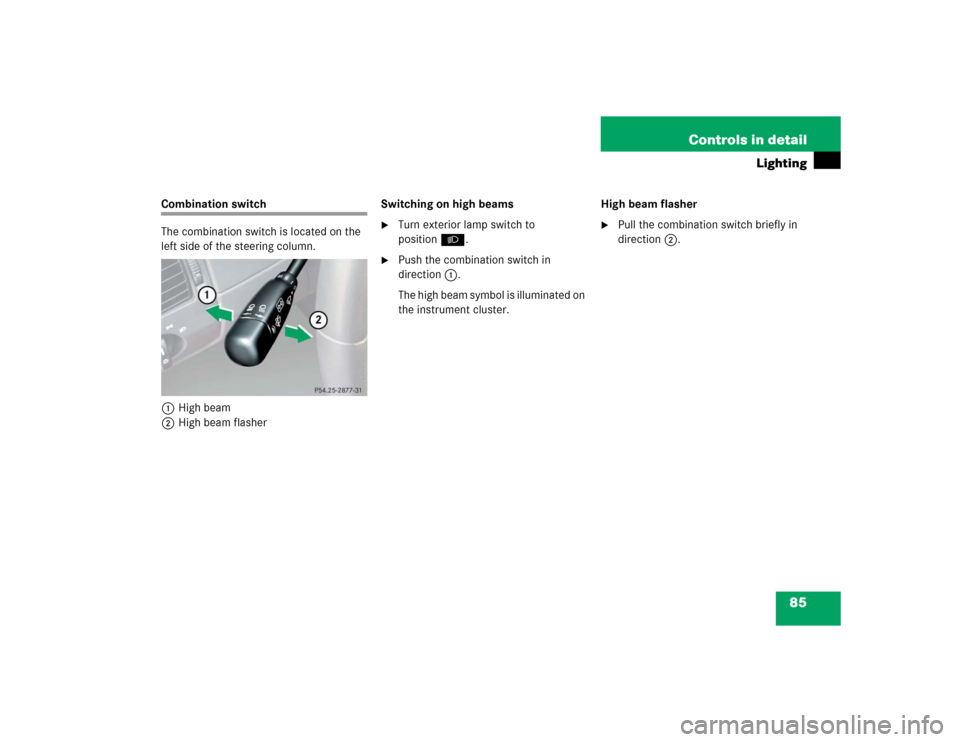
Combination switch
The combination switch is located on the
left side of the steering column.
1High beam
2High beam flasherSwitching on high beams
�
Turn exterior lamp switch to
positionB.
�
Push the combination switch in
direction1.
The high beam symbol is illuminated on
the instrument cluster.High beam flasher
�
Pull the combination switch briefly in
direction2.
Page 89 of 314
.
The instrume")
89 Controls in detail
Instrument cluster
�Instrument cluster
A full view illustration of the instrument
cluster can be found in the “At a glance”
section of this manual (
�page 20).
The instrument cluster is activated when
you
�
open the driver’s door
�
turn the key in steering lock to
position2 (
�page 29)
�
press left knob3 (
�page 20)
Instrument cluster illumination
Instrument lamps
To brighten illumination�
Turn knob3 (
�page 20) clockwise.
The instrument lamps will brighten.
To dim illumination
�
Turn knob3 counterclockwise.
The instrument lamps will dim.
Display illumination
�
Press knob3.
With key removed or in steering lock
position0 or1 (
�page 29), the display
is illuminated for a short time.
Coolant temperature gauge
Under normal driving conditions, the cool-
ant temperature may rise to 248°F
(120°C). The coolant temperature may
climb to the red marking:�
at high outside temperatures
�
during stop-and-go traffic
�
when driving on hilly terrain
The engine should not be operated with
the coolant temperature in the red zone.
Doing so may cause serious engine dam-
age which is not covered by the
Mercedes-Benz Limited Warranty.
Page 90 of 314
 once
with key in steering lock position2
(
�page 29) until the trip odometer is
reset
or
�
Press left knob3 (
�pa")
90 Controls in detailInstrument cluster
Trip odometer�
Press left knob3 (
�page 20) once
with key in steering lock position2
(
�page 29) until the trip odometer is
reset
or
�
Press left knob3 (
�page 20) twice
with key removed or in steering lock
position0 or1 (
�page 29) until the
trip odometer is reset.
Tachometer
The red marking on the tachometer
(�page 20) denotes excessive engine
speed.
To help protect the engine, the fuel supply
is interrupted if the engine is operated
within the red marking.
Warning!
G
Driving when your engine is badly overheat-
ed can cause some fluids which may have
leaked into the engine compartment to
catch fire. You could be seriously burned.
Steam from an overheated engine can cause
serious burns and can occur just by opening
the engine hood. Stay away from the engine
if you see or hear steam coming from it.
Turn off the engine, get out of the vehicle
and do not stand near the vehicle until the
engine has cooled down.
!Avoid driving at excessive engine
speeds, as it may result in serious en-
gine damage that is not covered by the
Mercedes-Benz Limited Warranty.
Page 92 of 314
.
Do not exceed the maximum s")
92 Controls in detailManual transmission
�Manual transmissionInformation on driving with a manual trans-
mission is found in the “Getting started”
section (
�page 40).
Do not exceed the maximum speed in the
individual gears. Refer to tachometer
(
�page 90) for engine speeds.
Shifting into reverse�
Stop the vehicle completely.
�
Pull gearshift lever up and shift in
Rreverse.
Warning!
G
For vehicles equipped with a manual trans-
mission, getting out of your vehicle with the
gearshift lever not engaged in first or re-
verse gear and parking brake engaged is
dangerous. Also, when parked on an incline,
an engaged first or reverse gear alone may
not prevent your vehicle from moving, possi-
bly hitting people or objects.
Always set the parking brake in addition to
engaging first or reverse gear (
�page 47).
When parked on an incline, turn front wheels
towards the road curb.
Do not park this vehicle in areas where com-
bustible materials such as grass, hay or
leaves can come into contact with the hot
exhaust system, as these materials could be
ignited and cause a vehicle fire.Warning!
G
When leaving the vehicle, always remove the
key from the steering lock, and lock the ve-
hicle. Do not leave children unattended in
the vehicle, or with access to an unlocked
vehicle. Children could move the gearshift
lever, which could result in an accident
and/or serious injury.
On slippery road surfaces as well as high en-
gine speeds, never downshift in order to ob-
tain braking action. This could result in drive
wheel slip and reduced vehicle control. Your
vehicle’s ABS will not prevent this type of
loss of control.
!Downshifting gears leading to overrev-
ving the engine can result in engine
damage that is not covered by the
Mercedes-Benz Limited Warranty.
Never hold the vehicle stopped on a hill
by using the clutch pedal. The clutch
may be damaged which is not covered
by the Mercedes-Benz Limited
Warranty.
Do not exceed the engine speed limits
(�page 90).
Page 96 of 314

96 Controls in detailAutomatic transmission*
EffectThe key can only be removed
from the steering lock with the
gear selector lever in positionP.
With the key removed, the gear
selector lever is locked in
positionP.
If the vehicle’s electrical system
is malfunctioning, the gear
selector lever could remain
locked in positionP.
í
Reverse gear
Place gear selector lever in
positionR only when vehicle is
stopped.
Effect
ë
Neutral
No power is transmitted from the
engine to the drive axle. When
the brakes are released, the
vehicle can be moved freely
(pushed or towed).
To avoid damage to the trans-
mission, never engageN while
driving.
If the ESP is deactivated or
malfunctioning:
Move gear selector lever toN
only if the vehicle is in danger of
skidding, e.g. on icy roads.
ê
Drive
The transmission shifts
automatically. All five forward
gears are available.
!Coasting the vehicle, or driving for any
other reason with gear selector lever
inN can result in transmission damage
that is not covered by the
Mercedes-Benz Limited Warranty.Warning!
G
Getting out of your vehicle with the gear
selector lever not fully engaged in positionP
is dangerous. Also, positionP alone is not
intended to or capable of preventing your
vehicle from moving, possibly hitting people
or objects.
Always set the parking brake in addition to
shifting to positionP (
�page 42).
When parked on an incline, turn the front
wheels towards the road curb.
Do not park this vehicle in areas where com-
bustible materials such as grass, hay or
leaves can come into contact with the hot
exhaust system, as these materials could be
ignited and cause a vehicle fire.
Page 97 of 314

97 Controls in detail
Automatic transmission*
Program mode selector switch
The program mode selector switch is
located on the lower part of the center
console.
1Program mode selector switch
S Standard For regular driving
W Winter For winter driving
�
Press program mode selector
switch1.
SelectWfor winter driving:�
The vehicle starts out in second
gear (both forward and reverse) for
gentler starts. This does not apply if
full throttle is applied or gear
range1 is selected.
�
Traction and driving stability are
improved on icy roads.
�
Upshifts occur earlier even when
y ou gi ve m ore ga s. The eng ine then
operates at lower rpms and the
wheels are less likely to spin.
�
The power transmission ratio for
gear selector lever positionR
changes depending on the program
mode selected (SorW).
Warning!
G
When leaving the vehicle, always remove the
key from the steering lock, take it with you
and lock the vehicle. Do not leave children
unattended in the vehicle, or with access to
an unlocked vehicle. Children could move
the gear selector lever from positionP,
which could result in an accident and/or
serious personal injury.
!Never change the program mode when
the gear selector lever is out of
positionP. This could result in a
change of driving characteristics for
which you may not be prepared.