Page 217 of 314

217 Practical hints
Unlocking/locking in an emergency
�
Insert the mechanical key into the
trunk lid lock.
�
Turn the mechanical key counterclock-
wise to position1 and hold it in this
position.
�
Pull trunk lid handle2 and lift the
trunk lid.
Locking the vehicle
If you are unable to lock the vehicle with
the remote control, lock it with the key as
follows:�
Close the passenger door and the trunk
lid.
�
Press the central locking switch in the
upper center console (
�page 79).
�
Check to see whether the locking knob
on the passenger door is still visible. If
necessary, push it down manually.
�
Lock the driver’s door with the key. To
do so, push key into the lock until it
stops and turn it to the right2
(�page 216).
�
Lock the trunk, if necessary with the
key. To do so, push key into the trunk
lid lock until it stops and turn it to the
right.
!Always make sure there is sufficient
overhead clearance. iUnlocking your vehicle with the key will
trigger the anti-theft alarm system. To
cancel the alarm, do one of the follow-
ing:�
Press buttonŒ or‹on the
key.
�
Insert the key in the steering lock
and turn it to position 2.
Page 219 of 314
219 Practical hints
Unlocking/locking in an emergency
Synchronizing remote control
If you are unable to lock or unlock the ve-
hicle with the remote control, the remote
control may have to be resynchronized.�
Aim transmitter eye at vehicle and
briefly press transmit buttonŒ
or‹twice.
�
Within approximately 30 seconds
insert key in steering lock and turn it to
position2 (
�page 29).
The remote control should once again be
operational.
If the remote control is still malfunctioning,
contact an authorized Mercedes-Benz
Center.
Fuel filler flap
In case the central locking system does
not release the fuel filler flap, you can open
it manually.
1Release knob
2Cover
�
Open the trunk lid.
�
Open cover2 in the right side trunk
panel.
The cover is located behind the trunk
lid hinge.
�
Pull release knob1 in the direction of
arrow.
The fuel filler flap is opened simulta-
neously.
Page 221 of 314

221 Practical hints
Opening/closing in an emergency
�Opening/closing in an emergency
Raising retractable hardtop manually
If the retractable hardtop cannot be closed
automatically, make certain that all points
listed under the “Retractable hardtop” sec-
tion (
�page 130) were observed.
If the automatic operation still does not
function properly, you can close the re-
tractable hardtop manually.
This procedure should be performed with
great care by two persons.
�
Open doors or lower windows
(�page 128).
�
Set parking brake (
�page 47).
�
Remove key from steering lock
(�page 29).
�
Open trunk lid (
�page 78).
�
Remove CD changer (
�page 122).
�
Open the right side trim panel in the
trunk. Remove cover, if necessary.
!Manually closing the retractable hard-
top is a complicated and technically de-
manding procedure. Close the
retractable hardtop manually in emer-
gency cases only. Otherwise, visit an
authorized Mercedes-Benz Center.
Warning!
G
�
It is important that a second person
helps you. Otherwise, you could become
trapped or injured.
�
Remove any wristwatches or jewelry
such as rings or bracelets. Otherwise,
they could get caught in the vehicle
mechanism, causing personal injury to
yourself or damage to the vehicle.
�
Always use the grips provided. Other-
wise you could injure yourself.
iIf your CD changer holder does not
have the fasteners 1 as shown under
“Installing and removing the CD chang-
er*” (
�page 122), your vehicle may be
equipped with a non-factory installed
CD changer holder. The holder then
does not need to be removed as there
should be enough room between the
CD changer holder and the right side
trim panel in the trunk to remove the
cover and gain access to the screw for
hydraulic pump should you need to
raise the retractable hardtop manually.
��
Page 222 of 314

222 Practical hintsOpening/closing in an emergency1Screw of hydraulic pump
2Control cable, right
3Hex-socket wrench�
Remove hex-socket wrench3 from
cover.
�
Using wrench3 turn screw1 of the
hydraulic pump counterclockwise as
far as it will go.
�
Keep wrench with you for later use in
closing and locking the retractable
hardtop.
�
Pull the loop of right control cable2
out of the opening.
�
Remove first aid kit (
�page 212).
�
Open the left side trim panel in the
trunk. 4Control cable, left
�
Pull the loop of left control cable4 out
of the opening.
iVehicles with factory-installed
CD changer:
Guide hex-socket wrench through the
available opening in the CD changer
holder to access and turn the screw of
the hydraulic pump. !Do not operate the hardtop switch with
screw1 in opened position, otherwise
the hydraulic pump could be damaged.
iIf you cannot find the control cable,
carefully insert a finger into the open-
ing to feel for the cable. Warning!
G
At this point, the remaining procedure
needs to be done by two people. Otherwise
you could be injured.
��
Page 223 of 314
223 Practical hints
Opening/closing in an emergency
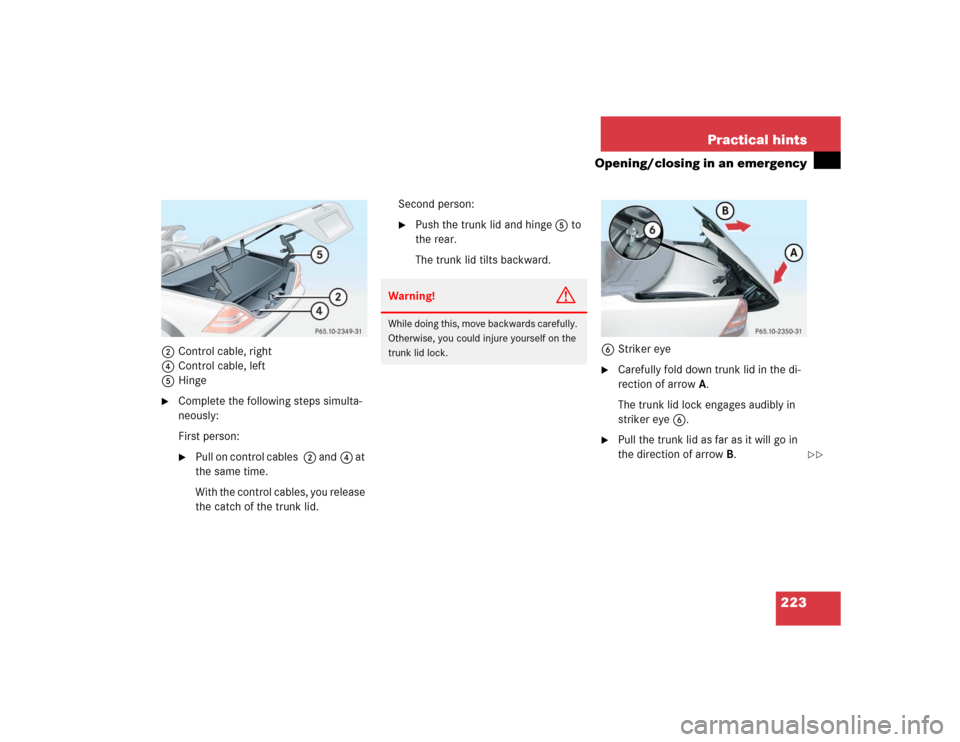
2Control cable, right
4Control cable, left
5Hinge�
Complete the following steps simulta-
neously:
First person:�
Pull on control cables 2 and4 at
the same time.
With the control cables, you release
the catch of the trunk lid.Second person:
�
Push the trunk lid and hinge5 to
the rear.
The trunk lid tilts backward.
6Striker eye
�
Carefully fold down trunk lid in the di-
rection of arrowA.
The trunk lid lock engages audibly in
striker eye6.
�
Pull the trunk lid as far as it will go in
the direction of arrowB.
Warning!
G
While doing this, move backwards carefully.
Otherwise, you could injure yourself on the
trunk lid lock.
��
Page 224 of 314

224 Practical hintsOpening/closing in an emergency7Bottom half of retractable hardtop�
One person should stand on the left
side of the vehicle and the other on the
right side.
�
At the same time, reach from each side
of the trunk underneath the bottom
half of retractable hardtop7.
�
In a smooth motion, pull up on the re-
tractable hardtop in the direction of the
arrow until the bottom half of the re-
tractable hardtop is standing vertically.
8Pins for the retractable hardtop locking
mechanism
9Holes for the pins
�
Complete the next steps simultaneous-
ly. One person should stand on the left
side of the vehicle and the other on the
right side.�
Move the retractable hardtop with
one hand in the direction of the ar-
row.
�
With the other hand, guide pins8
belonging to the retractable hard-
top locking mechanism into corre-
sponding holes9 located in the
upper edges of the windshield.
Warning!
G
Do not place your hands near the upper
windshield area, trunk lid, or between roof
panels while the retractable hardtop is being
raised and locked. Serious personal injury
may occur.
Warning!
G
Do not place your hands in areas marked X.
Serious personal injury may occur.
��
Page 225 of 314

225 Practical hints
Opening/closing in an emergency
3Hex-socket wrench
aProtective cap
bScrew for the retractable hardtop lock-
ing mechanism�
Take off protective capa on the inner
side of the retractable hardtop.
�
Turn the retractable hardtop’s locking
mechanism screwb with hex-socket
wrench3 clockwise as far as it will go.
The screw will be difficult to turn.
The clasp will open and the retractable
hardtop will engage audibly.
�
Turn the retractable hardtop’s locking
mechanism screwb with hex-socket
wrench3 counterclockwise as far as
it will go.
The retractable hardtop will be locked.
�
Put protective capa back into the
opening and press down on it firmly.
�
Place flat hands near edges (arrows)
and close trunk lid.Have the retractable hardtop operation
checked at your authorized
Mercedes-Benz Center as soon as possi-
ble.
iAfter you have closed the retractable
hardtop manually, you can no longer�
lock the trunk lid
�
close the rear quarter windows
The trunk lid will also no longer seal
properly.
Page 230 of 314

230 Practical hintsReplacing bulbsSide marker lamp bulb�
Switch off the lights.
�
Carefully slide lamp towards front.
�
Remove rear end first.
�
Twist bulb socket counterclockwise
and pull out.
�
Gently push bulb into socket, turn
counterclockwise and remove.
�
Insert new bulb in socket, push in and
twist clockwise.
�
Reinstall bulb socket, push in and twist
clockwise.
�
To reinstall lamp, set rear end in
bumper and let front end snap into
place.
Replacing bulbs for rear lamps
Tail lamp assemblies
1Brake lamp
2Turn signal lamp
3Tail, parking and standing lamp, side
marker
4Backup lamp
5Rear fog lamp (driver’s side)
�
Switch off the lights.
�
Open trunk lid (
�page 78).
�
Remove cover in right side panel.
�
Remove first aid kit (
�page 212).
�
Remove cover in left side panel.
�
Turn bulb socket counterclockwise and
pull out.
�
Gently push bulb into socket, turn
counterclockwise and remove.
�
Insert new bulb in socket, push in and
turn clockwise.
�
Reinstall bulb socket, push in and turn
clockwise.
�
Close cover.