Page 141 of 314

141 Controls in detail
Useful features
Opening compartment in armrest�
Lift lid with handle2.
Closing compartment in armrest
�
Lower lid until it engages in lock.Parcel net in front passenger footwell
A small convenience parcel net is located
in the front passenger footwell. It is for
small and light items, such as road maps,
mail, etc.Shelf behind roll barsiThe storage compartment in the arm-
rest can be locked with the remote con-
trol (
�page 74).
The storage compartment cannot be
locked with the central locking switch
(
�page 79).
There are additional storage pockets
behind the seats and in the door
panels.
Warning!
G
Do not place heavy or fragile objects, or ob-
jects having sharp edges, in the parcel net.
In an accident, during hard braking or sud-
den maneuvers, they could be thrown
around inside the vehicle, and cause injury
to vehicle occupants.
Warning!
G
The shelf behind the roll bars should not be
used to carry objects. This will prevent such
objects from being thrown around and injur-
ing vehicle occupants during an accident or
sudden maneuver.
The trunk is the preferred place to carry ob-
jects.
Page 151 of 314
, and the
reserve key is not handy:�
Contact the Mercedes-Ben")
151 Controls in detail
Useful features
Remote door unlock
In case you have locked your vehicle unin-
tentionally (e.g. key inside vehicle), and the
reserve key is not handy:�
Contact the Mercedes-Benz Response
Center at 1-800-756-9018 (in the USA)
or 1-888-923-8367 (in Canada).
You will be asked to provide your pass-
word which you provided when you
completed the subscriber agreement.
�
Then return to your vehicle and pull
outside trunk handle for minimum of
20 seconds until the SOS button is
flashing.
As an alternative, you may unlock the vehi-
cle via Internet using the ID and password
sent to you shortly after the completion of
your acquaintance call.
The Response Center will then unlock your
vehicle with the remote door unlocking
feature.
iThe indicator lamp in the respective
button flashes until the call is conclud-
ed. Calls can only be terminated by a
Response Center or Customer Assis-
tance Center representative, except
Roadside Assistance and Information
calls.iWhen a Tele Aid call has been initiated,
the audio system is muted and the se-
lected mode (radio, tape or CD) paus-
es. The optional cellular phone (if
installed) switches off. If you must use
this phone, the vehicle must be parked.
Disconnect the coiled cord and place
the call.
iThe remote door unlock feature is avail-
able if the relevant cellular phone net-
work is available.
The SOS button will flash to indicate re-
ceipt of the door unlock command.
Once the vehicle is unlocked, a Re-
sponse Center specialist will attempt
to establish voice contact with the ve-
hicle occupants.
If the trunk handle was pulled for more
than 20 seconds before door unlock
authorization was received by the Re-
sponse Center, you must wait
15 minutes before pulling the trunk
handle again.
Page 168 of 314

168 OperationDriving instructionsStanding water
Passenger compartmentDriving abroad
Abroad, there is a widely-spread
Mercedes-Benz service network at your
disposal. If you plan to drive into areas
which are not listed in the index of your
Mercedes-Benz Center directory, you
should request pertinent information from
your authorized Mercedes-Benz Center.Control and operation of radio trans-
mitter
Radio and telephone*
!Do not drive through flooded areas or
water of unknown depth. Never accel-
erate before driving into water. The
wave could force water into the engine
and auxiliary equipment, thus damag-
ing them.
If you must drive through standing wa-
ter, drive slowly to prevent water from
entering the passenger compartment
or the engine compartment. Water in
these areas could cause damage to
electrical components or wiring of the
engine or transmission, or could result
in water being ingested by the engine
through the air intake causing severe
internal engine damage. Any such dam-
age is not covered by the
Mercedes-Benz Limited Warranty.
Warning!
G
Always fasten items being carried as secure-
ly as possible.
In an accident, during hard braking or sud-
den maneuvers, loose items will be thrown
around inside the vehicle, and cause injury
to vehicle occupants unless the items are
securely fastened in the vehicle.
The trunk is the preferred place to carry ob-
jects.
Warning!
G
Please do not forget that your primary re-
sponsibility is to drive the vehicle. Only op-
erate the radio or telephone
1 if road, traffic
and weather conditions permit.
Bear in mind that at a speed of just 30 mph
(approximately 50 km / h), your vehicle is
covering a distance of approximately
44 feet (approximately 13.5 m) every sec-
ond.
1Observe all legal requirements
Page 212 of 314

212 Practical hintsWhere will I find ...?
�Where will I find ...?First aid kit
The first aid kit is located on the left side of
the trunk.
1First aid kit�
Loosen the fastening strap.
�
Remove first aid kit1.
Vehicle tool kit, vehicle jack
The following is included:�
Towing eye bolt
�
Wheel wrench
�
Alignment bolt
�
Wheel bolts
�
Special fuse puller
�
Vehicle jack
Vehicle jackThe jack is exclusively designed for lifting
the vehicle during a wheel change. Always
lower the vehicle on sufficient capacity
jackstands before working under the
vehicle.
iCheck expiration dates and contents
for completeness at least once a year
and replace missing/expired items.
Warning!
G
The jack is designed exclusively for jacking
up the vehicle at the jack tubes built into ei-
ther side of the vehicle. To help avoid per-
sonal injury, use the jack only to lift the
vehicle during a wheel change. Never get
beneath the vehicle while it is supported by
the jack. Keep hands and feet away from the
area under the lifted vehicle.
Always firmly set parking brake and block
wheels before raising vehicle with jack.
Do not disengage parking brake while the
vehicle is raised. Be certain that the jack is
always vertical (plumb line) when in use, es-
pecially on hills. Always try to use the jack
on level surface. Make sure the jack arm is
fully inserted in the jack tube. Always lower
the vehicle onto sufficient capacity jack-
stands before working under the vehicle.
Page 213 of 314
213 Practical hints
Where will I find ...?
Spare wheel (SLK 230 Kompressor, SLK 320)
1Spare wheel with collapsible tire
2Vehicle tool kit
3Wheel wrench
4Jack
5Electric air pump, bolts for spare wheel
rimSparewheel, vehicle tool kit, wheel
wrench, jack and electric air pump are
located under the trunk floor cover.
�
Lift trunk floor cover.
You can take out vehicle tool kit2,
wheel wrench3 and jack4.
Electric air pump5 is secured with a belt.
�
Loosen the belt.
�
Remove electric air pump from pump
holder.
Spare wheel1 is secured with the pump
holder.
�
Turn pump holder counterclockwise.
�
Remove pump holder.
�
Remove spare wheel out of the wheel
well.Spare wheel bolts
Wheel bolts1 Wheel bolt for�
wheel rim size 7J x16H2 and
8Jx16H2
�
AMG wheel rim size 7½ J x 17 H2 and
8½ J x 17 H2
�
spare wheel rim size 4.5 B x 16 H2
2 Wheel bolt for
�
spare wheel rim size 4.5 B x 15 H2
(located with electric air pump)
Page 214 of 314
214 Practical hintsWhere will I find ...?More information can be found in the
“Technical data” section (
�page 263).
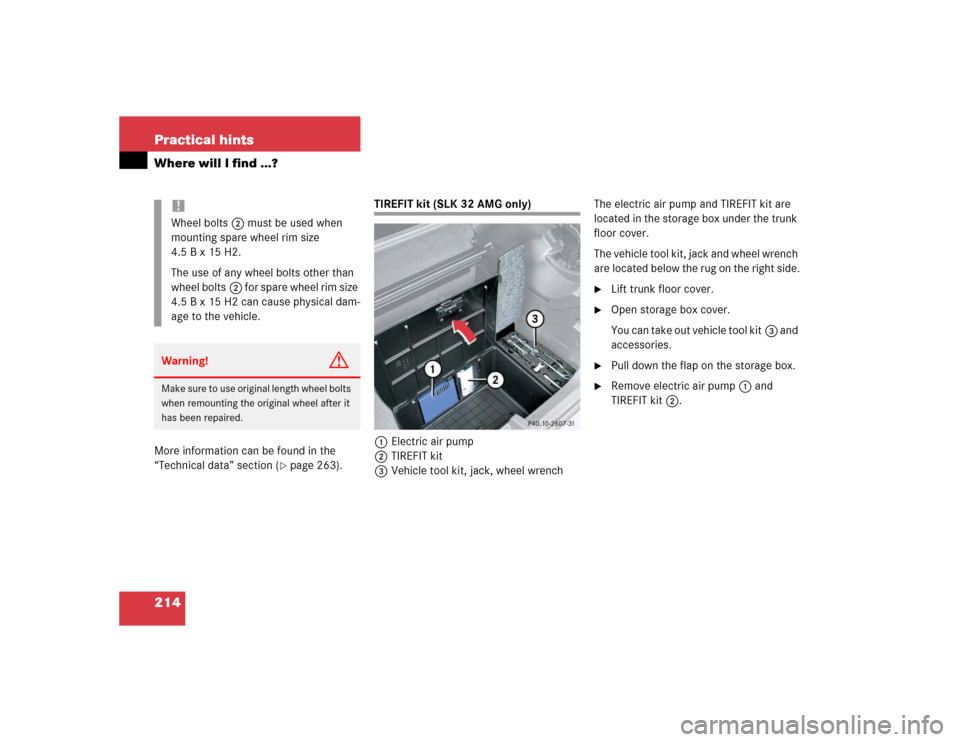
TIREFIT kit (SLK 32 AMG only)
1Electric air pump
2TIREFIT kit
3Vehicle tool kit, jack, wheel wrenchThe electric air pump and TIREFIT kit are
located in the storage box under the trunk
floor cover.
The vehicle tool kit, jack and wheel wrench
are located below the rug on the right side.
�
Lift trunk floor cover.
�
Open storage box cover.
You can take out vehicle tool kit3 and
accessories.
�
Pull down the flap on the storage box.
�
Remove electric air pump1 and
TIREFIT kit2.
!Wheel bolts2 must be used when
mounting spare wheel rim size
4.5 B x 15 H2.
The use of any wheel bolts other than
wheel bolts2 for spare wheel rim size
4.5 B x 15 H2 can cause physical dam-
age to the vehicle.Warning!
G
Make sure to use original length wheel bolts
when remounting the original wheel after it
has been repaired.
Page 215 of 314
215 Practical hints
Where will I find ...?
Vehicles with TIREFIT kit (SLK 32 AMG)
and CD changer* in trunk
1Storage box cover
2CD changer*
The vehicle tool kit, jack and wheel wrench
are located underneath the
CD changer2.�
Lift trunk floor cover.
�
Open storage box cover1.3Latch
�
Slide latch3 forward to disengage
storage box.
�
Remove storage box.4Carpet cover
�
Slide small carpet cover4 from un-
derneath the CD changer*2 and flip
backwards for easier access to tool kit,
jack and wrench.
�
Slide out tool kit and jack in the direc-
tion of arrow. The wheel wrench is lo-
cated behind the tool kit and jack.
Page 216 of 314

216 Practical hintsUnlocking/locking in an emergency
�Unlocking/locking in an emergencyUnlocking the vehicle
Unlocking the driver’s door
If you are unable to unlock the driver’s
door with the remote control, open the
door using the key as follows:
1Unlocking
2Locking
3Driver’s door lock�
Remove protective cap3 from driv-
er’s door lock.
�
Unl ock t he door wi th the ke y. T o do s o,
push key into the lock until it stops and
turn it to the left1.Unlocking the trunk
A minimum height clearance of 5.97 ft
(1.82 m) is required to open the trunk lid.
If you are unable to unlock the trunk with
the remote control, open the trunk using
the key.
The lock is located next to the recessed
handle.
1Unlocking in an emergency
2Handle
iUnlocking your vehicle with the key will
trigger the anti-theft alarm system. To
cancel the alarm, do one of the follow-
ing:�
Press buttonŒor‹on the
remote control.
�
Insert the key in the steering lock
and turn it to position1.
iUsing the key does not operate the
central locking system.

1Spare wheel with collapsible tire
2Vehicle tool kit
3Wheel wrench
4Jack
5Electric air pump, bolts for spare wheel")

and CD changer* in trunk
1Storage box cover
2CD changer*
The vehicle tool kit, jack and wheel wrench
are located un")