Page 86 of 314
86 Controls in detailLightingHazard warning flasher
The hazard warning flasher can be activat-
ed with the ignition switched on or off. It is
activated automatically when an airbag is
deployed.
The switch is located on the center
console.
1Hazard warning flasher switchSwitching on hazard warning flasher
�
Press hazard warning flasher
switch1.
All the turn signals will blink.
Switching off hazard flasher
�
Press hazard warning flasher switch1
again.
Page 100 of 314

100 Controls in detailGood visibility
Sun visors
The sun visors protect you from sun glare
while driving.
Warning!
G
The automatic antiglare function does not
react if incoming light is not aimed directly
at sensors in the interior rear view mirror.
The interior rear view mirror and the exterior
rear view mirror on the driver’s side do not
react, for example, if the wind screen is in-
stalled.
Glare can endanger you and others.Warning!
G
In the case of an accident, liquid electrolyte
may escape from the mirror housing if the
mirror glass breaks.
Electrolyte has an irritating effect. Do not al-
low the liquid to come into contact with
eyes, skin, clothing, or the respiratory sys-
tem. In case it does, immediately flush af-
fected area with water, and seek medical
help if necessary.
Warning!
G
Exercise care when using the passenger
side exterior rear view mirror. The mirror
surface is convex (outwardly curved surface
for a wider field of view). Objects in mirror
are closer than they appear. Check your in-
terior rear view mirror or glance over your
shoulder before changing lanes.!Electrolyte drops coming into contact
with the vehicle paint finish can be
completely removed only while in the
liquid state by applying plenty of water.
Warning!
G
Do not use the vanity mirror while driving.
Keep the mirrors in the sun visors closed
while vehicle is in motion. Reflected glare
can endanger you and others.
Page 101 of 314

101 Controls in detail
Good visibility
1Mirror cover�
Swing sun visors down when you expe-
rience glare.
�
Push mirror cover1 to the side, as
required.
Rear window defroster
The rear window defroster uses a large
amount of power. To keep the battery
drain to a minimum, switch off the defrost-
er as soon as the rear window is clear. The
defroster is automatically deactivated af-
ter a maximum of 12 minutes.
Activating�
Switch on the ignition.
�
Press buttonF (
�page 102).
The indicator lamp on the button lights
up.
Deactivating
�
Press buttonF (
�page 102) again.
The indicator lamp on the button goes
out.
Warning!
G
Any accumulation of snow and ice should be
removed from the rear window before driv-
ing. Visibility could otherwise be impaired,
endangering you and others.!If the rear window defroster switches
off too soon and the indicator lamp
starts blinking, this means that too
many electrical consumers are operat-
ing simultaneously and there is insuffi-
cient voltage in the battery. The system
responds automatically by deactivating
the rear window defroster.
As soon as the battery has sufficient
voltage, the rear window defroster au-
tomatically turns itself back on.
Page 107 of 314
 function of the climate
control system. The air in the vehicle will
then no longer b")
107 Controls in detail
Climate control
Deactivating
It is possible to deactivate the air condi-
tioning (cooling) function of the climate
control system. The air in the vehicle will
then no longer be cooled or dehumidified. �
Press button± (
�page 102).
The indicator lamp on the button±
lights up.Activating
Moist air can fog up the windows. You can
dehumidify the air with the air condition-
ing.
�
Press button± again (
�page 102).
The indicator lamp on the ±button
goes out.
The air conditioning uses the refrigerant
R134a. This refrigerant is free of CFCs
which are harmful to the ozone layer.
Residual heat
With the engine switched off, it is possible
to continue to heat or ventilate the interior
for up to 30 minutes. This feature makes
use of the residual heat produced by the
engine.
Activating�
Turn the key in the steering lock to
position1or0, or remove it from the
starter switch.
�
Press buttonÐ (
�page 102).
The indicator lamp on the buttonÐ
comes on.
Warning!
G
While driving, deactivate the air conditioning
only temporarily to prevent window fogging.
Page 121 of 314

121 Controls in detail
Audio system
CD mode
General notes on CD mode
Should excessively high temperatures oc-
cur while the audio system is in CD mode, TEMP HIGH
will appear in the display and
muting will take place. The unit will then
switch back to radio mode until the tem-
perature has decreased to a safe operating
level.
Should excessively low temperatures oc-
cur while the audio system is in CD mode,
TEMP LOW
will be displayed, but the CD will
still be played. It will be sensitive to skip-
ping if you are driving over rough roads.
Handle CDs carefully to prevent interfer-
ence during playback.
Avoid fingerprints and dust on CDs. Do not
write on the CDs or apply any label to the
CDs.
Clean CDs from time to time with a com-
mercially available cleaning cloth. No sol-
vents, anti-static sprays, etc. should be
used. Replace the CD in its container after use.
Protect CDs from heat and direct sunlight.
Only use CDs which bear the label shown
and that conform to the compact disc dig-
ital audio standard (IEC 60908). You can
therefore only use CDs with a maximum
thickness of 1.3 mm.
!Your CD drive has been designed to
play CDs which correspond to the EN
60908 standard. If you insert thicker
data carriers, e.g. ones that have data
on both sides (one side with DVD data,
the other side with audio data), they
cannot be ejected and will damage the
drive.
Use of CDs which do not meet this
standard may cause damage to the CD
changer. Do not play single-CDs
(80 mm) with an adapter.
Warning!
G
The CD changer* is a Class 1 laser product.
There is a danger of invisible laser radiation
if the cover is opened or damaged.
Do not remove the cover. The CD changer*
does not contain any parts which can be ser-
viced by the user. For safety reasons, have
any service work which may be necessary
performed only by qualified personnel.
Page 140 of 314
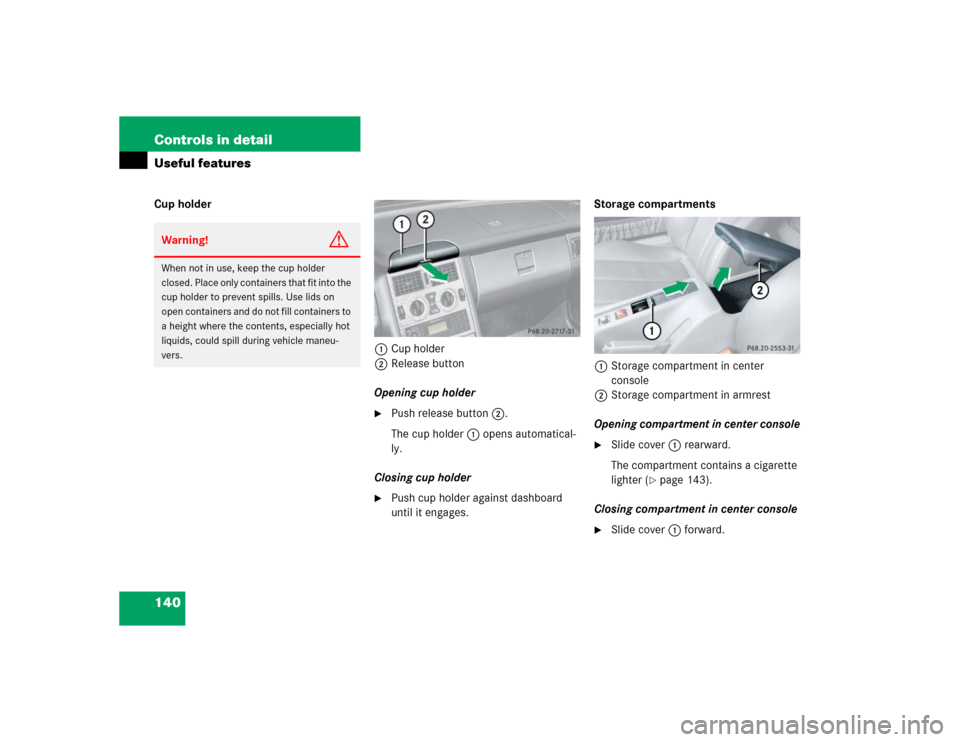
140 Controls in detailUseful featuresCup holder
1Cup holder
2Release button
Opening cup holder
�
Push release button2.
The cup holder1 opens automatical-
ly.
Closing cup holder
�
Push cup holder against dashboard
until it engages.Storage compartments
1Storage compartment in center
console
2Storage compartment in armrest
Opening compartment in center console
�
Slide cover1 rearward.
The compartment contains a cigarette
lighter (
�page 143).
Closing compartment in center console
�
Slide cover1 forward.
Warning!
G
When not in use, keep the cup holder
closed. Place only containers that fit into the
cup holder to prevent spills. Use lids on
open containers and do not fill containers to
a height where the contents, especially hot
liquids, could spill during vehicle maneu-
vers.
Page 141 of 314

141 Controls in detail
Useful features
Opening compartment in armrest�
Lift lid with handle2.
Closing compartment in armrest
�
Lower lid until it engages in lock.Parcel net in front passenger footwell
A small convenience parcel net is located
in the front passenger footwell. It is for
small and light items, such as road maps,
mail, etc.Shelf behind roll barsiThe storage compartment in the arm-
rest can be locked with the remote con-
trol (
�page 74).
The storage compartment cannot be
locked with the central locking switch
(
�page 79).
There are additional storage pockets
behind the seats and in the door
panels.
Warning!
G
Do not place heavy or fragile objects, or ob-
jects having sharp edges, in the parcel net.
In an accident, during hard braking or sud-
den maneuvers, they could be thrown
around inside the vehicle, and cause injury
to vehicle occupants.
Warning!
G
The shelf behind the roll bars should not be
used to carry objects. This will prevent such
objects from being thrown around and injur-
ing vehicle occupants during an accident or
sudden maneuver.
The trunk is the preferred place to carry ob-
jects.
Page 143 of 314
.
�
Slide cover2 rearward.
�
Push in cigarette lighter1.")
143 Controls in detail
Useful features
Cigarette lighter
1Cigarette lighter
2Cover�
Turn key in the steering lock to
position1 or2 (
�page 29).
�
Slide cover2 rearward.
�
Push in cigarette lighter1.
The cigarette lighter will pop out auto-
matically when hot.
Telephone*
Radio transmitters, such as a portable tele-
phone or a citizens band unit, should only
be used inside the vehicle if they are con-
nected to an antenna that is installed on
the outside of the vehicle.
The external antenna must be approved by
Mercedes-Benz. Please contact an autho-
rized Mercedes-Benz Center for informa-
tion on the installation of an approved
external antenna. Refer to the radio trans-
mitter operation instructions regarding use
of an external antenna.
Warning!
G
Never touch the heating element or sides of
the cigarette lighter; they are extremely hot.
Hold the knob only.
When leaving the vehicle, always remove the
key from the steering lock, and lock your
vehicle. Do not leave children unattended in
the vehicle, or with access to an unlocked
vehicle. Unsupervised use of vehicle equip-
ment may cause an accident and/or serious
personal injury.iThe cigarette lighter socket can be
used to accommodate electrical acces-
sories up to a maximum 85 W.
Warning!
G
Never operate radio transmitters equipped
with a built-in or attached antenna (i.e. with-
out being connected to an external antenna)
from inside the vehicle while the engine is
running. Doing so could lead to a malfunc-
tion of the vehicle’s electronic system, pos-
sibly resulting in an accident and/or serious
personal injury.