Page 168 of 314

168 OperationDriving instructionsStanding water
Passenger compartmentDriving abroad
Abroad, there is a widely-spread
Mercedes-Benz service network at your
disposal. If you plan to drive into areas
which are not listed in the index of your
Mercedes-Benz Center directory, you
should request pertinent information from
your authorized Mercedes-Benz Center.Control and operation of radio trans-
mitter
Radio and telephone*
!Do not drive through flooded areas or
water of unknown depth. Never accel-
erate before driving into water. The
wave could force water into the engine
and auxiliary equipment, thus damag-
ing them.
If you must drive through standing wa-
ter, drive slowly to prevent water from
entering the passenger compartment
or the engine compartment. Water in
these areas could cause damage to
electrical components or wiring of the
engine or transmission, or could result
in water being ingested by the engine
through the air intake causing severe
internal engine damage. Any such dam-
age is not covered by the
Mercedes-Benz Limited Warranty.
Warning!
G
Always fasten items being carried as secure-
ly as possible.
In an accident, during hard braking or sud-
den maneuvers, loose items will be thrown
around inside the vehicle, and cause injury
to vehicle occupants unless the items are
securely fastened in the vehicle.
The trunk is the preferred place to carry ob-
jects.
Warning!
G
Please do not forget that your primary re-
sponsibility is to drive the vehicle. Only op-
erate the radio or telephone
1 if road, traffic
and weather conditions permit.
Bear in mind that at a speed of just 30 mph
(approximately 50 km / h), your vehicle is
covering a distance of approximately
44 feet (approximately 13.5 m) every sec-
ond.
1Observe all legal requirements
Page 213 of 314
213 Practical hints
Where will I find ...?
Spare wheel (SLK 230 Kompressor, SLK 320)
1Spare wheel with collapsible tire
2Vehicle tool kit
3Wheel wrench
4Jack
5Electric air pump, bolts for spare wheel
rimSparewheel, vehicle tool kit, wheel
wrench, jack and electric air pump are
located under the trunk floor cover.
�
Lift trunk floor cover.
You can take out vehicle tool kit2,
wheel wrench3 and jack4.
Electric air pump5 is secured with a belt.
�
Loosen the belt.
�
Remove electric air pump from pump
holder.
Spare wheel1 is secured with the pump
holder.
�
Turn pump holder counterclockwise.
�
Remove pump holder.
�
Remove spare wheel out of the wheel
well.Spare wheel bolts
Wheel bolts1 Wheel bolt for�
wheel rim size 7J x16H2 and
8Jx16H2
�
AMG wheel rim size 7½ J x 17 H2 and
8½ J x 17 H2
�
spare wheel rim size 4.5 B x 16 H2
2 Wheel bolt for
�
spare wheel rim size 4.5 B x 15 H2
(located with electric air pump)
Page 250 of 314

250 Practical hintsFlat tire
�
Detach the electric air pump.
�
Reinstall tire valve cap.
�
Stow the electrical plug and the air
hose behind the flap and place the air
pump back in the trunk.
�
Close the trunk lid.Storing collapsible spare wheel in
wheel well
Before you can store the spare wheel with
collapsible tire in the wheel well you have
to release the air pressure of the tire.
�
Unscrew valve stem removal tool,
which is part of the valve cap, from tire
valve.
�
Using the valve stem removal tool,
open tire valve slightly by turning the
tire valve insert counterclockwise to
release air pressure.
�
When the air pressure has been re-
leased, remove tire valve insert (pro-
tect it from dirt and sand) using the
previously removed tire valve cap.
�
Once all air is out of the tire, and the
tire has collapsed to its original shape,
reinstall the tire valve insert and valve
cap.
�
Place spare wheel in wheel well and
secure it with the pump holder.
�
Turn pump holder clockwise to its stop.
Warning!
G
Follow recommended inflation pressures.
Do not overinflate tires. Overinflating tires
can result in sudden deflation (blowout) be-
cause they are more likely to become punc-
tured or damaged by road debris, potholes
etc.
Do not underinflate tires. Underinflated tires
wear unevenly, adversely affect handling
and fuel economy, and are more likely to fail
from being overheated.
Do not overload the tires by exceeding the
specified vehicle capacity weight (as indicat-
ed by the label on the pillar in the driver’s
door opening). Overloading the tires can
overheat them, possibly causing a blowout.
Warning!
G
To prevent possible injury when unscrewing
air pump filler hose from tire valve after in-
flating the tire, use a rag since the tire valve
could be hot.
��
Page 252 of 314

252 Practical hintsBatteryDisconnecting the battery�
Depress parking brake firmly or move
gear selector lever to positionP (man-
ual transmission to Neutral).
�
Turn off all electrical consumers.
�
Remove key from steering lock.
�
Open the hood (
�page 174).
�
Disconnect the battery negative lead.
�
Remove the cover2 from the positive
terminal.
�
Disconnect the battery positive lead.
Removing the battery�
Remove the screw on the swivel bar.
�
Remove the swivel bar.
�
Take out the battery.
Charging and reinstalling battery�
Charge battery in accordance with the
instructions of the battery charger
manufacturer.
�
Reinstall the charged battery. Follow
the previously described steps in re-
verse order.
Reconnecting the battery�
Turn off all electrical consumers.
�
Connect the positive lead and fasten its
cover2.
�
Connect the negative lead.
Warning!
G
With a disconnected battery�
you will no longer be able to turn the key
in the steering lock
�
automatic transmission: the gear selec-
tor lever will remain locked in positionP
Warning!
G
Never charge a battery while still installed in
the vehicle. Gases may escape during charg-
ing and cause explosions that may result in
paint damage, corrosion or personal injury.
!Never invert the terminal connections!!The battery, its filler caps and the vent
tube must always be securely installed
when the vehicle is in operation.
Page 258 of 314

258 Practical hintsTowing the vehicle
Towing eye
SLK 230 Kompressor except Sport
Package*, SLK 320 except Sport
Package*
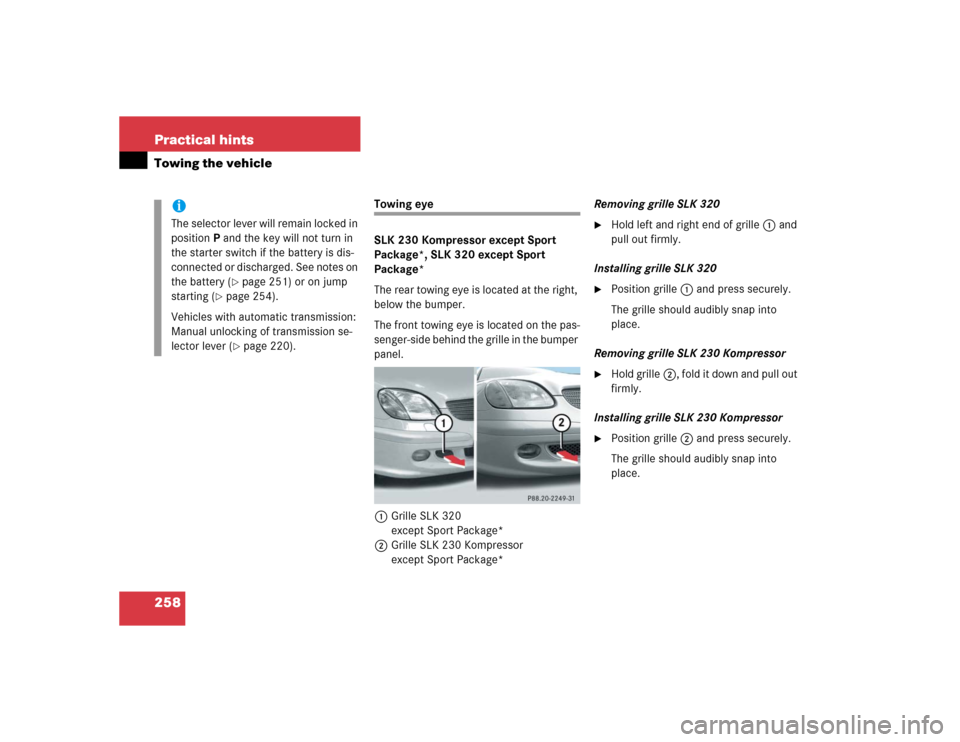
The rear towing eye is located at the right,
below the bumper.
The front towing eye is located on the pas-
senger-side behind the grille in the bumper
panel.
1Grille SLK 320
except Sport Package*
2Grille SLK 230 Kompressor
except Sport Package*Removing grille SLK 320
�
Hold left and right end of grille1 and
pull out firmly.
Installing grille SLK 320
�
Position grille1 and press securely.
The grille should audibly snap into
place.
Removing grille SLK 230 Kompressor
�
Hold grille2, fold it down and pull out
firmly.
Installing grille SLK 230 Kompressor
�
Position grille2 and press securely.
The grille should audibly snap into
place.
iThe selector lever will remain locked in
positionP and the key will not turn in
the starter switch if the battery is dis-
connected or discharged. See notes on
the battery (
�page 251) or on jump
starting (
�page 254).
Vehicles with automatic transmission:
Manual unlocking of transmission se-
lector lever (�page 220).
Page 259 of 314
259 Practical hints
Towing the vehicle
Installing towing eye bolt
SLK 32 AMG, Sport Package*
The rear towing eye is located at the right,
below the bumper.
SLK 32 AMG and Sport Package are fitted
with a towing eye bolt.
The towing eye bolt is stored with the jack
in the trunk (
�page 213).The threaded hole for the towing eye bolt
is located on the passenger-side behind
the grille in the bumper panel.
1Grille SLK 32 AMG, Sport Package*Removing grille
�
Hold grille1 (arrow) and pull forward.
Installing towing eye bolt
�
Take towing eye bolt and wheel wrench
out of trunk.
�
Screw towing eye bolt into its stop and
tighten with wheel wrench.
Removing towing eye bolt
�
Loosen towing eye bolt with wheel
wrench.
�
Unscrew towing eye bolt.
�
Store towing eye bolt and wheel
wrench in trunk.
Installing grille
�
Position grille1 and press securely
The grille should audibly snap into
place.
Page 302 of 314

302 Index
High beam flasher 85
High beams 85
Instrument cluster illumination 89
Interior 87
Low beam 83
Parking lamps 83
Rear fog lamp 84
Trunk 88
Limiting the gear range 95
Limp Home Mode 98
Lock buttons 289
Locking 47, 74
Centrally from inside 80
Driver’s door and trunk in an
emergency 217
Fuel filler flap 171
Global, Remote control 75
Loss of keys 76
Loss of Service and Warranty Information
Booklet 265
Low and high beam headlamps (Xenon*
headlamps only) 228Low beam headlamps
Replacing bulbs 226, 228
Lowering
Vehicle 248
Lubricants
Technical data 277
M
Main dimensions 275
Maintenance 10, 190
Manual operations
Fuel filler flap 219
Hardtop 221
Interior lighting control 88
Locking the driver’s door and
trunk 217
Unlocking the driver’s door 216
Unlocking the trunk 216
Unlocking transmission selector
lever 220
Manual seat
Adjusting 31
Adjusting backrest tilt 32
Adjusting head restraint height 32
Adjusting seat height 31
Seat fore and aft adjustment 31Manual transmission 92
Shifting into reverse 92
Starting with 40
Microphone
Hands-free microphone 25
Mirrors
Adjusting 35
Automatic antiglare for rear view
mirror 99
Exterior rear view mirror 35
Inside rear view mirror 35
MON 171
MON (Motor Octane Number) 289
N
Night security illumination 88
O
Occupant safety 52
Airbags 53
Children and airbags 54
Children in the vehicle 60
Fastening the seat belt 37
Infant and child restraint systems 60
Seat belts 37, 55
Odometer, main 21