Page 201 of 314
201 Practical hints
What to do if …
Problem
Possible cause
Suggested solution
-
The yellow ABS malfunction indi-
cator lamp and warning comes
on while driving.
The ABS has detected a malfunction and has
switched off. The BAS and ESP are also
switched off. Both indicator lamps come on
with the engine running.
The brake system is still functioning normally
but without the ABS available.
�
Continue driving with added caution.
Wheels will lock during hard braking
reducing steering capability.
�
Have the system checked at an autho-
rized Mercedes-Benz Center as soon
as possible.
Failure to follow these instructions in-
creases the risk of an accident.
The charging voltage has fallen below
10 volts and the ABS has switched off.
�
When the voltage is above this value
again, the ABS is operational again.
�
If necessary, have the alternator and
battery checked.
Page 202 of 314
202 Practical hintsWhat to do if …Problem
Possible cause
Suggested solution
¿
The yellow BAS/ESP malfunction
indicator lamp comes on while
driving.
The ESP is deactivated because of an inter-
rupted power supply. The ABS may still be
operational.
�
Synchronize the ESP. With vehicle sta-
tionary and the engine running, turn
the steering wheel completely to the
left and then to the right to synchro-
nize the ESP.
The BAS has detected a malfunction and
switched off. The brake system is still func-
tioning normally but without the BAS avail-
able.
�
Continue driving with added caution.
�
Have the system checked at an autho-
rized Mercedes-Benz Center as soon
as possible.
Failure to follow these instructions in-
creases the risk of accident.
!When synchronizing the ESP, make
sure you can turn the steering wheel in
both directions as far as it will go with-
out the wheels hitting any objects, e.g.
a road curb.
Page 212 of 314

212 Practical hintsWhere will I find ...?
�Where will I find ...?First aid kit
The first aid kit is located on the left side of
the trunk.
1First aid kit�
Loosen the fastening strap.
�
Remove first aid kit1.
Vehicle tool kit, vehicle jack
The following is included:�
Towing eye bolt
�
Wheel wrench
�
Alignment bolt
�
Wheel bolts
�
Special fuse puller
�
Vehicle jack
Vehicle jackThe jack is exclusively designed for lifting
the vehicle during a wheel change. Always
lower the vehicle on sufficient capacity
jackstands before working under the
vehicle.
iCheck expiration dates and contents
for completeness at least once a year
and replace missing/expired items.
Warning!
G
The jack is designed exclusively for jacking
up the vehicle at the jack tubes built into ei-
ther side of the vehicle. To help avoid per-
sonal injury, use the jack only to lift the
vehicle during a wheel change. Never get
beneath the vehicle while it is supported by
the jack. Keep hands and feet away from the
area under the lifted vehicle.
Always firmly set parking brake and block
wheels before raising vehicle with jack.
Do not disengage parking brake while the
vehicle is raised. Be certain that the jack is
always vertical (plumb line) when in use, es-
pecially on hills. Always try to use the jack
on level surface. Make sure the jack arm is
fully inserted in the jack tube. Always lower
the vehicle onto sufficient capacity jack-
stands before working under the vehicle.
Page 213 of 314
213 Practical hints
Where will I find ...?
Spare wheel (SLK 230 Kompressor, SLK 320)
1Spare wheel with collapsible tire
2Vehicle tool kit
3Wheel wrench
4Jack
5Electric air pump, bolts for spare wheel
rimSparewheel, vehicle tool kit, wheel
wrench, jack and electric air pump are
located under the trunk floor cover.
�
Lift trunk floor cover.
You can take out vehicle tool kit2,
wheel wrench3 and jack4.
Electric air pump5 is secured with a belt.
�
Loosen the belt.
�
Remove electric air pump from pump
holder.
Spare wheel1 is secured with the pump
holder.
�
Turn pump holder counterclockwise.
�
Remove pump holder.
�
Remove spare wheel out of the wheel
well.Spare wheel bolts
Wheel bolts1 Wheel bolt for�
wheel rim size 7J x16H2 and
8Jx16H2
�
AMG wheel rim size 7½ J x 17 H2 and
8½ J x 17 H2
�
spare wheel rim size 4.5 B x 16 H2
2 Wheel bolt for
�
spare wheel rim size 4.5 B x 15 H2
(located with electric air pump)
Page 214 of 314
214 Practical hintsWhere will I find ...?More information can be found in the
“Technical data” section (
�page 263).
TIREFIT kit (SLK 32 AMG only)
1Electric air pump
2TIREFIT kit
3Vehicle tool kit, jack, wheel wrenchThe electric air pump and TIREFIT kit are
located in the storage box under the trunk
floor cover.
The vehicle tool kit, jack and wheel wrench
are located below the rug on the right side.
�
Lift trunk floor cover.
�
Open storage box cover.
You can take out vehicle tool kit3 and
accessories.
�
Pull down the flap on the storage box.
�
Remove electric air pump1 and
TIREFIT kit2.
!Wheel bolts2 must be used when
mounting spare wheel rim size
4.5 B x 15 H2.
The use of any wheel bolts other than
wheel bolts2 for spare wheel rim size
4.5 B x 15 H2 can cause physical dam-
age to the vehicle.Warning!
G
Make sure to use original length wheel bolts
when remounting the original wheel after it
has been repaired.
Page 215 of 314
215 Practical hints
Where will I find ...?
Vehicles with TIREFIT kit (SLK 32 AMG)
and CD changer* in trunk
1Storage box cover
2CD changer*
The vehicle tool kit, jack and wheel wrench
are located underneath the
CD changer2.�
Lift trunk floor cover.
�
Open storage box cover1.3Latch
�
Slide latch3 forward to disengage
storage box.
�
Remove storage box.4Carpet cover
�
Slide small carpet cover4 from un-
derneath the CD changer*2 and flip
backwards for easier access to tool kit,
jack and wrench.
�
Slide out tool kit and jack in the direc-
tion of arrow. The wheel wrench is lo-
cated behind the tool kit and jack.
Page 235 of 314

235 Practical hints
Flat tire
�Flat tire
Your vehicle is equipped with a TIREFIT kit
(SLK 32 AMG only) (
�page 214) or a
spare wheel with collapsible tire
(SLK 230 Kompressor and SLK 320 only)
(
�page 213).
You can identify which TIREFIT kit
(SLK 32 AMG only) you have as follows:
�
The TIREFIT container of kit 1 is a
squeeze container.
�
The TIREFIT container of kit 2 is a rigid
container and includes a flange for filler
hose (outlet) and air hose (inlet).
Preparing the vehicle�
Park the vehicle as far as possible from
moving traffic on a hard surface.
�
Turn on hazard warning flasher.
�
Engage the steering wheel lock in the
straight ahead position and set the
parking brake.
�
Move the selector lever toP (manual
transmission to first or reverse gear).
�
Have any passenger exit the vehicle at
a safe distance from the roadway.
Sealing tires with TIREFIT kit 1
Small tire punctures, only those in the
tread, can be sealed with TIREFIT.
TIREFIT can be used in ambient tempera-
tures down to -4°F (-20°C).
The TIREFIT kit stored in the trunk
(�page 214) contains the TIREFIT
container, a filler hose, a valve stem tool,
a valve core and a sticker.
�
Foreign objects (e.g. screws or nails)
should not be removed from the tire.
�
Attach the sticker where it will be easily
seen by the driver on the instrument
cluster.
Warning!
G
Keep TIREFIT away from sparks, open flame
or heat source.
Do not smoke.
Warning!
G
TIREFIT is a limited repair device. TIREFIT
cannot be used for:�
cuts or punctures larger than approx.
0.16 in (4 mm)
�
on a flat tire, or a damaged wheel
�
tire damage caused by driving with ex-
tremely low tire pressure
Do not drive the vehicle under such circum-
stances.
Contact your nearest Mercedes-Benz
Center for assistance or call Roadside Assis-
tance.
Page 241 of 314

241 Practical hints
Flat tire
�
Take the TIREFIT kit out of the trunk
(�page 214).
�
Foreign objects (e.g. screws or nails)
should not be removed from the tire.
�
Attach the sticker where it will be easily
seen by the driver on the instrument
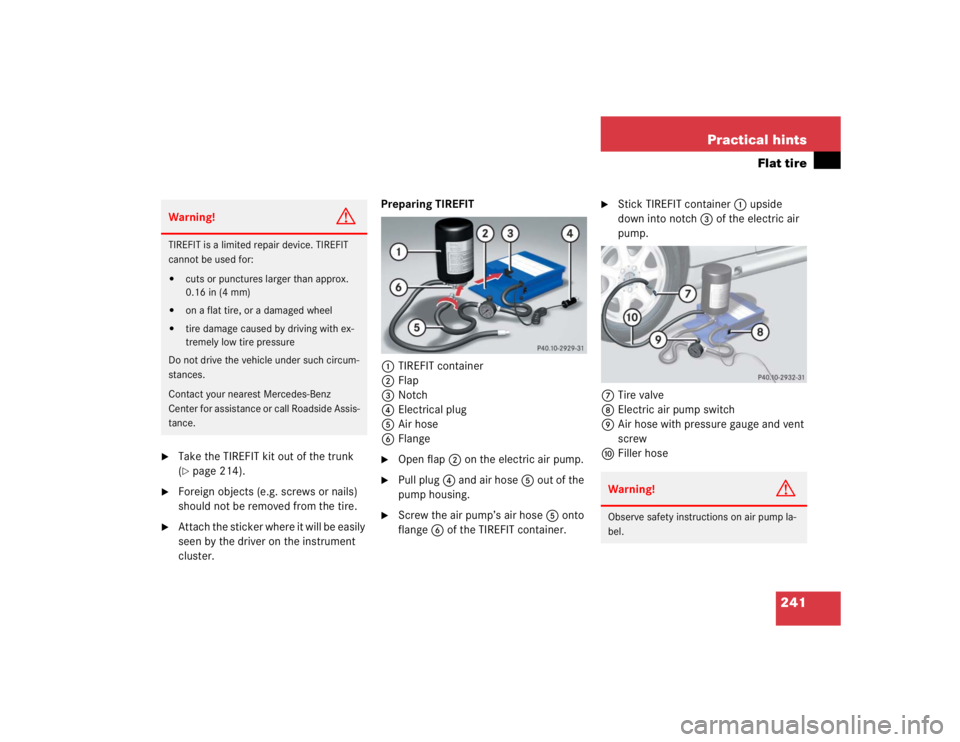
cluster.Preparing TIREFIT
1TIREFIT container
2Flap
3Notch
4Electrical plug
5Air hose
6Flange
�
Open flap2 on the electric air pump.
�
Pull plug4 and air hose5 out of the
pump housing.
�
Screw the air pump’s air hose5 onto
flange6 of the TIREFIT container.
�
Stick TIREFIT container 1 upside
down into notch 3 of the electric air
pump.
7Tire valve
8Electric air pump switch
9Air hose with pressure gauge and vent
screw
aFiller hose
Warning!
G
TIREFIT is a limited repair device. TIREFIT
cannot be used for:�
cuts or punctures larger than approx.
0.16 in (4 mm)
�
on a flat tire, or a damaged wheel
�
tire damage caused by driving with ex-
tremely low tire pressure
Do not drive the vehicle under such circum-
stances.
Contact your nearest Mercedes-Benz
Center for assistance or call Roadside Assis-
tance.
Warning!
G
Observe safety instructions on air pump la-
bel.