Page 180 of 314

180 OperationEngine compartmentBe careful not to spill any oil when adding.
Avoid environmental damage caused by oil
entering the ground or water.�
Screw filler cap2 back on filler neck.
More information on engine oil can be
found in the “Technical data” section
(
�page 277) and (
�page 279).
Transmission fluid level
The transmission fluid level does not need
to be checked. If you notice transmission
fluid loss or gear shifting malfunctions,
have an authorized Mercedes-Benz Center
check the transmission.Coolant
The engine coolant is a mixture of water
and anticorrosion/antifreeze. To check
the coolant level, the vehicle must be
parked on level ground and the engine
must be cool.
The coolant expansion tank is located on
the passenger side of the engine compart-
ment.
!Excess oil must be siphoned or drained
off. It could cause damage to the
engine and catalytic converter not
covered by the Mercedes-Benz Limited
Warranty.
Warning!
G
In order to avoid any possibly serious burns:�
Use extreme caution when opening the
hood if there are any signs of steam or
coolant leaking from the cooling system,
or if the coolant temperature gauge indi-
cates that the coolant is overheated.
�
Do not remove pressure cap on coolant
reservoir if engine temperature is above
194°F (90°C). Allow engine to cool
down before removing cap. The coolant
reservoir contains hot fluid and is under
pressure.
�
Using a rag, slowly open the cap approx-
imately ½ turn to relieve excess pres-
sure. If opened immediately, scalding
hot fluid and steam will be blown out un-
der pressure.
�
Do not spill antifreeze on hot engine
parts. Antifreeze contains ethylene gly-
col which may burn if it comes into con-
tact with hot engine parts.
��
Page 228 of 314
�
Switch off the lights.
�
Open the hood (
�page 174).
1Headlamp cover with loc")
228 Practical hintsReplacing bulbsReplacing bulbs for front lamps
Low and high beam headlamps (Halo-
gen headlamps only)�
Switch off the lights.
�
Open the hood (
�page 174).
1Headlamp cover with locking tab
�
Push down locking tab at top and end
of headlamp cover1 and remove.2Electrical connector for low beam
headlamp bulb
3Electrical connector for high beam
headlamp bulb
�
Pull off electrical connector2 or3.
�
Unhook clamping ring and pull out the
bulb together with clamping ring.
�
Remove bulb.
�
Insert new bulb so that bulb sits prop-
erly in cutouts of bulb socket.
�
Mount clamping ring and reinstall.
�
Plug electrical connector onto the bulb.
�
Reinstall headlamp cover1.Low and high beam headlamps (Xenon*
headlamps only)
Warning!
G
Do not remove the cover for the xenon head-
lamp. Because of high voltage in xenon
lamps, it is dangerous to replace the bulb or
repair the lamp and its components. We rec-
om men d t ha t y ou ha ve s uc h w o rk do n e by a
qualified technician.
Page 229 of 314
229 Practical hints
Replacing bulbs
Parking, standing and turn signal lamp�
Switch off the lights.
�
Open the hood (
�page 174).
1Release opening
�
Insert the screwdriver from the vehicle
tool kit into release opening1.
�
Press the top of the screwdriver toward
the middle of the vehicle and toward
the rear.
The turn signal lamp will be lifted out.
�
Pull the turn signal lamp slightly out of
its mounting.
�
Pull off the electrical connector from
the turn signal lamp.
�
Take the turn signal lamp completely
out of its mounting.
�
Twist bulb socket counterclockwise
and pull out.
�
Gently push bulb into socket, turn
counterclockwise and remove.
�
Insert new bulb in socket, push in and
twist clockwise.
�
Reinstall bulb socket, push in and twist
clockwise.
�
Plug electrical connector back into the
turn signal lamp.2Guides
3Tabs
�
Slide the turn signal lamp with tabs3
into guides2 and press it toward the
rear into the mounting until it engages.
Page 231 of 314
231 Practical hints
Replacing bulbs
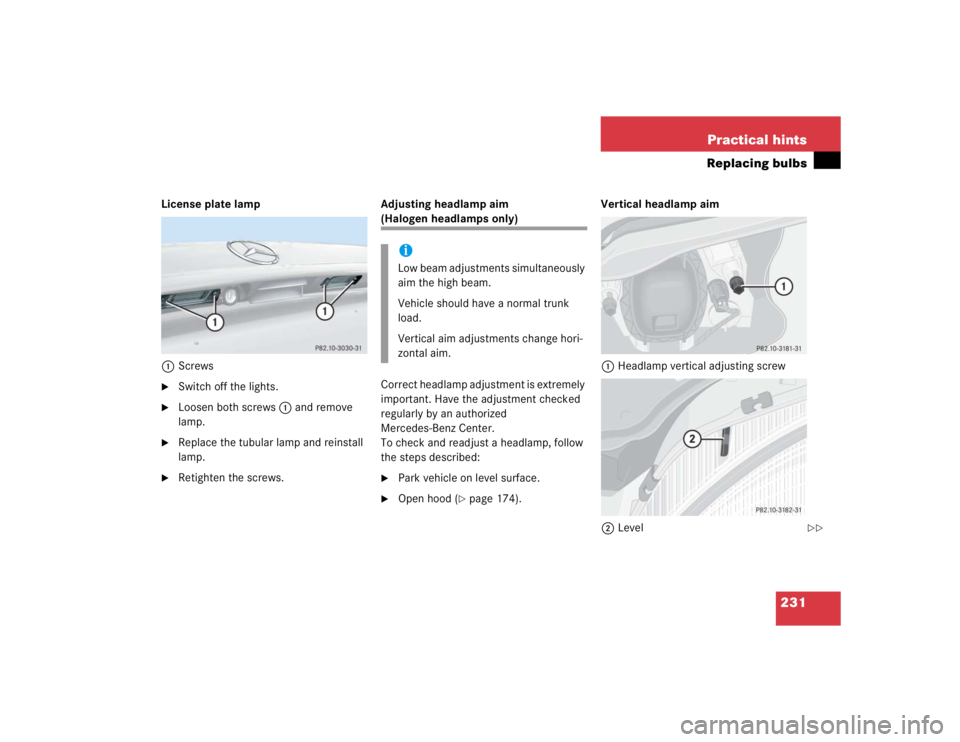
License plate lamp
1Screws�
Switch off the lights.
�
Loosen both screws1 and remove
lamp.
�
Replace the tubular lamp and reinstall
lamp.
�
Retighten the screws.Adjusting headlamp aim
(Halogen headlamps only)
Correct headlamp adjustment is extremely
important. Have the adjustment checked
regularly by an authorized
Mercedes-Benz Center.
To check and readjust a headlamp, follow
the steps described:�
Park vehicle on level surface.
�
Open hood (
�page 174).Vertical headlamp aim
1Headlamp vertical adjusting screw
2Level
iLow beam adjustments simultaneously
aim the high beam.
Vehicle should have a normal trunk
load.
Vertical aim adjustments change hori-
zontal aim.
��
Page 234 of 314
234 Practical hintsReplacing wiper bladesInstalling wiper blades�
Slide the wiper blade onto wiper arm
until it locks in place.
�
Rotate the wiper blade into position
parallel to wiper arm.
�
Fold the wiper arm back to rest on the
windshield. Make sure you hold on to
the wiper when folding the wiper arm
back.
!Never open the hood when the wiper
arms are folded forward.
Hold on to the wiper when folding the
wiper arm back. If released, the force
of the impact from the tensioning
spring could crack the windshield.
Do not allow the wiper arms to contact
the windshield glass without a wiper
blade inserted.
Make certain that the wiper blades are
properly installed. Improperly installed
wiper blades may cause windshield
damage.
For your convenience, we recommend
that you have this work carried out by
an authorized Mercedes-Benz Center.
Page 252 of 314
.
�
Turn off all electrical consumers.
�
R")
252 Practical hintsBatteryDisconnecting the battery�
Depress parking brake firmly or move
gear selector lever to positionP (man-
ual transmission to Neutral).
�
Turn off all electrical consumers.
�
Remove key from steering lock.
�
Open the hood (
�page 174).
�
Disconnect the battery negative lead.
�
Remove the cover2 from the positive
terminal.
�
Disconnect the battery positive lead.
Removing the battery�
Remove the screw on the swivel bar.
�
Remove the swivel bar.
�
Take out the battery.
Charging and reinstalling battery�
Charge battery in accordance with the
instructions of the battery charger
manufacturer.
�
Reinstall the charged battery. Follow
the previously described steps in re-
verse order.
Reconnecting the battery�
Turn off all electrical consumers.
�
Connect the positive lead and fasten its
cover2.
�
Connect the negative lead.
Warning!
G
With a disconnected battery�
you will no longer be able to turn the key
in the steering lock
�
automatic transmission: the gear selec-
tor lever will remain locked in positionP
Warning!
G
Never charge a battery while still installed in
the vehicle. Gases may escape during charg-
ing and cause explosions that may result in
paint damage, corrosion or personal injury.
!Never invert the terminal connections!!The battery, its filler caps and the vent
tube must always be securely installed
when the vehicle is in operation.
Page 255 of 314

255 Practical hints
Jump starting
The battery is located on the right side of
the engine compartment.�
Make sure the two vehicles do not
touch.
�
Turn off all electrical consumers.
�
Apply parking brake.
�
Shift gear selector lever to positionP
(manual transmission to Neutral).
�
Open the hood.
�
Connect positive terminals1 and2
of the batteries with the jumper cables.
Clamp cable to charged battery1
first.1Positive terminal of charged battery
2Positive terminal of discharged battery
3Negative terminal of discharged
battery
4Negative terminal of charged battery
�
Start engine of the vehicle with the
charged battery and run at idle speed.
�
Connect negative terminals3 and4
of the batteries with the jumper cables.
Clamp cable to charged battery4
first.
�
Start the engine of the disabled vehi-
cle.
You can now again turn on the electrical
consumers. Do not turn on the lights under
any circumstances.
�
Remove the jumper cables first from
negative terminals3 and4 of the
batteries and then from positive
terminals1 and2.
You can now turn on the lights.
�
Have the battery checked at the near-
est authorized Mercedes-Benz Center.
Warning!
G
Keep flames or sparks away from battery.
Do not smoke.
Observe all safety instructions and precau-
tions when handling automotive batteries.
!Never invert the terminal connections.
iVehicles with automatic transmission:
Do not tow-start vehicle.
Page 298 of 314

298 IndexDownhill driving
Cruise control 137
Downshifting 92, 94
Drink holder see Cup holder 140
Drinking and driving 161
Driving
General instructions 37, 161
Hydroplaning 165
In winter 167
Problems 45
Safety systems 66
Through standing water 168
Traveling abroad 168
Driving instructions 161
Driving off 163
Driving safety systems
ABS 66
BAS 67
ESP 68
Driving systems 136
Cruise control 136
Driving safety systems 66E
Electrical fuses 260
Electrical system
Technical data 274
Electronic Stability Program see ESP 22,
68, 288
Emergency call system 145
Requirements 145
Emergency calls
Initiating an emergency call 147
With Tele Aid 146
Emergency operation (Limp Home
Mode) 98
Emergency operations
Closing hardtop 221
Opening hardtop 221
Releasing trunk lid from inside 78
Remote door unlock 151
Unlocking the vehicle 216
Emergency tensioning device see
ETD 60, 288
Emission control 170
Emission control label 266
Engine
Compartment 174Starting with automatic
transmission* 41
Starting with manual
transmission 40
Starting with the key 40, 41
Technical data 268
Turning off with the key 48
Engine cleaning 194
Engine compartment 174
Hood 174
Engine malfunction indicator lamp 21,
205
Engine number 288
Engine oil 175, 279
Adding 179
Additives 279
Checking level 175
Consumption 175
Messages in display 176
Oil dipstick 179
Viscosity 288
Engine oil level see Oil level 172
ESP 22, 68, 288
Switching off 69
Switching on 70
Synchronizing 202