Page 6 of 314

Contents
Manually unlocking the
transmission selector lever .......... 220
Opening/closing in an emergency ..... 221
Raising retractable hardtop
manually ...................................... 221
Replacing bulbs ................................. 226
Bulbs ............................................ 226
Replacing bulbs for front lamps.... 228
Replacing bulbs for rear lamps ..... 230
Adjusting headlamp aim
(Halogen headlamps only) ............ 231
Replacing wiper blades ...................... 233
Removing wiper blades ................ 233
Installing wiper blades.................. 234
Flat tire .............................................. 235
Preparing the vehicle.................... 235
Sealing tires with TIREFIT kit 1 ..... 235
Sealing tires with TIREFIT kit 2 ..... 240
Mounting the spare wheel ............ 244
Battery ............................................... 251
Disconnecting the battery ............ 252
Removing the battery ................... 252
Charging and reinstalling battery . 252
Reconnecting the battery ............. 252
Jump starting ..................................... 254Towing the vehicle ............................. 256
Towing eye ................................... 258
Installing towing eye bolt ............. 259
Fuses ................................................. 260
Main fuse box............................... 260
Auxiliary fuse box ......................... 261
Technical data................................. 263
Spare parts service ............................ 264
Warranty coverage............................. 265
Loss of Service and Warranty
Information Booklet ..................... 265
Identification labels ........................... 266
Layout of poly-V-belt drive ................. 267
SLK 230 Kompressor ................... 267
SLK 320 ....................................... 267
SLK 32 AMG................................. 267
Engine................................................ 268
Rims and Tires ................................... 269
Same size tires ............................. 270
Mixed size tires ............................ 271
Spare wheel with collapsible tire.. 273
Electrical system ............................... 274
Main Dimensions ............................... 275
Weights.............................................. 276Fuels, coolants, lubricants etc. .......... 277
Capacities .................................... 277
Engine oils ................................... 279
Engine oil additives ...................... 279
Air conditioning refrigerant .......... 279
Brake fluid.................................... 279
Premium unleaded gasoline ......... 280
Fuel requirements ........................ 280
Gasoline additives ........................ 280
Coolants ...................................... 281
Windshield washer system and
headlamp washer system* .......... 283
Consumer information ....................... 284
Uniform tire quality grading ......... 284
Technical terms............................... 287Index................................................. 293
Page 174 of 314

174 OperationEngine compartment
�Engine compartmentHood
Opening
1Hood release
�
Pull hood release1 downwards.
The hood is unlocked.
2Lever for opening the hood
�
Push lever2 on the hood upwards.
�
Open the hood (do not pull up on the
lever) and then release it.
The hood will be automatically held
open at shoulder height by gas-filled
struts.
Warning!
G
Do not pull the release lever while the vehi-
cle is in motion. Otherwise the hood could
be forced open by passing air flow.
!To avoid damage to the windshield wip-
ers or hood, never open the hood if the
wiper arms are folded forward away
from the windshield.
Warning!
G
To help prevent personal injury, stay clear of
moving parts when the hood is open and the
engine is running. Make sure the hood is
properly closed before driving. When closing
the hood, use extreme caution not to catch
hands or fingers.
The radiator fan may continue to run for ap-
proximately 30 seconds or even restart af-
ter the engine has been turned off. Stay
clear of fan blades.
Page 195 of 314

195 Operation
Vehicle care
Wiper blades�
Fold wiper arm forward.
�
Clean the wiper blade inserts with a
clean cloth and detergent solution.Window cleaning
�
Fold wiper arm forward.
�
Use a window cleaning solution on all
glass surfaces.
An automotive glass cleaner is recom-
mended.Rear window cleaning
The corner flaps of the rear shelf partially
cover the rear window. This prevents the
window from being fully cleaned with the
hardtop closed.
Warning!
G
For safety reasons, switch off wipers and re-
move Key from starter switch before clean-
ing the wiper blades, otherwise the wiper
motor might suddenly turn on and cause in-
jury.!Fold the windshield wiper arms back
onto the windshield before turning the
key in the starter switch.
Hold onto the wiper when folding the
wiper arm back. If released, the force
of the impact from the tensioning
spring could crack the windshield.
Warning!
G
For safety reasons, switch off wipers and re-
move Key from starter switch before clean-
ing the wiper blades, otherwise the wiper
motor might suddenly turn on and cause in-
jury.!Fold the windshield wiper arms back
onto the windshield before turning the
key in the steering lock.
Hold onto the wiper when folding the
wiper arm back. If released, the force
of the impact from the tensioning
spring could crack the windshield.
!Do not manually move corner flaps or
rear shelf. Doing so will result in dam-
age to the roof folding mechanism that
is not covered by the Mercedes-Benz
Limited Warranty.Warning!
G
If a warning sounds and the indicator lamp
in the hardtop switch blinks, immediately
stop cleaning and move back from window
to prevent possible injury.
The hardtop is lowered into its storage com-
partment.
Page 199 of 314
199 Practical hints
What to do if …
Where will I find ...?
Unlocking/locking in an emergency
Opening/closing in an emergency
Replacing bulbs
Replacing wiper blades
Flat tire
Battery
Jump starting
Towing the vehicle
Fuses
Page 233 of 314
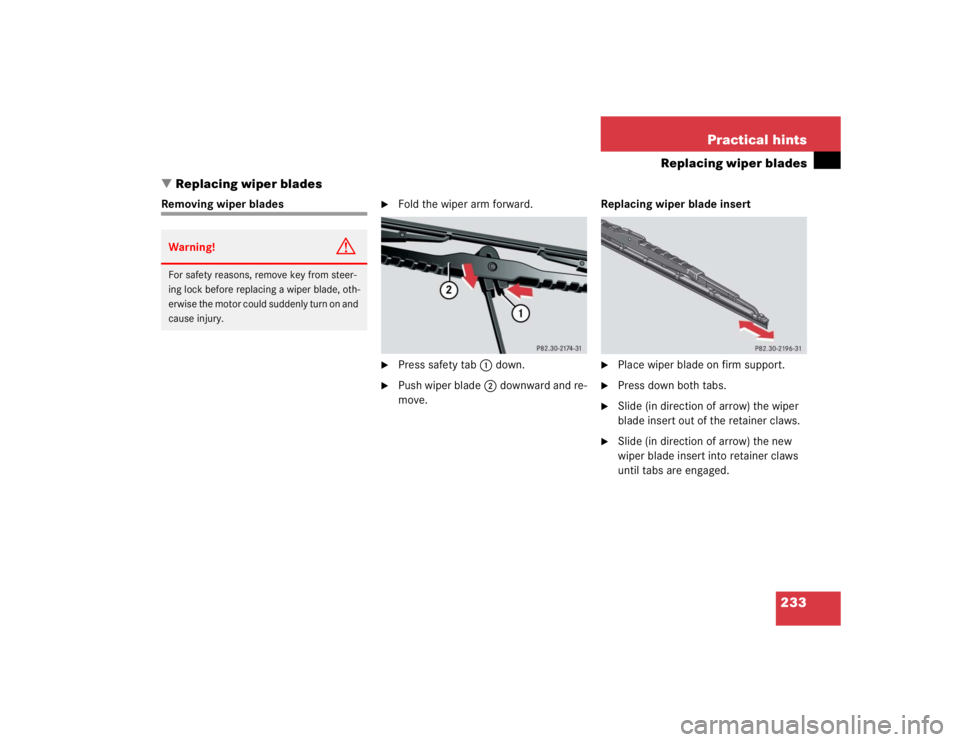
233 Practical hints
Replacing wiper blades
�Replacing wiper blades
Removing wiper blades
�
Fold the wiper arm forward.
�
Press safety tab1down.
�
Push wiper blade2downward and re-
move.Replacing wiper blade insert
�
Place wiper blade on firm support.
�
Press down both tabs.
�
Slide (in direction of arrow) the wiper
blade insert out of the retainer claws.
�
Slide (in direction of arrow) the new
wiper blade insert into retainer claws
until tabs are engaged.
Warning!
G
For safety reasons, remove key from steer-
ing lock before replacing a wiper blade, oth-
erwise the motor could suddenly turn on and
cause injury.
Page 234 of 314
234 Practical hintsReplacing wiper bladesInstalling wiper blades�
Slide the wiper blade onto wiper arm
until it locks in place.
�
Rotate the wiper blade into position
parallel to wiper arm.
�
Fold the wiper arm back to rest on the
windshield. Make sure you hold on to
the wiper when folding the wiper arm
back.
!Never open the hood when the wiper
arms are folded forward.
Hold on to the wiper when folding the
wiper arm back. If released, the force
of the impact from the tensioning
spring could crack the windshield.
Do not allow the wiper arms to contact
the windshield glass without a wiper
blade inserted.
Make certain that the wiper blades are
properly installed. Improperly installed
wiper blades may cause windshield
damage.
For your convenience, we recommend
that you have this work carried out by
an authorized Mercedes-Benz Center.
Page 296 of 314

296 IndexCentral locking
From inside 80
Unlocking from inside 80
Certification label 266
Changing CDs
CD mode 121
Charging
Vehicle battery 252
CHECK ENGINE malfunction indicator
lamp 205
Checking
Coolant level 173, 180
Oil level 172, 175
Tire inflation pressure 173
Vehicle lighting 173
Child safety 60
Airbags 54
Infant and child restraint systems 57,
60
Cigarette lighter 143
Cleaning
Cloth upholstery 197Cup holder 196
Gear selector lever 196
Hard plastic trim items 196
Headliner 197
Instrument cluster 196
Leather upholstery 197
Light alloy wheels 196
Plastic and rubber parts 197
Rear window 195
Seat belts 197
Steering wheel 196
Windows 195
Windshield 45
Wiper blades 195
Cleaning*
Headlamps 99
Climate control 102
Adjusting air distribution 105
Adjusting air volume 105
Air conditioning 106
Air recirculation mode 106
Deactivating the climate control
system 110
Defogging windshield 110
Defrosting 109Reactivating the climate control
system 110
Rear window defroster 101
Residual heat utilization 107
Residual ventilation 107
Setting the temperature 104
Clock 21
Setting 91
Closing
Glove box 139
Hood 175
Retractable hardtop 221
Side windows 128
Trunk lid 78
Windows 128
Closing hardtop
In an emergency 221
Cloth upholstery
Cleaning 197
Cockpit 18, 287
Coin holder 142
Collapsible tire 287
Page 300 of 314
 288
Glove box 19, 139
Closing 139
Opening 139
Good visibility 99
GPS 288
H
Hands-free microphone 25
Hard plastic trim items
Clea")
300 IndexGlobal
Locking 75
Unlocking 75
Global Positioning System (GPS) 288
Glove box 19, 139
Closing 139
Opening 139
Good visibility 99
GPS 288
H
Hands-free microphone 25
Hard plastic trim items
Cleaning 196
Hazard warning flasher 86
Switching off 86
Switching on 86
Head restraints 81
Installing 81
Manual seats 32
Removing 81
Headlamp cleaning system 184Headlamps
Cleaning 194
Cleaning system 184
Cleaning system* 99
Refilling washer fluid 184
Switching off 48
Switching on 43
Washer fluid 283
Washer system 283
Xenon* 291
Headliner
Cleaning 197
Heated seats* 82
Height adjustment
Head restraints 32
Telescoping steering column* 34
High beam flasher 44, 85
High beam headlamps
Replacing bulbs 226, 228
Switching on 85
High mounted brake lamp 227
Hood 174
Closing 175
Opening 174
Hydroplaning 165I
Identification labels 266
Certification label 266
Vehicle Identification Number
(VIN) 266
Ignition 29
Switching on 40, 41
Immobilizer 71
Activating 71
Deactivating 71
Infant and child restraint systems 60
Information
About service and warranty 8
Button for Tele Aid 149
Inside rear view mirror
Adjusting 35
Installing
Towing eye bolt 259
Wiper blades 234
Instrument cluster 20, 89, 288
Cleaning 196
Coolant temperature gauge 89
Illumination 89
Lamps in 207
Outside temperature indicator 91
Instruments and controls see Cockpit 18