Page 355 of 434
354 Practical hintsFlat tire�
Unscrew the alignment bolt, install last
wheel bolt and tighten slightly.Inflating the spare tire
�
Take the electric air pump out of the
trunk (
�page 323).
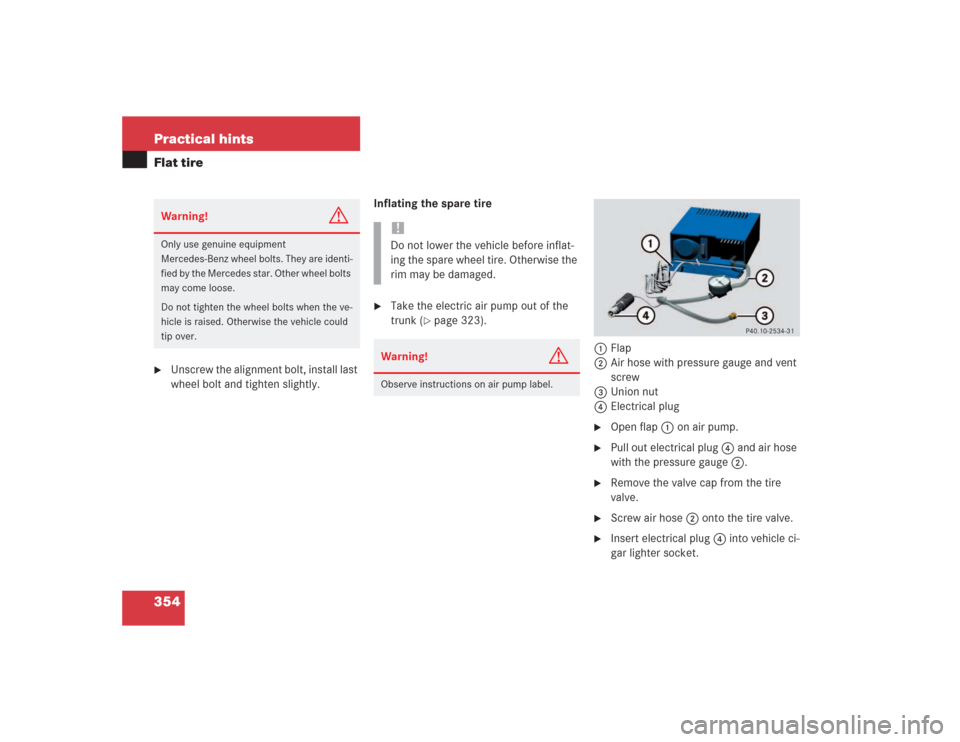
1Flap
2Air hose with pressure gauge and vent
screw
3Union nut
4Electrical plug
�
Open flap 1 on air pump.
�
Pull out electrical plug 4 and air hose
with the pressure gauge 2.
�
Remove the valve cap from the tire
valve.
�
Screw air hose 2 onto the tire valve.
�
Insert electrical plug 4 into vehicle ci-
gar lighter socket.
Warning!
G
Only use genuine equipment
Mercedes-Benz wheel bolts. They are identi-
fied by the Mercedes star. Other wheel bolts
may come loose.
Do not tighten the wheel bolts when the ve-
hicle is raised. Otherwise the vehicle could
tip over.
!Do not lower the vehicle before inflat-
ing the spare wheel tire. Otherwise the
rim may be damaged.Warning!
G
Observe instructions on air pump label.
Page 357 of 434

356 Practical hintsFlat tire�
Detach the electric air pump.
�
Stow the electrical plug and the air
hose behind the flap and place the air
pump back in the trunk.Lowering the vehicle
�
Lower vehicle by turning crank coun-
terclockwise until the full weight of the
vehicle is resting on the ground.
�
Pull the jack out of the jack support
tube.
1 - 5 Wheel bolts
�
Tighten the five wheel bolts evenly, fol-
lowing the diagonal sequence illustrat-
ed (1 to 5), until all bolts are tight.
Observe a tightening torque of 96 lb-ft
(130 Nm).
�
Before storing the jack in the trunk,
crank back to storage position and fold
in the arm.
iThe flat tire may be transported in the
trunk when the retractable hardtop is
raised. Use the protective sheet provid-
ed with the spare wheel. Do not acti-
vate the tire inflation pressure monitor
until the deflated tire has been re-
moved from the vehicle.
Warning!
G
Have the tightening torque checked after
changing a wheel. The wheels could come
loose if they are not tightened to a torque of
96 lb-ft (130 Nm).Warning
G
When turning the wheel wrench to tighten
the wheel bolts, make sure you position
hands on the wrench in such a way that you
avoid injury to yourself, such as scraping
your hands against the wheel. Make sure
turning the wheel wrench will not scratch or
damage the wheel rim.
��
Page 359 of 434

�
The battery for electrical consumers
(located in the")
358 Practical hintsBatteries
�BatteriesYour vehicle is equipped with two
batteries:�
The starter battery (located in the en-
gine compartment)
�
The battery for electrical consumers
(located in the trunk)
Starter battery in the engine compartment1Positive terminal
2Negative terminal
Warning!
G
Failure to follow these instructions can re-
sult in severe injury or death.
Never lean over batteries while connecting,
you might get injured.
Battery fluid contains sulfuric acid. Do not
allow this fluid to come in contact with eyes,
skin or clothing. In case it does, immediately
flush affected area with water and seek
medical help if necessary.
A battery will also produce hydrogen gas,
which is flammable and explosive. Keep
flames or sparks away from battery, avoid
improper connection of jumper cables,
smoking, etc.
!Never loosen or detach battery termi-
nal clamps while the engine is running
or the SmartKey is in the starter switch.
Otherwise the alternator and other
electronic components could be se-
verely damaged.
Have the starter battery checked regu-
larly by an authorized Mercedes-Benz
Center.
Refer to Service Booklet for mainte-
nance intervals or contact an autho-
rized Mercedes-Benz Center for further
information.
Page 361 of 434
360 Practical hintsBatteriesDisconnecting the batteries Disconnecting the battery for electrical
consumers
�
Unhook the luggage cover in the trunk.
�
Remove the trunk floor.
The battery for electrical consumers is
located in the right hand area of the
trunk (
�page 323).
�
Use the 10 mm open-end wrench from
the vehicle tool kit to disconnect the
battery negative lead.
�
Remove the cover from the positive ter-
minal.
�
Disconnect the battery positive lead.Disconnecting the starter battery
�
Use the 10 mm open-end wrench from
the vehicle tool kit to disconnect the
battery negative lead.
�
Remove the cover from the positive ter-
minal.
�
Disconnect the battery positive lead.
!To avoid damage to electrical compo-
nents, always disconnect the battery
for electrical consumers (in trunk) first.
This applies even if you only wish to
charge the starter battery. Otherwise
the electronics of the vehicle can be
damaged.
Page 362 of 434

361 Practical hints
Batteries
Removing the batteries
Removing the battery for electrical con-
sumers�
Remove the screws securing the bat-
tery in the trunk.
�
Remove the battery support and brack-
et. Take out the battery.
Removing the starter battery
�
Remove the screws securing the start-
er battery in the engine compartment.
�
Lift the retaining bracket and remove
the battery.
Charging and reinstalling batteries�
Charge batteries in accordance with
the instructions of the battery charger
manufacturer.
�
Reinstall the charged battery. Follow
the previously described steps in re-
verse order.
Reconnecting the batteries
Reconnecting the starter battery�
Turn off all electrical consumers.
�
Connect the positive lead and fasten its
cover.
�
Connect the negative lead.
Warning!
G
Never charge a battery while still installed in
the vehicle. Gases may escape during charg-
ing and cause explosions that may result in
paint damage, corrosion or personal injury.
!To avoid damage to electrical compo-
nents, always reconnect the starter
battery (in engine compartment) first. !Never invert the terminal connections!!The battery, its filler caps, and the vent
tube must always be securely installed
when the vehicle is in operation.
Page 363 of 434
362 Practical hintsBatteriesReconnecting the battery for electrical
consumers�
Turn off all electrical consumers.
�
Connect the positive lead and fasten its
cover.
�
Connect the negative lead.
�
Reinstall the trunk floor.
�
Rehook trunk luggage cover into hold-
ers.
!Never invert the terminal connections!iThe following procedures must be car-
ried out following any interruption of
battery power (e.g. due to reconnec-
tion):�
Resynchronize the ESP
(�page 295).
�
Resynchronize side windows
(�page 183).
Page 369 of 434
368 Practical hintsTowing the vehicleInstalling towing eye bolt
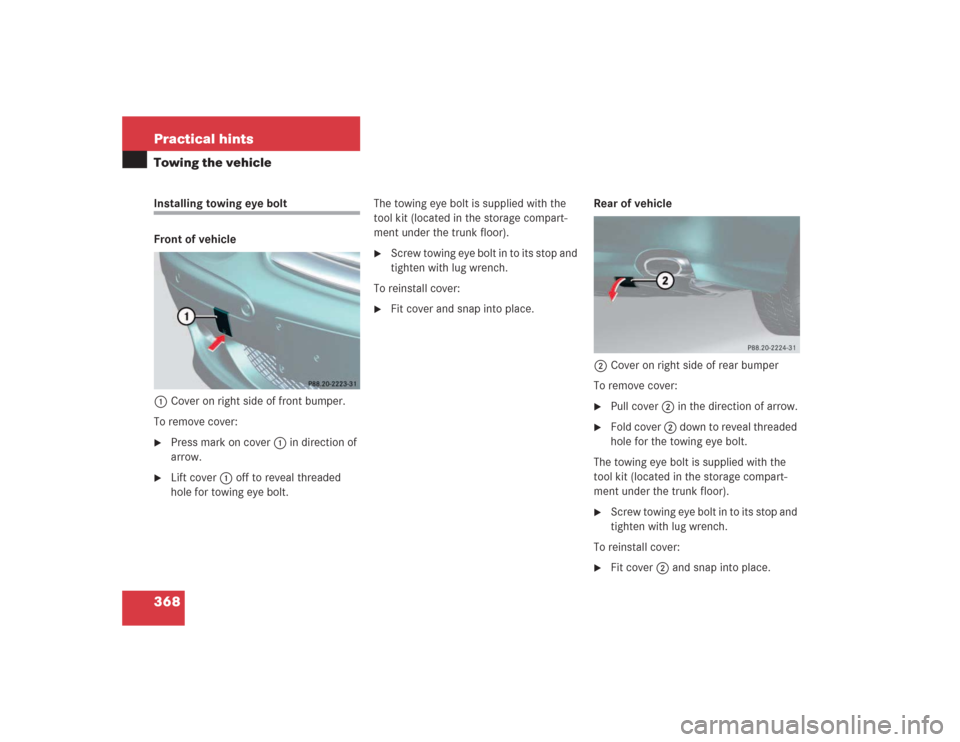
Front of vehicle
1Cover on right side of front bumper.
To remove cover:�
Press mark on cover 1 in direction of
arrow.
�
Lift cover1off to reveal threaded
hole for towing eye bolt.The towing eye bolt is supplied with the
tool kit (located in the storage compart-
ment under the trunk floor).
�
Screw towing eye bolt in to its stop and
tighten with lug wrench.
To reinstall cover:
�
Fit cover and snap into place.Rear of vehicle
2Cover on right side of rear bumper
To remove cover:
�
Pull cover 2 in the direction of arrow.
�
Fold cover 2 down to reveal threaded
hole for the towing eye bolt.
The towing eye bolt is supplied with the
tool kit (located in the storage compart-
ment under the trunk floor).
�
Screw towing eye bolt in to its stop and
tighten with lug wrench.
To reinstall cover:
�
Fit cover 2 and snap into place.
Page 370 of 434
")
369 Practical hintsFuses
�Fuses
Main fuse box
The main fuse box is in the engine com-
partment on the driver’s side in front of the
bulkhead (wall separating the engine and
passenger compartments).
1Main fuse box
2Unlocking
3Locking
Opening�
Move slide to position 2 and lift cover.Closing
�
Hook cover onto tabs and close.
�
Move slide to position 3.
Fuse chart
The fuse chart is found in the vehicle tool
kit in the trunk. The amperages of the fus-
es are also given there.
Spare fuses
Spare fuses are found in the vehicle tool kit
in the trunk.
Fuse extractor
The fuse extractor is found in the vehicle
tool kit in the trunk.
iOnly install fuses that have been tested
and approved by Mercedes-Benz and
that have the specified amperage rat-
ing.
Never attempt to repair or bridge a
blown fuse. Have the cause determined
and remedied by an authorized
Mercedes-Benz Center.
!The fuse box cover must be properly
positioned with the slide at the ‹
symbol to prevent moisture or dirt from
entering the fuse box and possibly im-
pairing fuse operation.