Page 222 of 434

221 Controls in detail
Useful features
Load assist in the trunk
To facilitate trunk loading after opening the
lid, use the load assist feature to raise the
retracted hardtop from its storage position
in the trunk.
1Retracted hardtop
2Luggage cover
3Load assist buttonRaising the hardtop
The hardtop can only be raised when the
luggage cover is closed and the trunk lid is
completely opened.
�
Press button3.
The hardtop rises a short distance.
Button3 comes on brightly. You can
now open the luggage cover.Lowering the hardtop
The hardtop can only be lowered when the
luggage cover is closed and the trunk lid is
completely opened.
�
Close the luggage cover.
�
Press button3.
The hardtop lowers. Button3 is dimly
lit.
Warning!
G
To prevent injuries, make sure that there is
no possibility of body parts getting caught in
moving parts. If potential danger exists,
press the switch again. This will immediately
stop the movement of the hardtop.
!Only close the trunk if the roof is com-
pletely lowered. Otherwise you could
damage the hardtop.
If you begin to close the trunk lid before
the hardtop is completely lowered,
button3 will flash and a warning will
sound.
Page 224 of 434

223 Controls in detail
Useful features
You can take and place telephone calls us-
ing the í and ì buttons on the
steering wheel. To carry out other tele-
phone functions, use the control system
(�page 152).
See separate instruction manual for in-
structions on how to operate the tele-
phone.
Tele Aid The Tele Aid system
(Tele
matic A
larm I
dentification on D
e-
mand)
The Tele Aid system consists of three
types of response:
�
automatic and manual emergency
�
roadside assistance
�
information.
The Tele Aid system is operational provid-
ing that the vehicle’s battery is charged,
properly connected, not damaged and cel-
lular and GPS coverage is available.
The speaker volume of a Tele Aid call can
be adjusted when using the volume control
on the multifunction steering wheel. To
raise, press buttonæ and to lower,
press buttonç.
�
To activate, press the SOS button, the
Roadside Assistance button• or
the Information button¡, depend-
ing on the type of response required.
Bear in mind that at a speed of just 30 mph
(approximately 50 km / h), your vehicle is
covering a distance of 44 feet
(approximately 14 m) every second.
!The initial activation of the Tele Aid sys-
tem may only be performed by com-
pleting the subscriber agreement and
placing an acquaintance call using the
SOS button. Failure to complete either
of these steps will result in a system
that is not activated. If the system is
not activated, the indicator lamp in the
SOS button stays on after switching on
the ignition and the message
Tele Aid
not activated
will appear in the multi-
function display for approximately
ten seconds.
If you have any questions regarding ac-
tivation, please call the Response
Center at 1-800-756-9018 (in the USA)
or 1-888-923-8367 (in Canada).
Page 255 of 434
.
The hood will lock audibly.
�
Check to make sure the hood is fully
closed.
If you can ra")
254 OperationEngine compartment
Closing�
Let the hood drop from a height of ap-
proximately 1
1/2ft (50 cm).
The hood will lock audibly.
�
Check to make sure the hood is fully
closed.
If you can raise the hood at a point
above the headlamps, then it is not
properly closed. Open it again and let it
drop with somewhat greater force.
Warning!
G
If you see flames or smoke coming from the
engine compartment, or if the coolant tem-
perature gauge indicates that the engine is
overheated, do not open the hood. Move
away from the vehicle and do not open the
hood until the engine has cooled. If neces-
sary, call the fire department.
Warning!
G
The engine is equipped with a transistorized
ignition system. Because of the high voltage
it is dangerous to touch any components (ig-
nition coils, spark plug sockets, diagnostic
socket) of the ignition system�
with the engine running
�
while starting the engine
�
if ignition is “on” and the engine is
turned manually
Warning!
G
Be careful that you do not close the hood on
anyone.
Page 289 of 434
288 Practical hintsWhat to do if …Problem
Possible cause
Suggested solution
C
The yellow roll bar warning lamp
comes on or flickers when the
engine is running.
The roll bar is not operational.
�
For safety reasons, always have the
roll bar raised when driving with the
retractable hardtop open. Attempt to
raise the roll bar manually.
�
Have the roll bar checked by an au-
thorized Mercedes-Benz Center.
Warning!
G
If the roll bar warning lamp does not come
on, does not go out after a long time, flickers
or comes on while driving as described
above, then the roll bar system is not oper-
ating properly and may not activate in an ac-
cident. In this case, raise the roll bar
manually (
�page 69) before continuing to
drive.
Page 317 of 434
316 Practical hintsWhat to do if …Left display
Right display
Possible cause
Possible solution
C
Raise
roll-over bar
The roll bar is malfunctioning.
�
Raise the roll bar using the roll bar button
(�page 69).
�
Have the roll bar checked by an authorized
Mercedes-Benz Center.
<
Seat belt system
Drive to
workshop!
The seat belt system is malfunction-
ing.
�
Visit an authorized Mercedes-Benz Center as
soon as possible.
L
Tele Aid
Drive to
workshop!
One or more main functions of the
Tele Aid system are malfunctioning.
�
Have the Tele Aid system checked by an au-
thorized Mercedes-Benz Center.
Tele Aid battery
Drive to
workshop!
The emergency power battery for
the Tele Aid system is malfunction-
ing. If the vehicle battery is also dis-
charged, Tele Aid will not be
operational.
�
Have the Tele Aid system checked by an au-
thorized Mercedes-Benz Center.
Page 351 of 434
.
�
Turn spare wheel bracket counter-
clockwise to loosen.
�
Take the spare whe")
350 Practical hintsFlat tireMounting the spare wheel Preparing the vehicle
Prepare the vehicle as described
(
�page 339).
�
Turn spare wheel bracket counter-
clockwise to loosen.
�
Take the spare wheel out of the trunk.
Lifting the vehicle
�
Prevent the vehicle from rolling away
by blocking wheels with wheel chocks
(not included) or other sizable objects.
When changing wheel on a level sur-
face:�
Place one chock in front of and one
behind the wheel that is diagonally
opposite to the wheel being
changed.
When changing wheel on a hill:
�
Place chocks on the downhill side
blocking both wheels of the other
axle.
�
Take the vehicle tool kit and the jack
out of the storage compartment under
the trunk floor (
�page 323).
Warning!
G
The dimensions of the spare wheel are dif-
ferent from those of the road wheels. As a
result, the vehicle handling characteristics
change when driving with a mounted spare
wheel. Adapt your driving style accordingly.
The spare wheel is for temporary use only.
When driving with spare wheel mounted, en-
sure proper tire pressure and do not exceed
vehicle speed of 50 mph (80 km/h).
Drive to the nearest Mercedes-Benz Center
as soon as possible to have the spare wheel
replaced with a regular road wheel.
Never operate the vehicle with more than
one spare wheel mounted.
Warning!
G
The jack is designed exclusively for jacking
up the vehicle at the jack tubes built into
both sides of the vehicle. To help avoid per-
sonal injury, use the jack only to lift the ve-
hicle during a wheel change. Never get
beneath the vehicle while it is supported by
the jack. Keep hands and feet away from the
area under the lifted vehicle. Always firmly
set parking brake and block wheels before
raising vehicle with jack.
Do not disengage parking brake while the
vehicle is raised. Be certain that the jack is
always vertical (plumb line) when in use, es-
pecially on hills. Always try to use the jack
on level surface. Be sure that the jack arm is
fully inserted in the jack tube. Always lower
the vehicle onto sufficient capacity jack-
stands before working under the vehicle.
Page 355 of 434
354 Practical hintsFlat tire�
Unscrew the alignment bolt, install last
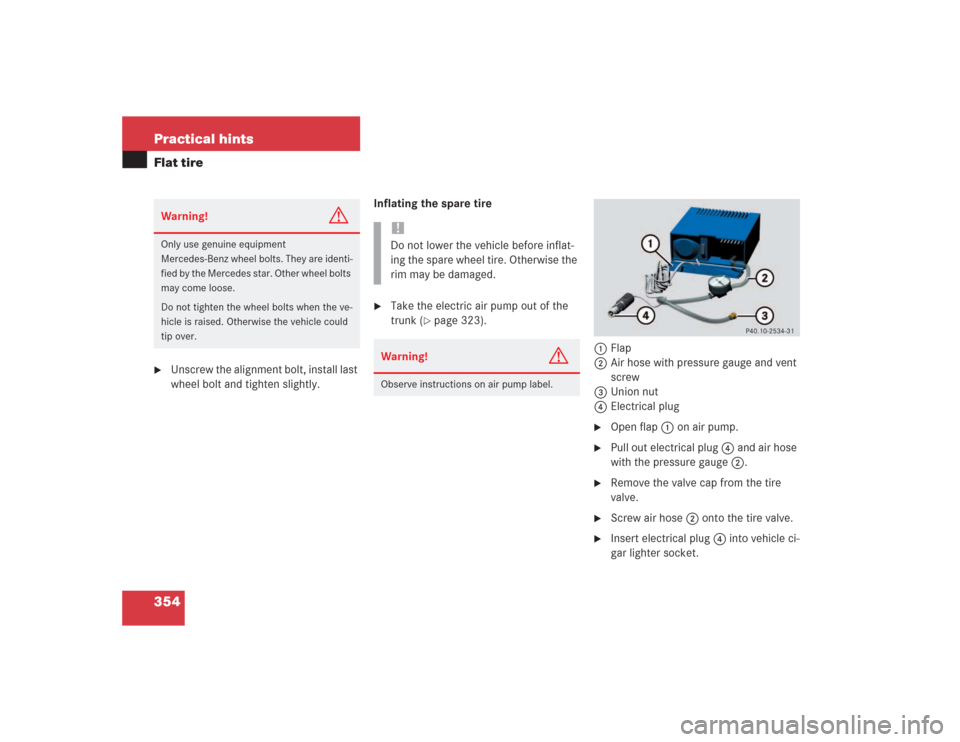
wheel bolt and tighten slightly.Inflating the spare tire
�
Take the electric air pump out of the
trunk (
�page 323).
1Flap
2Air hose with pressure gauge and vent
screw
3Union nut
4Electrical plug
�
Open flap 1 on air pump.
�
Pull out electrical plug 4 and air hose
with the pressure gauge 2.
�
Remove the valve cap from the tire
valve.
�
Screw air hose 2 onto the tire valve.
�
Insert electrical plug 4 into vehicle ci-
gar lighter socket.
Warning!
G
Only use genuine equipment
Mercedes-Benz wheel bolts. They are identi-
fied by the Mercedes star. Other wheel bolts
may come loose.
Do not tighten the wheel bolts when the ve-
hicle is raised. Otherwise the vehicle could
tip over.
!Do not lower the vehicle before inflat-
ing the spare wheel tire. Otherwise the
rim may be damaged.Warning!
G
Observe instructions on air pump label.
Page 357 of 434

356 Practical hintsFlat tire�
Detach the electric air pump.
�
Stow the electrical plug and the air
hose behind the flap and place the air
pump back in the trunk.Lowering the vehicle
�
Lower vehicle by turning crank coun-
terclockwise until the full weight of the
vehicle is resting on the ground.
�
Pull the jack out of the jack support
tube.
1 - 5 Wheel bolts
�
Tighten the five wheel bolts evenly, fol-
lowing the diagonal sequence illustrat-
ed (1 to 5), until all bolts are tight.
Observe a tightening torque of 96 lb-ft
(130 Nm).
�
Before storing the jack in the trunk,
crank back to storage position and fold
in the arm.
iThe flat tire may be transported in the
trunk when the retractable hardtop is
raised. Use the protective sheet provid-
ed with the spare wheel. Do not acti-
vate the tire inflation pressure monitor
until the deflated tire has been re-
moved from the vehicle.
Warning!
G
Have the tightening torque checked after
changing a wheel. The wheels could come
loose if they are not tightened to a torque of
96 lb-ft (130 Nm).Warning
G
When turning the wheel wrench to tighten
the wheel bolts, make sure you position
hands on the wrench in such a way that you
avoid injury to yourself, such as scraping
your hands against the wheel. Make sure
turning the wheel wrench will not scratch or
damage the wheel rim.
��