Page 82 of 434

81 Safety and Security
Driving safety systems
SBC brake system
The SBC brake system combines a hydrau-
lic brake circuit with electronically con-
trolled brake servo assistance. You have
increased braking safety and improved
braking comfort.Warning!
G
Never ignore a brake malfunction indicated
in the speedometer display, for example by
the
;
(USA only) or
3
(Canada only)
indicator lamp. Refer to the “Practical hints”
section (
�page 284). Also read and ob-
serve the messages in the instrument clus-
ter multifunction display (
�page 299).
Warning!
G
The SBC brake system requires electrical
power to operate.
A malfunction in the vehicle’s power supply
or electrical system may impair brake sys-
tem operation and switch it into its emer-
gency operation mode. In such a case, the
red brake warning lamp (
�page 284)
comes on and warning messages
(
�page 299) appear in the multifunction
display while driving. To brake, the driver
must then apply significantly greater brake
pedal pressure and depress the pedal much
further to obtain the expected braking ef-
fect. If necessary, apply full pressure to the
brake pedal. Brakes are only applied to the
front wheels. Stopping distance is in-
creased!
If there is a malfunction in the SBC brake
system, we recommend that the vehicle be
transported with all wheels off the ground
using flatbed or appropriate wheel lift/dolly
equipment.
A tow bar must be used if circumstances do
not permit the use of the recommended
towing methods and the vehicle requires
towing with all four wheels on the ground.
Towing the vehicle with all four wheels on
the ground is only permissible for distances
up to 30 miles (50 km) and at a speed not to
exceed 30 mph (50 km/h). For more infor-
mation, see “Towing the vehicle”
(�page 365).
Page 87 of 434

86 Safety and SecurityAnti-theft systemsDisarming the alarm system
The alarm system is disarmed when you
unlock your vehicle with the SmartKey or
KEYLESS-GO*. The turn signal lamps flash
once to indicate that the alarm system is
deactivated.Canceling the alarm
To cancel the alarm:
With the SmartKey
�
Insert the SmartKey in the starter
switch.
or
�
Press the Œ or ‹ button on the
SmartKey.
With KEYLESS-GO*
�
Grasp the outside door handle.
or
�
Press the KEYLESS-GO start/stop but-
ton.
Tow-away alarm
Once the tow-away alarm is armed, a visual
and audible alarm will be triggered when
someone attempts to raise the vehicle.
iThe alarm system will rearm automati-
cally again after approximately 40 sec-
onds if no door was opened.
iThe tow-away protection alarm is trig-
gered, for example, if the vehicle is lift-
ed on one side.
If the alarm stays on for more than
20 seconds, an emergency call is initi-
ated automatically by the Tele Aid sys-
tem (
�page 225) provided Tele Aid
service was subscribed to and properly
activated, and that necessary cellular
service and GPS coverage are avail-
able.
Page 88 of 434

87 Safety and Security
Anti-theft systems
Arming tow-away alarm
When you lock your vehicle, the tow-away
alarm is automatically armed after about
30 seconds.
When you unlock your vehicle, the
tow-away protection disarms automatical-
ly.
Disarming tow-away alarm
To prevent triggering the tow-away alarm,
switch off the tow-away alarm feature be-
fore towing the vehicle, or when parking on
a surface subject to movement, such as a
ferry or auto train.
The switch is located on the center console
between the driver’s seat and the passen-
ger seat.1Tow-away alarm off switch
2Indicator lamp
�
Switch off ignition and remove the
SmartKey.
�
Press switch1.
The indicator lamp2 in the switch
comes on briefly.
�
Exit and lock your vehicle with the
SmartKey or (vehicles with
KEYLESS-GO*) the lock button at each
door handle.
The tow-away alarm remains disarmed un-
til you lock your vehicle again.
Canceling tow-away alarm
To cancel the alarm:
With the SmartKey
�
Insert the SmartKey in the starter
switch.
or
�
Press the Œ or ‹ button on the
SmartKey.
With KEYLESS-GO*
�
Grasp the outside door handle.
or
�
Press the KEYLESS-GO start/stop but-
ton.
iYou cannot disarm the tow-away alarm
if the ignition is switched on.
Page 159 of 434

158 Controls in detailAutomatic transmissionGear selector lever position
Effect
ì
Park position
Gear selector lever position
when the vehicle is parked. Place
gear selector lever in positionP
only when vehicle is stopped.
The park position is not intended
to serve as a brake when the
vehicle is parked. Rather, the
driver should always set the
parking brake in addition to
placing the gear selector lever in
positionP to secure the vehicle.
EffectThe SmartKey can only be
removed from the starter switch
with the gear selector lever in
positionP. With the SmartKey
removed, the gear selector lever
is locked in positionP.
í
Reverse gear
Place gear selector lever in
positionR only when vehicle is
stopped.
Effect
ë
Neutral
No power is transmitted from the
engine to the drive axle. When
the brakes are released, the
vehicle can be moved freely
(pushed or towed).
To avoid damage to the trans-
mission, never engageN while
driving.
If the ESP is deactivated or
malfunctioning:
Move gear selector lever toN
only if the vehicle is in danger of
skidding, e.g. on icy roads.
ê
Drive
The transmission shifts
automatically. All forward gears
are available.
Page 160 of 434

159 Controls in detail
Automatic transmission
!
Coasting the vehicle, or driving for any
other reason with gear selector lever
inN can result in transmission damage
that is not covered by the
Mercedes-Benz Limited Warranty.
Warning!
G
Getting out of your vehicle with the gear
selector lever not fully engaged in positionP
is dangerous. Also, positionP alone is not
intended to or capable of preventing your
vehicle from moving, possibly hitting people
or objects.
Always set the parking brake in addition to
shifting to positionP (
�page 45).
When parked on an incline, turn the front
wheels towards the road curb.
Do not park this vehicle in areas where com-
bustible materials such as grass, hay or
leaves can come into contact with the hot
exhaust system, as these materials could be
ignited and cause a vehicle fire.
Warning!
G
When leaving the vehicle, always remove the
SmartKey from the starter switch, take the
SmartKey with KEYLESS-GO* with you and
lock the vehicle. Do not leave children unat-
tended in the vehicle, or with access to an
unlocked vehicle. Children could move the
gear selector lever from positionP, which
could result in an accident and/or serious
personal injury.
Page 192 of 434

191 Controls in detail
Retractable hardtop
2Buckle�
Guide the fastening straps around the
top of the roll bar and close buckles 2.
�
Tighten the fastening straps if neces-
sary.
�
Lower the roll bar.
�
Fold the upper section of the wind
screen up towards the head restraints
until it stops.Removing
�
Fold the upper section of the wind
screen back down.
�
Raise the roll bar slightly (
�page 69).
1Release button
�
Undo the buckles on the upper section
of the roll bar by pressing release
button1.
�
Lower the roll bar. Make sure the fas-
tening straps do not get caught.
�
Pull the wind screen out towards the
front of the vehicle. Be careful not to
damage interior trim with the guide
tabs.
�
Place the wind screen back into the
bag.
Sunshade for panorama roof*
The sunshade protects you from excessive
sunlight coming in through the panorama
roof.Warning!
G
Do not operate the sunshade while driving.
Adjusting the sunshade while driving could
cause the driver to lose control of the vehi-
cle.
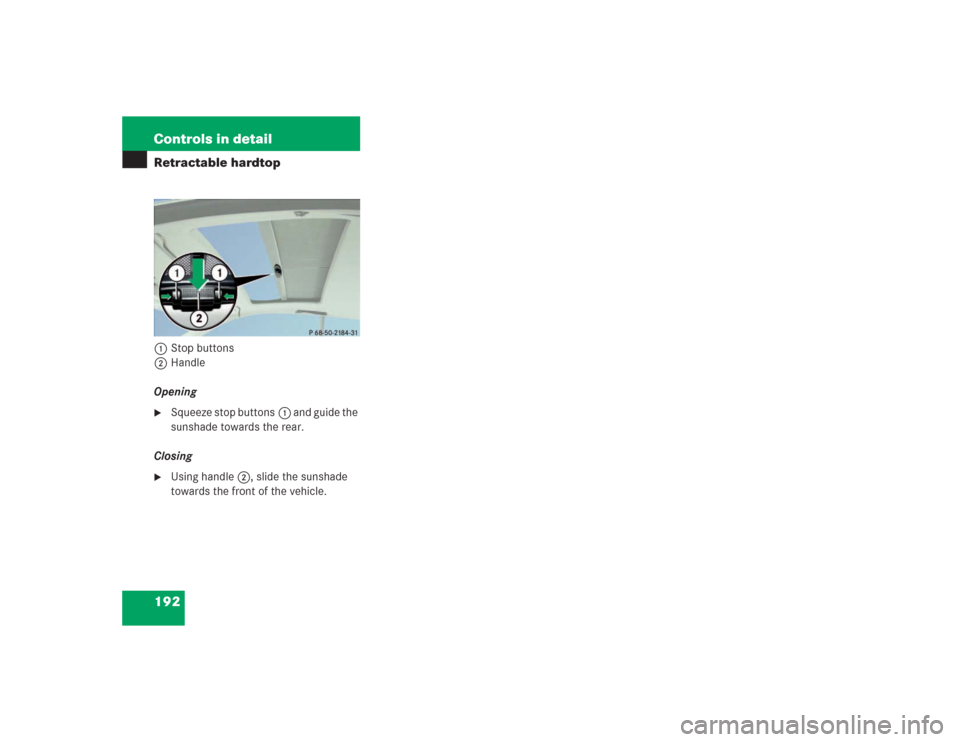
Page 193 of 434
192 Controls in detailRetractable hardtop1Stop buttons
2Handle
Opening�
Squeeze stop buttons1 and guide the
sunshade towards the rear.
Closing
�
Using handle2, slide the sunshade
towards the front of the vehicle.
Page 204 of 434

�
the ESP is active (
�page 78) or you de-
activate")
203 Controls in detail
Driving systems
Distronic deactivates automatically when�
you set the parking brake
�
you drive slower than 25 mph
(40 km/h)
�
the ESP is active (
�page 78) or you de-
activate the ESP
�
You move the gear selector lever into
positionN.
A signal will sound. The
DTR off
mes-
sage appears in the speedometer dis-
play for approximately five seconds.Setting the following distance in
Distronic
You can set the specified following for Dis-
tronic by varying the time setting between
1.0 and 2.0 seconds. Using this time set-
ting and the current speed of your vehicle,
Distronic calculates and sets the required
following distance to the vehicle ahead.
The set distance will be shown in the
speedometer display field.
The thumbwheel for making the time set-
ting is located on the lower section of the
center console.1Distance warning function on/off
switch
2Thumbwheel for setting distance
Increasing distance
Increasing the distance setting tells Dis-
tronic to maintain a greater following dis-
tance to the vehicle ahead.
�
Turn thumbwheel2 towards ¯.
Warning!
G
Distronic switches off and releases the
brakes when the vehicle decelerates below
the minimum speed of 25 mph (40 km / h)
by operation of the system. At that time the
driver must apply the brakes in order to re-
duce vehicle speed further or bring it to a
stop.
Warning!
G
It is up to the driver to exercise discretion to
select the appropriate setting given road
conditions, traffic, driver’s preferred driving
style and applicable laws and driving recom-
mendations for safe following distance.