Page 220 of 434
219 Controls in detail
Useful features
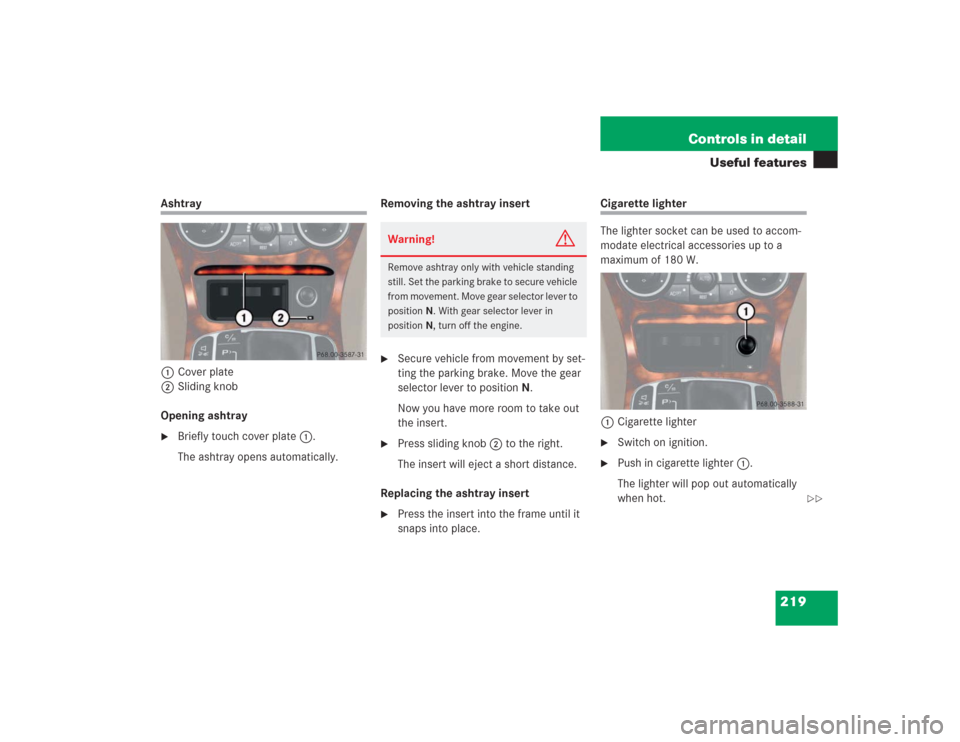
Ashtray
1Cover plate
2Sliding knob
Opening ashtray�
Briefly touch cover plate1.
The ashtray opens automatically.Removing the ashtray insert
�
Secure vehicle from movement by set-
ting the parking brake. Move the gear
selector lever to positionN.
Now you have more room to take out
the insert.
�
Press sliding knob2 to the right.
The insert will eject a short distance.
Replacing the ashtray insert
�
Press the insert into the frame until it
snaps into place.
Cigarette lighter
The lighter socket can be used to accom-
modate electrical accessories up to a
maximum of 180 W.
1Cigarette lighter�
Switch on ignition.
�
Push in cigarette lighter1.
The lighter will pop out automatically
when hot.
Warning!
G
Remove ashtray only with vehicle standing
still. Set the parking brake to secure vehicle
from movement. Move gear selector lever to
positionN. With gear selector lever in
positionN, turn off the engine.
��
Page 221 of 434

The steering wheel heating warms up the
leather area of the steering wheel.
The lever is on the lower left-hand side of")
220 Controls in detailUseful features
Heated steering wheel* (SL 500, SL 600)
The steering wheel heating warms up the
leather area of the steering wheel.
The lever is on the lower left-hand side of
the steering wheel.
1Switching on
2Indicator lamp
3Switching offSwitching on
�
Switch on ignition.
All lamps in the instrument cluster
come on.
�
Turn switch at tip of stalk in the direc-
tion of arrow1.
The steering wheel is heated. Indicator
lamp2 comes on.
Switching off
�
Turn switch at tip of stalk in the direc-
tion of arrow3.
The steering wheel heating is turned
off. Indicator lamp2 goes out.
Warning!
G
Never touch the heating element or sides of
the lighter; they are extremely hot. Hold the
knob only.
When leaving the vehicle, always remove the
SmartKey from the starter switch, take the
SmartKey with KEYLESS-GO
* with you and
lock your vehicle. Do not leave children un-
attended in the vehicle, or with access to an
unlocked vehicle. Unsupervised use of vehi-
cle equipment may cause serious personal
injury.
iThe steering wheel heating does not
turn off automatically.
��
Page 222 of 434

221 Controls in detail
Useful features
Load assist in the trunk
To facilitate trunk loading after opening the
lid, use the load assist feature to raise the
retracted hardtop from its storage position
in the trunk.
1Retracted hardtop
2Luggage cover
3Load assist buttonRaising the hardtop
The hardtop can only be raised when the
luggage cover is closed and the trunk lid is
completely opened.
�
Press button3.
The hardtop rises a short distance.
Button3 comes on brightly. You can
now open the luggage cover.Lowering the hardtop
The hardtop can only be lowered when the
luggage cover is closed and the trunk lid is
completely opened.
�
Close the luggage cover.
�
Press button3.
The hardtop lowers. Button3 is dimly
lit.
Warning!
G
To prevent injuries, make sure that there is
no possibility of body parts getting caught in
moving parts. If potential danger exists,
press the switch again. This will immediately
stop the movement of the hardtop.
!Only close the trunk if the roof is com-
pletely lowered. Otherwise you could
damage the hardtop.
If you begin to close the trunk lid before
the hardtop is completely lowered,
button3 will flash and a warning will
sound.
Page 223 of 434

222 Controls in detailUseful featuresElectrical outlet
An electrical outlet is located on the right
side of the trunk.�
Switch on ignition
�
Flip up cover and insert electrical plug
(cigar lighter type).
Telephone*
Radio transmitters, such as a portable tele-
phone or a citizens band unit, should only
be used inside the vehicle if they are con-
nected to an antenna that is installed on
the outside of the vehicle.
The external antenna must be approved by
Mercedes-Benz. Please contact an autho-
rized Mercedes-Benz Center for informa-
tion on the installation of an approved
external antenna. Refer to the radio trans-
mitter operation instructions regarding use
of an external antenna.
iThe electrical outlet can be used to ac-
commodate electrical consumers (e.g.
air pump, auxiliary lamps) up to a max-
imum of 180 W.
Warning!
G
Never operate radio transmitters equipped
with a built-in or attached antenna (i.e. with-
out being connected to an external antenna)
from inside the vehicle while the engine is
running. Doing so could lead to a malfunc-
tion of the vehicle’s electronic system, pos-
sibly resulting in an accident and/or serious
personal injury.
Warning!
G
Please do not forget that your primary re-
sponsibility is to drive the vehicle. A driver’s
attention to the road must always be
his /her primary focus when driving. For
your safety and the safety of others, we rec-
ommend that you pull over to a safe location
and stop before placing or taking a tele-
phone call.
If you choose to use the telephone
1 while
driving, please use the hands-free device
and only use the telephone when road,
weather, and traffic conditions permit.
Some jurisdictions prohibit the driver from
using a cellular telephone while driving a ve-
hicle.
Only operate the COMAND (Cockpit Man-
agement and Data System)
1 if road, weath-
er, and traffic conditions permit.
1Observe all legal requirements
Page 225 of 434

224 Controls in detailUseful featuresShortly after the completion of your Tele
Aid acquaintance call, you will receive a
user ID and password via first call mail. By
visiting www.mbusa.com and selecting
“Tele Aid” (USA only), you will have access
to account information, remote door un-
lock, and more.System self-check
Initially, after switching on the ignition,
malfunctions are detected and indicated
(the indicator lamps in the SOS button, the
Roadside Assistance button• and the
Information button¡ stay on longer
than ten seconds or do not come on). The
message
Tele Aid – Drive to workshop!
appears for approximately ten seconds in
the multifunction display.
iThe SOS button is located above the in-
side rear view mirror.
The Roadside Assistance button•
and the Information button¡ are
located below the center armrest cov-
er.!The Tele Aid system utilizes the cellular
network for communication and the
GPS (Global Positioning System) satel-
lites for vehicle location. If either of
these signals are unavailable, the Tele
Aid system may not function and if this
occurs, assistance must be summoned
by other means.
Warning!
G
If the indicator lamps in the SOS button, in
the Roadside Assistance button, and/or in
the Information button do not come on dur-
ing the system self-check, or if any of these
indicators remain illuminated continuously
in red and/or the message
Tele Aid -
Drive to workshop!
is displayed in the
multifunction display after the system
self-check, a malfunction in the system has
been detected.
If a malfunction is indicated as outlined
above, the system may not operate as ex-
pected. Have the system checked at the
nearest Mercedes-Benz Center as soon as
possible
Page 227 of 434

226 Controls in detailUseful features
Initiating an emergency call manually
1Cover
2SOS button�
Briefly press on cover1.
The cover will open.
�
Press SOS button2 briefly.
The indicator lamp in SOS button2
will flash until the emergency call is
concluded.
�
Wait for a voice connection to the Re-
sponse Center.
�
Close cover1 after the emergency
call is concluded.
Warning!
G
If the indicator lamp in the SOS button is il-
luminated continuously and there was no
voice connection to the Response Center
established, then the Tele Aid system could
not initiate an emergency call (e.g. the rele-
vant cellular phone network is not available).
The message
Emergency call –
Call failed appears in the multifunction
display for approximately ten seconds.
Should this occur, assistance must be sum-
moned by other means.
Warning!
G
If you feel at any way in jeopardy when in the
vehicle (e.g. smoke or fire in the vehicle, ve-
hicle in a dangerous road location), please
do not wait for voice contact after you have
pressed the emergency button. Carefully
leave the vehicle and move to a safe loca-
tion. The Response Center will automatically
contact local emergency officials with the
vehicle’s approximate location if they re-
ceive an automatic SOS signal and cannot
make voice contact with the vehicle occu-
pants.
Page 233 of 434

232 Controls in detailUseful featuresWarning!
G
Before programming the integrated remote
control to a garage door opener or gate op-
erator, make sure that people and objects
are out of the way of the device to prevent
potential harm or damage.
When programming a garage door opener,
the door moves up or down. When program-
ming a gate operator, the gate opens or
closes.
Do not use the integrated remote control
with any garage door opener that lacks safe-
ty stop and reverse features as required by
U.S. federal safety standards (this includes
any garage door opener model manufac-
tured before April 1, 1982). A garage door
that cannot detect an object - signaling the
door to stop and reverse - does not meet
current U.S. federal safety standards.
iCertain types of garage door openers
are incompatible with the integrated
opener. If you should experience diffi-
culties with programming the transmit-
ter, contact an authorized
Mercedes-Benz Center, or call
Mercedes-Benz Customer Assistance
Center (in the USA only) at
1-800-FOR-MERCedes, or Customer
Service (in Canada) at
1-800-387-0100.
iFor operation in the USA only:
This device complies with Part 15 of
the FCC Rules. Operation is subject to
the following two conditions:
(1) This device may not cause harmful
interference, and
(2) this device must accept any inter-
ference received, including interfer-
ence that may cause undesired
operation.
Any unauthorized modification to this
device could void the user’s authority
to operate the equipment.
Page 240 of 434

239 Operation
Driving instructions
�Driving instructions
Drive sensibly – save fuel
Fuel consumption, to a great extent, de-
pends on driving habits and operating con-
ditions.
To save fuel you should:�
Keep tires at the recommended infla-
tion pressures.
�
Remove unnecessary loads
�
Allow engine to warm up under low
load use.
�
Avoid frequent acceleration and decel-
eration.
�
Have all maintenance work performed
at the intervals specified in the Service
Booklet and as required by the FSS.
Contact an authorized Mercedes-Benz
Center.
Fuel consumption is also increased by driv-
ing in cold weather, in stop-and-go traffic,
on short trips and in hilly country.
Drinking and driving
Pedals
Warning!
G
Drinking and driving and/ or taking drugs
and driving are a very dangerous combina-
tion. Even a small amount of alcohol or
drugs can affect your reflexes, perceptions
and judgement.
The possibility of a serious or even fatal ac-
cident are greatly increased when you drink
or take drugs and drive.
Do not drink or take drugs and drive or allow
anyone to drive who has been drinking or
taking drugs.
Warning!
G
Keep driver’s foot area clear at all times. Ob-
jects stored in this area may impair pedal
movement.