Page 109 of 434

108 Controls in detailSeatsMoving the seats forward and backward
You can move the seats forward and back
to facilitate loading and unloading.The switch is located on the top side of the
seat.
1Seat forward
2Seat backward
Moving the seat forward
�
Press switch at1.
Moving the seat backward
�
Press switch at2.
Lumbar support
You can adjust the contour of the seat’s
lumbar support to best support your spine.
The thumbwheel is located on the lower
side of the seat.
1Thumb wheel�
Make sure the ignition is switched on.
All the lamps in the instrument cluster
come on.
�
Set the lumbar support between 0
and 5.
Warning!
G
When moving the seats, be sure that no one
can be caught by them. Never place hands
under seat or near any moving parts during
a seat adjustment procedure. To stop the
seat from moving when potential danger ex-
ists:�
press the switch again
�
move the seat adjustment switch on the
door (
�page 34)
!When moving the seats, make sure that
there are no items in the footwell or be-
hind the seats. Otherwise you could
damage the seats.
Page 110 of 434
109 Controls in detailSeats
Multicontour backrest* (standard on SL 600 and SL 55 AMG)
The multicontour backrest has inflatable
air cushions built into the seat backrest to
provide additional lumbar and side sup-
port.
The seat backrest cushion height and cur-
vature can be continuously varied with
switches on the lower side of the seat
when the ignition is switched on.1Shoulder region support
2Side bolsters adjustment
3Massage function (PULSE)
4Lumbar region support
�
Make sure the ignition is switched on.
All the lamps in the instrument cluster
come on.
Shoulder region support
�
Press æ or ç on switch1.
The air cushion inflates or deflates.Lumbar region support
�
Press k or j on rocker
switch4.
This selects the air cushion you wish to
adjust.
�
Press æ or ç on rocker
switch4.
The air cushion inflates or deflates.
Side bolsters adjustment
�
Press switch2 to the right or left.
The lateral support increases or de-
creases.
Page 111 of 434

You can reduce muscle tension during long
trips by periodically using the massage
function. �
Press button3.
The indicator lamp on button3 comes")
110 Controls in detailSeatsMassage function (PULSE)
You can reduce muscle tension during long
trips by periodically using the massage
function. �
Press button3.
The indicator lamp on button3 comes
on. The air cushions in the lumbar re-
gion inflate and deflate rhythmically.
Seat heating
Vehicles without seat ventilation*
The switch is located on the door.
1Normal heating
2Rapid heating�
Make sure the ignition is switched on.
All the lamps in the instrument cluster
come on.Switching on seat heating
�
Press lower switch position1.
A red indicator lamp on the switch
comes on.
Switching off seat heating
�
Press lower switch position1 again.
Switching on rapid seat heating
�
Press upper switch position2.
Both red indicator lamps on the switch
come on.
iThe massage function switches off au-
tomatically after approximately eight
minutes. The indicator lamp goes out.
iThe seat heating will be automatically
switched off after approximately
30 minutes. iThe system switches to normal heating
mode after approximately five minutes.
Only the right-hand indicator lamp re-
mains lit.
Page 112 of 434

111 Controls in detailSeats
Switching off rapid seat heating�
Press upper switch position2 again. Vehicles with seat ventilation*
The switch is located on the door. The red
indicator lamps on the switch indicate the
selected heating level:
1Seat heating switch
�
Make sure the ignition is switched on.
All the lamps in the instrument cluster
come on.Switching on seat heating
�
Press upper switch position1 twice.
A red indicator lamp on the switch
comes on.
Switching off seat heating
�
Press upper switch position1 again.
Switching on rapid seat heating
�
Press upper switch position1 once.
Both indicator lamps on the switch
come on.
!If one or both of the lamps on the seat
heating switch are flashing, there is in-
sufficient voltage available since too
many electrical consumers are turned
on. The seat heating switches off auto-
matically.
The seat heating will switch back on
again automatically as soon as suffi-
cient voltage is available.
Leveloff
No indicator lamp on
1
One indicator lamp on
2
Two indicator lamps on
iThe seat heating will be automatically
switched off after approximately
30 minutes. iThe system switches to normal heating
mode after approximately five minutes.
Only the right-hand indicator lamp re-
mains lit.
Page 113 of 434
112 Controls in detailSeatsSwitching off rapid seat heating�
Press upper switch position1 twice.
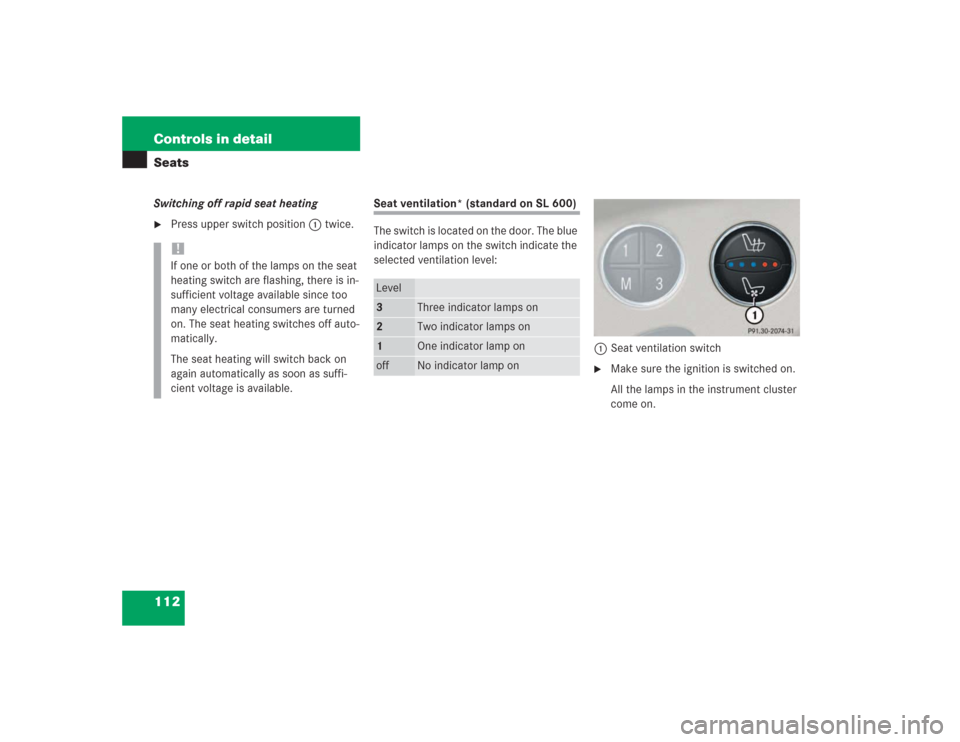
Seat ventilation* (standard on SL 600)
The switch is located on the door. The blue
indicator lamps on the switch indicate the
selected ventilation level:
1Seat ventilation switch
�
Make sure the ignition is switched on.
All the lamps in the instrument cluster
come on.
!If one or both of the lamps on the seat
heating switch are flashing, there is in-
sufficient voltage available since too
many electrical consumers are turned
on. The seat heating switches off auto-
matically.
The seat heating will switch back on
again automatically as soon as suffi-
cient voltage is available.
Level3
Three indicator lamps on
2
Two indicator lamps on
1
One indicator lamp on
off
No indicator lamp on
Page 115 of 434

114 Controls in detailMemory function
�Memory function
With the memory switch you can store up
to three different settings per SmartKey or
SmartKey with KEYLESS-GO*.
The following settings are saved for each
stored position:�
Driver’s seat and backrest position
�
Steering wheel position
�
Interior rear view mirror position
�
Driver’s side exterior rear view mirror
position
�
Passenger side exterior rear view mir-
ror position
These key-dependent memory settings
can be deactivated if desired
(
�page 149).The memory switch is located on the door.
M Memory button
1, 2, 3 Stored positions
�
Switch on ignition.
or
�
Open the respective door.
All the lamps in the instrument cluster
come on when the ignition is switched
on.
!Prior to operating the vehicle, the driv-
er should check and adjust the seat
height, seat position fore and aft, and
seat backrest angle if necessary, to en-
sure adequate control, reach and com-
fort. The head restraint should also be
adjusted for proper height. See also the
section on airbags (
�page 59) for
proper seat positioning.
In addition, adjust the steering wheel to
ensure adequate control, reach, opera-
tion and comfort. Both the inside and
outside rear view mirrors should be ad-
justed for adequate rear vision.
Fasten seat belts. Infants and small
children should be seated in a properly
secured restraint system that complies
with U.S. Federal Motor Vehicle Safety
Standard 213 and Canadian Motor Ve-
hicle Safety Standard 213.
Warning!
G
Do not activate the memory function while
driving. Activating the memory function
while driving could cause the driver to lose
control of the vehicle.
Page 125 of 434
.
The instrument cluster is activated when")
124 Controls in detailInstrument cluster
�Instrument clusterFor a full view illustration of the instrument
cluster, see “Instrument cluster”
(�page 22).
The instrument cluster is activated when
you
�
open a door
�
switch on the ignition
�
press the reset button (
�page 22)
�
switch on the exterior lamps
Opening a door will activate the instrument
cluster only for about 30 seconds.
You can change the instrument cluster set-
tings in the Instrument cluster submenu of
the control system (
�page 140).
Instrument cluster illumination
Use the reset button to adjust the illumina-
tion brightness for the instrument cluster
and the switches on the center console.
To brighten illumination�
Turn the reset button in the instrument
cluster (
�page 22) clockwise.
The instrument cluster illumination will
brighten.
To dim illumination
�
Turn the reset button in the instrument
cluster (
�page 22) counterclockwise.
The instrument cluster illumination will
dim.
Coolant temperature gauge
iThe instrument cluster illumination is
dimmed or brightened to suit ambient
light conditions.
Warning
G
�
Driving when your engine is badly over-
heated can cause some fluids which
may have leaked into the engine com-
partment to catch fire. You could be se-
riously burned.
�
Steam from an overheated engine can
cause serious burns an can occur just by
opening the hood. Stay away from the
engine if you see or hear steam coming
from it.
Turn off the engine, get out of the vehicle
and do not stand near the vehicle until the
engine has cooled down.
Page 126 of 434
.
The engine should not be operated")
125 Controls in detail
Instrument cluster
During severe operating conditions, e.g.
stop-and-go traffic, the coolant tempera-
ture may rise close to 248°F (120°C).
The engine should not be operated with
the coolant temperature above 248°F
(120°C). Doing so may cause serious en-
gine damage which is not covered by the
Mercedes-Benz Limited Warranty.
Trip odometer�
Make sure you are viewing the trip
odometer display (
�page 127).
�
If it is not displayed, press the j or
k button on the multifunction
steering wheel repeatedly until the trip
odometer appears.
�
Press and hold reset button4
(�page 22) until the trip odometer is
reset.
Tachometer
The red marking on the tachometer de-
notes excessive engine speed.
To help protect the engine, the fuel supply
is interrupted if the engine is operated
within the red marking.
SL 55 AMG
The tachometer of the SL 55 AMG does not
have a red marking denoting excessive en-
gine speed.
To help protect the engine, the fuel supply
is interrupted if the engine is operated at
an excessive speed.
!Excessive coolant temperature triggers
the coolant temperature warning lamp
(�page 304) and a warning in the
multifunction display (
�page 286).
!Avoid driving at excessive engine
speeds, as it may result in serious en-
gine damage that is not covered by the
Mercedes-Benz Limited Warranty.

The multicontour backrest has inflatable
air cushions built into the seat backrest to
provide additional lumbar")